Application for pumping. How to speed up loading C # / XAML Windows Store apps
There are various ways to speed up the download speed of the application and its performance.
In particular, you can use deferred loading of page elements or use incremental content loading . About these ways to load the page faster and about other recommendations read on.
Delayed loading of page elements
Sometimes when loading an application we do not need some elements right away. In this case, we can not download them immediately, thus accelerating the launch of the application, and download them only later, when they really become necessary.
Let us consider an example. Add this code to the XAML of our page:
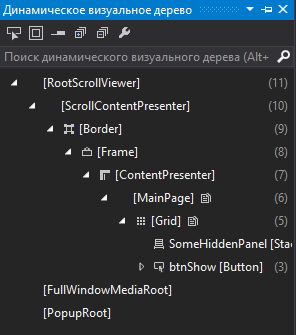
<Grid HorizontalAlignment="Center" Background="{ThemeResource ApplicationPageBackgroundThemeBrush}"> <StackPanel x:Name="SomeHiddenPanel" Visibility="Collapsed" Width="100" Height="100" Background="Yellow"> </StackPanel> <Button x:Name="btnShow" Click="btnShow_Click"> </Button> </Grid> As you can see from the code, the StackPanel element is hidden. Run the application. Yellow is not displayed in the StackPanel application window. But in the dynamic visual tree (by the way, this is a new feature of Visual Studio 2015) immediately after launch we will be able to see our hidden item named SomeHiddenPanel:
')
It turns out that the fact that we made it Collapsed does not mean that it will not load. The control does not occupy the interface space of the window, but loads and eats our resources. If desired, we will be able to display it on the page using:
SomeHiddenPanel.Visibility = Visibility.Visible; After we add the attribute x to the StackPanel element: DeferLoadStrategy = "Lazy" we get the following code:
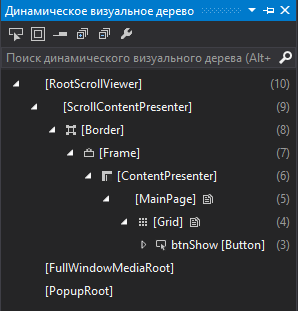
<Grid HorizontalAlignment="Center" Background="{ThemeResource ApplicationPageBackgroundThemeBrush}"> <StackPanel x:Name="SomeHiddenPanel" x:DeferLoadStrategy="Lazy" Visibility="Collapsed" Width="100" Height="100" Background="Yellow"> </StackPanel> <Button x:Name="btnShow" Click="btnShow_Click"> </Button> </Grid> Now, after launching the application, the StackPanel element will really be missing
If we try to access the SomeHiddenPanel element from the code and, let's say, try to change its visibility
SomeHiddenPanel.Visibility = Visibility.Visible; then we get an exception System.NullReferenceException. And that's right, because the element is really missing.
To load an element at the right moment for us, you can use the FindName method.
After the call
FindName("SomeHiddenPanel"); The XAML element will be loaded. It only remains to display it:
SomeHiddenPanel.Visibility = Visibility.Visible; Voila:

Other ways to load an item with deferred loading x: DeferLoadStrategy = "Lazy" is:
1. Use binding, which refers to an unloaded item.
2. In the states of VisualState, use Setter or an animation that will refer to an unloaded item.
3. Call an animation that affects an unloaded item.
Check the last way. Add to the resources page StoryBoard:
<Page.Resources> <Storyboard x:Name="SimpleColorAnimation"> <ColorAnimation BeginTime="00:00:00" Storyboard.TargetName="SomeHiddenPanel" Storyboard.TargetProperty="(StackPanel.Background).(SolidColorBrush.Color)" From="Yellow" To="Green" Duration="0:0:4" /> </Storyboard> </Page.Resources> Now in the btnShow_Click event, run the animation:
SimpleColorAnimation.Begin(); SomeHiddenPanel.Visibility = Visibility.Visible; Now, after pressing the button, the item will be displayed.
A bit of theory:
The x: DeferLoadStrategy attribute can only be added to a UIElement element (except for classes that inherit from FlyoutBase. Such as Flyout or MenuFlyout). You cannot apply this attribute to the root elements of a page or user control, as well as elements found in a ResourceDictionary. If you load XAML code using XamlReader.Load, then there is no sense in this attribute, and accordingly it cannot be used with XamlReader.Load.
Be careful when hiding a large number of interface elements and displaying all of them at the same time at a time, as this can cause a hitch in the work of the program.
Incremental download in Windows 8.1 applications
XAML elements ListView / GridView usually contain a binding to an array of data. If there is a lot of data, then all of them will be displayed at one time, of course, they will not be able to and the application window scrolling will be intermittent (this is especially noticeable if images are used as data).
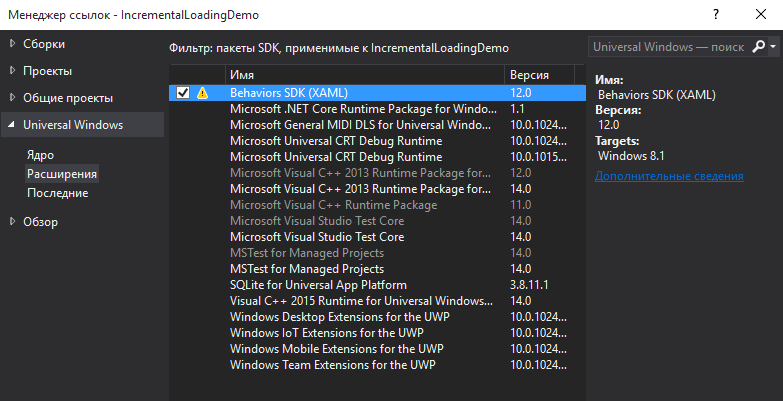
How was it possible to set the boot priority in Windows 8.1? Using the Behaviors SDK (XAML) extension.
Added a link to it. Menu "Project" - "Add link". In the Extensions group, Behaviors SDK (XAML) was selected.
Next to the root element of the Page added links to the namespace:
xmlns:Interactivity="using:Microsoft.Xaml.Interactivity" xmlns:Core="using:Microsoft.Xaml.Interactions.Core" After that, in the template it was possible to set the boot priority in a similar way:
<Image Source="ms-appx:///Assets/placeHolderImage.png" Height="100" Width="60" VerticalAlignment="Center" Margin="0,0,10,0"> <Interactivity:Interaction.Behaviors> <Core:IncrementalUpdateBehavior Phase="0"/> </Interactivity:Interaction.Behaviors> </Image> Consider an example.
Add a blank image with the name placeHolderImage.jpg to the project in the Assets folder.
As described above, add a link to the Behaviors SDK (XAML).
Create a data class
ImageInfo data class code
public class ImageInfo { private string _name; private Uri _url; public string Name { get { return _name; } set { _name = value;} } public Uri Url { get { return _url; } set { _url = value; } } } Add the namespace declarations to the Page tag of the MainPage.xaml page:
xmlns:Interactivity="using:Microsoft.Xaml.Interactivity" xmlns:Core="using:Microsoft.Xaml.Interactions.Core" and a link to the namespace of our project (I have this IncrementalLoadingDemo)
xmlns:local="using:IncrementalLoadingDemo" Now you can add a ListView with the element template inside and specify the loading phases (there should be no more than 3 phases)
<ListView ItemsSource="{Binding}" HorizontalContentAlignment="Center" Width="200" Height="500" BorderThickness="1" BorderBrush="Black"> <ListView.ItemTemplate> <DataTemplate x:DataType="local:ImageInfo"> <StackPanel Orientation="Vertical"> <TextBlock Text="{Binding Name}" > <Interactivity:Interaction.Behaviors> <Core:IncrementalUpdateBehavior Phase="1"/> </Interactivity:Interaction.Behaviors> </TextBlock> <Grid> <Image Source="Assets/placeHolderImage.jpg" Height="100" Width="100" VerticalAlignment="Center" Margin="0"> <Interactivity:Interaction.Behaviors> <Core:IncrementalUpdateBehavior Phase="0"/> </Interactivity:Interaction.Behaviors> </Image> <Image Source="{Binding Path=Url}" Height="100" Width="100" VerticalAlignment="Center" Margin="0"> <Interactivity:Interaction.Behaviors> <Core:IncrementalUpdateBehavior Phase="3"/> </Interactivity:Interaction.Behaviors> </Image> </Grid> </StackPanel> </DataTemplate> </ListView.ItemTemplate> </ListView> And fill it with data in the code-behind:
ObservableCollection<ImageInfo> myimages = new ObservableCollection<ImageInfo>(); public MainPage() { this.InitializeComponent(); this.DataContext = myimages; int i; for (i=0; i < 20000; i++) { myimages.Add(new ImageInfo { Name = " 1", Url = new Uri("http://www.alexalex.ru/TesT.png") }); myimages.Add(new ImageInfo { Name = " 2", Url = new Uri("http://www.alexalex.ru/RedactoR.jpg") }); myimages.Add(new ImageInfo { Name = " 3", Url = new Uri("http://www.alexalex.ru/TesT.gif") }); } } Now the first thing to do is to load the local image placeHolderImage.png and only then the image from the network will be loaded and displayed in the Grid, shielding the image of the blank. If we quickly scroll through the list, then we note that sometimes the web image does not have time to load and our image stub slips.
Incremental loading without data bindings using the ContainerContentChanging event
In Windows 8.x applications, it was possible to use the Behaviors SDK, and you could use the ContainerContentChanging event and set the drawing phases from the code. The method with ContainerContentChanging is a bit more complicated to implement, but it improves the speed of the application. When it is in fast scrolling, only the items currently displayed in the window are loaded. The method implies the absence of data bindings and the imperative loading of content from C # code.
Let's change our example.
We need an ItemTemplate template. Create a custom control with the name ItemViewer and this XAML code:
Code here
<UserControl x:Class="IncrementalLoadingDemo.ItemViewer" xmlns="http://schemas.microsoft.com/winfx/2006/xaml/presentation" xmlns:x="http://schemas.microsoft.com/winfx/2006/xaml" xmlns:local="using:IncrementalLoadingDemo" xmlns:d="http://schemas.microsoft.com/expression/blend/2008" xmlns:mc="http://schemas.openxmlformats.org/markup-compatibility/2006" mc:Ignorable="d" d:DesignHeight="300" d:DesignWidth="400"> <StackPanel Orientation="Vertical"> <TextBlock x:Name="txtName" Text="{Binding Name}" ></TextBlock> <Grid> <Image x:Name="imgHolder" Source="Assets/placeHolderImage.jpg" Height="100" Width="100" VerticalAlignment="Center" Margin="0" /> <Image x:Name="imgUrl" Height="100" Width="100" VerticalAlignment="Center" Margin="0" /> </Grid> </StackPanel> </UserControl> Add a few methods to the user control class code. One method displays the text, another image replaces the image, the third image is downloaded from the Internet and, finally, the fourth clears the data:
C # class code
public sealed partial class ItemViewer : UserControl { private ImageInfo _item; public ItemViewer() { this.InitializeComponent(); } public void ShowPlaceholder() { imgHolder.Opacity = 1; } public void ShowTitle(ImageInfo item) { _item = item; txtName.Text = _item.Name; txtName.Opacity = 1; } public void ShowImage() { imgUrl.Source = new BitmapImage(_item.Url); imgUrl.Opacity = 1; imgHolder.Opacity = 0; } public void ClearData() { _item = null; txtName.ClearValue(TextBlock.TextProperty); imgHolder.ClearValue(Image.SourceProperty); imgUrl.ClearValue(Image.SourceProperty); } } Now in the XAML file MainPage.xaml we add a link to the newly created custom element. We will have it as a template:
<Page.Resources> <DataTemplate x:Key="FrontImageTemplate"> <local:ItemViewer/> </DataTemplate> </Page.Resources> And add the ListView element itself.
<ListView ItemsSource="{Binding}" HorizontalContentAlignment="Center" Width="200" Height="500" BorderThickness="1" BorderBrush="Black" ShowsScrollingPlaceholders="True" ItemTemplate="{StaticResource FrontImageTemplate}" ContainerContentChanging="ItemListView_ContainerContentChanging"> </ListView> In it, we specify the template and the event ContainerContentChanging. The code for this event will display items based on the current boot phase:
void ItemListView_ContainerContentChanging
private void ItemListView_ContainerContentChanging(ListViewBase sender, ContainerContentChangingEventArgs args) { ItemViewer iv = args.ItemContainer.ContentTemplateRoot as ItemViewer; if (args.InRecycleQueue == true) { iv.ClearData(); } else if (args.Phase == 0) { iv.ShowTitle(args.Item as ImageInfo); // callback args.RegisterUpdateCallback(ContainerContentChangingDelegate); } else if (args.Phase == 1) { iv.ShowPlaceholder(); // callback args.RegisterUpdateCallback(ContainerContentChangingDelegate); } else if (args.Phase == 2) { iv.ShowImage(); // , } // Handled true args.Handled = true; } And we also need a callback with a delegate (add it too to MainPage.xaml.cs):
private TypedEventHandler<ListViewBase, ContainerContentChangingEventArgs> ContainerContentChangingDelegate { get { if (_delegate == null) { _delegate = new TypedEventHandler<ListViewBase, ContainerContentChangingEventArgs>(ItemListView_ContainerContentChanging); } return _delegate; } } private TypedEventHandler<ListViewBase, ContainerContentChangingEventArgs> _delegate; This method can also be used in Windows 8.x applications and in Windows 10 applications.
Incremental loading in Windows UAP applications
With the release of Windows 10 and UWP, a more convenient and faster way appeared, since it became possible to use the compiled x: Bind bindings.
I wrote about them recently - Compiled data bindings in Windows 10 applications
I will repeat a bit and give the same example already using x: Bind.
To bind a link to Image, we need a converter.
Converter code
class ConverterExample : IValueConverter { public object Convert(object value, Type targetType, object parameter, string language) { if (value == null) return string.Empty; System.Uri u = (System.Uri)value; Windows.UI.Xaml.Media.Imaging.BitmapImage bitmapImage = new Windows.UI.Xaml.Media.Imaging.BitmapImage(u); return bitmapImage; } public object ConvertBack(object value, Type targetType, object parameter, string language) { // throw new NotImplementedException(); } } Add a link to the XAML page resources.
<Page.Resources> <local:ConverterExample x:Name="ThatsMyConverter"/> </Page.Resources> And now we can add a ListView, specifying the elements of the loading phase to the elements of the template (there should be no more than three phases)
<ListView ItemsSource="{x:Bind myimages}" HorizontalContentAlignment="Center" Width="200" Height="500" BorderThickness="1" BorderBrush="Black"> <ListView.ItemTemplate> <DataTemplate x:DataType="local:ImageInfo"> <StackPanel Orientation="Vertical"> <TextBlock Text="{x:Bind Name}" x:Phase="0" ></TextBlock> <Grid> <Image Source="Assets/placeHolderImage.jpg" Height="100" Width="100" VerticalAlignment="Center" Margin="0" /> <Image Source="{x:Bind Url,Converter={StaticResource ThatsMyConverter}}" Height="100" Width="100" VerticalAlignment="Center" Margin="0" x:Phase="3" /> </Grid> </StackPanel> </DataTemplate> </ListView.ItemTemplate> </ListView> The example became simpler and, of course, the application began to work faster. How can you still optimize it?
You can use DecodePixelHeight and DecodePixelWidth to optimize the loading of large images (and it was possible earlier in Windows 8.x). If you set values for these attributes, then the BitmapImage value will be cached not in the normal size, but in the displayed size. If you need to preserve the proportions automatically, you can specify only DecodePixelHeight or DecodePixelWidth, but not both values at the same time.
That is, in our case, we can change the code of the Convert method of our converter slightly by adding one line (we know that we will display an image 100 pixels high):
public object Convert(object value, Type targetType, object parameter, string language) { if (value == null) return string.Empty; System.Uri u = (System.Uri)value; Windows.UI.Xaml.Media.Imaging.BitmapImage bitmapImage = new Windows.UI.Xaml.Media.Imaging.BitmapImage(u); bitmapImage.DecodePixelHeight = 100; // return bitmapImage; } A few general recommendations:
You will get a performance boost if you convert your application from Windows 8.x to Windows 10.
Use the profiler to search for bottlenecks in your code.
Learn Zen. The fastest code is code that does not exist. Choose between a large number of features and the speed of your application.
Optimize the size of the images used by your application.
Reduce the number of elements in the data template. Grid inside Grid is not a good solution.
Materials that helped me in pumping the application:
x: DeferLoadStrategy attribute
XAML Performance: Techniques for Maximizing Universal Windows App Experiences Built with XAML
Incremental loading Quickstart for Windows Store apps using C # and XAML
Source: https://habr.com/ru/post/267131/
All Articles