Publish Android library in jCenter

In the life of every android developer, there comes a moment when the number of self-written utilities and helpers that swing from project to project exceeds ten. In this case, it will be a good practice to design such helpers as independent “modules” in terms of Android Studio. Even better, if you are going to share your experience with the community, providing the source code with a suitable license. But simply uploading the source code to GitHub in this case will not be enough - I want everyone to be able to connect the library using a single-line Gradle dependency, like this:
dependencies { compile 'com.github.romangromov:simpleprefs:0.0.8' } How to achieve this and will be discussed in this article.
How Android Studio loads dependencies
Along with the release of Android Studio, developers were offered a new system to automatically build Gradle projects. Now, to add a library to your project, it is enough to correct the file build.gradle , specifying a single-line dependency (in this case it is called Remote Binary Dependency) in the dependencies block:
')
dependencies { compile 'com.mcxiaoke.volley:library:1.0.16' } After that, Android Studio will download the specified library of the required version from the storage server and add to the project, which is really very convenient. Perhaps the most popular server repositories of Java libraries are jCenter and Maven Central . Analogs are NPM for Node.js, NuGet for .Net, pip for Python, etc.
Let's look at build.gradle , located at the root of the project:
buildscript { repositories { jcenter() } dependencies { classpath 'com.android.tools.build:gradle:1.2.3' } } allprojects { repositories { jcenter() } } Here jcenter () indicates that Android Studio should look for the specified dependencies in the jCenter repositories. A similar entry will force Android Studio to look for dependencies on Maven Central:
allprojects { repositories { mavenCentral() } } The latest versions of Android Studio by default indicate jCenter - in part this is due to the fact that loading the library in Maven Central requires more effort from the developer. jCenter is considered the largest repository of Java libraries, but at the same time, many developers prefer Maven Central. Do not forget that jCenter and Maven Central are physically different servers, and the presence of a library in one does not guarantee its presence in the other.
Our task is to download the library only in jCenter. Schematically, the process will look like this:

Step 0: Choose the name of the future library package
There is a package naming convention that we must adhere to. The name of the package consists of 3 parts:
GROUP_ID:ARTIFACT_ID:VERSIONGROUP_ID : You can think of yourself as an identifier for an account, organization, or package name under which a library or several libraries are distributed. GROUP_ID must be in Reverse FQDN format;
ARTIFACT_ID : name of the library or, in Maven terminology, the name of the “artifact”;
VERSION : It is recommended to use the xyz type pattern, but any string values are allowed.
Example:
dependencies { compile 'com.squareup.okhttp:okhttp:2.1.0' compile 'com.squareup.okhttp:okhttp-urlconnection:2.1.0' } Here com.squareup.okhttp is a GROUP_ID under which many libraries are distributed, in particular okhttp and okhttp-urlconnection .
Note: when selecting GROUP_ID, please note that you must own the selected domain. Otherwise, problems will arise when it is registered at Step 2.
As a demo, I'll use the trivial class SimplePrefs.java , which makes it easy to access SharedPreferences . The implication is that you can independently make a library module from it in Android Studio and place the source code in a public repository.
SimplePrefs.java
package com.romangromov.simpleprefs; import android.content.Context; import android.content.SharedPreferences; public class SimplePrefs { private SharedPreferences prefs; public SimplePrefs(Context context, String prefsName, int mode) { this.prefs = context.getSharedPreferences(prefsName, mode); } public void putString(String key, String value) { prefs.edit().putString(key, value).apply(); } public String getString(String key) { return prefs.getString(key, null); } public void putInt(String key, int value) { prefs.edit().putInt(key, value).apply(); } public int getInt(String key, int defValue) { return prefs.getInt(key, defValue); } public void putLong(String key, long value) { prefs.edit().putLong(key, value).apply(); } public long getLong(String key, long defValue) { return prefs.getLong(key, defValue); } public void putBoolean(String key, boolean value) { prefs.edit().putBoolean(key, value).apply(); } public boolean getBoolean(String key) { return prefs.getBoolean(key, false); } public void clear() { prefs.edit().clear().apply(); } } AndroidManifest.xml
<manifest package="com.romangromov.simpleprefs" /> Since I will post the source code on Github, I should select GROUP_ID in the format:
com.github.<my-cool-username>We will use the library name as the artifact identifier, choose any version. In my case, the name of the future package looks like this:
com.github.romangromov:simpleprefs:0.0.8'Step 1: Create a container in Bintray
The fact is that deploying a library in Maven Central is a very time consuming task, so there are services that simplify this process. Bintray is a library storage system that acts as an intermediary between jCenter, Mavel Central and other repositories. This is what we will use.
We create an account on Bintray (enough free account) and prepare the container into which our library will be loaded: in the Owned Repositories section, select Maven:

Click on the Add New package:

Fill in all fields, do not forget to specify the selected license, click Create Package:

After that, Bintray will prepare our container:

Step 2: Register the GROUP_ID with Sonatype
Sonatype OSS Repository Hosting Service is a trusted artifact repository for Maven Central. Maven Central servers synchronize regularly with OSSRH, and those artifacts that the user marks as ready for release are uploaded to the Maven Central central repository. To register GROUP_ID, on behalf of which you will distribute libraries, you need to add an issue to their JIRA. After consideration of the application you will open the desired repository on Sonatype, and you can download the artifact.
Register here , open and fill in a new issue:
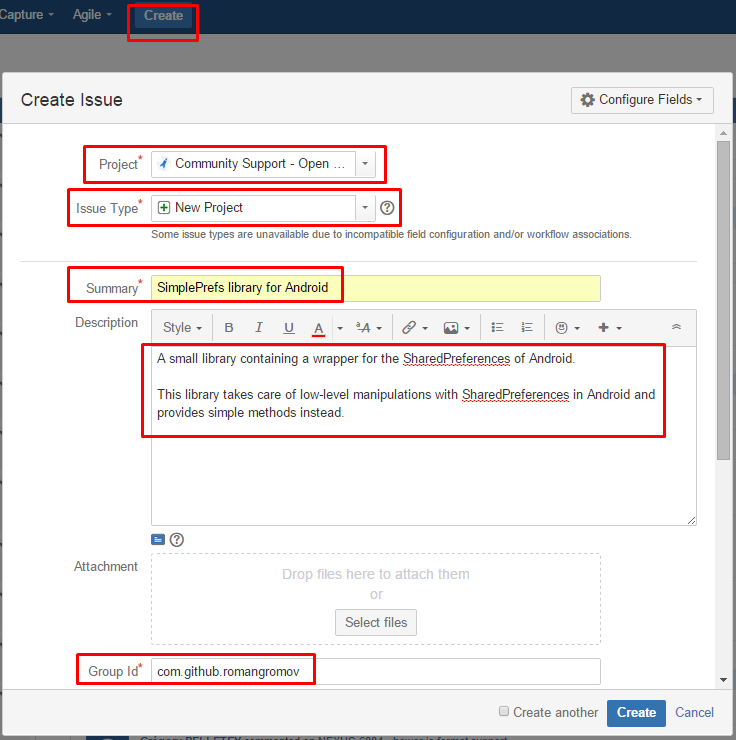
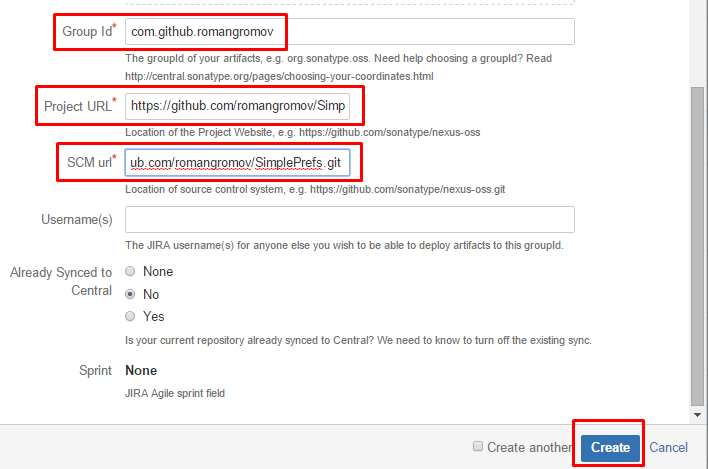
It remains to wait for a response, after which you will create Sonatype repositories with the selected GROUP_ID. I was answered within an hour:

My bummer with GROUP_ID
I initially did not know that restrictions were imposed on GROUP_ID and chose this: com.romangromov , to which I received an answer:

here is the link from the letter
After that, I changed GROUP_ID to the suggested com.github.romangromov and calmed down.
here is the link from the letter
After that, I changed GROUP_ID to the suggested com.github.romangromov and calmed down.
It remains for us to link our Sonatype account with Bintray, for this we go to Profile Settings -> Accounts and indicate the username registered in Sonatype mode:

Step 3: Set up automatic package signing in Bintray
Before uploading artifacts to Maven Central, they must be digitally signed. Bintray allows you to configure automatic signing of new packages or when downloading updates for existing ones. First you need to generate private and public key. PGP (Pretty Good Privacy) is a standard Linux encryption utility. It is free for individuals, but a license is required to use it for commercial purposes. Fully open analogue of this program GnuPG (Gnu Privacy Guard) - does the same thing, but is absolutely free.
How to install GPG?
For Linux users:
For Windows users: download , install, add to PATH.
apt-get install gpg , but on my Ubuntu 14.04 LTS was out of the box;For Windows users: download , install, add to PATH.
We generate a pair of public-private key:
gpg --gen-keyHere you will be offered to choose encryption algorithms, indicate your full name and postal address, as well as come up with a password. We leave everything by default, remember the mail and password, we get something like this:

We are interested in the public key identifier in the pub :
2048R/<PUBLIC_KEY_ID> . It is necessary to upload this PUBLIC_KEY_ID to the cryptographic key server; for this we do:gpg --keyserver hkp://pool.sks-keyservers.net --send-keys PUBLIC_KEY_IDNow we export the generated key pair as text files, not forgetting to substitute the value for the mail you specified during the key generation step:
gpg -a --export yourmail@email.com > public_key_sender.asc
gpg -a --export-secret-key yourmail@email.com > private_key_sender.asc
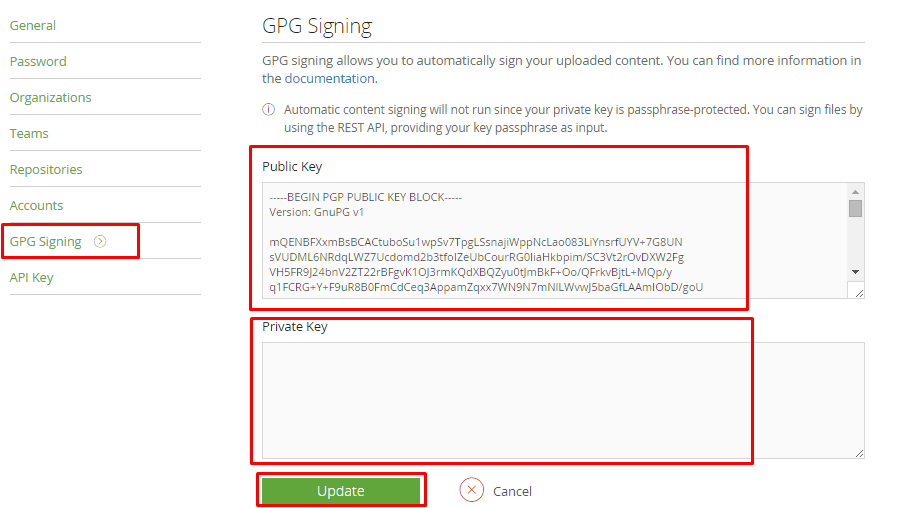
Two text files will appear, copy their contents, go to Profile Settings on Bintray, section GPG Signing :
It remains to put a tick that allows automatic signature: go to profile editing again and look for GPG Sign Uploaded files automatically .
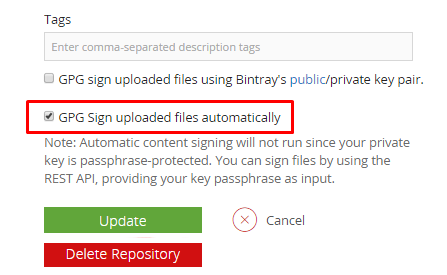
Downloadable artifacts will now be automatically signed into Bintray.
More details can be read here .
Step 4: set up a project in Android Studio
We create a typical project that contains two modules:
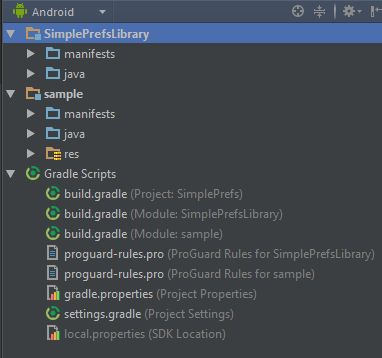
1) Library Module, SimplePrefsLibrary , which we will upload to jCenter;
2) The application module, sample , demonstrating the capabilities of the library (not downloadable).
In order to upload our library to Bintray, we will use the bintray-release plugin for Gradle.
The fact is that before loading a library into Bintray, it must be supplied with certain meta-data that meets the requirements of jCenter or Maven Central. In order not to do this manually, we will use a plugin that takes on the generation of the necessary meta-files.
First we take the API key, which Bintray kindly gives us: Profile Settings -> API Key :

Now we go to build.gradle at the root of the project, add the plugin:
buildscript { repositories { jcenter() } dependencies { classpath 'com.android.tools.build:gradle:1.3.1' classpath 'com.novoda:bintray-release:0.3.4' } } allprojects { repositories { jcenter() } } We rule build.gradle for the library module:
apply plugin: 'com.android.library' apply plugin: 'com.novoda.bintray-release' android { compileSdkVersion 21 buildToolsVersion "21.1.2" defaultConfig { minSdkVersion 14 targetSdkVersion 21 versionCode 1 versionName "1.0" } buildTypes { release { minifyEnabled false proguardFiles getDefaultProguardFile('proguard-android.txt'), 'proguard-rules.pro' } } } dependencies { } // bintray-release publish { groupId = 'com.github.romangromov' artifactId = 'simpleprefs' publishVersion = '0.0.8' desc = 'A small library containing a wrapper for the SharedPreferences of Android' licences = ['MIT'] website = 'https://github.com/romangromov/SimplePrefs' } Here we specified the necessary maven configuration parameters in Bintray, a detailed description of the parameters is on the wiki .
After that, open the terminal in Android Studio and execute:
gradlew clean build bintrayUpload -PbintrayUser=< bintray> -PbintrayKey=<api bintray> -PdryRun=false
This will launch the gradle script for building the project and deploying to Bintray, and if everything is in order, we will see the inscription BUILD SUCCESSFUL , otherwise we will read the message and eliminate errors, as a rule, the messages are intelligible / google.
Now go to Bintray in the Files tab and check if the package has loaded:
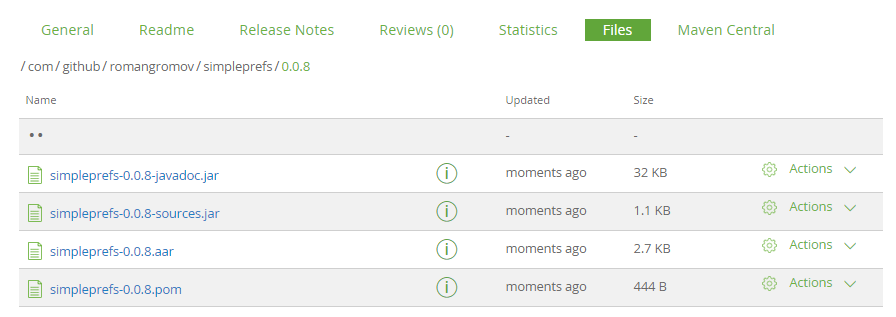
If everything is in order, we will see the contents of our package. Great, now anyone can download it! But at the moment the package is placed in our personal Maven repository, and not in Maven Central or jCenter. To use it, you must specify the author's maven repository explicitly:
repositories { maven { url 'https://dl.bintray.com/romangromov/maven/' } } dependencies { compile 'com.github.romangromov:simpleprefs:0.0.8' } I myself don’t like such dependencies, so we’ll immediately get rid of it using synchronization with jCenter (since it’s done in one click!): Go to Bintray to our package page, click the Maven Central tab and link from the “Add to jCenter” pop-up window .
Well, that's it, after that a request will be made to add a library to jCenter:
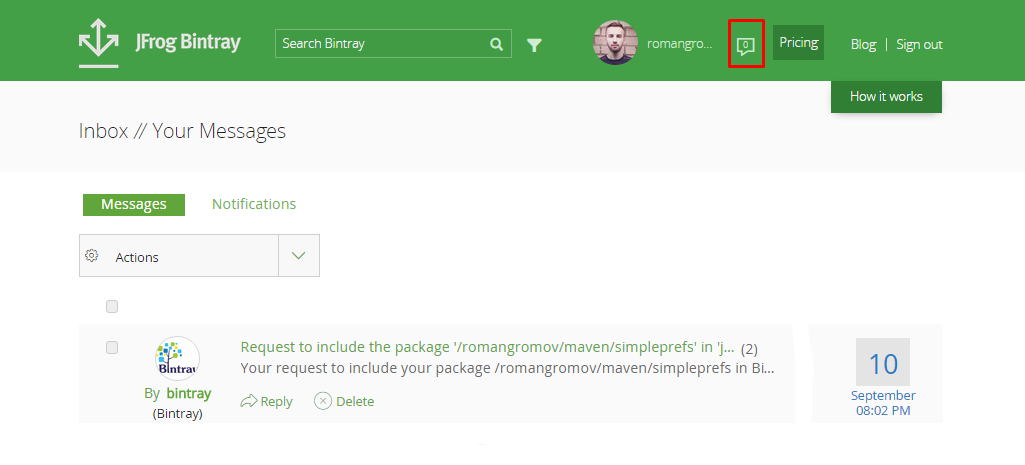
After the library is added to jCenter, the Linked to jCenter icon will appear, now anyone can use your library with a single-line dependency:
dependencies { compile 'com.github.romangromov:simpleprefs:0.0.8' } That's all, thanks for the attention!
Project sources on Github .
Used materials:
1. inthecheesefactory.com
2. blog.bintray.com
3. habrahabr.ru
4. opennet.ru
Source: https://habr.com/ru/post/266801/
All Articles