Microservices without servers (cloud version)
Hello dear readers!
As the most attentive of you remember, we are working on an innovative book about microservices , but at the same time, we do not forget to read what they write on the web on this topic. Therefore, we could not get past the most interesting article from the blog Amazon, whose author Tim Wagner shares his views on microservice architecture.
A lot of Java, JavaScript, schemes, reasoning and a lot of text
')
At the LinuxCon / ContainerCon 2015 conference, I presented a demo report titled “ Server-Free Microservices ”. In it, I described the creation of a microservice for image processing, deployed it in several regions, wrote a mobile application that used this microservice as a machine interface, added an HTTPS-based API, using the Amazon API Gateway and the website, and then performed it for the whole structure modular and load testing - all without servers.
In this article, the aforementioned report is restored in full detail, and in some places I delve into the subtleties of architecture. Additional illustrations - in the selection of slides . Another example of such an architecture is the SquirrelBin executable file in the gist repository.
Serverless architecture
The term “serverless” means that we do not need any explicit architecture, that is: do without servers, without deploying on servers, without installing any programs. We will work only with managed cloud services and with a laptop. The diagram below shows the main components and their connections: the lambda function as a machine interface and a mobile application that directly connects to it, plus the Amazon API Gateway, which provides the HTTP end point for a static site located on Amazon S3.
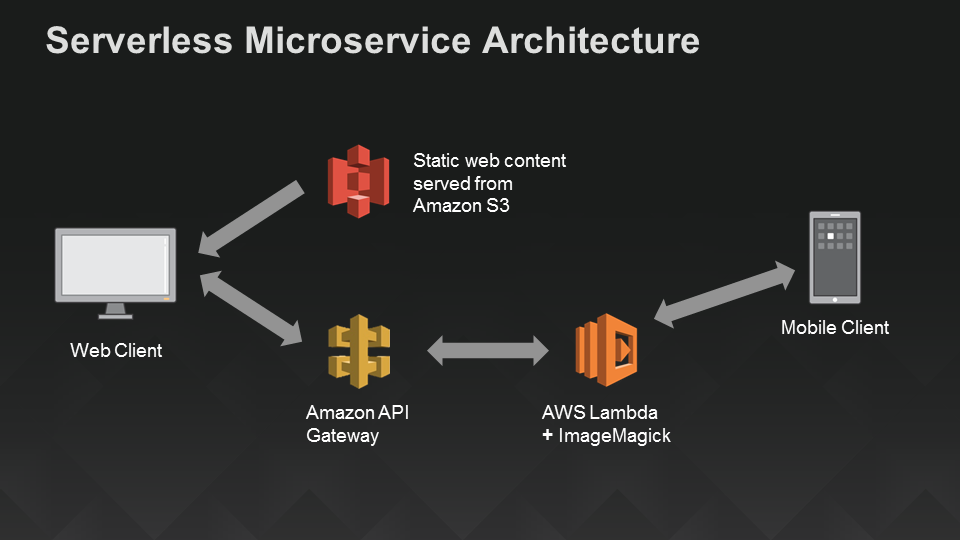
Serverless architecture for mobile and web applications using AWS Lambda
So, let's start!
Stage 1: Create an image processing service
To make the whole process easier, we will use the ImageMagick library, which is built into the nodejs language of the Lambda technology. However, this is not necessary - if you prefer your own libraries, you can load JavaScript libraries or native libraries, run Python, or even wrap the code in a command line executable file . The following example is implemented on nodejs, but you can equally well create such a service using Java , Clojure , Scala, or another jvm-language in AWS Lambda.
The code below can be considered a kind of “hello world” for ImageMagick - it allows you to get acquainted with the basic structure of the command (this command is a switch operator), extract the embedded image of a rose and return it. Apart from coding the result, everything else may well be written in JSON, something like this.
First, let's make sure the service works. To do this, send the following JSON to the test window of the AWS Lambda console:
You should get a mandatory “pong” response. Next, go to the actual ImageMagick call, sending the following JSON:
This query retrieves a string representation of the base64 encoded rose PNG image: “” iVBORw0KGg ... Jggg == ”. To make sure that these are not just some random characters, cut them out and paste (without double quotes) into any convenient decoder that converts Base64 into images, for example codebeautify.org/base64-to-image-converter. You should have a beautiful rose image:

Sample image (red rose)
Now let's finish the image processing service by preparing the rest of its nodejs wrapper for use. We are going to offer a number of different operations:
Most of the code here is extremely straightforward. The code wraps the ImageMagick procedures implemented on nodejs, some of them accept JSON (in this case, the event sent by Lambda is cleared and redirected), while others take command line arguments (so-called “custom”) that are passed as an array of strings. One aspect of this functionality may not be obvious if you have not previously worked with ImageMagick, namely: it functions as a command line wrapper, and file names have semantics. We have two competing needs: first, the client must transmit semantics (for example, the output image format, say, PNG vs. JPEG), secondly, the author of the service must determine where to make temporary storage on the disk, so we don’t allow leaks of details implementation. To solve both of these tasks at the same time, we define two arguments in the JSON schema: “inputExtension” and “outputExtension”, and then create the actual file location by combining the client part (file extension) with the server part (directory name and base name). You can view (and use!) The finished code in the next image processing drawing .
There are many tests that can be performed here (which we will do below), but as a quick health check we will again extract the same image of the rose and pass it back using a negative filter (performing color inversion). You can use a similar JSON file in the Lambda console, just replace the contents of the base64Image field with the characters that match your image (this sequence is quite long).
The output decoded into the image is a real botanical delicacy, a blue rose:

Blue rose (negative from the original image with a red rose)
That's all that concerns the functionality of the service. As a rule, the quotes begin here, we move from “once worked” to “scalable and reliable service with round-the-clock tracking and logging of production”. But this is the beauty of Lambda: our image processing code is already fully deployed microservice, ready for practical use. It remains to add a mobile application that can call it ...
Stage 2: Create a mobile client
There are several ways to contact our microservice for processing applications, but to demonstrate a sample client, we will write a small Android application. Below is the client code used by the report on ContainerCon. A simple Android application is created here that allows you to take an image and a filter, after which the filter is applied to the image in the “convert” operation, and we see what happens in the end. Filtering is carried out in the microservice image processing, which now works in AWS Lambda.
To make it clearer what this application does, take for example the AWS Lambda icon:
Android emulator displaying AWS Lambda icon
We will select a “negative” filter to invert the colors on the icon:
Selecting the 'Negate' filter for image conversion
... and here is the result: the blue version of our moniker Lambda (it was originally orange):
Result of applying the 'Negate' filter to the AWS Lambda icon
In addition, we could give a vintage look to the modern panorama of Seattle. Take a picture of Seattle and apply to it a filter in sepia tones:

Seattle panorama in sepia tones.
Go to the code. I don’t want to teach you the basics of programming under Android, but just pay attention to the Lambda-specific elements of the application. If you are writing your own application, you will need to enable the AWS Mobile SDK archive to run the code samples below). Conceptually, the code consists of four parts:
Consider all the parts in turn.
The data scheme defines all the objects that need to be transferred between the client and the server. There is no "Lambda isms"; All objects are plain POJO (Plain Old Java Object) without any special libraries or frameworks. We define a base event and then expand it to reflect the structure of our operation. You can assume that there is “javacification” of the JSON that we used when defining and testing the image processing service above. If you are also writing a Java server, you will usually share these files as part of defining the overall structure of events; in our example, these POJO objects are turned into server-side JSON.
LambdaEvent.java
ImageConvertRequest.java
So far everything is relatively simple. Now that we have the data model, we define the end point of the server with a few Java annotations. Here we provide two operations, “ping” and “convert”; It will be easy to extend the code by adding other operations to them, but this is not required for the demo application discussed below.
ILambdaInvoker.java
Now we are ready to go to the main part of the application. Here you will see mainly the Android screen code, as well as the code for simple client resource management, but I’ll separately note a couple of snippets related to Lambda:
This is the “init” section; here, an authentication provider is created to invoke the Lambda API and and creates a Lambda invoker to call the endpoints defined above and pass the POJOs to our data model:
Another piece of code that is (rather) interesting is the remote procedure call itself:
In fact, it is not so interesting, because all the magic (the serialization of the argument and the deserialization of the result) proceeds implicitly, and we only need to do some error handling here.
Here is the complete source file:
MainActivity.java
That's all mobile app. It consists of a data model (Java class), a control model (a couple of methods), three commands for initializing all sorts of things, and then a remote call enclosed in a try / catch block ... everything is simple.
Deploy in multiple regions
Until now, we have not particularly stopped on where this code will work. Lambda is responsible for deploying your code within a particular region, but you have to decide in which other regions you will use it. In my original demo, I wrote a function to work in the eastern United States — for example, this refers to a data center in Virginia. I wrote above that we are doing a global service, so let's expand its coverage area to the west of Europe (Ireland) and the Pacific region (Tokyo) so that mobile applications from these regions can connect to the service with minimal delay:
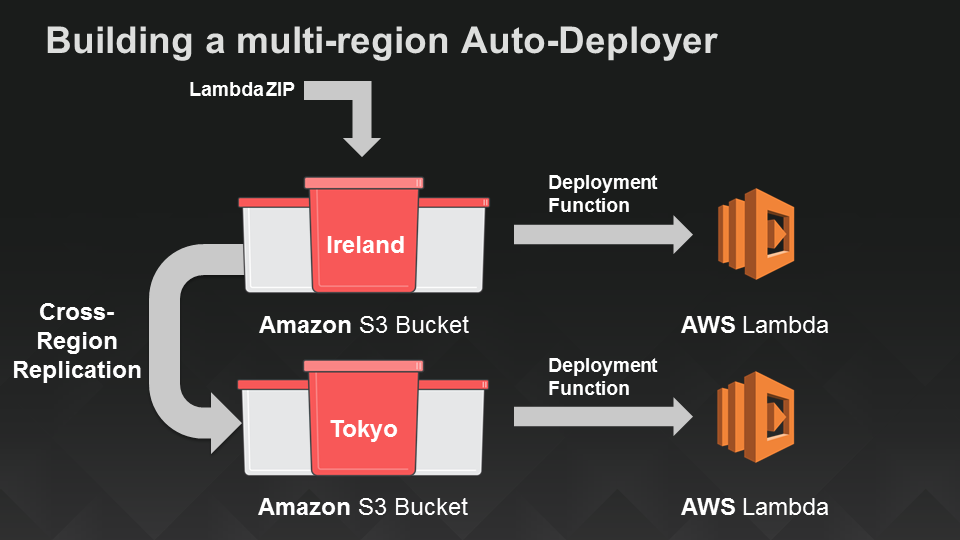
Serverless mechanism for deploying Lambda functions in two additional regions
Serverless web application part 1: API endpoints
So now we have a mobile application and a globally deployed image processing service that serves as its machine interface. Let's move on to creating a serverless web application for those comrades who prefer to work in the browser, and not on the device. We will do this in two stages. First, create an API endpoint for the image processing service. Then, in the next section, we add the site itself using Amazon S3.
AWS Lambda makes it easy to turn code into services, in particular, because the web service client interface is already “embedded” here. However, this requires clients (such as the mobile client that we wrote in the previous section) to sign requests with credentials provided by AWS. This task is solved by the Amazon Cognito authorization client used in our Android application, but what if we wanted to open a shared access to the image processing service through the website?
To do this, turn to another server, the Amazon API Gateway . This service allows you to define an API without requiring any infrastructure — the API is fully managed by AWS. We use the API gateway to create a URL that will be used by the image processing service, which provides access to a subset of its capabilities to any web user. Amazon API Gateway provides various ways to control access to various APIs: API calls can be signed with AWS credentials, or you can use OAuth tokens and simply redirect the headers to verification, you can use API keys (not recommended if you need secure access) or make the API completely publicly available, as will be shown here.
In addition to the various access models, API Gateway also offers many features that are beyond the scope of this article. Some of them are built-in (for example, protection against DDOS attacks), while others, such as caching, can further reduce delays and the cost of repeatedly extracting a popular image. By implementing the level of indirection between clients and (micro) services, API Gateway also allows you to develop them independently, using separate procedures for version control and primary data placement (staging). In the meantime, we will focus on solving the main task: to provide our image processing service as an API.
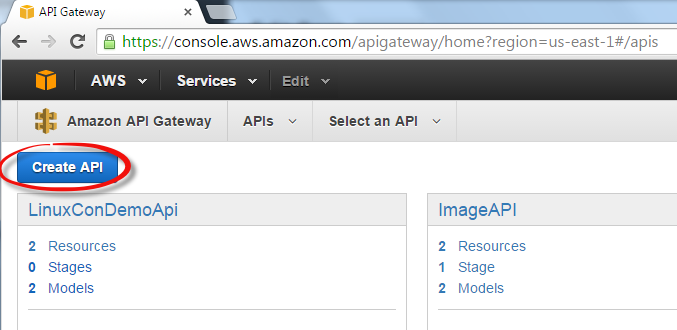
So let's create our API. In AWS Console, click API Gateway, and then select “New API”, set a name for the API, you can also add a description. I chose the name “ImageAPI”.
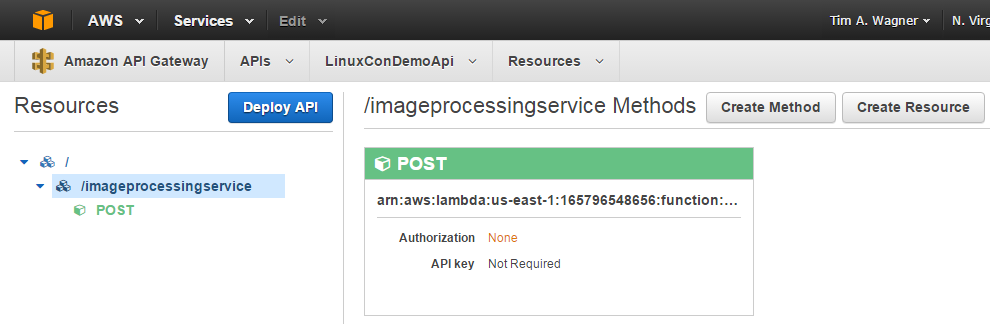
Next, create a resource for your new API (I called it “ImageProcessingService”), then make the POST method in it. Select “Lambda function” as the integration type and enter the name of the Lambda function that you will use as a service for image processing. In the “Method Request” configuration, set the type of authorization to “none” (that is, it will be a public endpoint). That's all.
To test the integration, click the “Test” button:
Then specify the test payload {“operation”: “ping”}. You should get the expected pong result indicating that you have successfully associated your API with the Lambda function.
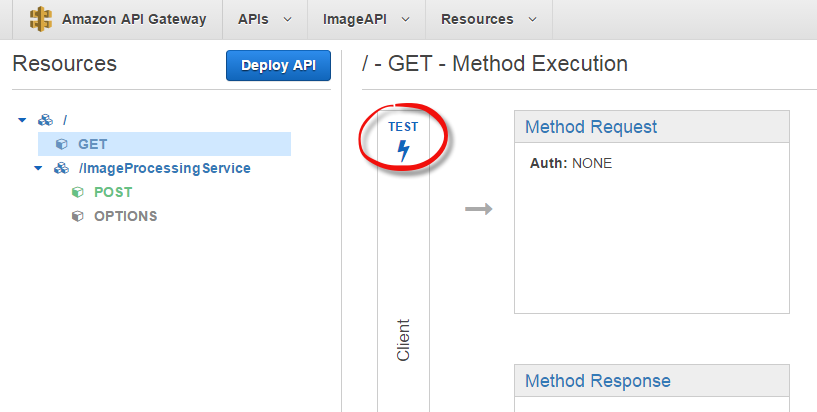
Remark: below we will do more complete (and deep) testing, but usually I find it useful to add a GET method to my API as a top-level resource, which is associated with some simple operation, for example, ping. This way, I can quickly verify from any browser that my API is correctly associated with the Lambda function. In our demo application (and in general) this is not mandatory, but it is possible that you will like this.
For what comes next (static content S3), we also need to activate CORS. It's simple, but done in several steps. The API Gateway team continues to simplify this process, so in order not to repeat their instructions here (which may well become outdated soon), I refer you to the documentation .
Click the “Deploy this API” button. Now everything should be ready to create your site!
-, 2: Amazon S3
: Javascript- S3, :
HTML- ( ) :
, CSS:
… S3:

URL S3 , ., “http://image-processing-service.s3-website-us-east-1.amazonaws.com/”. URL — :
API Gateway Lambda- , URL. . , , !
, API. : « HTTPS-» Lambda, POST , API Gateway:
. : Lambda- Amazon DynamoDB. Lambda, « »:
, , . Lambda, « »:
:
, , .. -, API Gateway HTTP, . , - DynamoDB, .
, , . «» , , , - : , , API, . !
As the most attentive of you remember, we are working on an innovative book about microservices , but at the same time, we do not forget to read what they write on the web on this topic. Therefore, we could not get past the most interesting article from the blog Amazon, whose author Tim Wagner shares his views on microservice architecture.
A lot of Java, JavaScript, schemes, reasoning and a lot of text
')
At the LinuxCon / ContainerCon 2015 conference, I presented a demo report titled “ Server-Free Microservices ”. In it, I described the creation of a microservice for image processing, deployed it in several regions, wrote a mobile application that used this microservice as a machine interface, added an HTTPS-based API, using the Amazon API Gateway and the website, and then performed it for the whole structure modular and load testing - all without servers.
In this article, the aforementioned report is restored in full detail, and in some places I delve into the subtleties of architecture. Additional illustrations - in the selection of slides . Another example of such an architecture is the SquirrelBin executable file in the gist repository.
Serverless architecture
The term “serverless” means that we do not need any explicit architecture, that is: do without servers, without deploying on servers, without installing any programs. We will work only with managed cloud services and with a laptop. The diagram below shows the main components and their connections: the lambda function as a machine interface and a mobile application that directly connects to it, plus the Amazon API Gateway, which provides the HTTP end point for a static site located on Amazon S3.
Serverless architecture for mobile and web applications using AWS Lambda
So, let's start!
Stage 1: Create an image processing service
To make the whole process easier, we will use the ImageMagick library, which is built into the nodejs language of the Lambda technology. However, this is not necessary - if you prefer your own libraries, you can load JavaScript libraries or native libraries, run Python, or even wrap the code in a command line executable file . The following example is implemented on nodejs, but you can equally well create such a service using Java , Clojure , Scala, or another jvm-language in AWS Lambda.
The code below can be considered a kind of “hello world” for ImageMagick - it allows you to get acquainted with the basic structure of the command (this command is a switch operator), extract the embedded image of a rose and return it. Apart from coding the result, everything else may well be written in JSON, something like this.
var im = require("imagemagick"); var fs = require("fs"); exports.handler = function(event, context) { if (event.operation) console.log("Operation " + event.operation + " requested"); switch (event.operation) { case 'ping': context.succeed('pong'); return; case 'getSample': event.customArgs = ["rose:", "/tmp/rose.png"]; im.convert(event.customArgs, function(err, output) { if (err) context.fail(err); else { var resultImgBase64 = new Buffer(fs.readFileSync("/tmp/rose.png")).toString('base64'); try {fs.unlinkSync("/tmp/rose.png");} catch (e) {} // discard context.succeed(resultImgBase64); } }); break; // default: var error = new Error('Unrecognized operation "' + event.operation + '"'); context.fail(error); return; } }; First, let's make sure the service works. To do this, send the following JSON to the test window of the AWS Lambda console:
{ "operation": "ping" } You should get a mandatory “pong” response. Next, go to the actual ImageMagick call, sending the following JSON:
{ "operation": "getSample" } This query retrieves a string representation of the base64 encoded rose PNG image: “” iVBORw0KGg ... Jggg == ”. To make sure that these are not just some random characters, cut them out and paste (without double quotes) into any convenient decoder that converts Base64 into images, for example codebeautify.org/base64-to-image-converter. You should have a beautiful rose image:
Sample image (red rose)
Now let's finish the image processing service by preparing the rest of its nodejs wrapper for use. We are going to offer a number of different operations:
- ping: check service availability.
- getDimensions: an abbreviated version of the identify operation call to get the height and width of the image.
- identify: extract image metadata.
- resize: auxiliary procedure for resizing (“under the hood” causing convert)
- thumbnail: a synonym for resize.
- convert: “universal” procedure - can convert media formats, apply transformations, recalculate dimensions, etc.
- getSample: retrieves a sample image; this operation corresponds to “hello world”
Most of the code here is extremely straightforward. The code wraps the ImageMagick procedures implemented on nodejs, some of them accept JSON (in this case, the event sent by Lambda is cleared and redirected), while others take command line arguments (so-called “custom”) that are passed as an array of strings. One aspect of this functionality may not be obvious if you have not previously worked with ImageMagick, namely: it functions as a command line wrapper, and file names have semantics. We have two competing needs: first, the client must transmit semantics (for example, the output image format, say, PNG vs. JPEG), secondly, the author of the service must determine where to make temporary storage on the disk, so we don’t allow leaks of details implementation. To solve both of these tasks at the same time, we define two arguments in the JSON schema: “inputExtension” and “outputExtension”, and then create the actual file location by combining the client part (file extension) with the server part (directory name and base name). You can view (and use!) The finished code in the next image processing drawing .
There are many tests that can be performed here (which we will do below), but as a quick health check we will again extract the same image of the rose and pass it back using a negative filter (performing color inversion). You can use a similar JSON file in the Lambda console, just replace the contents of the base64Image field with the characters that match your image (this sequence is quite long).
{ "operation": "convert", "customArgs": [ "-negate" ], "outputExtension": "png", "base64Image": "...fill this in with the rose sample image, base64-encoded..." } The output decoded into the image is a real botanical delicacy, a blue rose:
Blue rose (negative from the original image with a red rose)
That's all that concerns the functionality of the service. As a rule, the quotes begin here, we move from “once worked” to “scalable and reliable service with round-the-clock tracking and logging of production”. But this is the beauty of Lambda: our image processing code is already fully deployed microservice, ready for practical use. It remains to add a mobile application that can call it ...
Stage 2: Create a mobile client
There are several ways to contact our microservice for processing applications, but to demonstrate a sample client, we will write a small Android application. Below is the client code used by the report on ContainerCon. A simple Android application is created here that allows you to take an image and a filter, after which the filter is applied to the image in the “convert” operation, and we see what happens in the end. Filtering is carried out in the microservice image processing, which now works in AWS Lambda.
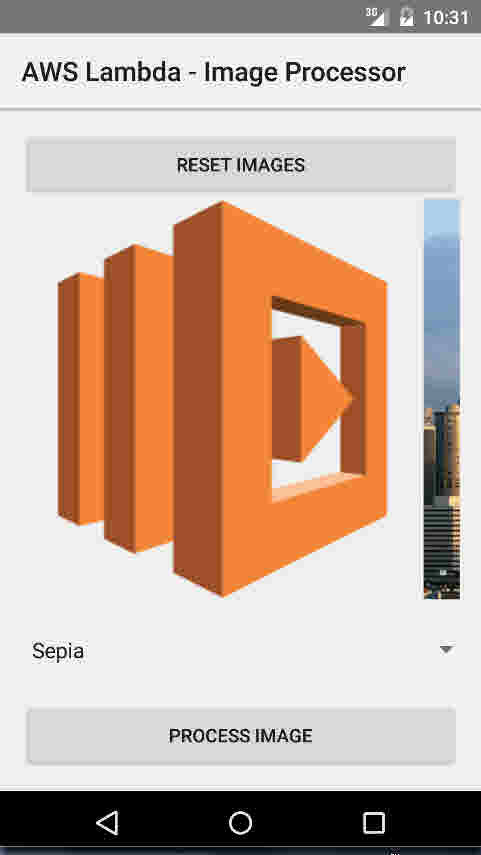
To make it clearer what this application does, take for example the AWS Lambda icon:
Android emulator displaying AWS Lambda icon
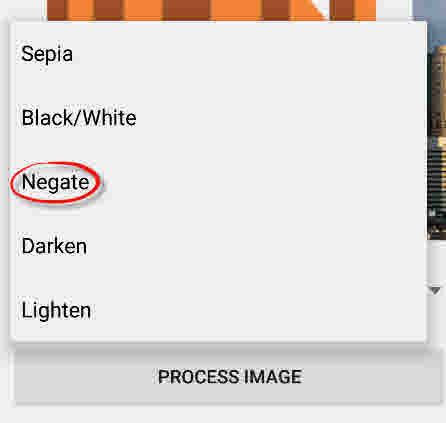
We will select a “negative” filter to invert the colors on the icon:
Selecting the 'Negate' filter for image conversion
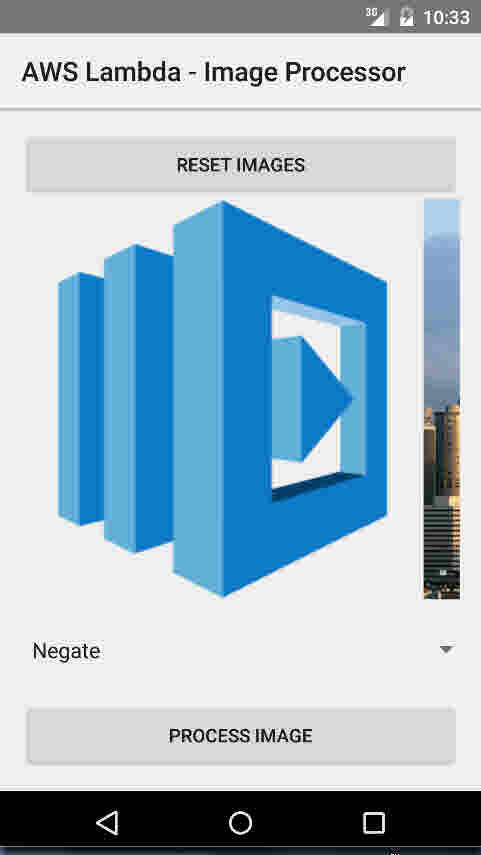
... and here is the result: the blue version of our moniker Lambda (it was originally orange):
Result of applying the 'Negate' filter to the AWS Lambda icon
In addition, we could give a vintage look to the modern panorama of Seattle. Take a picture of Seattle and apply to it a filter in sepia tones:
Seattle panorama in sepia tones.
Go to the code. I don’t want to teach you the basics of programming under Android, but just pay attention to the Lambda-specific elements of the application. If you are writing your own application, you will need to enable the AWS Mobile SDK archive to run the code samples below). Conceptually, the code consists of four parts:
- POJO data schema
- Remote Service Definition (operation)
- Initialization
- Service call
Consider all the parts in turn.
The data scheme defines all the objects that need to be transferred between the client and the server. There is no "Lambda isms"; All objects are plain POJO (Plain Old Java Object) without any special libraries or frameworks. We define a base event and then expand it to reflect the structure of our operation. You can assume that there is “javacification” of the JSON that we used when defining and testing the image processing service above. If you are also writing a Java server, you will usually share these files as part of defining the overall structure of events; in our example, these POJO objects are turned into server-side JSON.
LambdaEvent.java
package com.amazon.lambda.androidimageprocessor.lambda; public class LambdaEvent { private String operation; public String getOperation() {return operation;} public void setOperation(String operation) {this.operation = operation;} public LambdaEvent(String operation) {setOperation(operation);} } ImageConvertRequest.java
package com.amazon.lambda.androidimageprocessor.lambda; import java.util.List; public class ImageConvertRequest extends LambdaEvent { private String base64Image; private String inputExtension; private String outputExtension; private List customArgs; public ImageConvertRequest() {super("convert");} public String getBase64Image() {return base64Image;} public void setBase64Image(String base64Image) {this.base64Image = base64Image;} public String getInputExtension() {return inputExtension;} public void setInputExtension(String inputExtension) {this.inputExtension = inputExtension;} public String getOutputExtension() {return outputExtension;} public void setOutputExtension(String outputExtension) {this.outputExtension = outputExtension;} public List getCustomArgs() {return customArgs;} public void setCustomArgs(List customArgs) {this.customArgs = customArgs;} } So far everything is relatively simple. Now that we have the data model, we define the end point of the server with a few Java annotations. Here we provide two operations, “ping” and “convert”; It will be easy to extend the code by adding other operations to them, but this is not required for the demo application discussed below.
ILambdaInvoker.java
package com.amazon.lambda.androidimageprocessor.lambda; import com.amazonaws.mobileconnectors.lambdainvoker.LambdaFunction; import java.util.Map; public interface ILambdaInvoker { @LambdaFunction(functionName = "ImageProcessor") String ping(Map event); @LambdaFunction(functionName = "ImageProcessor") String convert(ImageConvertRequest request); } Now we are ready to go to the main part of the application. Here you will see mainly the Android screen code, as well as the code for simple client resource management, but I’ll separately note a couple of snippets related to Lambda:
This is the “init” section; here, an authentication provider is created to invoke the Lambda API and and creates a Lambda invoker to call the endpoints defined above and pass the POJOs to our data model:
// CognitoCachingCredentialsProvider CognitoCachingCredentialsProvider cognitoProvider = new CognitoCachingCredentialsProvider( this.getApplicationContext(), "us-east-1:<YOUR COGNITO IDENITY POOL GOES HERE>", Regions.US_EAST_1); // LambdaInvokerFactory, Lambda. LambdaInvokerFactory factory = new LambdaInvokerFactory(this.getApplicationContext(), Regions.US_EAST_1, cognitoProvider); // - Lambda Json. lambda = factory.build(ILambdaInvoker.class); Another piece of code that is (rather) interesting is the remote procedure call itself:
try { return lambda.convert(params[0]); } catch (LambdaFunctionException e) { Log.e("Tag", "Failed to convert image"); return null; } In fact, it is not so interesting, because all the magic (the serialization of the argument and the deserialization of the result) proceeds implicitly, and we only need to do some error handling here.
Here is the complete source file:
MainActivity.java
package com.amazon.lambda.androidimageprocessor; import android.app.Activity; import android.app.ProgressDialog; import android.graphics.Bitmap; import android.graphics.BitmapFactory; import android.os.AsyncTask; import android.os.Bundle; import android.util.Base64; import android.util.Log; import android.view.View; import android.widget.ImageView; import android.widget.Spinner; import android.widget.Toast; import com.amazon.lambda.androidimageprocessor.lambda.ILambdaInvoker; import com.amazon.lambda.androidimageprocessor.lambda.ImageConvertRequest; import com.amazonaws.auth.CognitoCachingCredentialsProvider; import com.amazonaws.mobileconnectors.lambdainvoker.LambdaFunctionException; import com.amazonaws.mobileconnectors.lambdainvoker.LambdaInvokerFactory; import com.amazonaws.regions.Regions; import java.io.ByteArrayOutputStream; import java.util.ArrayList; import java.util.HashMap; import java.util.List; import java.util.Map; import java.util.Objects; public class MainActivity extends Activity { private ILambdaInvoker lambda; private ImageView selectedImage; private String selectedImageBase64; private ProgressDialog progressDialog; @Override protected void onCreate(Bundle savedInstanceState) { super.onCreate(savedInstanceState); setContentView(R.layout.activity_main); // CognitoCachingCredentialsProvider CognitoCachingCredentialsProvider cognitoProvider = new CognitoCachingCredentialsProvider( this.getApplicationContext(), "us-east-1:2a40105a-b330-43cf-8d4e-b647d492e76e", Regions.US_EAST_1); // LambdaInvokerFactory, Lambda. LambdaInvokerFactory factory = new LambdaInvokerFactory(this.getApplicationContext(), Regions.US_EAST_1, cognitoProvider); // - Lambda Json. lambda = factory.build(ILambdaInvoker.class); // lambda-, , pingLambda(); } // lambda- @SuppressWarnings("unchecked") private void pingLambda() { Map event = new HashMap(); event.put("operation", "ping"); // Lambda- . // , . new AsyncTask<Map, Void, String>() { @Override protected String doInBackground(Map... params) { // "ping". , // LambdaFunctionException. try { return lambda.ping(params[0]); } catch (LambdaFunctionException lfe) { Log.e("Tag", "Failed to invoke ping", lfe); return null; } } @Override protected void onPostExecute(String result) { if (result == null) { return; } // Toast.makeText(MainActivity.this, "Made contact with AWS lambda", Toast.LENGTH_LONG).show(); } }.execute(event); } // "process image" public void processImage(View view) { // if (selectedImageBase64 == null) { Toast.makeText(this, "Please tap one of the images above", Toast.LENGTH_LONG).show(); return; } // String filter = ((Spinner) findViewById(R.id.filter_picker)).getSelectedItem().toString(); // ImageConvertRequest request = new ImageConvertRequest(); request.setBase64Image(selectedImageBase64); request.setInputExtension("png"); request.setOutputExtension("png"); // List customArgs = new ArrayList(); request.setCustomArgs(customArgs); switch (filter) { case "Sepia": customArgs.add("-sepia-tone"); customArgs.add("65%"); break; case "Black/White": customArgs.add("-colorspace"); customArgs.add("Gray"); break; case "Negate": customArgs.add("-negate"); break; case "Darken": customArgs.add("-fill"); customArgs.add("black"); customArgs.add("-colorize"); customArgs.add("50%"); break; case "Lighten": customArgs.add("-fill"); customArgs.add("white"); customArgs.add("-colorize"); customArgs.add("50%"); break; default: return; } // async- lambda- new AsyncTask() { @Override protected String doInBackground(ImageConvertRequest... params) { try { return lambda.convert(params[0]); } catch (LambdaFunctionException e) { Log.e("Tag", "Failed to convert image"); return null; } } @Override protected void onPostExecute(String result) { // , if (result == null || Objects.equals(result, "")) { hideLoadingDialog(); Toast.makeText(MainActivity.this, "Processing failed", Toast.LENGTH_LONG).show(); return; } // base64 byte[] imageData = Base64.decode(result, Base64.DEFAULT); selectedImage.setImageBitmap(BitmapFactory.decodeByteArray(imageData, 0, imageData.length)); hideLoadingDialog(); } }.execute(request); showLoadingDialog(); } /* */ public void selectLambdaImage(View view) { selectImage(R.drawable.lambda); selectedImage = (ImageView) findViewById(R.id.static_lambda); Toast.makeText(this, "Selected image 'lambda'", Toast.LENGTH_LONG).show(); } public void selectSeattleImage(View view) { selectImage(R.drawable.seattle); selectedImage = (ImageView) findViewById(R.id.static_seattle); Toast.makeText(this, "Selected image 'seattle'", Toast.LENGTH_LONG).show(); } public void selectSquirrelImage(View view) { selectImage(R.drawable.squirrel); selectedImage = (ImageView) findViewById(R.id.static_squirrel); Toast.makeText(this, "Selected image 'squirrel'", Toast.LENGTH_LONG).show(); } public void selectLinuxImage(View view) { selectImage(R.drawable.linux); selectedImage = (ImageView) findViewById(R.id.static_linux); Toast.makeText(this, "Selected image 'linux'", Toast.LENGTH_LONG).show(); } // 'id' , base64 private void selectImage(int id) { Bitmap bmp = BitmapFactory.decodeResource(getResources(), id); ByteArrayOutputStream stream = new ByteArrayOutputStream(); bmp.compress(Bitmap.CompressFormat.PNG, 100, stream); selectedImageBase64 = Base64.encodeToString(stream.toByteArray(), Base64.DEFAULT); } // public void reset(View view) { ((ImageView) findViewById(R.id.static_lambda)).setImageDrawable(getResources().getDrawable(R.drawable.lambda, getTheme())); ((ImageView) findViewById(R.id.static_seattle)).setImageDrawable(getResources().getDrawable(R.drawable.seattle, getTheme())); ((ImageView) findViewById(R.id.static_squirrel)).setImageDrawable(getResources().getDrawable(R.drawable.squirrel, getTheme())); ((ImageView) findViewById(R.id.static_linux)).setImageDrawable(getResources().getDrawable(R.drawable.linux, getTheme())); Toast.makeText(this, "Please choose from one of these images", Toast.LENGTH_LONG).show(); } private void showLoadingDialog() { progressDialog = ProgressDialog.show(this, "Please wait...", "Processing image", true, false); } private void hideLoadingDialog() { progressDialog.dismiss(); } } That's all mobile app. It consists of a data model (Java class), a control model (a couple of methods), three commands for initializing all sorts of things, and then a remote call enclosed in a try / catch block ... everything is simple.
Deploy in multiple regions
Until now, we have not particularly stopped on where this code will work. Lambda is responsible for deploying your code within a particular region, but you have to decide in which other regions you will use it. In my original demo, I wrote a function to work in the eastern United States — for example, this refers to a data center in Virginia. I wrote above that we are doing a global service, so let's expand its coverage area to the west of Europe (Ireland) and the Pacific region (Tokyo) so that mobile applications from these regions can connect to the service with minimal delay:
Serverless mechanism for deploying Lambda functions in two additional regions
Serverless web application part 1: API endpoints
So now we have a mobile application and a globally deployed image processing service that serves as its machine interface. Let's move on to creating a serverless web application for those comrades who prefer to work in the browser, and not on the device. We will do this in two stages. First, create an API endpoint for the image processing service. Then, in the next section, we add the site itself using Amazon S3.
AWS Lambda makes it easy to turn code into services, in particular, because the web service client interface is already “embedded” here. However, this requires clients (such as the mobile client that we wrote in the previous section) to sign requests with credentials provided by AWS. This task is solved by the Amazon Cognito authorization client used in our Android application, but what if we wanted to open a shared access to the image processing service through the website?
To do this, turn to another server, the Amazon API Gateway . This service allows you to define an API without requiring any infrastructure — the API is fully managed by AWS. We use the API gateway to create a URL that will be used by the image processing service, which provides access to a subset of its capabilities to any web user. Amazon API Gateway provides various ways to control access to various APIs: API calls can be signed with AWS credentials, or you can use OAuth tokens and simply redirect the headers to verification, you can use API keys (not recommended if you need secure access) or make the API completely publicly available, as will be shown here.
In addition to the various access models, API Gateway also offers many features that are beyond the scope of this article. Some of them are built-in (for example, protection against DDOS attacks), while others, such as caching, can further reduce delays and the cost of repeatedly extracting a popular image. By implementing the level of indirection between clients and (micro) services, API Gateway also allows you to develop them independently, using separate procedures for version control and primary data placement (staging). In the meantime, we will focus on solving the main task: to provide our image processing service as an API.
So let's create our API. In AWS Console, click API Gateway, and then select “New API”, set a name for the API, you can also add a description. I chose the name “ImageAPI”.
Next, create a resource for your new API (I called it “ImageProcessingService”), then make the POST method in it. Select “Lambda function” as the integration type and enter the name of the Lambda function that you will use as a service for image processing. In the “Method Request” configuration, set the type of authorization to “none” (that is, it will be a public endpoint). That's all.
To test the integration, click the “Test” button:
Then specify the test payload {“operation”: “ping”}. You should get the expected pong result indicating that you have successfully associated your API with the Lambda function.
Remark: below we will do more complete (and deep) testing, but usually I find it useful to add a GET method to my API as a top-level resource, which is associated with some simple operation, for example, ping. This way, I can quickly verify from any browser that my API is correctly associated with the Lambda function. In our demo application (and in general) this is not mandatory, but it is possible that you will like this.
For what comes next (static content S3), we also need to activate CORS. It's simple, but done in several steps. The API Gateway team continues to simplify this process, so in order not to repeat their instructions here (which may well become outdated soon), I refer you to the documentation .
Click the “Deploy this API” button. Now everything should be ready to create your site!
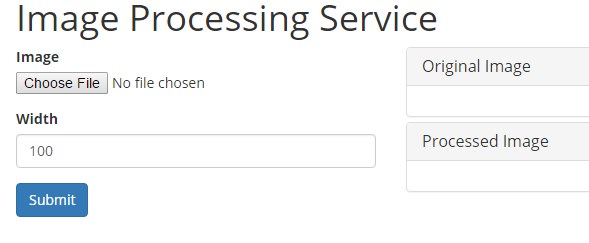
-, 2: Amazon S3
: Javascript- S3, :
var ENDPOINT = 'https://fuexvelc41.execute-api.us-east-1.amazonaws.com/prod/ImageProcessingService'; angular.module('app', ['ui.bootstrap']) .controller('MainController', ['$scope', '$http', function($scope, $http) { $scope.loading = false; $scope.image = { width: 100 }; $scope.ready = function() { $scope.loading = false; }; $scope.submit = function() { var fileCtrl = document.getElementById('image-file'); if (fileCtrl.files && fileCtrl.files[0]) { $scope.loading = true; var fr = new FileReader(); fr.onload = function(e) { $scope.image.base64Image = e.target.result.slice(e.target.result.indexOf(',') + 1); $scope.$apply(); document.getElementById('original-image').src = e.target.result; // ! $http.post(ENDPOINT, angular.extend($scope.image, { operation: 'resize', outputExtension: fileCtrl.value.split('.').pop() })) .then(function(response) { document.getElementById('processed-image').src = "data:image/png;base64," + response.data; }) .catch(console.log) .finally($scope.ready); }; fr.readAsDataURL(fileCtrl.files[0]); } }; }]); HTML- ( ) :
<!DOCTYPE html> <html lang="en"> <head> <title>Image Processing Service</title> <meta charset="utf-8"> <meta http-equiv="X-UA-Compatible" content="IE=edge"> <meta name="viewport" content="width=device-width, initial-scale=1"> <link rel="stylesheet" type="text/css" href="https://cdnjs.cloudflare.com/ajax/libs/twitter-bootstrap/3.3.4/css/bootstrap.min.css"> <link rel="stylesheet" type="text/css" href="http://fonts.googleapis.com/css?family=Open+Sans:400,700"> <link rel="stylesheet" type="text/css" href="main.css"> </head> <body ng-app="app" ng-controller="MainController"> <div class="container"> <h1>Image Processing Service</h1> <div class="row"> <div class="col-md-4"> <form ng-submit="submit()"> <div class="form-group"> <label for="image-file">Image</label> <input id="image-file" type="file"> </div> <div class="form-group"> <label for="image-width">Width</label> <input id="image-width" class="form-control" type="number" ng-model="image.width" min="1" max="4096"> </div> <button type="submit" class="btn btn-primary"> <span class="glyphicon glyphicon-refresh" ng-if="loading"></span> Submit </button> </form> </div> <div class="col-md-8"> <accordion close-others="false"> <accordion-group heading="Original Image" is-open="true"> <img id="original-image" class="img-responsive"> </accordion-group> <accordion-group heading="Processed Image" is-open="true"> <img id="processed-image" class="img-responsive"> </accordion-group> </accordion> </div> </div> </div> <script type="text/javascript" src="https://cdnjs.cloudflare.com/ajax/libs/angular.js/1.3.15/angular.min.js"></script> <script type="text/javascript" src="https://cdnjs.cloudflare.com/ajax/libs/angular-ui-bootstrap/0.13.3/ui-bootstrap.min.js"></script> <script type="text/javascript" src="https://cdnjs.cloudflare.com/ajax/libs/angular-ui-bootstrap/0.13.3/ui-bootstrap-tpls.min.js"></script> <script type="text/javascript" src="main.js"></script> </body> </html> , CSS:
body { font-family: 'Open Sans', sans-serif; padding-bottom: 15px; } a { cursor: pointer; } /** LOADER **/ .glyphicon-refresh { -animation: spin .7s infinite linear; -webkit-animation: spin .7s infinite linear; } @keyframes spin { from { transform: rotate(0deg); } to { transform: rotate(360deg); } } @-webkit-keyframes spin { from { -webkit-transform: rotate(0deg); } to { -webkit-transform: rotate(360deg); } } … S3:
URL S3 , ., “http://image-processing-service.s3-website-us-east-1.amazonaws.com/”. URL — :
API Gateway Lambda- , URL. . , , !
, API. : « HTTPS-» Lambda, POST , API Gateway:
{ "options": { "host": "fuexvelc41.execute-api.us-east-1.amazonaws.com", "path": "/prod/ImageProcessingService", "method": "POST" }, "data": { "operation": "getSample" } } . : Lambda- Amazon DynamoDB. Lambda, « »:
{ "operation": "unit", "function": "HTTPSInvoker", "resultsTable": "unit-test-results", "testId": "LinuxConDemo", "event": { "options": { "host": "fuexvelc41.execute-api.us-east-1.amazonaws.com", "path": "/prod/ImageProcessingService", "method": "POST" }, "data": { "operation": "getSample" } } } , , . Lambda, « »:
{ "operation": "load", "iterations": 100, "function": "TestHarness", "event": { "operation": "unit", "function": "HTTPSInvoker", "resultsTable": "unit-test-results", "testId": "LinuxConLoadTestDemo", "event": { "options": { "host": "fuexvelc41.execute-api.us-east-1.amazonaws.com", "path": "/prod/ImageProcessingService", "method": "POST" }, "data": { "operation": "getSample" } } } } :
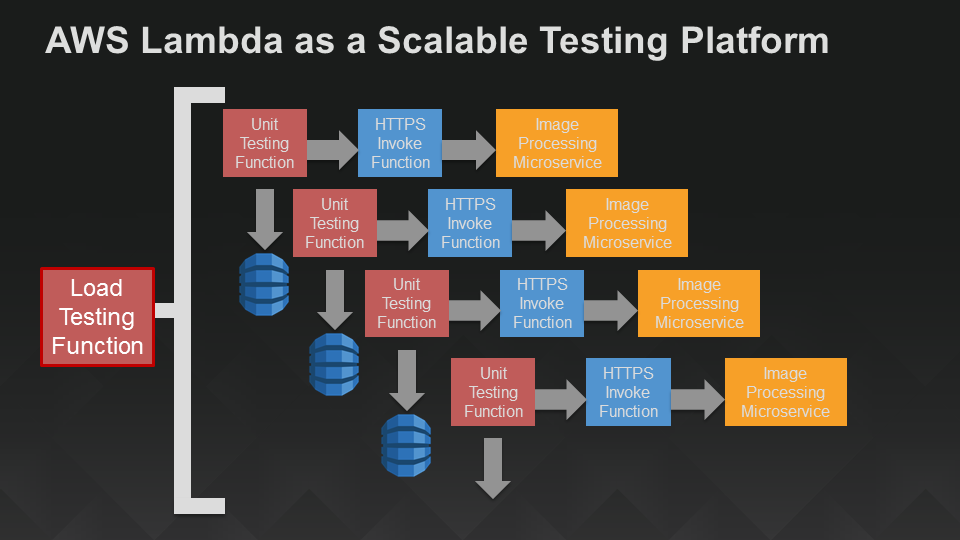
, , .. -, API Gateway HTTP, . , - DynamoDB, .
, , . «» , , , - : , , API, . !
Source: https://habr.com/ru/post/266703/
All Articles