Simulator ghost. From the idea of becoming a programmer to the finished game on iOS
It has been about 10 months since I decided to teach programming, since the current work as a technical support engineer simply caught up with apathy and did not lead to anything. And in order to make the learning process as interesting as possible, I decided to write a game for mobile devices. Then we will talk about what exactly I was trying to create, and what difficulties newcomers have to face.

There is one important point for novice developers who are eager to link their lives with the world of the IT industry. You must determine for yourself the most comfortable self-education strategy. One needs to solve practical tasks regularly, the other will not budge until he understands the subtle nuances of the theory. After all, the vast majority, despite the purity of their intentions, have a main job, family, friends, hobbies ... And anyway, this whole routine whirlpool affects the time and quality of your training. And it may lead to the fact that you will throw your daily classes on the back burner and never return to them.
')
Personally for myself, I determined that the most comfortable way to develop is when I can see a holistic, clear picture of my result in the form of a game or application. As a platform, I chose iOS and the accompanying language Apple - objective-C. For the gaming framework, the cocos2d-iphone came up perfectly. It is simple, free, and also has a huge number of examples and tutorials on the Internet.
It's time to talk about the game itself, how it looked in my fantasies, and what needed to be done to implement it.
The game is called "Ghost Simulator" and is a mixture of puzzle quest and anti-stress simulator. Your hero dies in mysterious circumstances and becomes a ghost. However, life does not end there, quite the contrary - it becomes much more exciting. After all, now you can take revenge on all your offenders in life, scaring them and bringing them to hysterics.
The gameplay comes down to the fact that you are in the room of the bad guy. Shifting various objects, you feed on the fear of your victim, this makes you stronger, and you can perform more complex tricks. Here is what my very first sketch looked like:
The idea is ripe. But in order to implement it, you must first learn how to program. The way of learning the language and the sources of information each must also choose for themselves individually. I can only offer my plan for studying objective-C. I propose to study not on a specific book, but on topics that you are looking for on the Internet. This will give you the opportunity among more info. resources, choose the most understandable and readable, and also reduce the likelihood of misinterpretation of new concepts. The most suitable books for me are: Stephen Kochan “Programming in Objective-C 2.0”, Bert Altenberg and Alex Clarke “Become an Xcoder”, as well as video tutorials at www.youtube.com/user/MacroTeamChannel , web resources macscripter.ru , imaladec.com.
In general, I bought an old MacBook for 100 bucks, uploaded Xcode version 4.3 (a newer version is not installed on it) and began to study the following topics:
- Object-oriented programming.
- Interface and Xcode elements.
- Primitive data types.
- Objects and classes. NSDate, #define, NSString. Scope of variables.
- Methods. Selector.
- Arrays. NSArray, NSMutableArray, NSSet, NSDictionary, NSNumber.
- Create your own. class (#import, interface , @implementation, private , public, protected, readonly , readwrite, setter, getter).
- Properties.
- Paradigms of OOP: inheritance, polymorphism, encapsulation.
- Categories.
- Patterns. MVC: Notification, delegate, outlet, target, sender.
- The life cycle of the View Controller.
- Delegation. Protocols (optinal, required).
- Blocks.
- Views, Gesture Recognizer.
- Multithreading (GCD), broadcaster KVO, UIAlertView, UIActionSheet.
- Singleton.
- Work with memory (retain, release, autorelease). ARC.
- Work with the network. Download data. Nscashe.
- JSON.
After studying this theory with the solutions of small tasks, I got a general idea of what a program is and how the process of programming something is arranged. It's time to return to the game and realize how realistic it is to make my plans a reality.
As it turned out, thanks to the cocos engine, the game should be very easy to implement. We create the initial scene, add the main layer to it, which plays the role of the background, add pictures in the form of sprites, add menu items. We create a transition to another scene, and in the dealloc method, we reset all the objects used, because cocos2d does not support ARC, and so on ...
I will not litter an article about how I gradually added new fragments to the game, since there are already a ton of lessons on this topic on the Internet. I will consider only the funniest moments. For example, I wanted to, while touching the screen with my finger, a white train followed him, as if at that very moment my ghost was hovering invisible around the room. Fortunately, in the coconut, even in this case there is a method. Here is its implementation:
The logic of the game comes down to the fact that there is a simple "intovy" counter, which increases each time we scare our hero in the right sequence. To determine the desired sequence, you must think like a ghost. You can, of course, use the hint. If the counter value is lower than the required value, then no action can be taken on the object. In this case, when you click on this item, it slightly changes color, and this means that action on it may be available later.
When you touch the desired item in the room starts a chain of animation. I drew all the objects myself, so at least it turned out ugly, but I would like to mention the painstaking work of artists separately.
Animation in cocos2d can be of 2 types: sprite and frame by frame. Sprite animation is the easiest way to make a moving picture on the screen. We just set the trajectory of the action. Then the system does everything for us, driving each frame of the animation along a given cycle:
I also used the frame animation:
However, with this approach, the graphics adapter processes each image separately, which instantly affects performance. To animate the little man it was necessary to learn a new way - an atlas of textures.
First you had to draw the character in Photoshop entirely. After that, divide the image into body parts, and save as separate pictures. The next step is to download and install the program Sprite Helper PRO. With its help we create a skeleton animation with a length of 10 seconds, start the storyboard, and at the output we get 360 animation pictures. Next, using the Texture Packer program, we pound all the images into one huge canvas, from which OpenGL will cut out the pieces it needs. Texture Packer also creates us a .plist document, thanks to which you can quickly reach the characteristics of each individual fragment. Import the image and plist file into the folder Supported files in Xcode, write the code to start the animation:
As a result, we get the correct animation of 360 consecutive frames. What a pleasure after all to observe how the character pulls a cute leg!
After writing the game, and eliminating all the "varnings", it took about a month to fix all sorts of bugs. I also had to run after people with newer Macs and iPhones to transfer my program from the 4th Xcode to the 6th, and run it “live” on the iphone device.
In order for the application to be displayed on the 4th and 6th iphone equally without the eerie black rectangles, it is also necessary to properly set the background images. There are many solutions to this problem on the Internet (for example, http://www.raywenderlich.com/33525/how-to-build-a-monkey-jump-game-using-cocos2d-2-x-physicseditor-texturepacker-part- 1 ), but they are all unnecessarily complex. Just create another background image with the size of 1136x640 and, at the beginning of the main init method, set the condition:
The code of the main game scene fit 1300 lines. The application is designed as a demo-version with one level, because an artist is needed for a full-fledged product: almost the entire game is tied to visual effects.
But, despite the design flaws in the application, I implemented all the functions that I planned at the very beginning. The game does not hang and do not crash. And I really could enjoy the study of a new field of science. As a first programming language, Objective-C seemed to me quite comfortable and intuitively reasonable.
I hope this article will push on new thoughts and solutions, both novice programmers and experienced gurus who could develop my idea many times better.
At the moment, the application is pending publication in the Apple Store. When it passes the test, I will drop the link in the comments. In the meantime, you can watch a video of what happened.
There is one important point for novice developers who are eager to link their lives with the world of the IT industry. You must determine for yourself the most comfortable self-education strategy. One needs to solve practical tasks regularly, the other will not budge until he understands the subtle nuances of the theory. After all, the vast majority, despite the purity of their intentions, have a main job, family, friends, hobbies ... And anyway, this whole routine whirlpool affects the time and quality of your training. And it may lead to the fact that you will throw your daily classes on the back burner and never return to them.
')
Personally for myself, I determined that the most comfortable way to develop is when I can see a holistic, clear picture of my result in the form of a game or application. As a platform, I chose iOS and the accompanying language Apple - objective-C. For the gaming framework, the cocos2d-iphone came up perfectly. It is simple, free, and also has a huge number of examples and tutorials on the Internet.
It's time to talk about the game itself, how it looked in my fantasies, and what needed to be done to implement it.
The idea of the project
The game is called "Ghost Simulator" and is a mixture of puzzle quest and anti-stress simulator. Your hero dies in mysterious circumstances and becomes a ghost. However, life does not end there, quite the contrary - it becomes much more exciting. After all, now you can take revenge on all your offenders in life, scaring them and bringing them to hysterics.
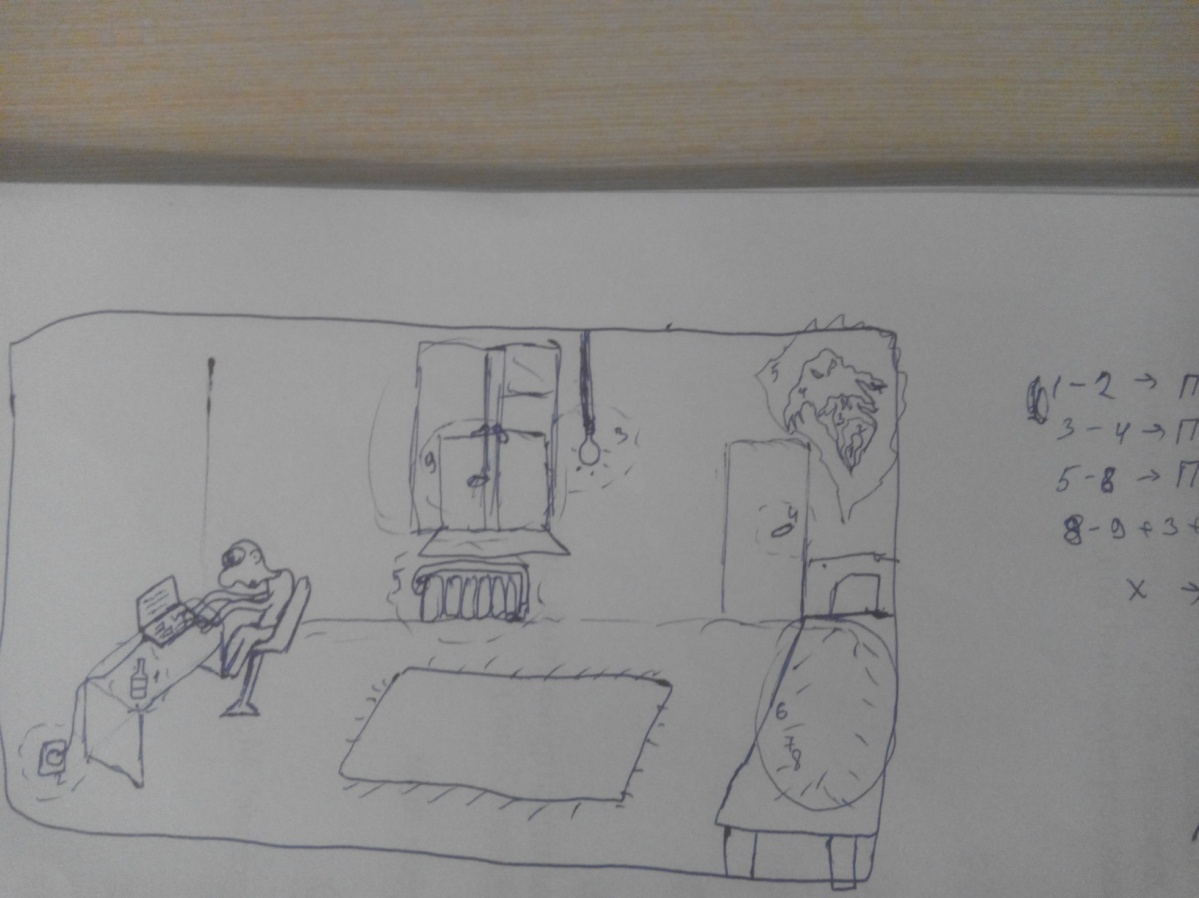
The gameplay comes down to the fact that you are in the room of the bad guy. Shifting various objects, you feed on the fear of your victim, this makes you stronger, and you can perform more complex tricks. Here is what my very first sketch looked like:
The idea is ripe. But in order to implement it, you must first learn how to program. The way of learning the language and the sources of information each must also choose for themselves individually. I can only offer my plan for studying objective-C. I propose to study not on a specific book, but on topics that you are looking for on the Internet. This will give you the opportunity among more info. resources, choose the most understandable and readable, and also reduce the likelihood of misinterpretation of new concepts. The most suitable books for me are: Stephen Kochan “Programming in Objective-C 2.0”, Bert Altenberg and Alex Clarke “Become an Xcoder”, as well as video tutorials at www.youtube.com/user/MacroTeamChannel , web resources macscripter.ru , imaladec.com.
In general, I bought an old MacBook for 100 bucks, uploaded Xcode version 4.3 (a newer version is not installed on it) and began to study the following topics:
- Object-oriented programming.
- Interface and Xcode elements.
- Primitive data types.
- Objects and classes. NSDate, #define, NSString. Scope of variables.
- Methods. Selector.
- Arrays. NSArray, NSMutableArray, NSSet, NSDictionary, NSNumber.
- Create your own. class (#import, interface , @implementation, private , public, protected, readonly , readwrite, setter, getter).
- Properties.
- Paradigms of OOP: inheritance, polymorphism, encapsulation.
- Categories.
- Patterns. MVC: Notification, delegate, outlet, target, sender.
- The life cycle of the View Controller.
- Delegation. Protocols (optinal, required).
- Blocks.
- Views, Gesture Recognizer.
- Multithreading (GCD), broadcaster KVO, UIAlertView, UIActionSheet.
- Singleton.
- Work with memory (retain, release, autorelease). ARC.
- Work with the network. Download data. Nscashe.
- JSON.
After studying this theory with the solutions of small tasks, I got a general idea of what a program is and how the process of programming something is arranged. It's time to return to the game and realize how realistic it is to make my plans a reality.
Game mechanics
As it turned out, thanks to the cocos engine, the game should be very easy to implement. We create the initial scene, add the main layer to it, which plays the role of the background, add pictures in the form of sprites, add menu items. We create a transition to another scene, and in the dealloc method, we reset all the objects used, because cocos2d does not support ARC, and so on ...
// Import the interfaces #import "HelloWorldLayerr.h" #import "CCTouchDispatcher.h" #import "CCAnimation.h" #import "SimpleAudioEngine.h" #import "LanguageOfGame.h" #import "LanguageOfGameUA.h" #import "LanguageOfGameRu.h" CCScene* scene; CCMenu* startMenu; // HelloWorldLayer implementation @implementation HelloWorldLayerr +(CCScene *) scene { // 'scene' is an autorelease object. scene = [CCScene node]; // 'layer' is an autorelease object. HelloWorldLayerr *layer = [HelloWorldLayerr node]; // add layer as a child to scene [scene addChild: layer]; // return the scene return scene; } // on "init" you need to initialize your instance -(id) init { if( (self=[super init])) { CGSize size = [[CCDirector sharedDirector] winSize]; // 16- [CCTexture2D setDefaultAlphaPixelFormat:kCCTexture2DPixelFormat_RGB565]; CCSprite* startPicture = [CCSprite spriteWithFile:@"startMenu.png"]; startPicture.scale = 0.5; startPicture.position = ccp(size.width/2, size.height/2); [self addChild: startPicture z:1]; CCLabelTTF *languageLabel = [CCLabelTTF labelWithString:@"Choose your language" fontName:@"AppleGothic" fontSize:30]; languageLabel.anchorPoint = CGPointMake(0, 0.5f); languageLabel.color = ccYELLOW; languageLabel.position = ccp(size.width*0.05, size.height*9/10); [self addChild:languageLabel z:2]; CCMenuItemFont* button1 = [CCMenuItemFont itemFromString:@"ENG" target:self selector:@selector(selector1:)]; button1.color = ccYELLOW; CCMenuItemFont* button2 = [CCMenuItemFont itemFromString:@"UA" target:self selector:@selector(selector2:)]; button2.color = ccYELLOW; CCMenuItemFont* button3 = [CCMenuItemFont itemFromString:@"RU" target:self selector:@selector(selector3:)]; button3.color = ccYELLOW; startMenu = [CCMenu menuWithItems:button1, button2,button3, nil]; button1.position = ccp(size.width/4, size.height*8/10); button2.position = ccp(size.width/4, size.height*6.5/10); button3.position = ccp(size.width/4, size.height*5/10); startMenu.position = CGPointZero; [self addChild:startMenu z:10]; } return self; } -(void)selector1:(id)sender{ CCTransitionRadialCCW *transition = [CCTransitionZoomFlipX transitionWithDuration:1.1 scene:[LanguageOfGame scene]]; [[CCDirector sharedDirector] replaceScene:transition]; } -(void)selector2:(id)sender{ CCTransitionRadialCCW *transition = [CCTransitionZoomFlipX transitionWithDuration:0.8 scene:[LanguageOfGameUA scene]]; [[CCDirector sharedDirector] replaceScene:transition]; } -(void)selector3:(id)sender{ CCTransitionRadialCCW *transition = [CCTransitionZoomFlipX transitionWithDuration:0.8 scene:[LanguageOfGameRu scene]]; [[CCDirector sharedDirector] replaceScene:transition]; } //on "dealloc" you need to release all your retained objects - (void) dealloc { [scene release]; [startMenu release]; [super dealloc]; } @end I will not litter an article about how I gradually added new fragments to the game, since there are already a ton of lessons on this topic on the Internet. I will consider only the funniest moments. For example, I wanted to, while touching the screen with my finger, a white train followed him, as if at that very moment my ghost was hovering invisible around the room. Fortunately, in the coconut, even in this case there is a method. Here is its implementation:
CCMotionStreak* streak; // -(void) ccTouchMoved:(UITouch *)touch withEvent:(UIEvent *)event{ NSLog(@"TouchesMoved"); CGPoint touchLocation = [self convertTouchToNodeSpace:touch]; CGPoint oldTouchLocation = [touch previousLocationInView:touch.view]; oldTouchLocation = [[CCDirector sharedDirector] convertToGL:oldTouchLocation]; oldTouchLocation = [self convertToNodeSpace:oldTouchLocation]; CGPoint changedPosition = ccpSub(touchLocation, oldTouchLocation); // [self moveMotionStreakToTouch:touch]; } -(void)moveMotionStreakToTouch:(UITouch*)touch{ CCMotionStreak* streak = [self getMotionStreak]; streak.position = [self locationFromTouch:touch]; } -(CGPoint)locationFromTouch:(UITouch*)touch{ CGPoint touchLocation = [touch locationInView:[touch view]]; return [[CCDirector sharedDirector] convertToGL:touchLocation]; } // -(CCMotionStreak*)getMotionStreak{ streak = [CCMotionStreak streakWithFade:0.99f minSeg:8 image:@"ghost01.png" width:22 length:48 color:ccc4(255, 255, 255, 180)]; [self addChild:streak z:5 tag:1]; CCNode* node = [self getChildByTag:1]; NSAssert([node isKindOfClass:[CCMotionStreak class]], @"not a CCMotionStreak"); return (CCMotionStreak*)node; } /* , CCMotionStreak */ -(void) ccTouchEnded:(NSSet *)touch withEvent:(UIEvent *)event{ NSLog(@"TouchesEnded"); selectedSprite = nil; streak = nil; } The logic of the game comes down to the fact that there is a simple "intovy" counter, which increases each time we scare our hero in the right sequence. To determine the desired sequence, you must think like a ghost. You can, of course, use the hint. If the counter value is lower than the required value, then no action can be taken on the object. In this case, when you click on this item, it slightly changes color, and this means that action on it may be available later.
When you touch the desired item in the room starts a chain of animation. I drew all the objects myself, so at least it turned out ugly, but I would like to mention the painstaking work of artists separately.
Animation
Animation in cocos2d can be of 2 types: sprite and frame by frame. Sprite animation is the easiest way to make a moving picture on the screen. We just set the trajectory of the action. Then the system does everything for us, driving each frame of the animation along a given cycle:
// -(void) nextFrame:(ccTime)dt{ bottle.positionInPixels = ccp(bottle.positionInPixels.x - 1, + bottle.positionInPixels.y); if (bottle.positionInPixels.x <= 49) { bottle.positionInPixels = ccp(bottle.positionInPixels.x + 1, + bottle.positionInPixels.y); } } -(void)moveTouchedObject:(CGPoint)changedPosition { if (selectedSprite == bottle) { [self nextFrame:5]; } } I also used the frame animation:
// CCSprite *crashBottle2 = [CCSprite spriteWithFile:@"crashBottle01.png"]; crashBottle2.scale = 0.5; [crashBottle2 setPosition:ccp(xOfBottle, yOfBottle)]; [self addChild:crashBottle2]; CCAnimation *cbot = [CCAnimation animation]; [cbot addFrameWithFilename:@"crashBottle00.png"]; [cbot addFrameWithFilename:@"crashBottle01.png"]; [cbot addFrameWithFilename:@"crashBottle02.png"]; [cbot addFrameWithFilename:@"crashBottle03.png"]; [cbot addFrameWithFilename:@"crashBottle04.png"]; [cbot addFrameWithFilename:@"crashBottle05.png"]; [cbot addFrameWithFilename:@"crashBottle06.png"]; [cbot addFrameWithFilename:@"crashBottle07.png"]; [cbot addFrameWithFilename:@"crashBottle08.png"]; [cbot addFrameWithFilename:@"crashBottle09.png"]; [cbot addFrameWithFilename:@"crashBottle10.png"]; [cbot addFrameWithFilename:@"crashBottle11.png"]; id animationAction = [CCAnimate actionWithDuration:0.2f animation:cbot restoreOriginalFrame:NO]; [crashBottle2 runAction:animationAction]; However, with this approach, the graphics adapter processes each image separately, which instantly affects performance. To animate the little man it was necessary to learn a new way - an atlas of textures.
First you had to draw the character in Photoshop entirely. After that, divide the image into body parts, and save as separate pictures. The next step is to download and install the program Sprite Helper PRO. With its help we create a skeleton animation with a length of 10 seconds, start the storyboard, and at the output we get 360 animation pictures. Next, using the Texture Packer program, we pound all the images into one huge canvas, from which OpenGL will cut out the pieces it needs. Texture Packer also creates us a .plist document, thanks to which you can quickly reach the characteristics of each individual fragment. Import the image and plist file into the folder Supported files in Xcode, write the code to start the animation:
CCSprite *manFrame1; CCAnimate *manCodding; CCRepeatForever* repeat; // -(void)manAnimation{ // - - CCSpriteBatchNode *manBatchNode; [[CCSpriteFrameCache sharedSpriteFrameCache] addSpriteFramesWithFile:@"man300N.plist"]; manBatchNode = [CCSpriteBatchNode batchNodeWithFile:@"man300N.png"]; [self addChild:manBatchNode]; CCSpriteBatchNode *manBatchNode2; [[CCSpriteFrameCache sharedSpriteFrameCache] addSpriteFramesWithFile:@"man359N.plist"]; manBatchNode2 = [CCSpriteBatchNode batchNodeWithFile:@"man359N.png"]; [self addChild:manBatchNode2]; manFrame1 = [CCSprite spriteWithSpriteFrameName:@"UntitledAnimation_0.png"]; manFrame1.position = ccp(size.width*0.4187,size.height*0.4281); [self addChild:manFrame1 z:30]; // NSString* fullFileName = @"man1Anim.plist"; NSString* rootPath = [NSSearchPathForDirectoriesInDomains(NSDocumentDirectory, NSUserDomainMask, YES) objectAtIndex:0]; NSString* plistPath = [rootPath stringByAppendingPathComponent:fullFileName]; if (![[NSFileManager defaultManager] fileExistsAtPath:plistPath]) { plistPath = [[NSBundle mainBundle] pathForResource:@"man1Anim" ofType:@"plist"]; } NSDictionary* animSettings = [NSDictionary dictionaryWithContentsOfFile:plistPath]; if (animSettings == nil){ NSLog(@"error reading plist"); } NSDictionary* animSettings2 = [animSettings objectForKey:@"man1Anim"]; float animationDelay = [[animSettings2 objectForKey:@"delay"] floatValue]; CCAnimation * animToReturn = [CCAnimation animation]; [animToReturn setDelay:animationDelay]; NSString* animationFramePrefix = [animSettings2 objectForKey:@"namePrefix"]; NSString* animationFrames = [animSettings2 objectForKey:@"animationFrames"]; NSArray* animFrameNumbers = [animationFrames componentsSeparatedByString:@","]; for (NSString* frameNumber in animFrameNumbers) { NSString* frameName = [NSString stringWithFormat:@"%@%@.png", animationFramePrefix, frameNumber]; [animToReturn addFrame:[[CCSpriteFrameCache sharedSpriteFrameCache] spriteFrameByName:frameName]]; } manCodding = [CCAnimate actionWithAnimation:animToReturn]; repeat = [CCRepeatForever actionWithAction:manCodding]; [manFrame1 runAction:repeat]; } As a result, we get the correct animation of 360 consecutive frames. What a pleasure after all to observe how the character pulls a cute leg!
After writing the game, and eliminating all the "varnings", it took about a month to fix all sorts of bugs. I also had to run after people with newer Macs and iPhones to transfer my program from the 4th Xcode to the 6th, and run it “live” on the iphone device.
In order for the application to be displayed on the 4th and 6th iphone equally without the eerie black rectangles, it is also necessary to properly set the background images. There are many solutions to this problem on the Internet (for example, http://www.raywenderlich.com/33525/how-to-build-a-monkey-jump-game-using-cocos2d-2-x-physicseditor-texturepacker-part- 1 ), but they are all unnecessarily complex. Just create another background image with the size of 1136x640 and, at the beginning of the main init method, set the condition:
-(id) init { if( (self=[super init])) { size = [[CCDirector sharedDirector] winSize]; if (size.width > 500) { CCSprite* walls = [CCSprite spriteWithFile:@"walls.png"]; walls.position = ccp(size.width/2, size.height/2); walls.scale = 0.5; [self addChild:walls z:-10]; size.width = [CCDirector sharedDirector].winSize.width - 87; } … } Conclusion
The code of the main game scene fit 1300 lines. The application is designed as a demo-version with one level, because an artist is needed for a full-fledged product: almost the entire game is tied to visual effects.
But, despite the design flaws in the application, I implemented all the functions that I planned at the very beginning. The game does not hang and do not crash. And I really could enjoy the study of a new field of science. As a first programming language, Objective-C seemed to me quite comfortable and intuitively reasonable.
I hope this article will push on new thoughts and solutions, both novice programmers and experienced gurus who could develop my idea many times better.
At the moment, the application is pending publication in the Apple Store. When it passes the test, I will drop the link in the comments. In the meantime, you can watch a video of what happened.
Source: https://habr.com/ru/post/266595/
All Articles