Expand the Ghost blog in InfoboxCloud
The main and only goal of Ghost is to create the perfect blog. If Wordpress has long ceased to be just blogs and turned into a full-fledged CMS, then Ghost is the complete opposition of Wordpress. This is just a blog.

In this article we will look at the process of installing Ghost in InfoboxCloud using Docker.
')
Using Docker makes it very easy to deploy applications in environments tested by developers, and easily migrate between servers if necessary. Together with autoscaling in the cloud, you can achieve a very high density of applications on the server and the most efficient use of resources.
By expanding Ghost this way you have much more control over your blog than when using Ghost as a service.
1. Create a server with CentOS 7 to install Docker in InfoboxCloud . A virtual machine is now needed for Docker to work, so when creating a server, be sure to check the “Allow OS kernel management” box.
After creating a server with CentOS 7, connect to it via SSH .
We have prepared a script that will allow you to install Docker and useful utilities for working with Docker on such a server. The necessary settings will be made automatically.
Run the command to install Docker and Compose:
Docker and compose will be installed.
You can create an image with the docker installed in the control panel by clicking on the server and then “Create an image”. After that, it will be possible to create new servers from the Docker image and not to perform this step again.
Create a folder in which your blog files will be stored:
where instead of sitename you can write your blog address.
Create a file ~ / sitename / docker-compose.yml with the following content:
where instead of sitename you can also specify the name of your site.
In this file, we indicate that you need to build the docker container from the official ghost image of the latest version, forward the internal port 2368 to the public 80, always restart the container in case of services in it and write the blog database files to the blog folder (so that lose data).
If before the Ghost you need to put a balancer - an example of creating linked containers with a balancer can be seen in this article .
If you don’t know how to edit a file, see the details in this article in the “How to Edit a Text File” section.
If you are interested in dealing with Docker Compose, see the details here .
Save the file ~ / sitename / docker-compose.yml and run the command:
You can now log in to your blog at:
Ghost has been successfully installed.

We will need to make some more settings of the blog itself.
Open the file ~ / sitename / blog / config.js for editing. There are various sections in it, we are interested in the development section. All settings we will change only in it, without touching the others.

Although Ghost supports the launch options for “Development” and “Production”, the default Docker template runs a blog in the Development configuration. It only says that the Development section in the config.js file is used. Ghost itself is already installed in the Production configuration without unnecessary dependencies and is suitable for use in production. Let it not bother you that we are editing the development configuration section. With the advent of Docker, it’s much easier to develop a separate container for development, rather than setting up multiple configurations in Ghost itself.
Our blog will probably be located in a domain or subdomain. In DNS, send the A record of the required domain (for example, blog.frodo.com) to the public ip – address of the server that we created for Docker. The public ip – address is the one you connected to via SSH.
In the ~ / sitename / blog / config.js file in the development section, set in url the address of your domain that will be used for the blog.

Now we need to configure the ability to send email blog.
It is recommended to use Mailgun for sending letters. Register in the service. After that, go to the “Domains” section in the Mailgun control panel, add your domain. Next, you will need to add additional records in the DNS domain, which will be reported by the service. After completing the verification of the domain, you will receive a login and password from the email in it. It can be used for a blog. The mail section in the config.js for Mailgun should look like this:
Be sure to include your username and password from Mailgun.
Notice that we deleted the comment characters // before each line of the config.js mail section.
Save the changes. Now we need to restart our container for the changes to take effect.
To view all running containers, run the command:
You can see the id – container, as shown in the screenshot below:

Reload the container by id:
where e3acf62e49b4 replace the id of your container.
Your blog is now set up successfully!
Log into the Ghost admin panel at:
Click “Create your account” to create an account in Ghost.

Enter the data to register an account and click "LAST STEP: Invite your team".

In the last step, you can invite the team to edit the blog, or simply click "I'll do this later" under the button "Invite".

Now you can start writing articles.

Send us your email address and full name, in return you will receive information to access the control panel. You can test the new cloud region for 15 days, then you can go to the full version of the cloud.
If you have questions or comments, write to us and we will be happy to answer.
Successful use of Ghost in InfoboxCloud!
In this article we will look at the process of installing Ghost in InfoboxCloud using Docker.
')
Using Docker makes it very easy to deploy applications in environments tested by developers, and easily migrate between servers if necessary. Together with autoscaling in the cloud, you can achieve a very high density of applications on the server and the most efficient use of resources.
By expanding Ghost this way you have much more control over your blog than when using Ghost as a service.
Environment preparation
1. Create a server with CentOS 7 to install Docker in InfoboxCloud . A virtual machine is now needed for Docker to work, so when creating a server, be sure to check the “Allow OS kernel management” box.
How to create a server in InfoboxCloud for Docker
If you do not have access to InfoboxCloud - order it .
After registration, you will receive data to access the control panel by email. Enter the control panel at: https://panel.infobox.ru
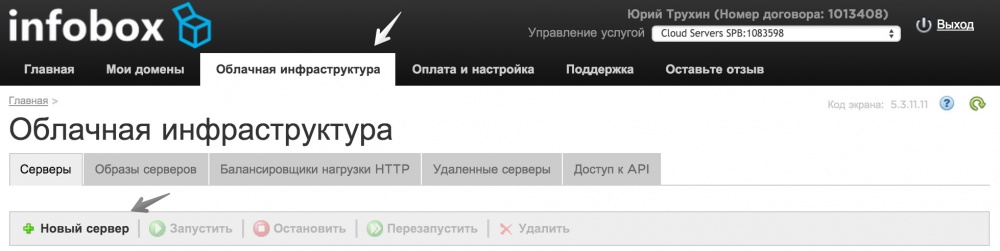
In the “Cloud Infrastructure” section of your subscription, click “New Server” (if necessary, the subscription changes in the upper right corner in the drop-down menu).
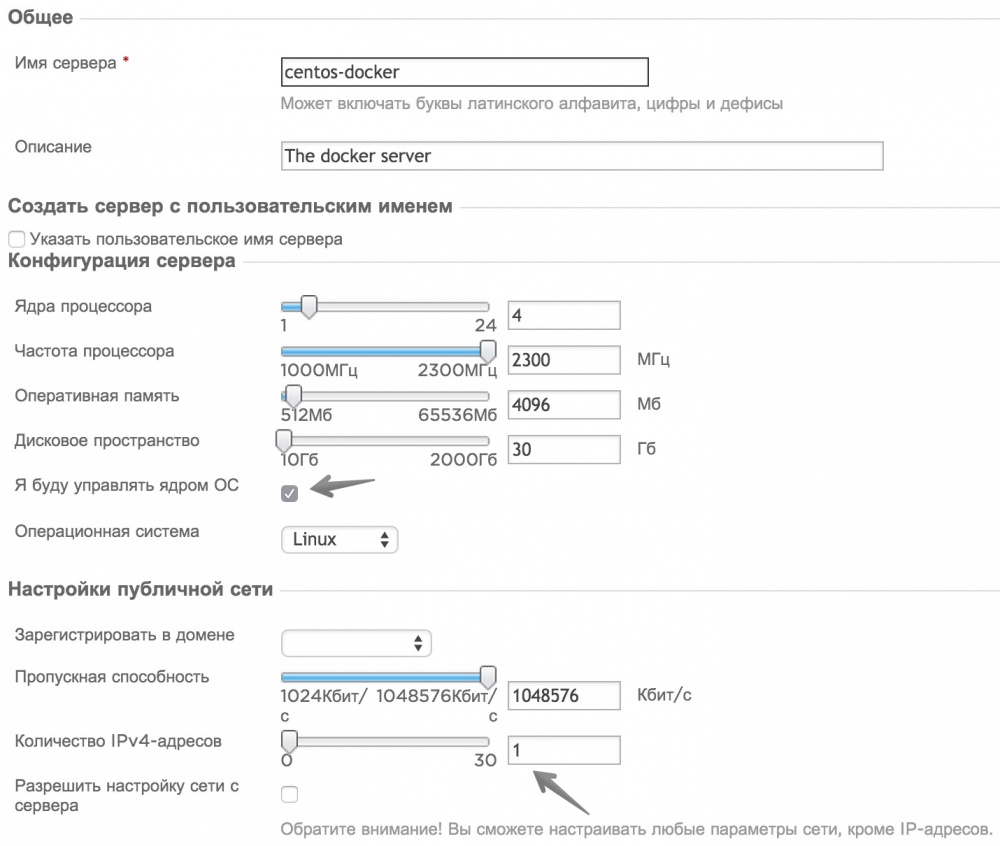
Set the required server parameters. Be sure to allocate a public IP address to the server and check the box “Allow OS kernel management” , as shown in the screenshot below.
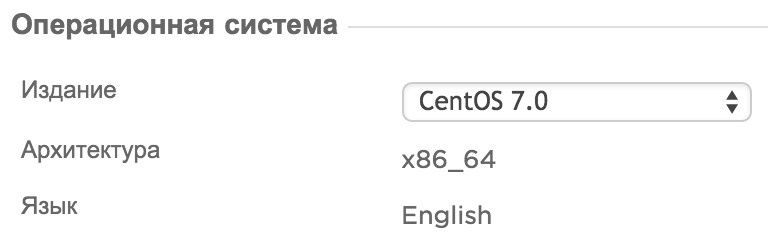
In the list of available operating systems, select CentOS 7 and complete server creation.
After that, the data to access the server will come to your email.
After registration, you will receive data to access the control panel by email. Enter the control panel at: https://panel.infobox.ru
In the “Cloud Infrastructure” section of your subscription, click “New Server” (if necessary, the subscription changes in the upper right corner in the drop-down menu).
Set the required server parameters. Be sure to allocate a public IP address to the server and check the box “Allow OS kernel management” , as shown in the screenshot below.
In the list of available operating systems, select CentOS 7 and complete server creation.
After that, the data to access the server will come to your email.
After creating a server with CentOS 7, connect to it via SSH .
We have prepared a script that will allow you to install Docker and useful utilities for working with Docker on such a server. The necessary settings will be made automatically.
Run the command to install Docker and Compose:
bash <(curl -s http://repository.sandbox.infoboxcloud.ru/scripts/docker/centos7/install.sh) Docker and compose will be installed.
You can create an image with the docker installed in the control panel by clicking on the server and then “Create an image”. After that, it will be possible to create new servers from the Docker image and not to perform this step again.
Install Ghost
Create a folder in which your blog files will be stored:
mkdir -p ~/sitename/blog where instead of sitename you can write your blog address.
Create a file ~ / sitename / docker-compose.yml with the following content:
sitename: image: ghost:latest ports: - 80:2368 restart: always volumes: - ./blog:/var/lib/ghost where instead of sitename you can also specify the name of your site.
In this file, we indicate that you need to build the docker container from the official ghost image of the latest version, forward the internal port 2368 to the public 80, always restart the container in case of services in it and write the blog database files to the blog folder (so that lose data).
If before the Ghost you need to put a balancer - an example of creating linked containers with a balancer can be seen in this article .
If you don’t know how to edit a file, see the details in this article in the “How to Edit a Text File” section.
If you are interested in dealing with Docker Compose, see the details here .
Save the file ~ / sitename / docker-compose.yml and run the command:
docker-compose up -d to deploy a container with ghost.You can now log in to your blog at:
http://ip– Ghost has been successfully installed.
Initial blog setup
We will need to make some more settings of the blog itself.
Open the file ~ / sitename / blog / config.js for editing. There are various sections in it, we are interested in the development section. All settings we will change only in it, without touching the others.
Although Ghost supports the launch options for “Development” and “Production”, the default Docker template runs a blog in the Development configuration. It only says that the Development section in the config.js file is used. Ghost itself is already installed in the Production configuration without unnecessary dependencies and is suitable for use in production. Let it not bother you that we are editing the development configuration section. With the advent of Docker, it’s much easier to develop a separate container for development, rather than setting up multiple configurations in Ghost itself.
Our blog will probably be located in a domain or subdomain. In DNS, send the A record of the required domain (for example, blog.frodo.com) to the public ip – address of the server that we created for Docker. The public ip – address is the one you connected to via SSH.
In the ~ / sitename / blog / config.js file in the development section, set in url the address of your domain that will be used for the blog.
Now we need to configure the ability to send email blog.
It is recommended to use Mailgun for sending letters. Register in the service. After that, go to the “Domains” section in the Mailgun control panel, add your domain. Next, you will need to add additional records in the DNS domain, which will be reported by the service. After completing the verification of the domain, you will receive a login and password from the email in it. It can be used for a blog. The mail section in the config.js for Mailgun should look like this:
mail: { transport: 'SMTP', options: { service: 'Mailgun', auth: { user: ' ', pass: ' ' } } } Be sure to include your username and password from Mailgun.
Notice that we deleted the comment characters // before each line of the config.js mail section.
Save the changes. Now we need to restart our container for the changes to take effect.
To view all running containers, run the command:
docker ps You can see the id – container, as shown in the screenshot below:
Reload the container by id:
docker restart e3acf62e49b4 where e3acf62e49b4 replace the id of your container.
Your blog is now set up successfully!
Use Ghost
Log into the Ghost admin panel at:
http://ip–-/ghost Click “Create your account” to create an account in Ghost.
Enter the data to register an account and click "LAST STEP: Invite your team".
In the last step, you can invite the team to edit the blog, or simply click "I'll do this later" under the button "Invite".
Now you can start writing articles.
How to get a trial version of InfoboxCloud for free?
Send us your email address and full name, in return you will receive information to access the control panel. You can test the new cloud region for 15 days, then you can go to the full version of the cloud.
If you have questions or comments, write to us and we will be happy to answer.
Successful use of Ghost in InfoboxCloud!
Source: https://habr.com/ru/post/266567/
All Articles