As I wrote a guitar tuner under iOs on Swift. And also a little about DSP, standing waves and how to achieve an accuracy of ± 0.1 Hz
 In this article I will talk about how I had the idea to write my tuner and what it led to. I will also share my modest knowledge in the field of DSP (digital signal processing) obtained in the university, and how they helped me solve some problems. And of course, I’ll share the source code and programming experience on Swift that I received during the implementation of this project.
Prehistory
I had an idea to write my own tuner for a guitar a long time ago, about 10 years ago when I was at university. There are several reasons for this:
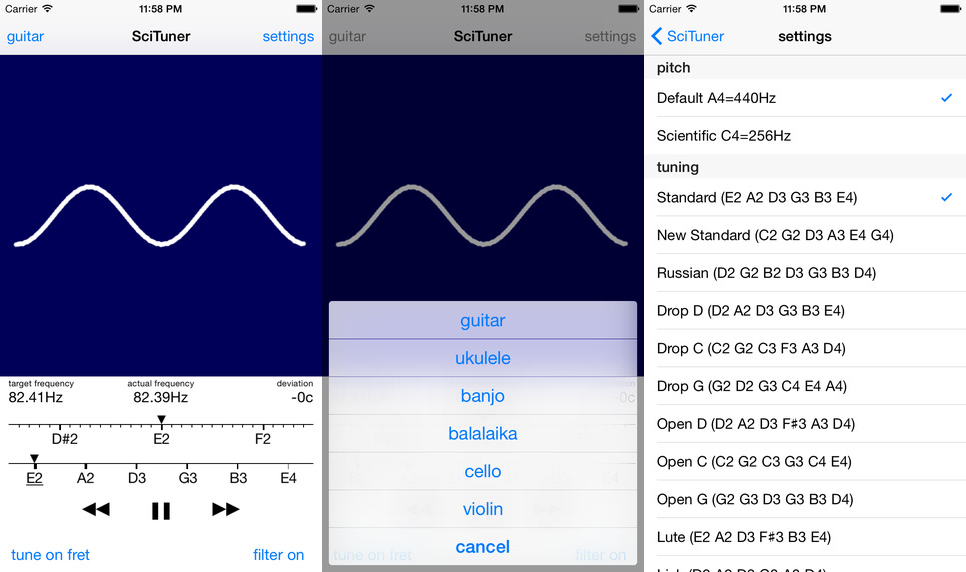
- Firstly, there are not so many really high-quality tuner programs - some simply incorrectly determine the frequency, or work extremely unstable on the upper strings. In addition, all the tuners that I came across are à priori tuned to A440 (when the first octave is tuned to 440 Hz). But there is also a setting on the C256 ( before the first octave it is tuned to 256 Hz). Many tuners do not allow tuning in frets, although if you need to play for 5-7 frets, it is better to tune the instrument in the same frets.
- Secondly, the visualization of the settings in the form of a slider, spectrum or frequency waveform, in my opinion, is not a bit physical. I wanted to show how the wave generated by the instrument itself looks like - how clean it is, or vice versa distorted. Make the visualization clear and responsive.
- Thirdly, I wanted to apply my knowledge in the field of DSP, obtained in the university, for the benefit of mankind.
In general, the idea has been sitting in my head for a long time, but it only came true this year, as I finally had free time, an iOs device and some experience in mobile development.
Some theory
Anyone who is somewhat familiar with European stringed instruments knows that each string is tuned to a certain note, and a certain frequency corresponds to this note. The difference between a note and a frequency is that each note carries a certain musical function. And this function is determined by the position of the note relative to other notes, for example, the note up in the C major sequence plays the role of a tonic , i.e. the main and most sustainable sound. If this note moves a little, it will lose its function. In order for the extracted sounds to correspond to the notes, it is necessary to observe a strict correspondence between the intervals of notes and the ratio of frequencies. From the accuracy and stability of the frequency generated by the string will depend on the correspondence of the extracted sound to the function that was laid in the note.
')
What is the sound generated by the string? If we use the ADSR model proposed by the American researcher and composer Vladimir Usachevsky for the first synthesizers, the string sound is a harmonic oscillation modulated by some envelope. This envelope is called ADSR, because it has four characteristic points: attack ( eng. attack ), decline ( eng. decay ), sustain ( eng. sustain ) and attenuation ( eng. release ).
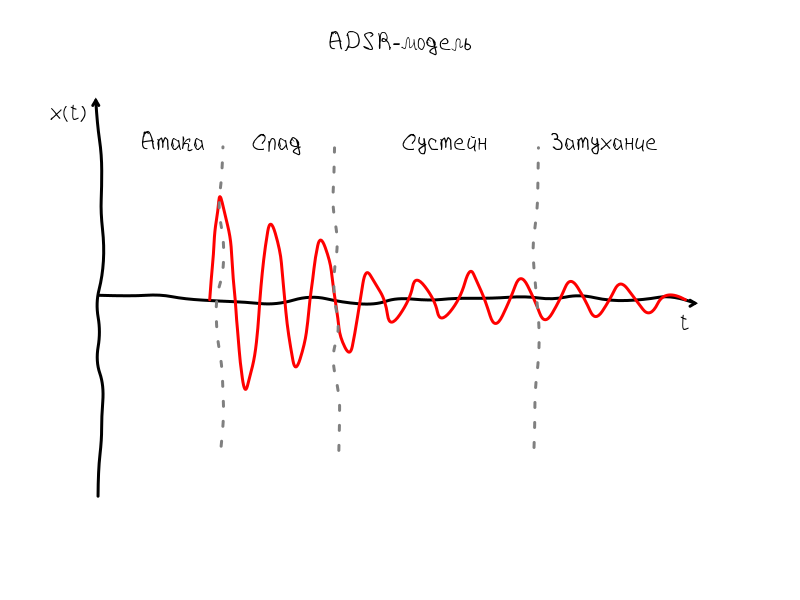
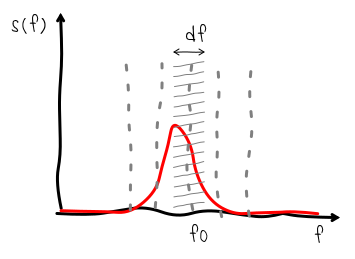
The sustain interval most clearly conveys the frequency, because fluctuations occur with little or no amplitude change. If the guitar produced a perfect monoharmonic sound, then, taking into account the ADSR-envelope, the spectrum of such oscillations would look like a narrow strip. The shape of this strip would correspond to the spectrum of the envelope:

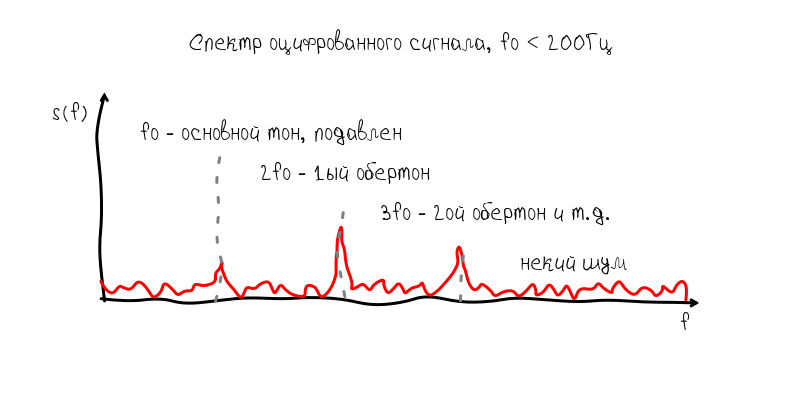
But the real instrument generates non-linear oscillatory processes, as a result of which additional harmonics appear, which are called overtones.
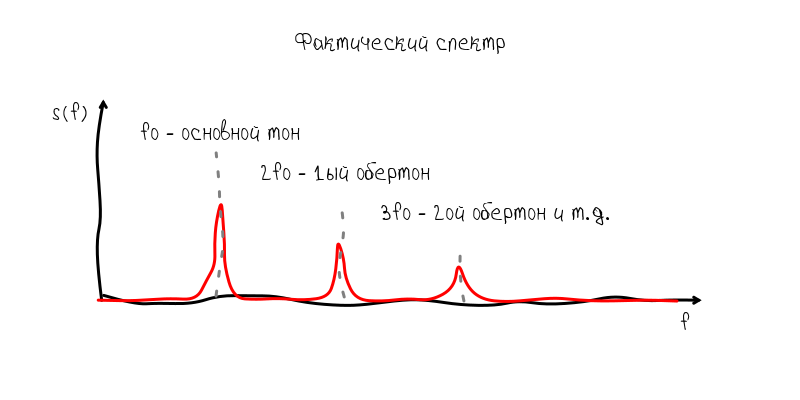
These overtones are quite treacherous companions, because they can prevail over the main tone and interfere with the frequency determination. But all the same, usually the basic tone is well defined without additional manipulations.
So, on the basis of these views, you can outline the path by which the program should work:
- Calculate the Fourier transform of the sound wave
- Find the main tone on the spectrum
- Calculate the pitch frequency
About standing waves
Typically, the sound on the graph is represented as a sweep in time. At the zero point on the abscissa axis is the value at the initial moment of observation, then, respectively, the values that will be observed after 1 s, 2 s, etc. The measurement process in this case can be represented by an imaginary frame that moves uniformly left to right. This frame can be called differently: observation window ( English observation window ), observation interval ( English observation interval ), time window ( English time window ) - all these terms mean about the same thing.
So, the frame allows us to understand how the measurement process takes place and which moments are at the beginning of the frame, and which are at the end. Based on this, we can imagine what will happen if we compare the coordinate system with the frame - we will have a feeling that the sound wave appears in the right part of the graph and disappears in the left. Such a wave is called traveling:
But such a representation of the sound wave is not informative, because the wave can move very, very fast. Our task is to somehow stop the wave. In order for the wave to stop, it is necessary that its speed be equal to 0. And since Since the wave has two speeds: phase and group, then you can get two types of standing waves:
A standing wave whose group velocity is equal to zero is characterized by the fact that its envelope always remains in one place. But at the same time the oscillations do not stop - the zeros and humps continue to move along the abscissa axis. Obviously, such a wave does not suit us, since Of interest is what happens inside the ADSR envelope, namely at the moment when we observe oscillations in the sustain mode.
For this, there is another type of standing wave whose phase velocity is zero:
The zero phase velocity ensures that the knots and humps always stay in one place, so we can easily make out the shape of the harmonic oscillation and assess how close it is to the ideal sinusoidal shape. The algorithm for obtaining such a wave is obvious:
- Find Phase Phase
- Shift the displayed wave by the magnitude of the phase
Implementation
Microphone recording
In fact, Apple provides many high-level capabilities for working with multimedia from Objective-C / Swift. But in essence, now work with sound revolves around Audio Queue Services:
Audio Queue Services provides you with features such as synchronization. The Sound Manager is deprecated in OS X v10.5 and does not work with 64-bit applications. Audio apps in existing Mac apps.
a source
But unlike SoundManager, which was a fairly high-level solution, Audio Queue Services are clumsy wrappers that simply repeat the Swift C code:
func AudioQueueNewInput(_ inFormat: UnsafePointer<AudioStreamBasicDescription>, _ inCallbackProc: AudioQueueInputCallback, _ inUserData: UnsafeMutablePointer<Void>, _ inCallbackRunLoop: CFRunLoop!, _ inCallbackRunLoopMode: CFString!, _ inFlags: UInt32, _ outAQ: UnsafeMutablePointer<AudioQueueRef>) -> OSStatus There is no profit from the low-level code in Swift, so I left the capture of the sound to the auxiliary C-code. If you omit the secondary code to manage the buffers, then the recording setup consists in initializing the AQRecorderState structure using the AudioQueueNewInput function:
void AQRecorderState_init(struct AQRecorderState* aq, double sampleRate, size_t count){ aq->mDataFormat.mFormatID = kAudioFormatLinearPCM; aq->mDataFormat.mFormatFlags = kLinearPCMFormatFlagIsPacked | kLinearPCMFormatFlagIsSignedInteger; aq->mDataFormat.mSampleRate = sampleRate; aq->mDataFormat.mChannelsPerFrame = 1; aq->mDataFormat.mBitsPerChannel = 16; aq->mDataFormat.mFramesPerPacket = 1; aq->mDataFormat.mBytesPerPacket = 2;// for linear pcm aq->mDataFormat.mBytesPerFrame = 2; AudioQueueNewInput(&aq->mDataFormat, HandleInputBuffer, aq, NULL, kCFRunLoopCommonModes, 0, &aq->mQueue); DeriveBufferSize(aq->mQueue, &aq->mDataFormat, (double)count / sampleRate, // seconds &aq->bufferByteSize); for (int i = 0; i < kNumberBuffers; ++i) { AudioQueueAllocateBuffer(aq->mQueue, aq->bufferByteSize, &aq->mBuffers[i]); AudioQueueEnqueueBuffer(aq->mQueue, aq->mBuffers[i], 0, NULL); } aq->mCurrentPacket = 0; aq->mIsRunning = true; aq->buffer = Buffer_new(32768); aq->preview_buffer = Buffer_new(5000); AudioQueueStart(aq->mQueue, NULL); } Data writing occurs through the function HandleInputBuffer. Calls Buffer_write_ints converts data from int to float and stores it in a buffer for further processing.
static void HandleInputBuffer ( void *aqData, AudioQueueRef inAQ, AudioQueueBufferRef inBuffer, const AudioTimeStamp *inStartTime, UInt32 inNumPackets, const AudioStreamPacketDescription *inPacketDesc ) { struct AQRecorderState* pAqData = (struct AQRecorderState*)aqData; if(inNumPackets == 0 && pAqData->mDataFormat.mBytesPerPacket != 0) inNumPackets = inBuffer->mAudioDataByteSize / pAqData->mDataFormat.mBytesPerPacket; const SInt16* data = inBuffer->mAudioData; Buffer_write_ints(pAqData->buffer, data, inNumPackets); Buffer_write_ints(pAqData->preview_buffer, data, inNumPackets); if (pAqData->mIsRunning == 0) return; AudioQueueEnqueueBuffer(pAqData->mQueue, inBuffer, 0, NULL); } Performance and Swift problems
Initially, the idea was to use 100% Swift language. In general, I did this, rewrote all the code in Swift, with the exception of FFT, for which the implementation from the Accelerate library was used. But oddly enough, the version on Swift produced a huge load in the region of 95% of processor time and a delay in signal processing which led to horribly slow rendering.
In this form, of course, the application was not suitable for use, so I had to completely transfer all signal processing to the Accelerate library. But even after that, the load still remained high. I had to transfer to C and those operations with arrays that required only one pass, i.e. linear execution time. For illustration, I will give an identical code on Swift and C:
class Processing{ ... func getFrequency() -> Double { var peak: Double = 0 var peakFrequency: Double = 0 for i in 1..<spectrum.count/2 { var spectrumValue: Double = p->spectrum[i] var f: Double = fd * i / spectrum.count if (spectrumValue > peak) { peak = spectrum[i] peakFrequency = f } } return peakFrequency } } double get_frequency(p* processing){ double peak = 0; double peakFrequency = 0; for(size_t i = 1; i < p.spectrumLength / 2; i ++){ double spectrumValue = p->spectrum[i]; double f = p->fd * i / p->spectrumLength; if (spectrumValue > peak) { peak = spectrum; peakFrequency = f; } } return peakFrequency; } In general, even a trivial pass through the array, if it is done in a loop with a frequency of 20 calls per second, could load the device quite heavily.
Perhaps it was the problem of the first version of Swift, but in the end I had to completely eliminate everything from Swift that produced element-wise operations. So in Swift there was only responsible for creating arrays, transfer to auxiliary libraries written in C, as well as the rendering code on OpenGL ES 2.
But was Swift good? Of course, with regard to high-level tasks, Swift copes with this perfectly. Writing code is much more pleasant, modern syntax does not require constant semicolons, a lot of intuitive and useful syntax sugar. So, despite the fact that the use of Swift has created some problems, in general, the language seemed quite pleasant.
Microphone sensitivity problem
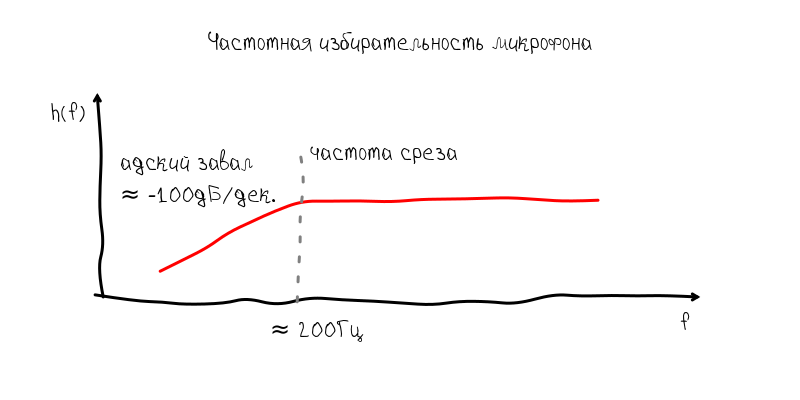
So, rewriting part of the code in C, it seemed that the moment when I could tune my guitar was about to come. But then another trouble arose about which I had not thought at all. The microphone on the iPhone horribly cut the low-frequency part of the spectrum. Of course, I assumed that the microphones in smartphones are not perfect, but everything turned out to be much worse. the dam began at 200 Hz.
As for the tuning of the guitar, such a block of frequency response makes it impossible to tune the sixth string, since It has a frequency of approximately 80 Hz. With this attenuation, the fundamental tone begins to sink in harmonics with a frequency of 160 Hz, 240 Hz, etc.
I immediately identified two possible ways to solve this problem:
- if the base frequency has a twin with a frequency of 0.5, then this should indicate that the base tone is muffled and the resulting frequency should be adjusted to be 1 / 2f
- enable the user to suppress the overtones of the low-pass filter, which will cut off the frequency slightly larger than the tone of the string
The first option seemed more interesting, because did not require additional effort from the user. However, he turned out to be not completely wealthy, since led to many bad situations. For example, the fundamental frequency is sometimes cut with a microphone so strongly that it was at the level of 1-2% of its first harmonic. In addition, because Because the guitar resonator is a very non-linear device, the situation often arose when the second and third, and even fourth harmonics began to compete with each other in amplitude. This led to the fact that the tone was captured four times higher than the main one.
In principle, these problems could be solved programmatically. The main disappointment was due to the fact that the harmonics in the guitar are very much walking, so tuning them will not provide an accuracy of ± 0.1 Hz. This is probably due to the fact that the main tone is set by the string with a fairly stable frequency, on the contrary, the harmonics are supported mainly due to oscillations in the guitar body and may deviate by several Hertz during the string's sound.
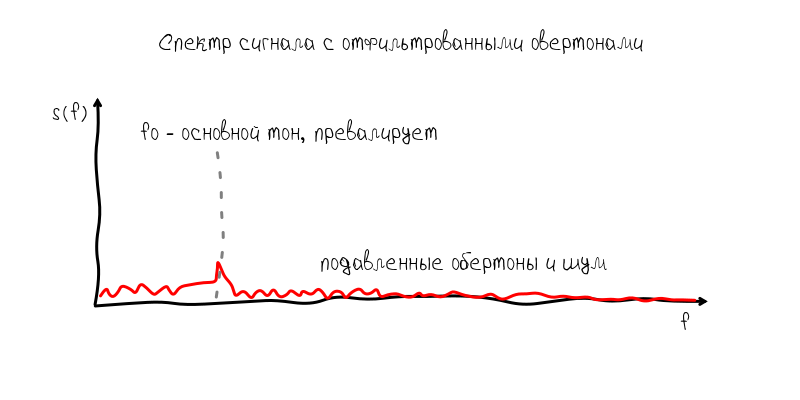
Therefore, the first solution had to be abandoned for the sake of a more predictable and less convenient one. So, the low-pass filter has approximately the following frequency response:
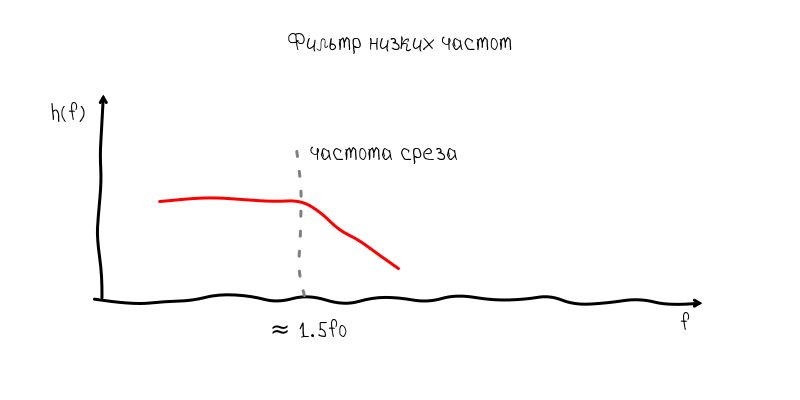
The blockage to the right of the cutoff frequency suppresses overtones, so that the main tone again becomes prevalent. The price paid for this is a general decrease in the signal-to-noise ratio and, as a consequence, a slight decrease in accuracy, but within the limits of the permissible.
Accuracy vs speed
In digital signal processing, the task of selecting the size of the observation window always emerges. A large observation window allows you to collect more information, make an accurate and stable assessment of signal parameters. On the other hand, this creates a number of problems due to the fact that it is necessary to store and process a larger number of samples at a time, plus it causes a proportional delay in signal processing.
In turn, Accelerate allows you to calculate the spectrum of sequences not exceeding 32768 samples. But such a number of readings means that the frequency grid step in the spectrum is approximately equal to 1.35 Hz. On the one hand, this is a permissible value when it comes to for example the first octave with a frequency of 440 Hz, i.e. notes which is obtained on the open first string (the thinnest). But on the sixth string, such an error is fatal, since between mi big octaves and, for example, re big octaves of only 3 Hz. Those. An error of 1.35 Hz is a half-tone error.
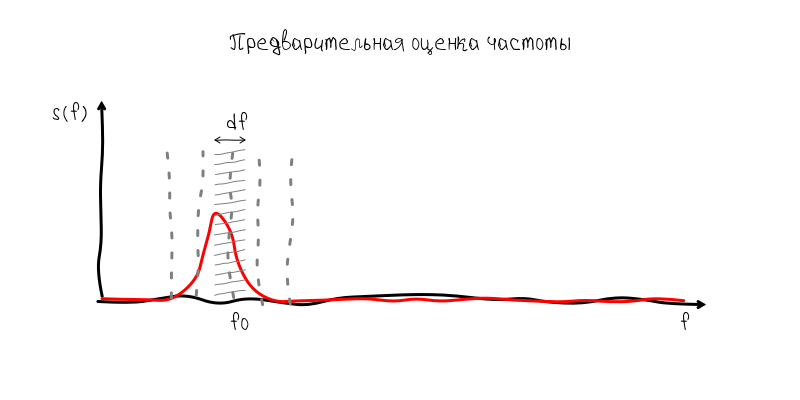
Nevertheless, the solution to this problem is quite simple, but it also demonstrates the full power of time-frequency analysis. Since there is no possibility to accumulate a few seconds of the signal, then we can accumulate the value of the spectrum at the frequency of the fundamental tone with repeated Fourier transform. Mathematically, the result will be equivalent to processing a 1.35 Hz filter at the pitch frequency. Having only 16 complex samples, we can increase the accuracy of the result by 16 times, i.e. up to about 0.08 Hz, which is slightly more accurate ± 0.1 Hz.

In other words, having no information about the pitch value, we would have to increase the time window to 5 s and get 163840 samples to get an accuracy of ± 0.1 Hz. But since with a time window of 0.743 s, we can already make a frequency estimate with an accuracy of 1.35 Hz, then for a more accurate estimate, it is enough to accumulate samples from an extremely narrow band with a sampling rate of 2.7 Hz. For this purpose, 2.7 Hz * 5 s = 13.75 complex counts are enough (or 16 if rounded and taken with a margin).
Comparison of notes and frequencies
This task is quite easily solved on Swift. I created a special Tuner class in which I brought all the information about the supported tools and matching rules. All these calculations are based on the two formulas "baseFrequency * pow (2.0, (n - b) / 12.0)" and "12.0 * log (f / baseFrequency) / log (2) + b",
where baseFrequency is the base frequency of 440 Hz or 256 Hz, b is the note number in integers, ranging from to subcontracted .
The code turned out quite Chinese:
class Tuner { ... init(){ addInstrument("guitar", [ ("Standard", "e2 a2 d3 g3 b3 e4"), ("New Standard", "c2 g2 d3 a3 e4 g4"), ("Russian", "d2 g2 b2 d3 g3 b3 d4"), ("Drop D", "d2 a2 d3 g3 b3 e4"), ("Drop C", "c2 g2 c3 f3 a3 d4"), ("Drop G", "g2 d2 g3 c4 e4 a4"), ("Open D", "d2 a2 d3 f#3 a3 d4"), ("Open C", "c2 g2 c3 g3 c4 e4"), ("Open G", "g2 g3 d3 g3 b3 d4"), ("Lute", "e2 a2 d3 f#3 b3 e4"), ("Irish", "d2 a2 d3 g3 a3 d4") ]) ... } ... func noteNumber(noteString: String) -> Int { var note = noteString.lowercaseString var number = 0 var octave = 0 if note.hasPrefix("c") { number = 0; } if note.hasPrefix("c#") { number = 1; } ... if note.hasPrefix("b") { number = 11; } if note.hasSuffix("0") { octave = 0; } if note.hasSuffix("1") { octave = 1; } ... if note.hasPrefix("8") { octave = 8; } return 12 * octave + number } func noteString(num: Double) -> String { var noteOctave: Int = Int(num / 12) var noteShift: Int = Int(num % 12) var result = "" switch noteShift { case 0: result += "c" case 1: result += "c#" ... default: result += "" } return result + String(noteOctave) } func noteFrequency(noteString: String) -> Double { var n = noteNumber(noteString) var b = noteNumber(baseNote) return baseFrequency * pow(2.0, Double(n - b) / 12.0); } func frequencyNumber(f: Double) -> Double { var b = noteNumber(baseNote); return 12.0 * log(f / baseFrequency) / log(2) + Double(b); } func frequencyDistanceNumber(f0: Double, _ f1: Double) -> Double { var n0 = frequencyNumber(f0) var n1 = frequencyNumber(f1) return n1 - n0; } func targetFrequency() -> Double { return noteFrequency(string) * fretScale() } func actualFrequency() -> Double { return frequency * fretScale() } func frequencyDeviation() -> Double { return 100.0 * frequencyDistanceNumber(noteFrequency(string), frequency) } } Standing wave visualization
As for the standing wave, which allows you to see the shape of the sound wave of the instrument, then, as I already wrote, the algorithm is absolutely trivial - the found wave frequency is calculated and the phase is estimated, and then the shift is made by the found value. Data is taken from the auxiliary preview buffer, which, unlike the main one, does not accumulate. Those. works according to the “ tumbling window ” algorithm:
double waveLength = p->fd / f; size_t index = p->previewLength - waveLength * 2; double* src = &p->preview[index]; // double re = 0; double im = 0; for (size_t i = 0; i < waveLength*2; i++) { double t = (double)2.0 * M_PI * i / waveLength; re += src[i] * cos(t); im += src[i] * sin(t); } double phase = get_phase(re, im); // double shift = waveLength * phase / (2.0 * M_PI); // // double* shiftedSrc = &p->preview[index - (size_t)(waveLength - shift) - (size_t)waveLength]; Appearance
I made the appearance and navigation based on the built-in player, but instead of switching on the tracks, switching on the strings takes place:
Conclusion
All the way to develop an application on Swift / C took about two months. The application was quite difficult to implement. Firstly, the performance of smartphones still leaves much to be desired and solutions "in the forehead" in the high-level language are absolutely unsuitable for domestic use by users. Secondly, the topic of sound processing is terribly unpopular with developers for iOs, so information has to be collected bit by bit. Although this concerns, probably, any topic not related to UI when developing for mobile applications. Thirdly, although Swift is not badly connected with C-data, but still this way of development is terribly inconvenient and terribly laborious.
Despite the fact that the article turned out to be quite substantial, many subtleties and nuances remained unlit. I hope the source code of the application will help clarify incomprehensible moments:
 github.com/kreshikhin/scituner
The source code is accompanied by a MIT license. Therefore, you can safely use the code sections you are interested in or the entire project code for your own purposes.
Source: https://habr.com/ru/post/266471/
All Articles