Sophos UTM Web Access Organization
This article discusses how to quickly and effectively configure and manage web filtering policies using Sophos UTM , a comprehensive enterprise information security solution. At the end of the article you will have a bonus when migrating from TMG or a similar solution.
Sophos UTM belongs to the class of solutions Unified Thread Management, a comprehensive solution for security and networking infrastructure. It combines the functions of routing, firewall, NGFW, IDS / IPS, web access organization, DPI technology, organization of VPN channels, WAF, email spam protection, security of workstations. Each of the functional modules is combined in one device in a single web interface and is activated depending on the changing needs. Sophos UTM supports Hardware , Software, or Virtual Deployment.
')
The history of Sophos UTM has about 15 years. In 2000 Astaro was founded in Karlsruhe. She offered the market a visionary perspective on network security issues. The modular architecture and ease of use allowed the company in 10 years to get 56,000 installations in 60 countries. In 2011, Astaro and Sophos merged, resulting in the Sophos UTM solution, which increased safety in the workplace. The solution is developed and supported in Germany to this day.
In Russia, the system operates in more than 1000 customers, from small organizations with one administrator to large companies with offices in each city of our country.
Today we will focus on the organization of web access.
The installation process of Sophos UTM comes down to 5 steps and is similar to installing a Linux distribution.
It is enough to download the ISO , install and go to the web interface https : //192.168.0.1: 4444 (the IP address is set during the installation process).
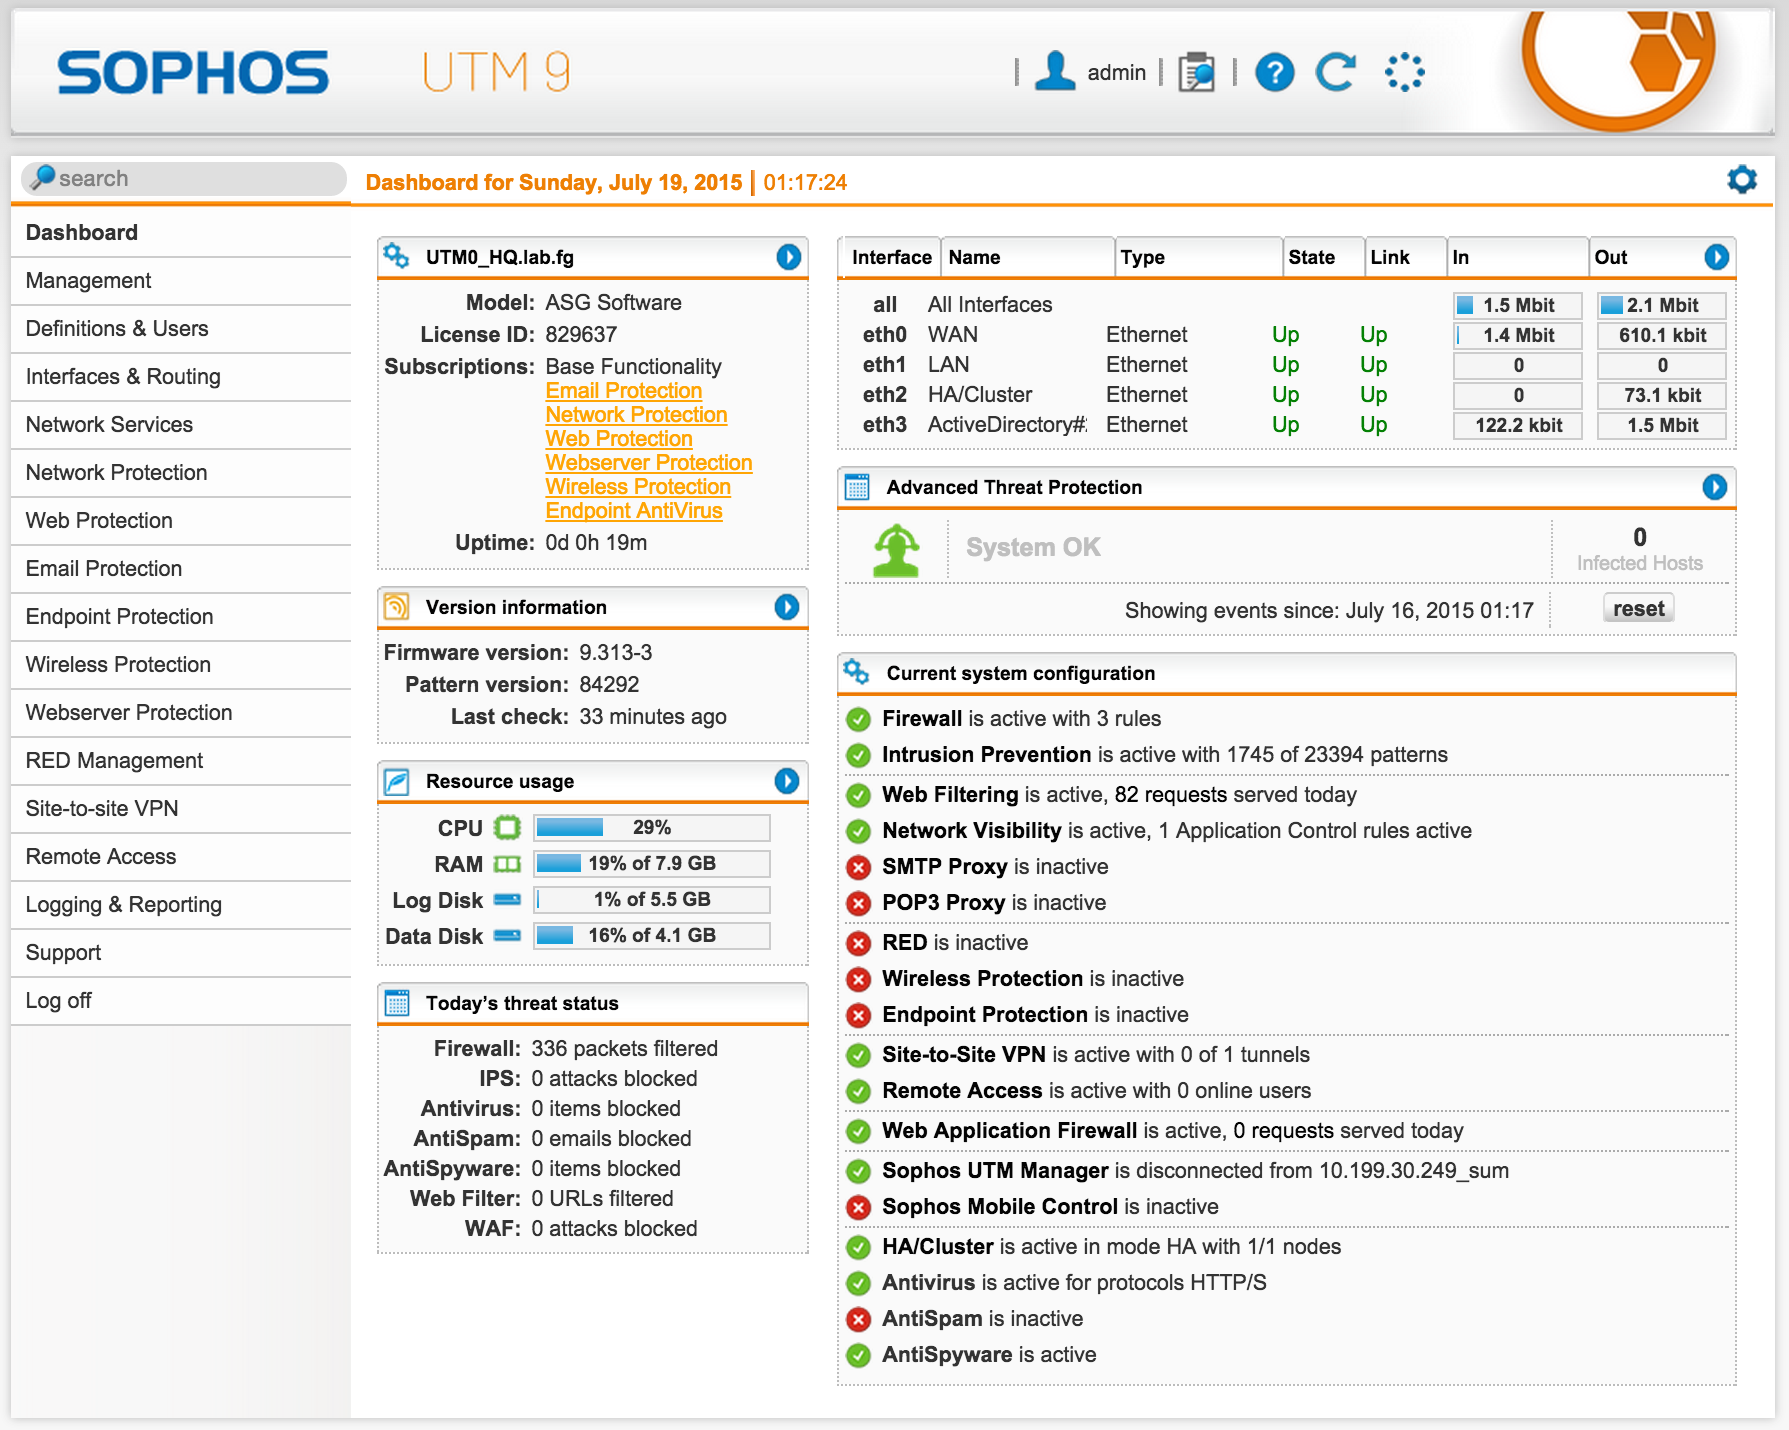
At the end, we should see the web interface in all its glory:
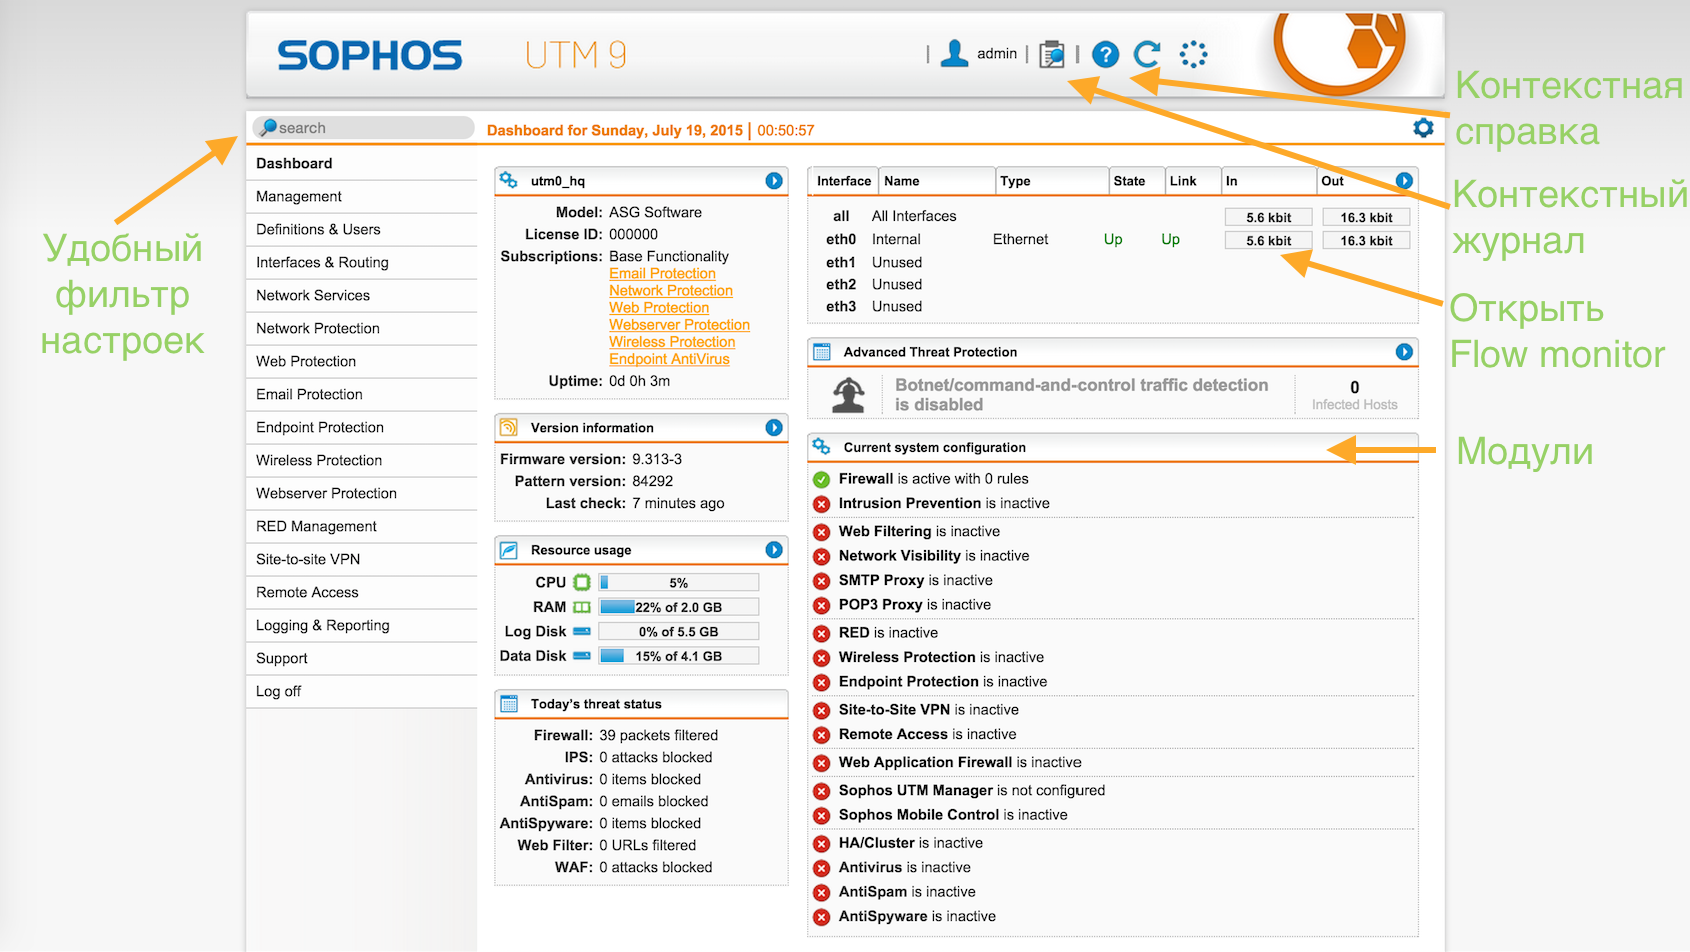
The system interface can be switched to Russian : Management -> WebAdmin Settings -> language.
As you can see, the main screen shows high-level information about the state of the system as a whole, the number of IS incidents and the included modules.
The system has several directories located in the Definitions & Users section, which allows the use of certain objects in various modules. By changing the value in one place, the object will change in the rest.
Sophos UTM supports work with both local user base and remote (Active Directory, LDAP, eDirectory, Radius, Tacacs +). The system understands Cyrillic user names.
To do this, go to the appropriate menu item and add a new server:
Definitions & Users -> Authentication Servers -> Servers -> 'New Authentication Server'.
First we add the server, save, then test.
If there are several domain controllers, all of them need to be added to this menu in the same way.
1) Add server
Create (plus sign) or select (daddy) AD host definition.
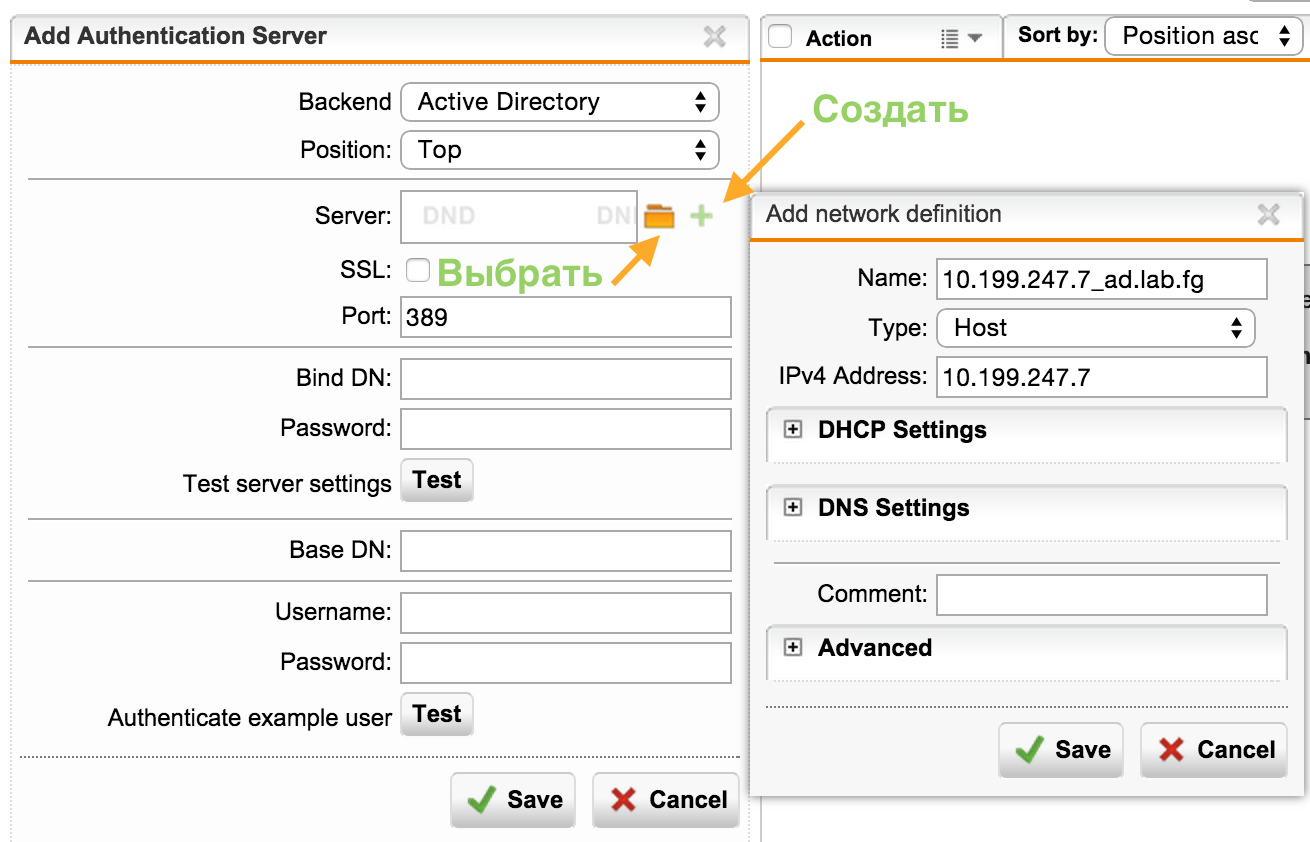
2) Customize and save
The user with whom we are connecting to AD must already be created.
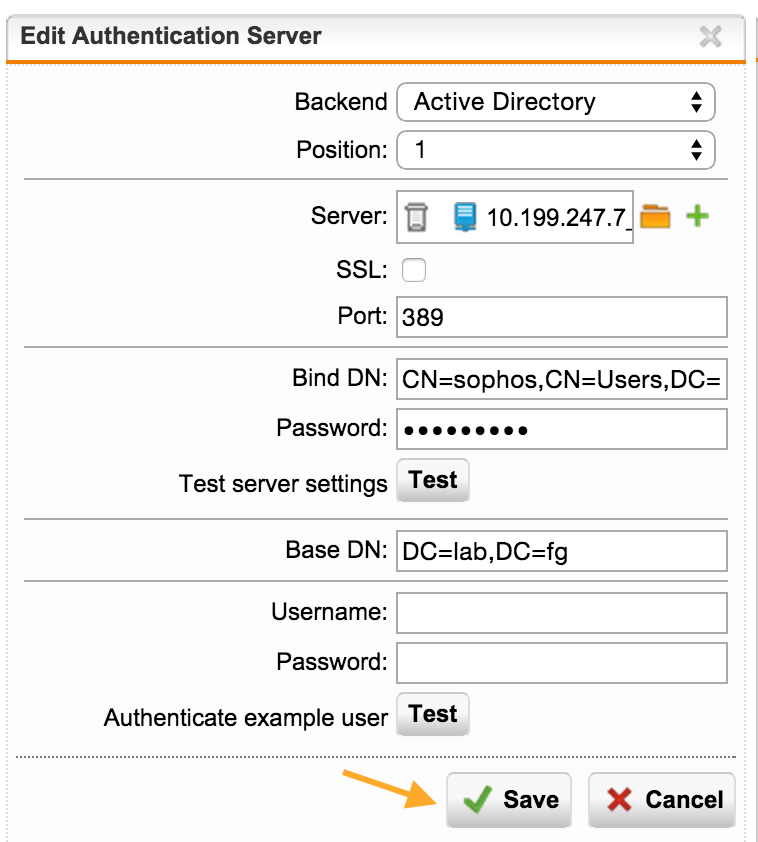
3) We test
Again, go to the server settings on the Edit button and test the connection.
By clicking on the Test button, we must get a successful passage - Passed.

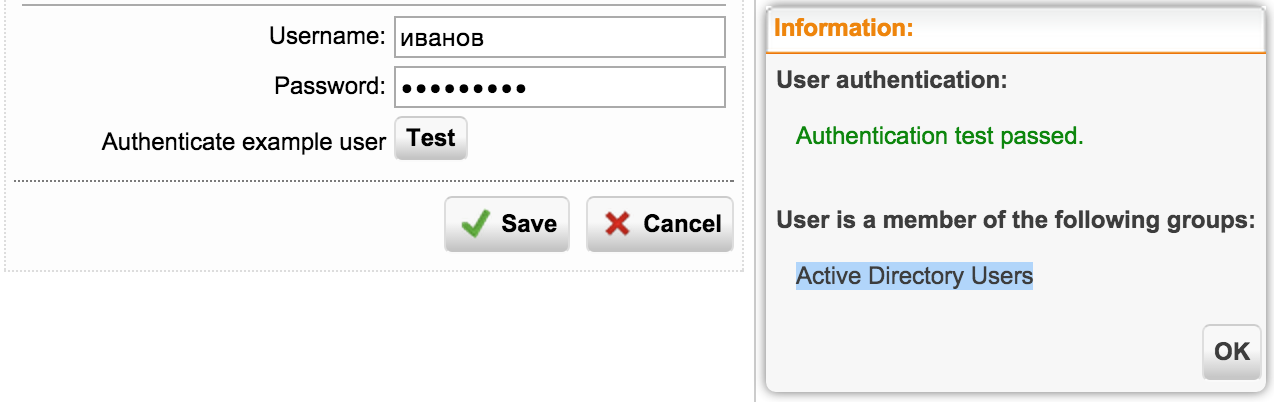
If you enter the username and password, we will see the result of the authentication and group of the user.
Before setting up the groups, we will see only the Active Directory Users group, all users from AD enter here.
The system supports Cyrillic usernames.
To do this, go to the appropriate menu item and add groups:
Definitions & Users -> Users & Groups -> Groups -> 'New Group'.
Names of groups, as such, do not matter. The nesting is important, i.e. instead of the general “Domain Users” group, you need to specify the specific group in which the user is - Sales, IT, Development, ...
Or use a common group if you do not need a split - “Active Directory Users”.
A user from AD cannot be selected as a member of a group in UTM, it is necessary to select a group in AD.
As a result, we get the required number of groups.
Now, if we make a check, we will see a user in his group:
Definitions & Users -> Authentication Servers -> Servers - Edit: Authenticate example user: Test
It’s enough to take two steps:
And finally, small touches - we will add users automatically:
On the Advanced tab, we will synchronize the groups every 2 hours, if we want to move the user from one group to another:
We now proceed directly to the purpose for which everything was started.
For clarity of the process, I will give a flowchart:

I will describe the order in which the rules are fulfilled:
Suppose we have a Corporate subnet 192.168.1.0/24, where computers are included in AciveDirectory and AD SSO authentication is used to access the Internet.
The next screen asks us which HTTPS filtering mode we will use:
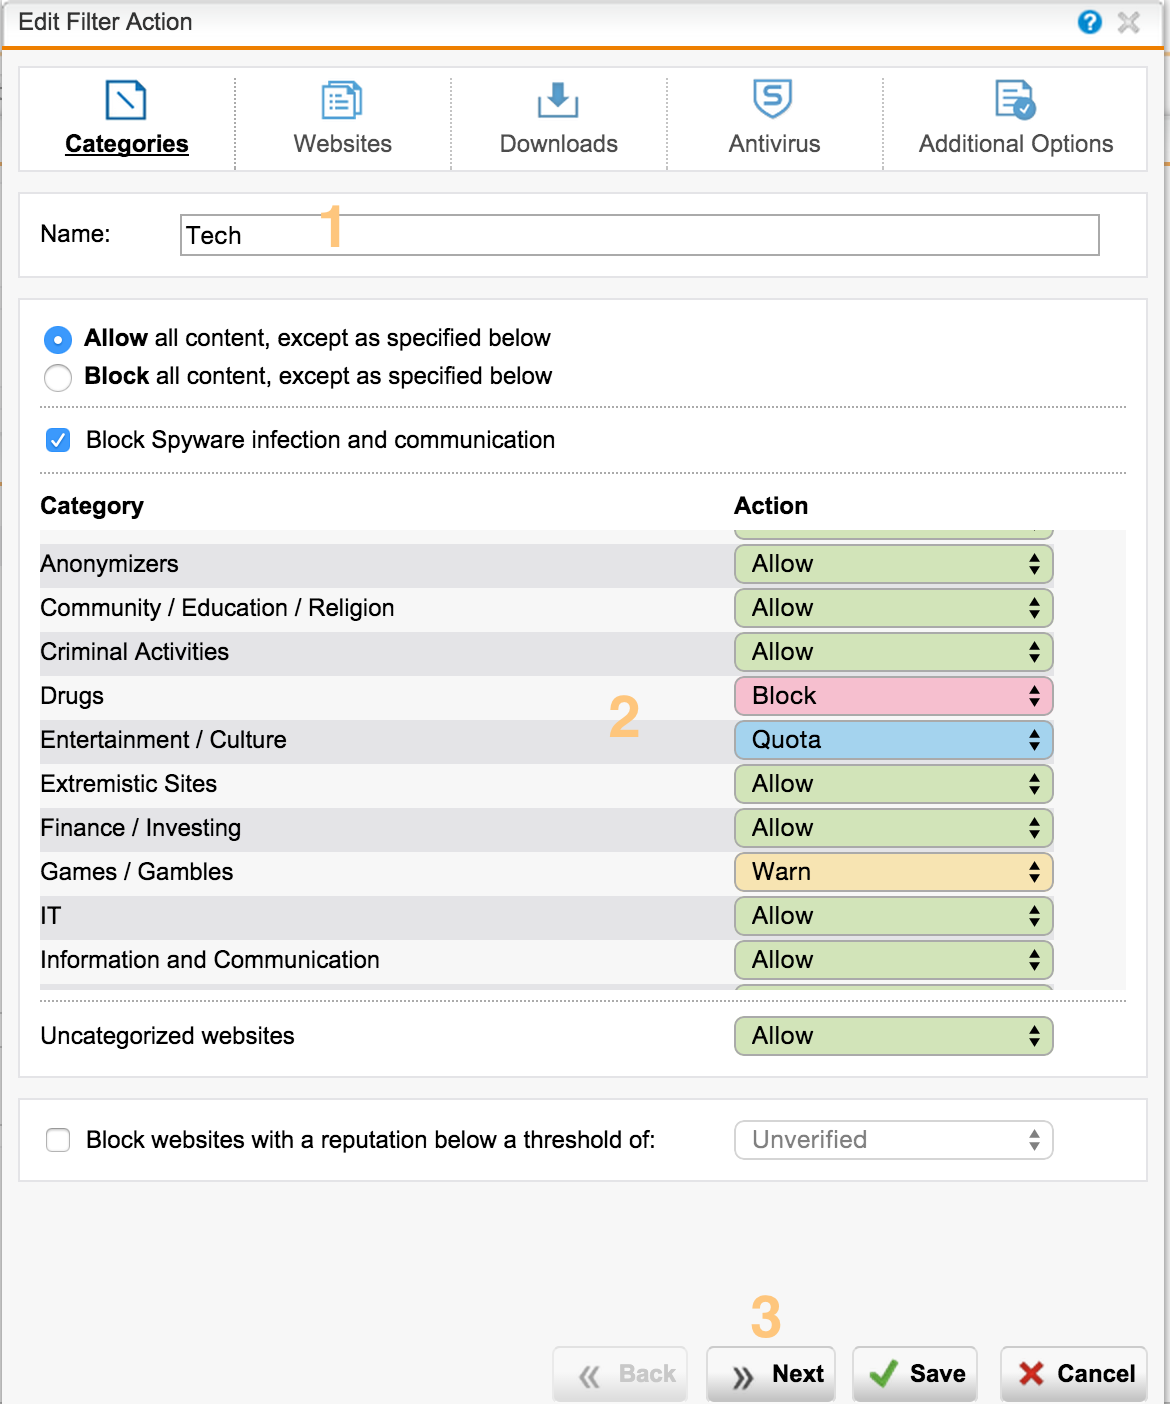
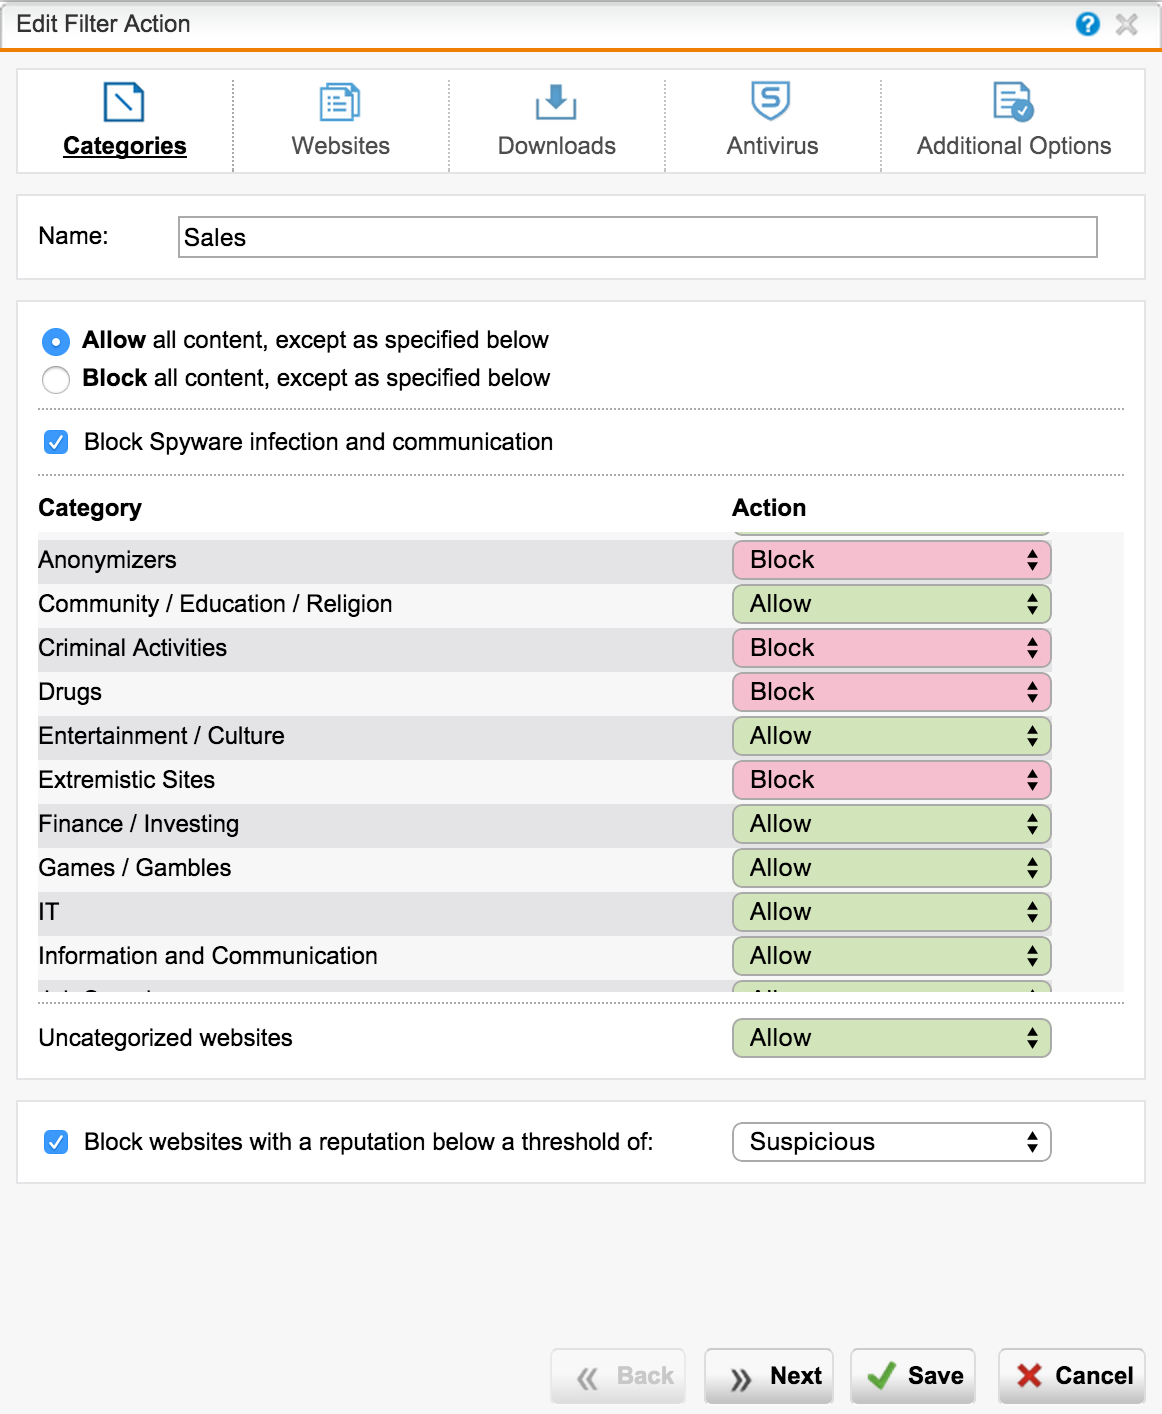
On the Policies tab, we create a filtering policy action policy. We match the Group and the Filtering Action, select the group for which this policy will apply. You can also specify the time interval for this policy.
For each category of sites we can choose different actions:
The base URL contains > 35 million sites in> 100 categories in> 65 languages. The base is updated regularly.
Sophos UTM allows you to flexibly manage categories of sites - you can override categories. You can also set tags for sites, which allows you to create your own categories.
In the list below we see grouped categories that you can edit or add your own (in the Filtering Options menu). You can block sites with low reputation - for example, Suspicious.
On the next tab, we can customize the list of exceptions, using not only domains, but also regular expressions:
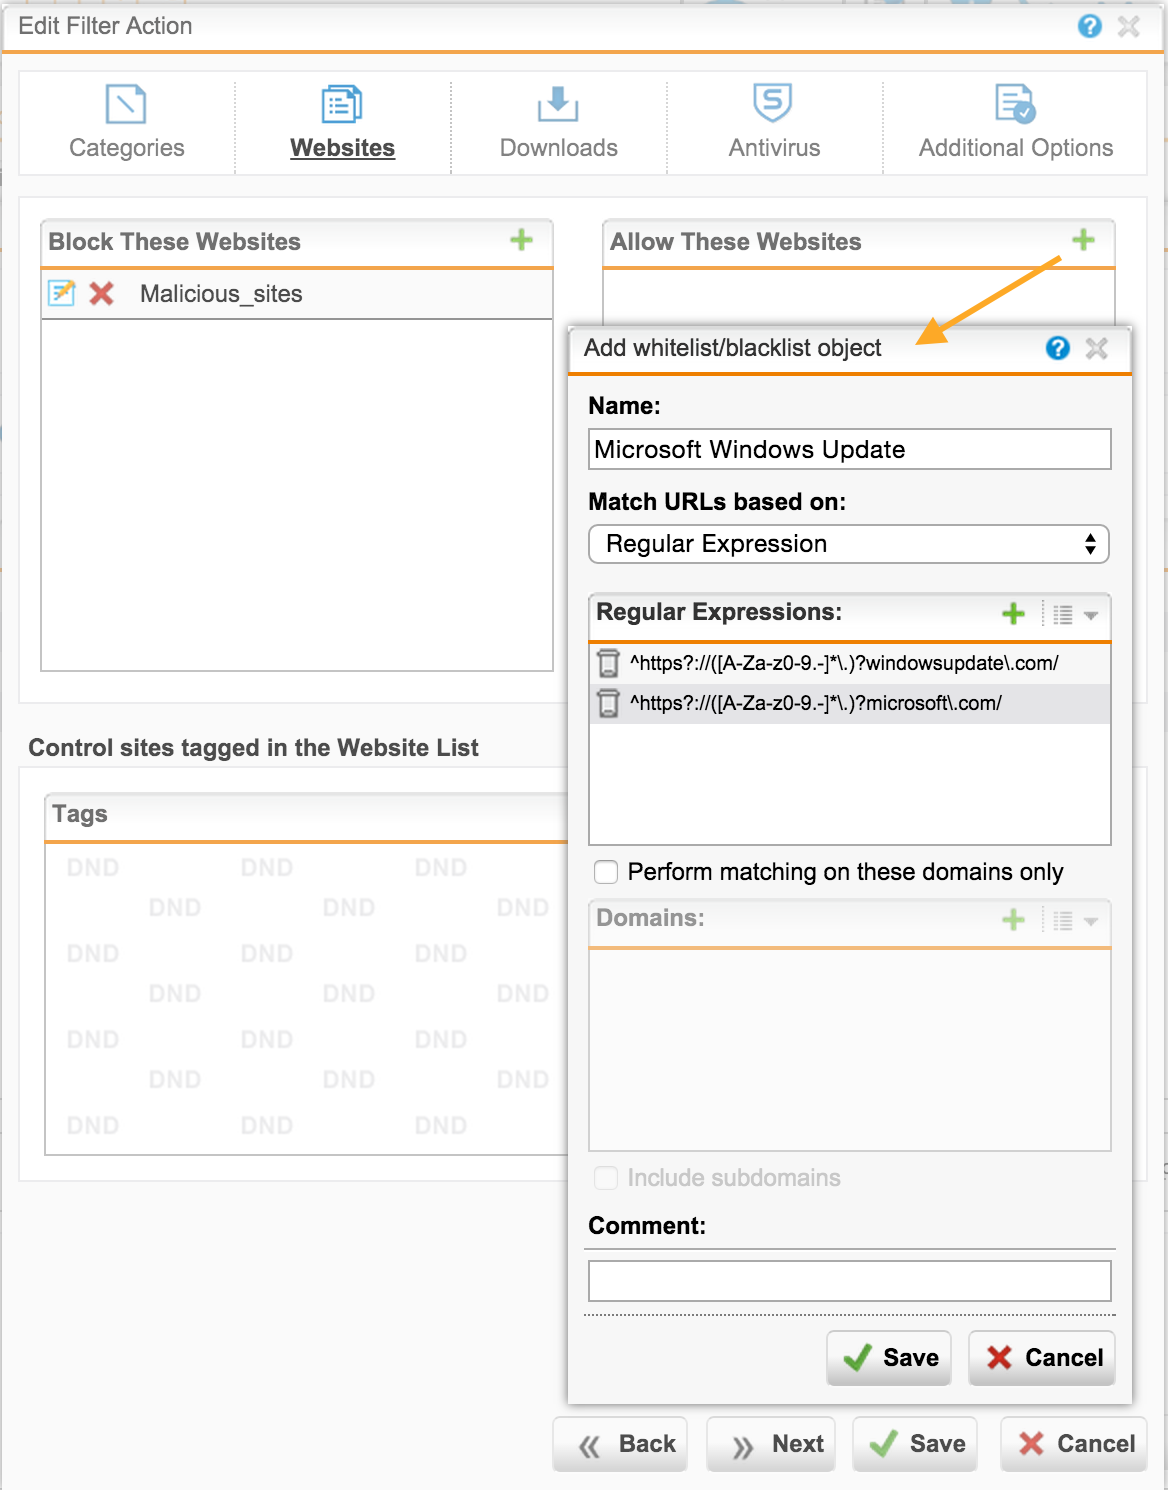
If you need to configure a global list of exceptions that applies to all profiles, you can later use the Web Protection tab -> Filtering Options -> Exceptions .
Add the appropriate actions for the over-defined site categories by tags:
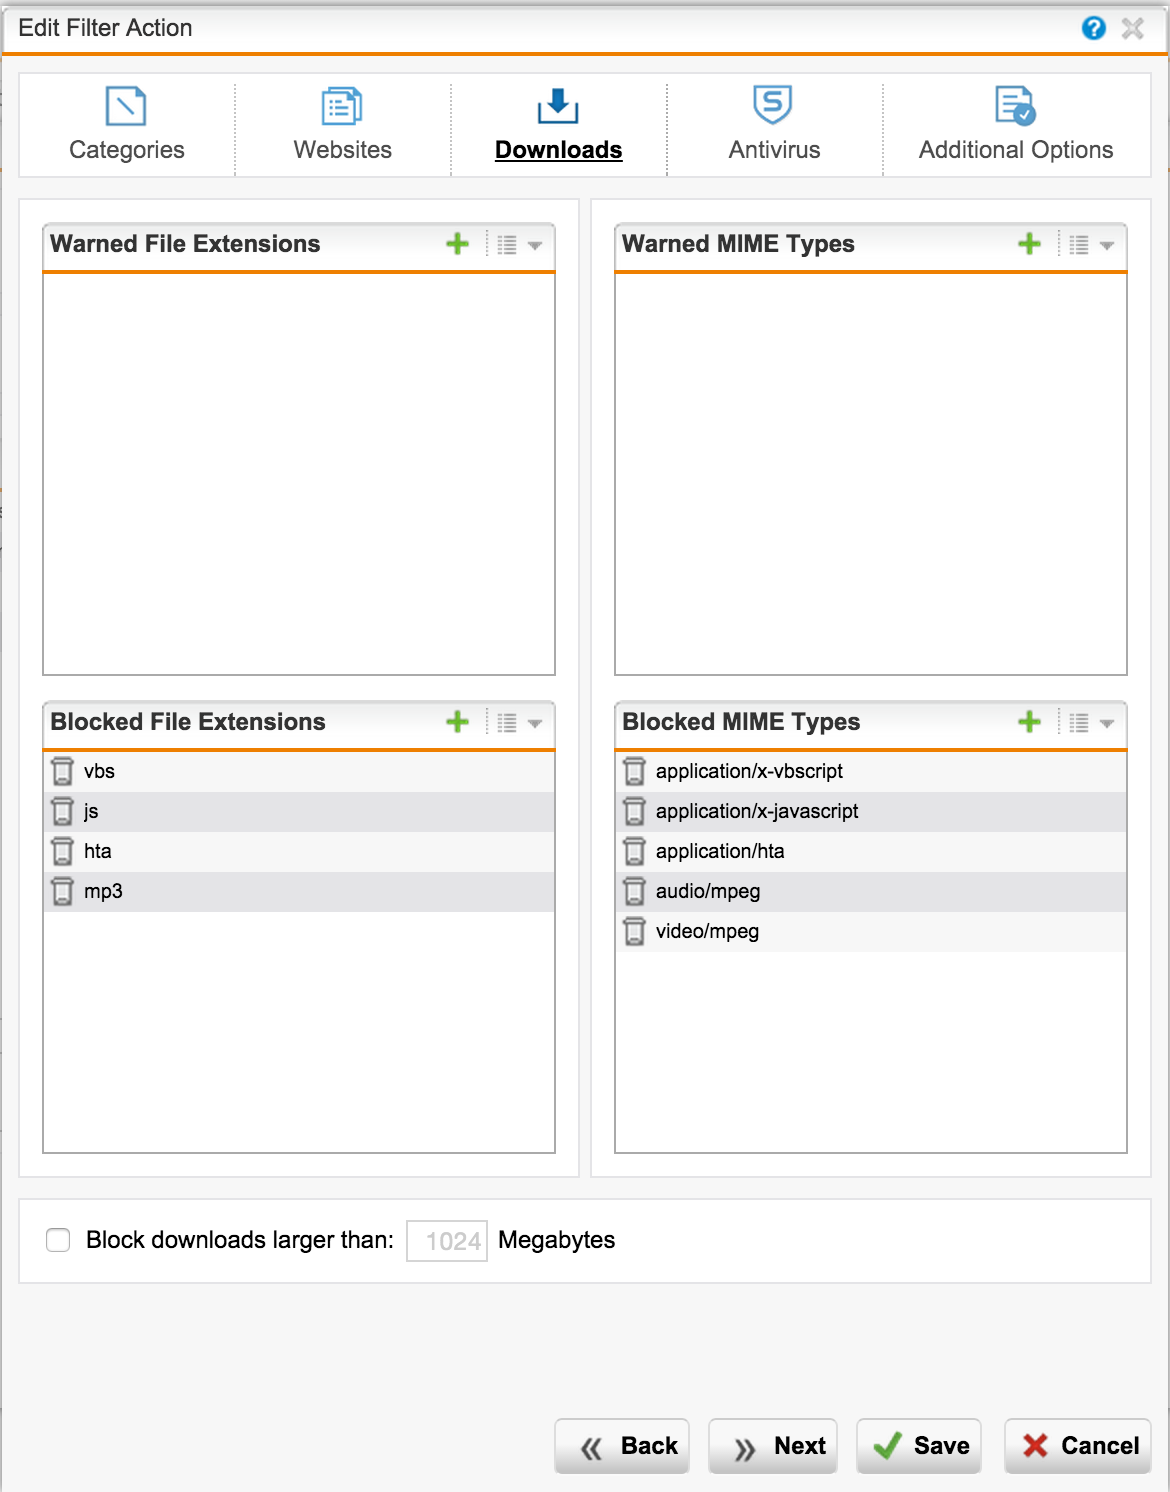
To block the download of certain file types, use the following tab.
From the interesting it is worth noting two points:
As a result of detection, the corresponding MIME type is assigned to the file. For this feature to work correctly, you need to enable the option: Web Protection -> Filtering Options -> Misc: "MIME blocking inspects HTTP body" .
We can also prohibit viewing streaming audio and video using the following list of MIME types .
For example, we want to prohibit downloading music files, regardless of the extension:
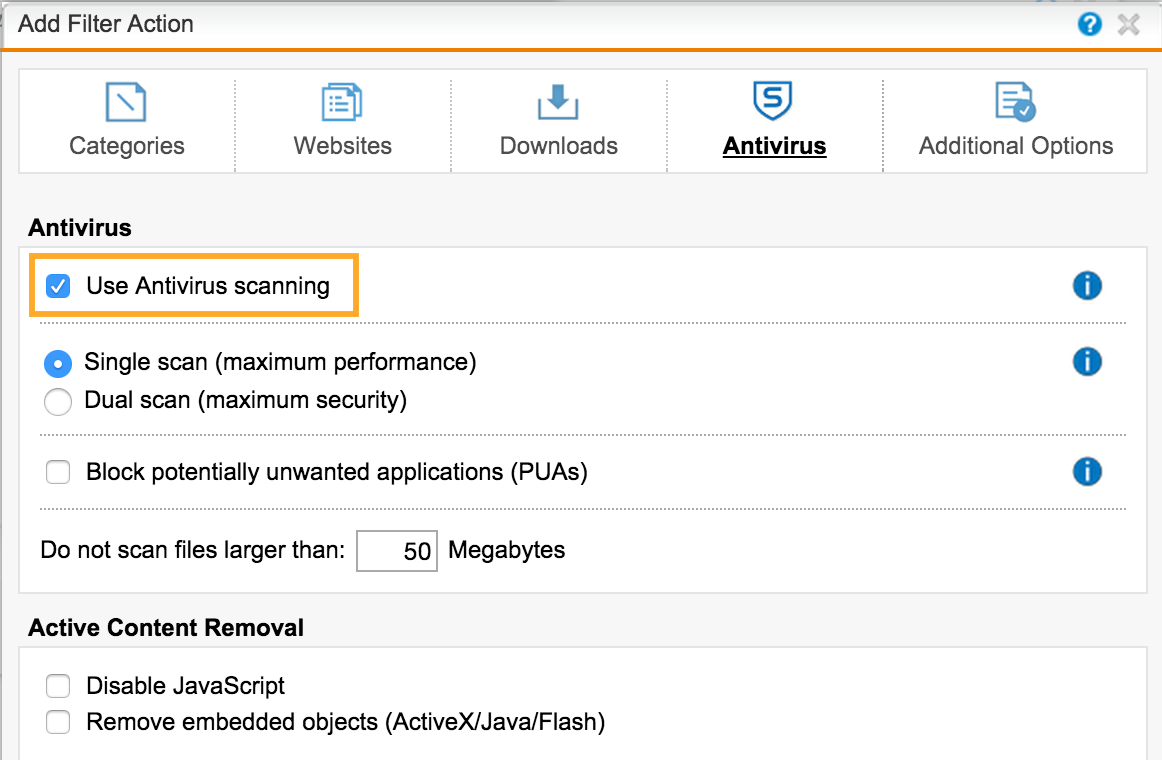
Do not forget to enable scanning antivirus . The first is Sophos Anti-Virus, the second is Avira.
Similar actions are done for the second group - Sales.
Select specific categories and actions for this user group:
As a result, we get the following picture:

Politicians are recommended to rank in order of increasing privileges: from the most strict to the softest.
To edit, you can click the appropriate Filter Action.
This completes the web access setup. Final touches left
Proxy settings can be registered manually, but with a large number of computers, this is difficult.
When using Standard AD SSO, it is convenient to distribute policies through Group Policy:
Disable the ability to change proxy settings (Connections tab):
You can also use a PAC file on UTM to automatically configure a proxy.
Read more on Fastvue and UTMtools .
In order for MiTM HTTPS analysis to be successful, UTM needs a root certificate that is trusted by clients. This can be done in several ways:
The system settings will pick up the following browsers: Internet Explorer of all versions, Chrome, browsers based on Chromium (Yandex, Opera, etc.). Firefox browser uses its own settings and certificate store. You can disable this application, or use third-party utilities, such as FirefoxADM or PolicyPak .
Often, it is necessary to block or allow unhindered access for a particular application. Sophos UTM has a built-in DPI engine that allows you to identify a specific application. Supported> 1000 application signatures and protocols. Since different protocols use different ports, the UTM should be a Default GW (not a proxy) to handle L7 traffic other than http (s).
For example, block all proxies and torrents, but allow IM to work without user authentication:
One of the important advantages of Sophos UTM in comparison with similar solutions is the large number (1000+) of embedded reports. All of them are located in the 'Logging & Reporting' menu. Reports support Cyrillic usernames.
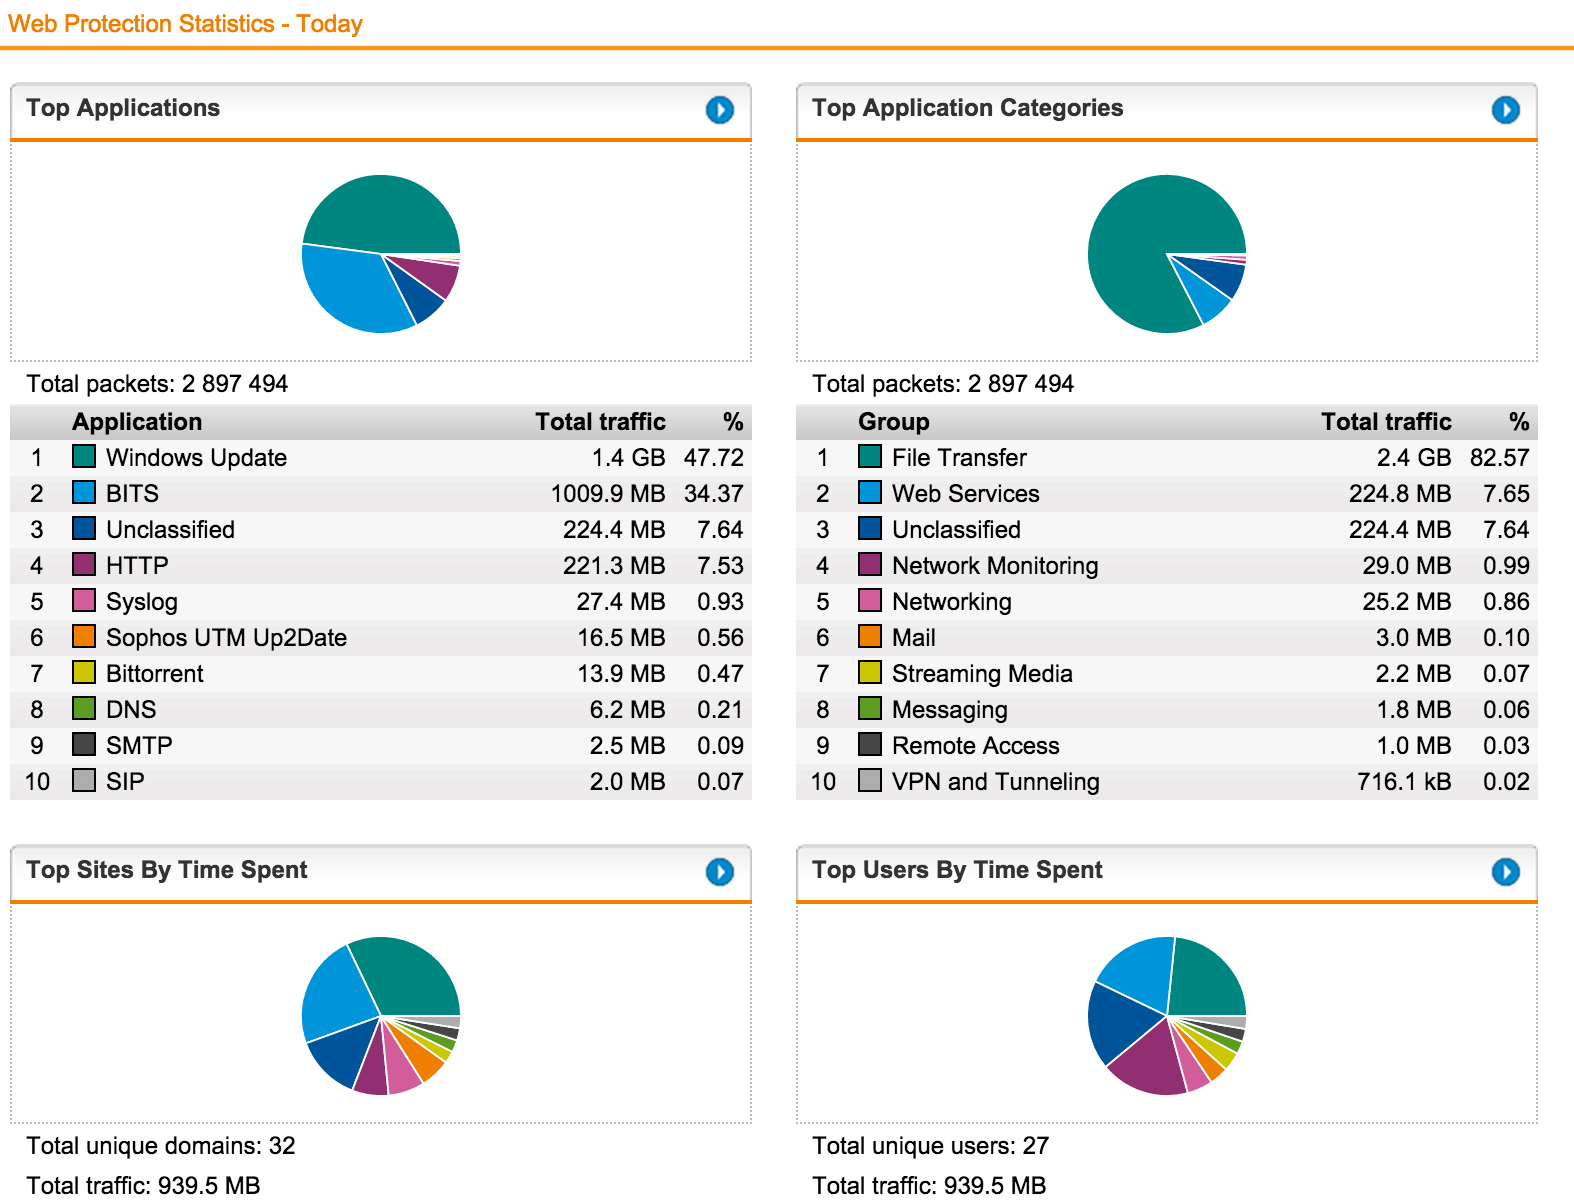
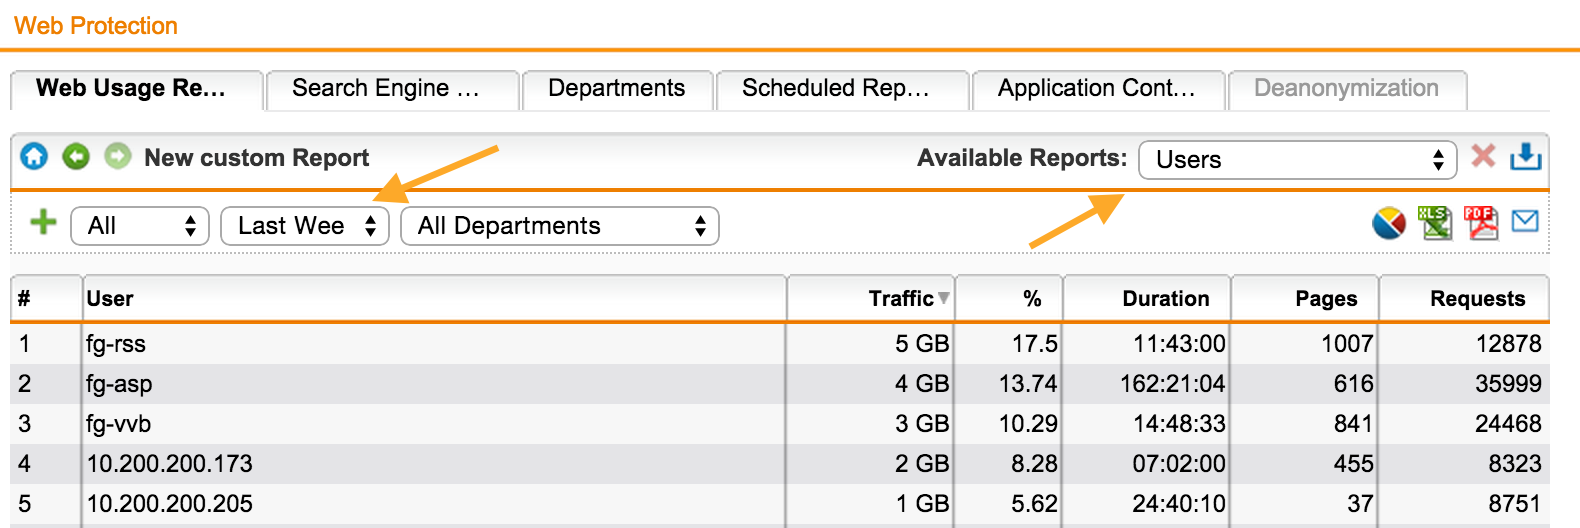
For example, let's see a report on users for the last week by web filtering:
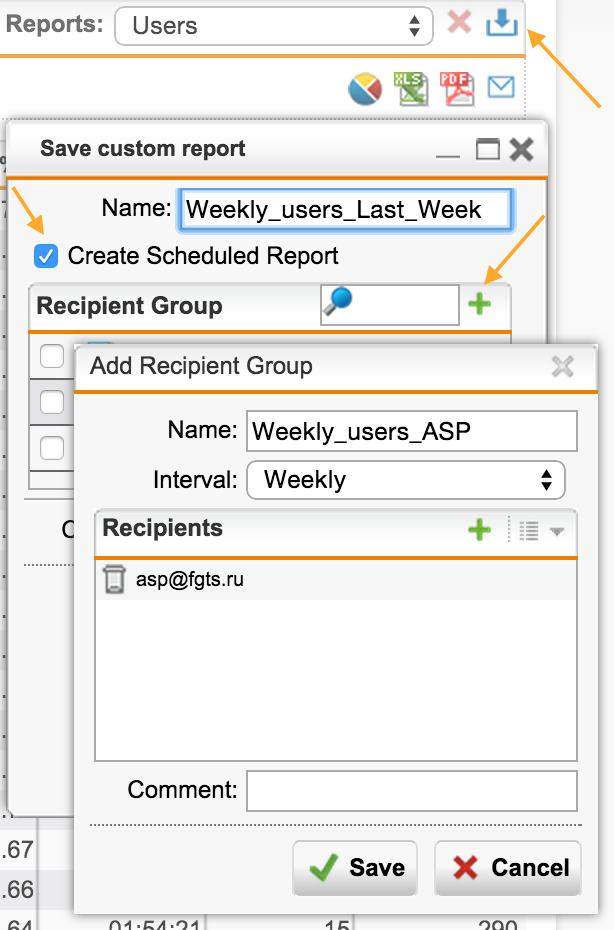
Let's save the resulting report and create its regular sending by mail:
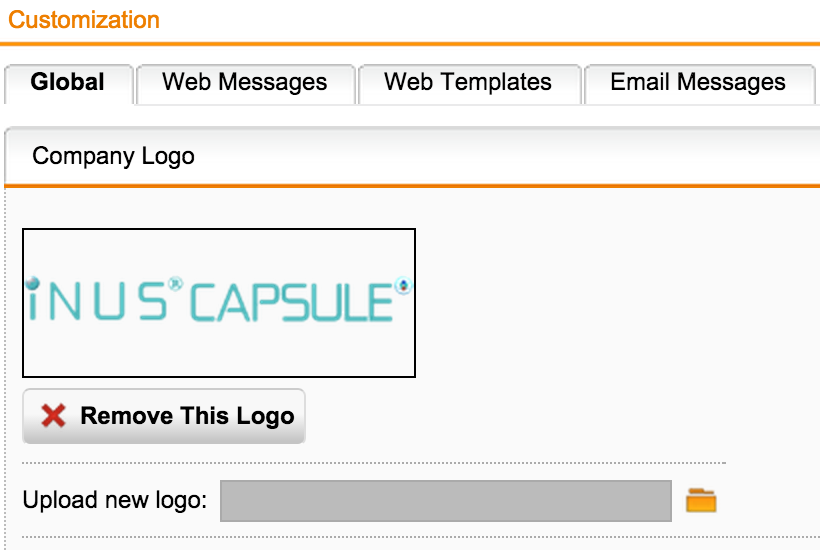
On the tab Management -> Customization, you can change the company logo displayed in the messages:
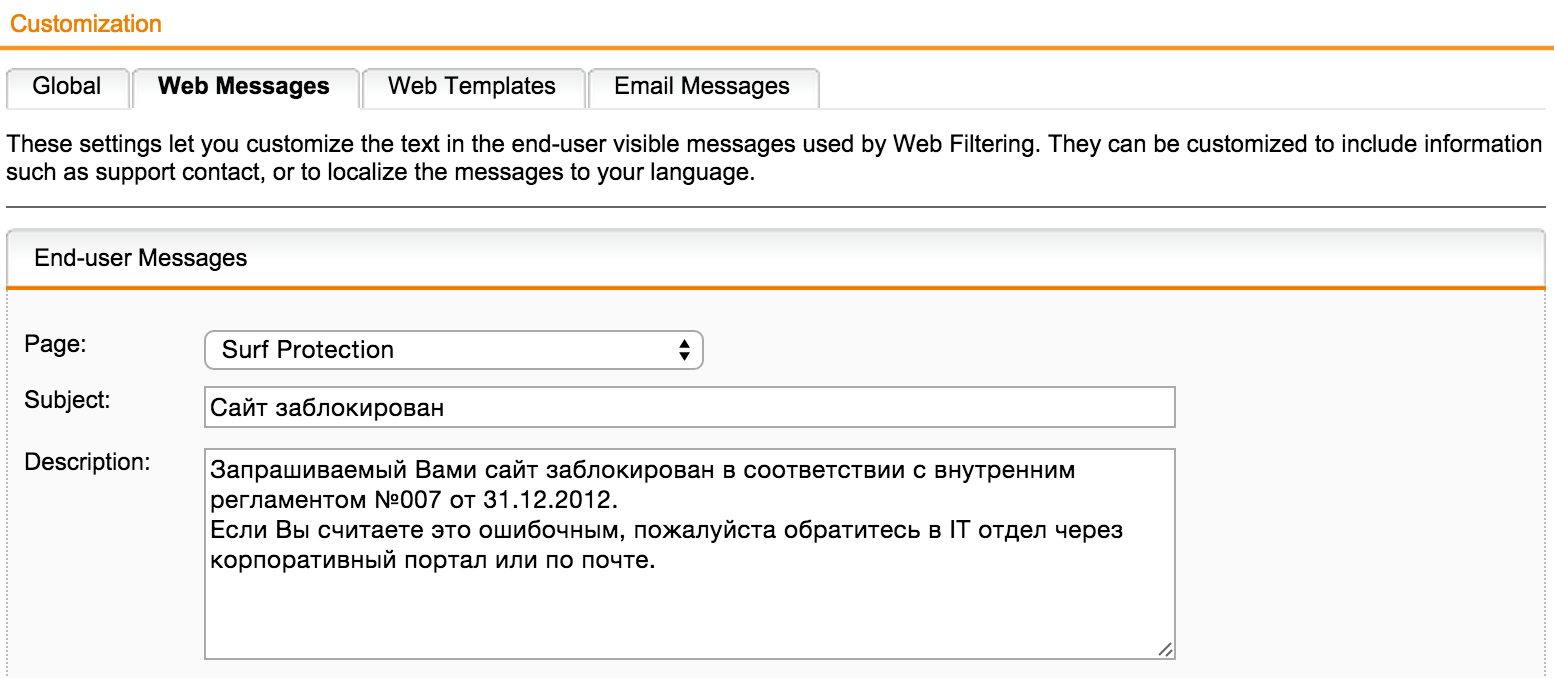
All messages displayed to the user can be easily changed:
Moreover, you can change the WebTemplate. Download the sample can be on the link from the help (in the upper right corner).
The user can download the data he needs on the personal portal - 'User Portal'.
Authentication agent, CA root certificate, or VPN settings, depending on the functionality available to the user.
Configured in the menu Management -> User Portal
+ Transparent User Authentication.
+ Different policies for different user groups.
+ URL filtering by category.
+ HTTPS scanning.
+ Scan downloaded files for viruses.
+ Correct definition of file types by signatures.
+ Regular and detailed reports.
+ Self-service user portal.
If something went wrong or doesn’t work at all, I recommend using the following troubleshooting procedure:
The system is self-documented - clicking on the question mark in the upper right corner brings up a context-sensitive help topic. If the system interface is in Russian, then the documentation will open in Russian. There is also a knowledge base by category .
If you have any questions, please contact us .
When migrating (replacing) with such solutions as TMG, PaloAlto, Fortinet, StoneSoft, CheckPoint, etc., a 20% discount is provided until the end of 2015. Details on the promotion page .
What is Sophos UTM or Define Terms
Sophos UTM belongs to the class of solutions Unified Thread Management, a comprehensive solution for security and networking infrastructure. It combines the functions of routing, firewall, NGFW, IDS / IPS, web access organization, DPI technology, organization of VPN channels, WAF, email spam protection, security of workstations. Each of the functional modules is combined in one device in a single web interface and is activated depending on the changing needs. Sophos UTM supports Hardware , Software, or Virtual Deployment.
')
The history of Sophos UTM has about 15 years. In 2000 Astaro was founded in Karlsruhe. She offered the market a visionary perspective on network security issues. The modular architecture and ease of use allowed the company in 10 years to get 56,000 installations in 60 countries. In 2011, Astaro and Sophos merged, resulting in the Sophos UTM solution, which increased safety in the workplace. The solution is developed and supported in Germany to this day.
In Russia, the system operates in more than 1000 customers, from small organizations with one administrator to large companies with offices in each city of our country.
Today we will focus on the organization of web access.
Preparation or How it all begins
The installation process of Sophos UTM comes down to 5 steps and is similar to installing a Linux distribution.
It is enough to download the ISO , install and go to the web interface https : //192.168.0.1: 4444 (the IP address is set during the installation process).
At the end, we should see the web interface in all its glory:
The system interface can be switched to Russian : Management -> WebAdmin Settings -> language.
As you can see, the main screen shows high-level information about the state of the system as a whole, the number of IS incidents and the included modules.
Connect to Active Directory or Where Users Come From
The system has several directories located in the Definitions & Users section, which allows the use of certain objects in various modules. By changing the value in one place, the object will change in the rest.
- Network Definitions - contains information about all network elements (hosts, networks, etc.)
- Service Definitions — Port and Protocol Mapping
- Users & Groups - users and groups
Sophos UTM supports work with both local user base and remote (Active Directory, LDAP, eDirectory, Radius, Tacacs +). The system understands Cyrillic user names.
Let's connect to Active Directory
To do this, go to the appropriate menu item and add a new server:
Definitions & Users -> Authentication Servers -> Servers -> 'New Authentication Server'.
First we add the server, save, then test.
If there are several domain controllers, all of them need to be added to this menu in the same way.
1) Add server
Create (plus sign) or select (daddy) AD host definition.
2) Customize and save
The user with whom we are connecting to AD must already be created.
Bind DN: CN = sophos, CN = Users, DC = lab, DC = fg
Base DN: DC = lab, DC = fg
3) We test
Again, go to the server settings on the Edit button and test the connection.
By clicking on the Test button, we must get a successful passage - Passed.
If you enter the username and password, we will see the result of the authentication and group of the user.
Before setting up the groups, we will see only the Active Directory Users group, all users from AD enter here.
The system supports Cyrillic usernames.
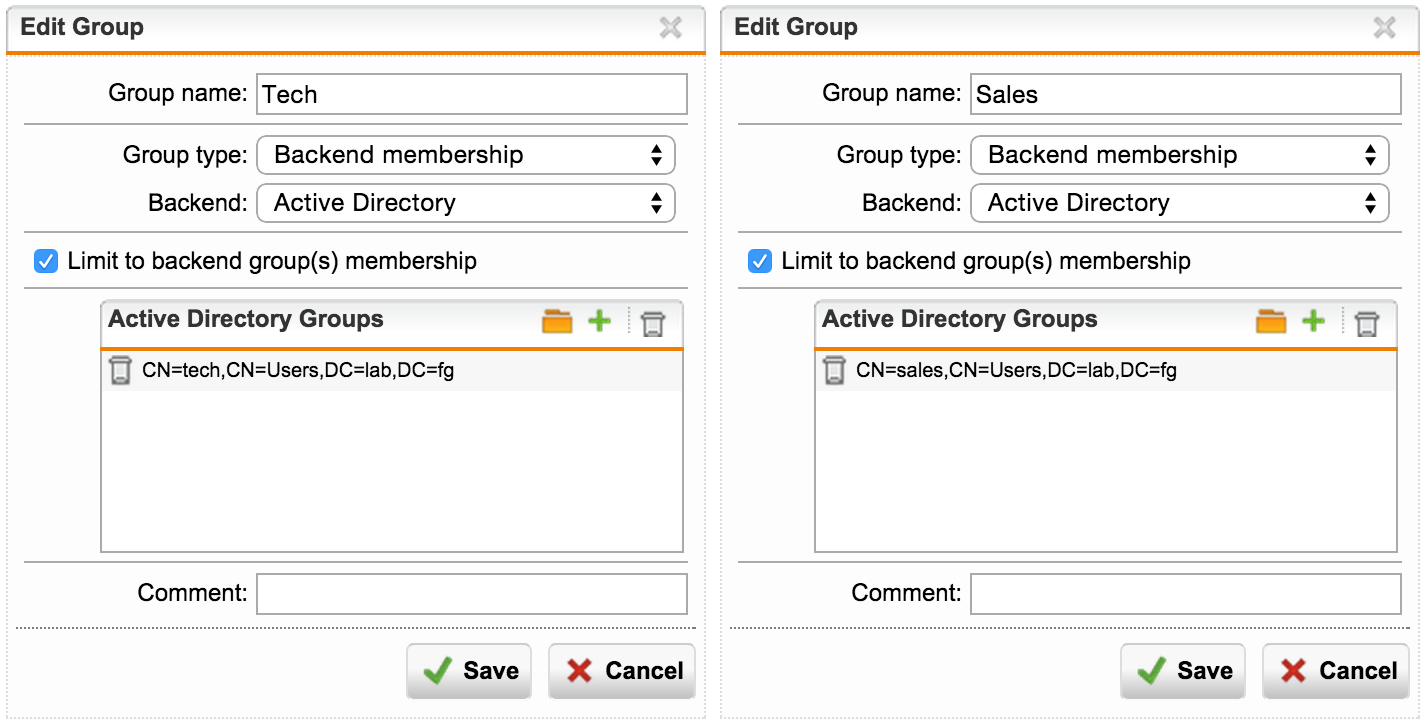
Add security groups from AD to Sophos UTM
To do this, go to the appropriate menu item and add groups:
Definitions & Users -> Users & Groups -> Groups -> 'New Group'.
Names of groups, as such, do not matter. The nesting is important, i.e. instead of the general “Domain Users” group, you need to specify the specific group in which the user is - Sales, IT, Development, ...
Or use a common group if you do not need a split - “Active Directory Users”.
A user from AD cannot be selected as a member of a group in UTM, it is necessary to select a group in AD.
As a result, we get the required number of groups.
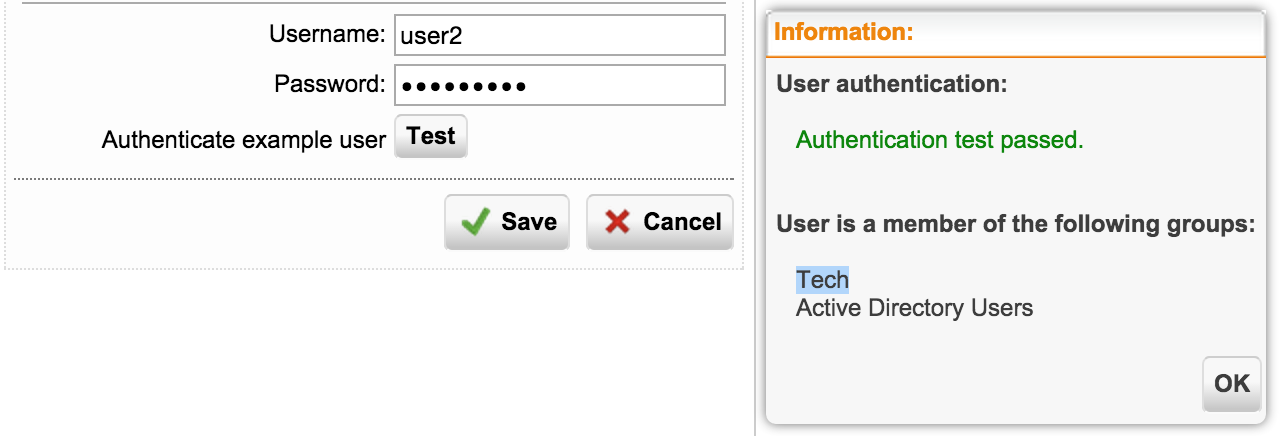
Now, if we make a check, we will see a user in his group:
Definitions & Users -> Authentication Servers -> Servers - Edit: Authenticate example user: Test
Add AD SSO
It’s enough to take two steps:
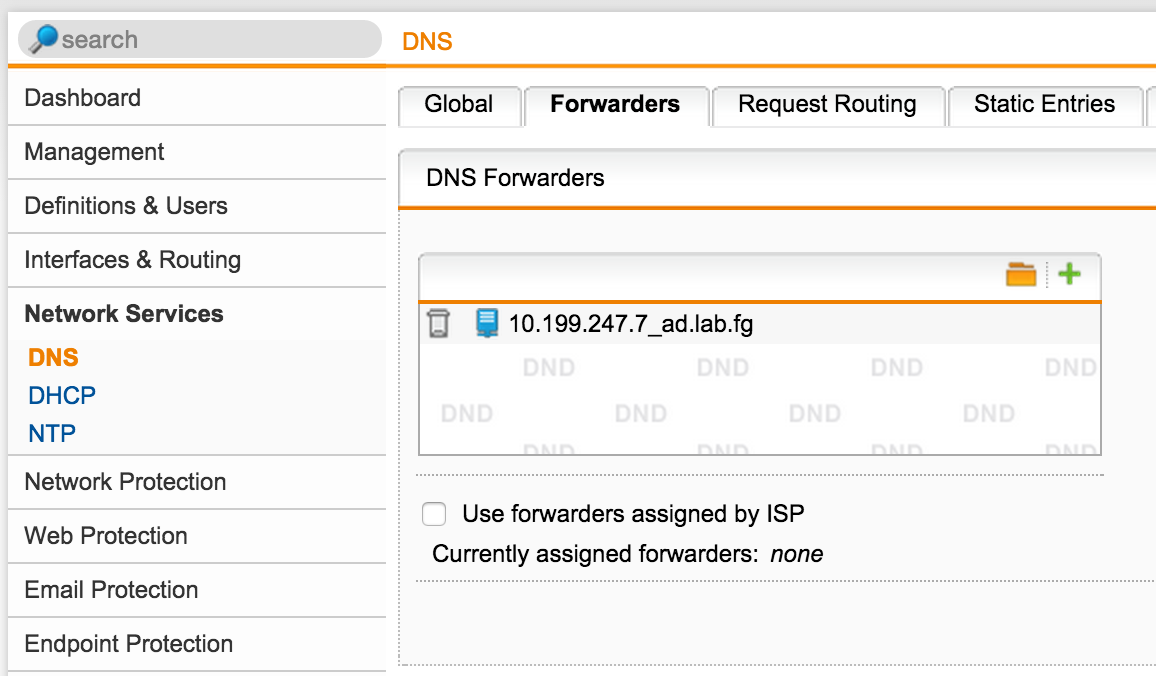
- As a DNS server, leave only DomainController: Network Services-> DNS -> Forwarders
- Add UTM to a domain controller: Definitions & Users -> Authentication Services -> Single Sign-On
Permissions are required that allow you to add computers to the domain.
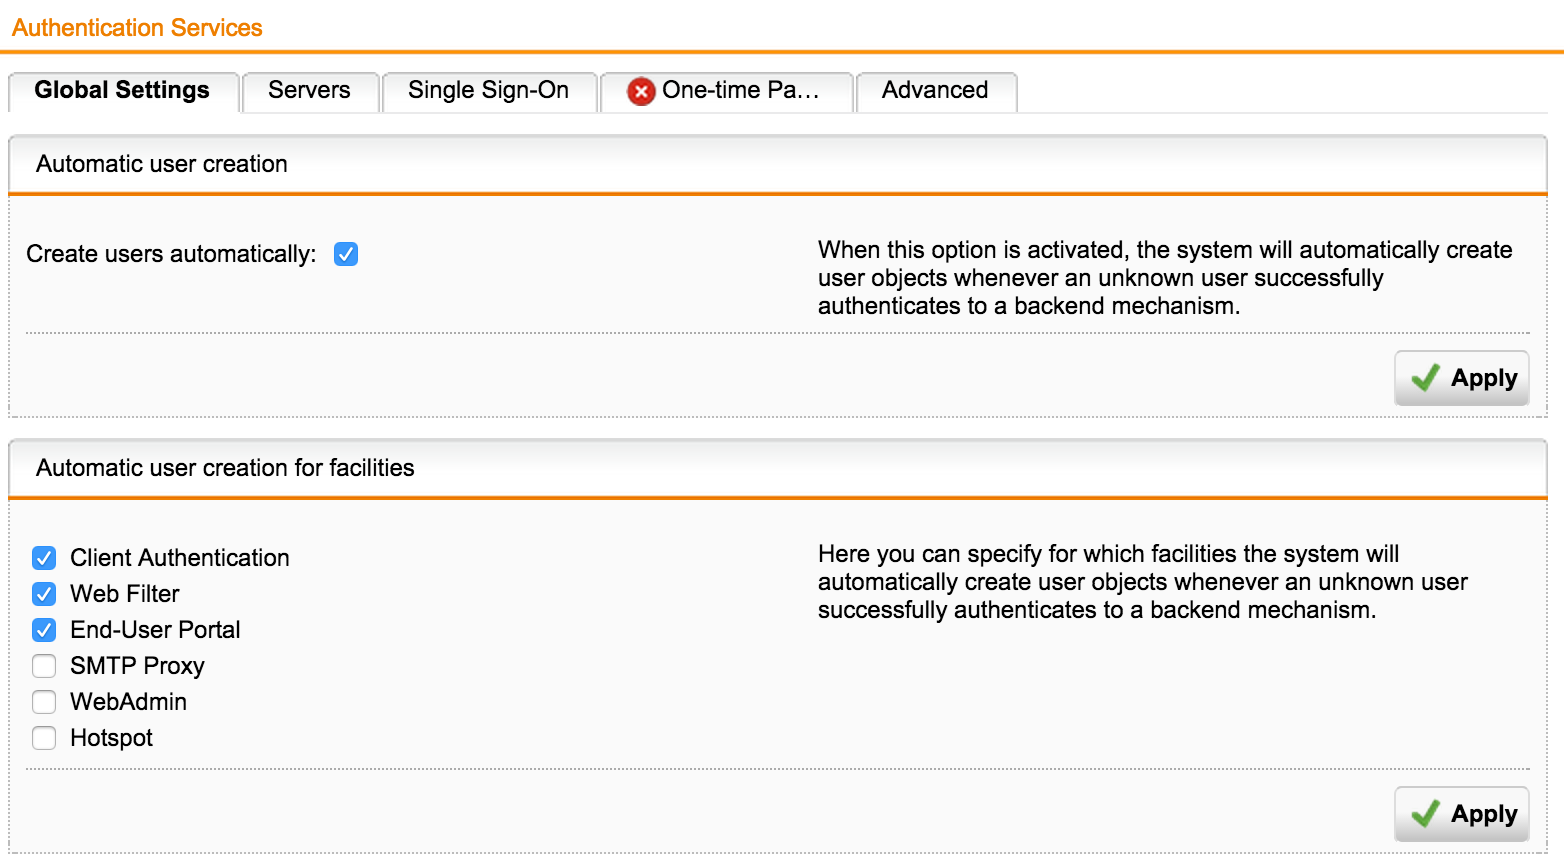
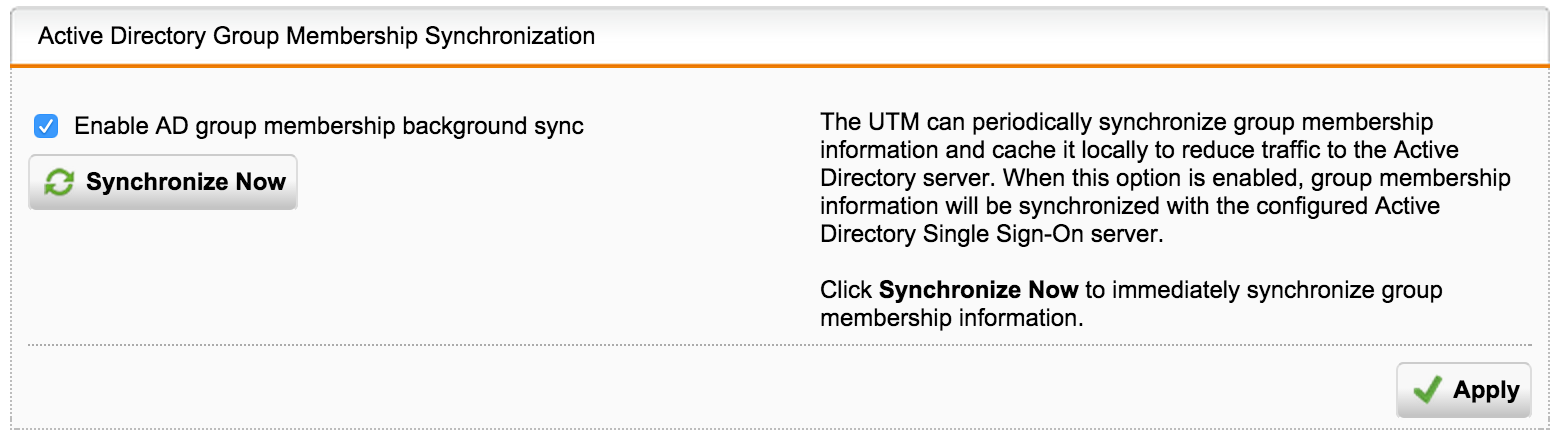
And finally, small touches - we will add users automatically:
On the Advanced tab, we will synchronize the groups every 2 hours, if we want to move the user from one group to another:
Set up web filtering or divide and conquer
We now proceed directly to the purpose for which everything was started.
For clarity of the process, I will give a flowchart:
I will describe the order in which the rules are fulfilled:
- Exceptions tab - Filtering Options -> Exceptions.
- Authentication Profiles Tab - Web Filter Profiles.
- The default action tab is Web Filtering.
- If nothing worked, the connection is blocked.
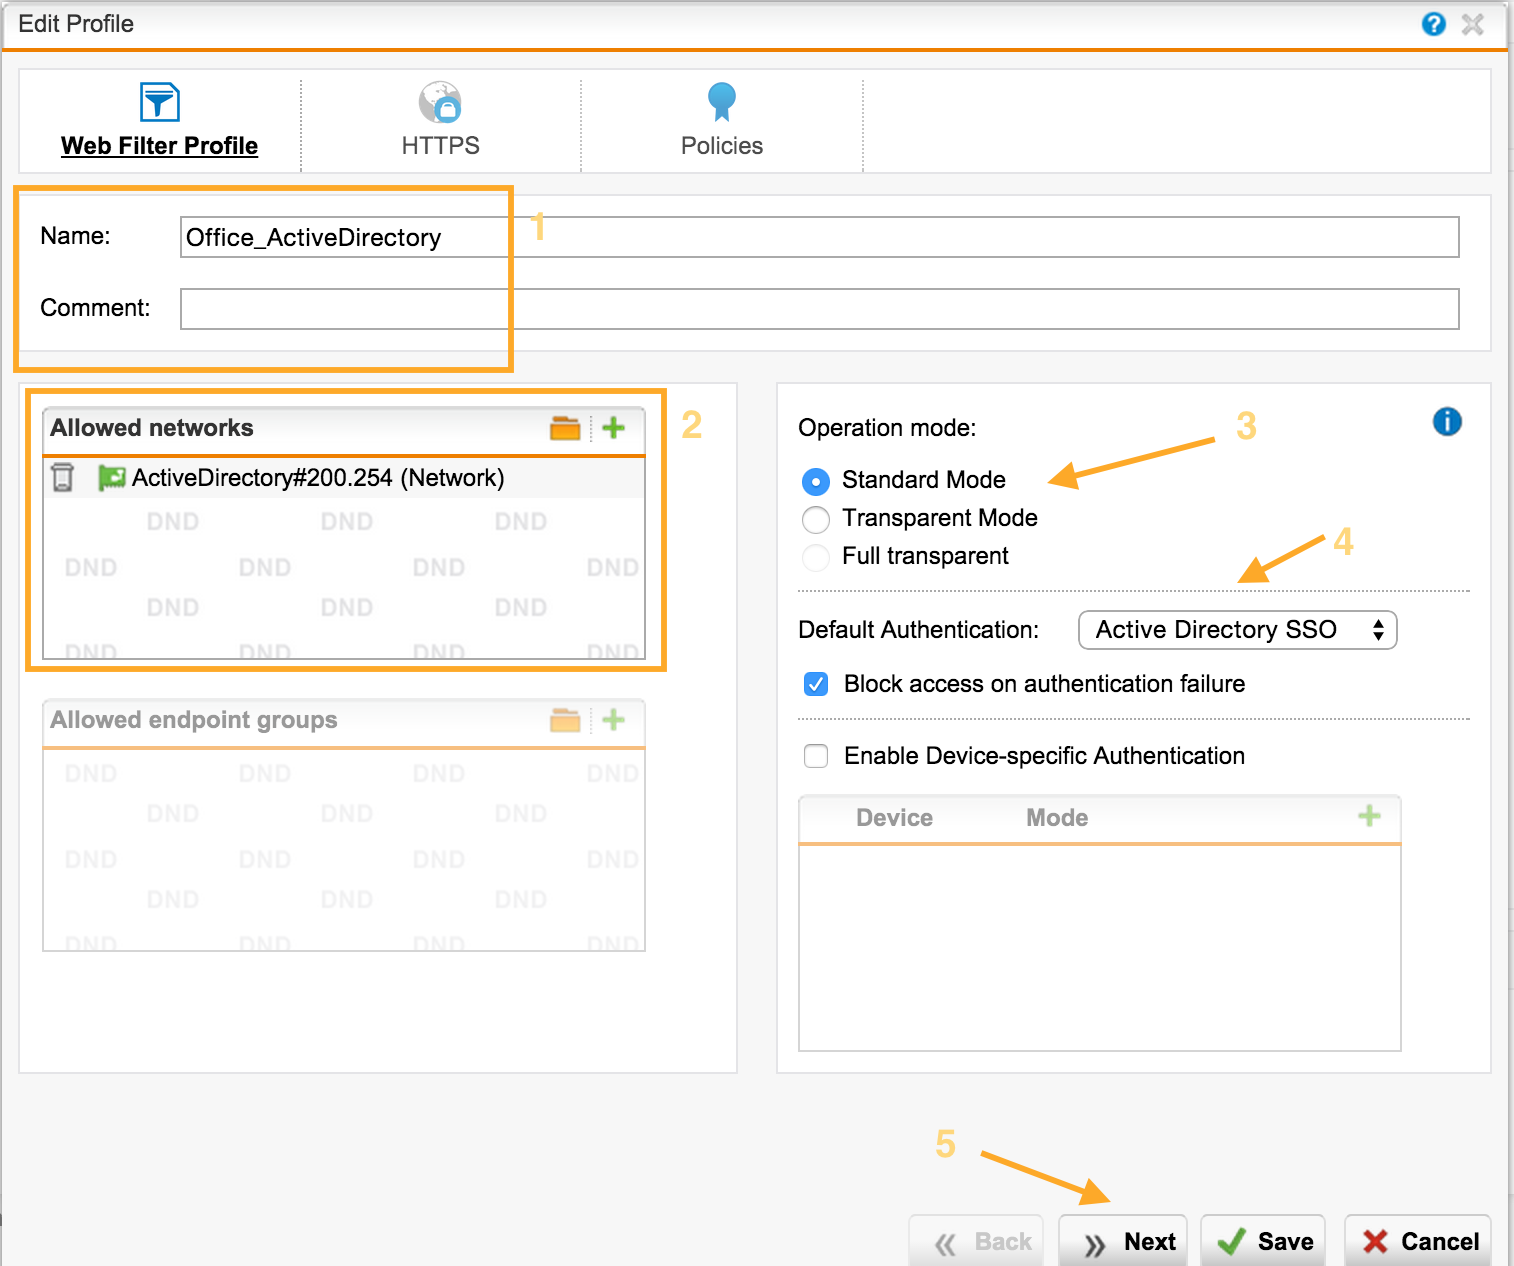
Suppose we have a Corporate subnet 192.168.1.0/24, where computers are included in AciveDirectory and AD SSO authentication is used to access the Internet.
Profile - create an authentication profile
- We set the Name.
- We select subnets to which this authentication method will apply.
- Operation mode:
- Standard is a standard proxy, users will access UTM as a proxy on port 8080.
- Transparent - web requests will be intercepted and the user does not even need to make proxy settings.
- Full Transparent - UTM operates at the L2 level (In-Line mode). You must first configure the network bridge.
- Authentication method, I will describe the frequently used ones:
- Active Directory SSO - speaks for itself, the computer must be in the domain.
- Browser - a form is displayed to the user requesting a username and password.
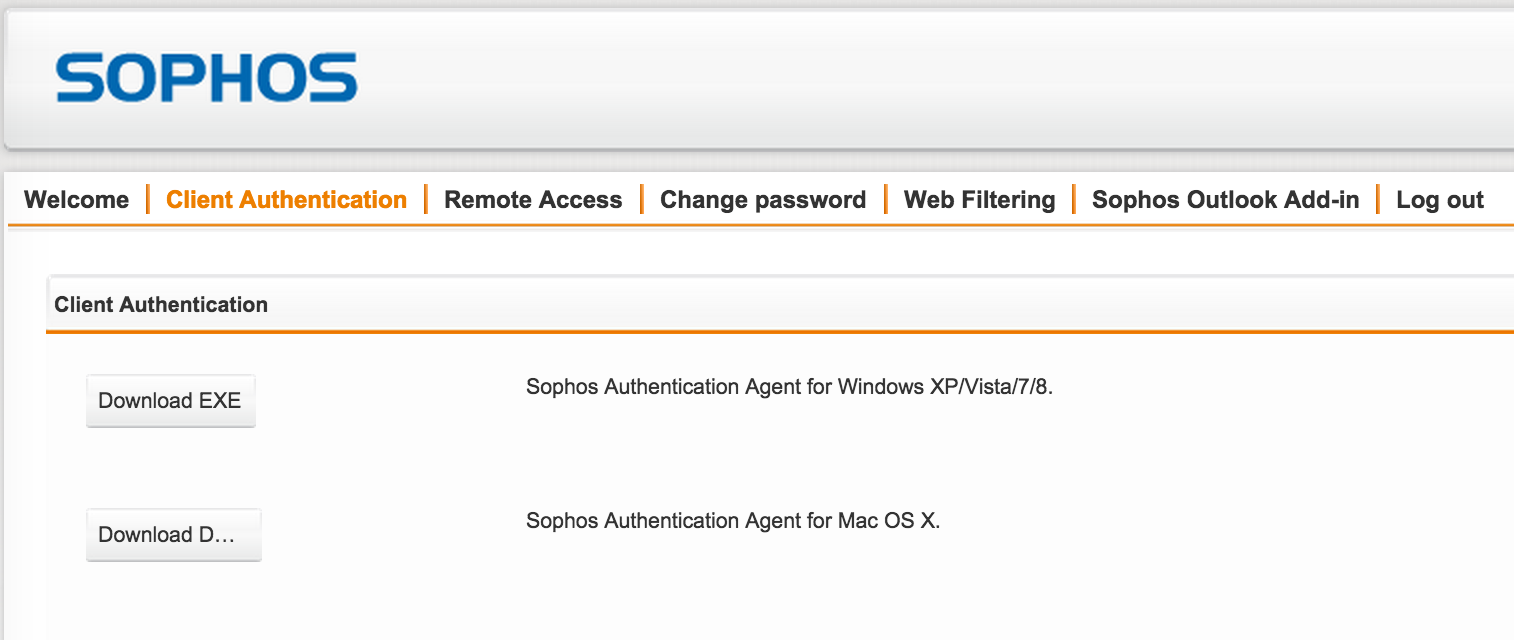
- Agent - an authentication agent must be installed on the computer. Supported by Windows (EXE, MSI) and MAC (DMG). His task is to compare the User and the IP address for which he works.
You can distribute the agent through AD using the MSI image ( Definitions & Users -> Client Authentication ).
The user can download using the personal User Portal (see below).
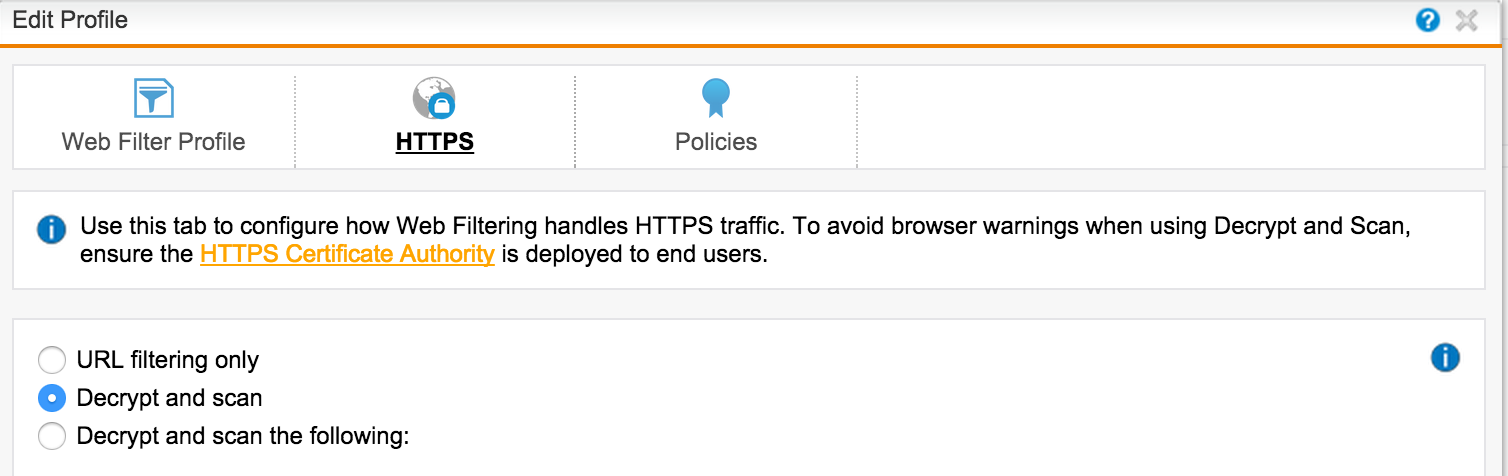
The next screen asks us which HTTPS filtering mode we will use:
- URL filtering only — Sophos will look only at the meta information of the certificate, and if the user accesses the forbidden site, then block.
- Decrypt and scan - open HTTPS traffic completely - we will see a specific URL that the user is accessing. Works in MiTM mode. For correct work, you need to distribute the root certificate of UTM via AD (see below).
- Decrypt and scan the following - we look at the detailed URL only for specific categories of sites.
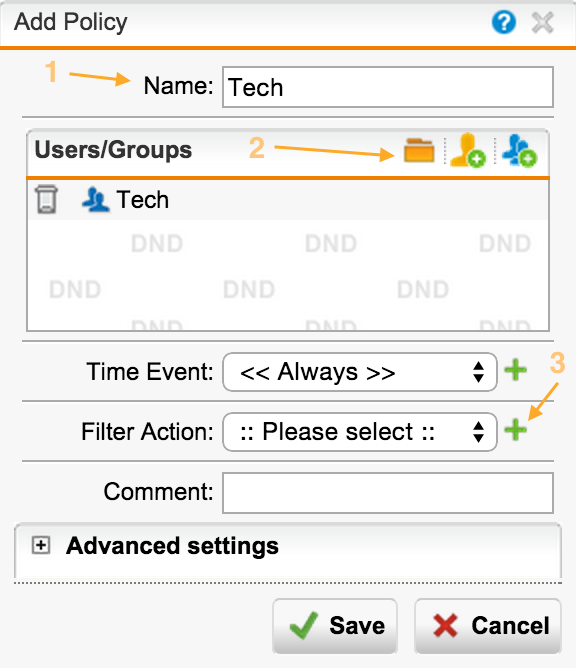
Policies - matching groups and filtering actions
On the Policies tab, we create a filtering policy action policy. We match the Group and the Filtering Action, select the group for which this policy will apply. You can also specify the time interval for this policy.
Filter Action - add Filtering Actions
For each category of sites we can choose different actions:
- Block - block
- Warn - notify that a bad site is visited.
- Quota - site stay timer
The base URL contains > 35 million sites in> 100 categories in> 65 languages. The base is updated regularly.
Sophos UTM allows you to flexibly manage categories of sites - you can override categories. You can also set tags for sites, which allows you to create your own categories.
In the list below we see grouped categories that you can edit or add your own (in the Filtering Options menu). You can block sites with low reputation - for example, Suspicious.
On the next tab, we can customize the list of exceptions, using not only domains, but also regular expressions:
If you need to configure a global list of exceptions that applies to all profiles, you can later use the Web Protection tab -> Filtering Options -> Exceptions .
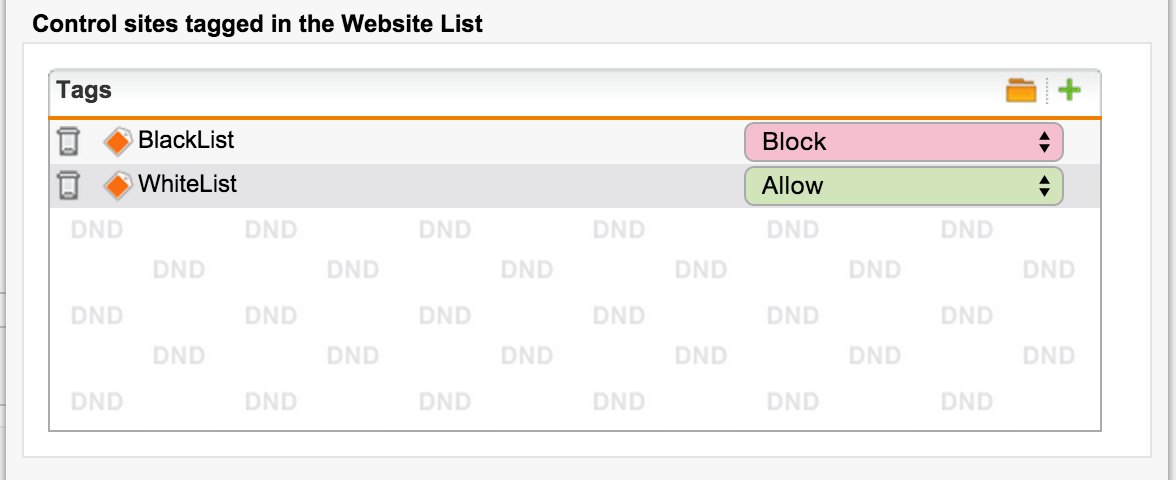
Add the appropriate actions for the over-defined site categories by tags:
To block the download of certain file types, use the following tab.
From the interesting it is worth noting two points:
- UTM opens archives and scans files from archives for malware; if everything is fine, gives the user a download.
- There is a function "True File Type" detection, which uses the work of the antivirus engine to determine file types. The file extension does not matter, the contents matter. Type signatures are updated regularly.
As a result of detection, the corresponding MIME type is assigned to the file. For this feature to work correctly, you need to enable the option: Web Protection -> Filtering Options -> Misc: "MIME blocking inspects HTTP body" .
We can also prohibit viewing streaming audio and video using the following list of MIME types .
For example, we want to prohibit downloading music files, regardless of the extension:
Do not forget to enable scanning antivirus . The first is Sophos Anti-Virus, the second is Avira.
Similar actions are done for the second group - Sales.
Select specific categories and actions for this user group:
As a result, we get the following picture:
Politicians are recommended to rank in order of increasing privileges: from the most strict to the softest.
To edit, you can click the appropriate Filter Action.
This completes the web access setup. Final touches left
Distribute proxy and certificate settings or Reach each
Proxy settings can be registered manually, but with a large number of computers, this is difficult.
When using Standard AD SSO, it is convenient to distribute policies through Group Policy:
- For browsers IE 6, IE 7, IE 8, IE 9 and the corresponding OS. Detailed instructions on TechNet .
All programs - Administrative Tools - Group Policy Management :
Group Policy Management: User configuration - Policies - Windows Settings - Internet Explorer Maintenance - Connection - Proxy Settings . - For browsers IE 10, IE 11 and the corresponding OS. Detailed instructions: video for WinServer 2012 or article for WinServer 2008
All programs - Administrative Tools - Group Policy Management :
Group Policy Management: User configuration - Preference - Control Panel Settings, New, Internet Explorer 10
Disable the ability to change proxy settings (Connections tab):
Computer Configuration - Policies - Administrative Templates - Windows Components - Internet Explorer - Internet Control Panel: Disable the Connections page (Enabled)
You can also use a PAC file on UTM to automatically configure a proxy.
Read more on Fastvue and UTMtools .
In order for MiTM HTTPS analysis to be successful, UTM needs a root certificate that is trusted by clients. This can be done in several ways:
- If there is a Certificate Authority in the AD structure, then it must issue a root certificate (root CA) for UTM, then unload it into UTM. This type of certificate has the right to sign other certificates. More details in the knowledge base .
- You can use the root certificate already generated in the UTM and distribute it through AD.
Certificate in UTM: Web Protection -> Filtering Options -> HTTPS CAs -> Signing CA: Download .
Distribute from AD: Computer Configuration | Policies | Windows Settings | Security Settings | Public Key Policies -> Trusted Root Certification Authorities .
The certificate will be accepted in both Windows 7 and Windows 8 (8.1). More details in the knowledge base .
After distributing the certificate, you need:- run on computer: gpupdate / force
- or log out and log on to the computer (logon / logoff events)
The system settings will pick up the following browsers: Internet Explorer of all versions, Chrome, browsers based on Chromium (Yandex, Opera, etc.). Firefox browser uses its own settings and certificate store. You can disable this application, or use third-party utilities, such as FirefoxADM or PolicyPak .
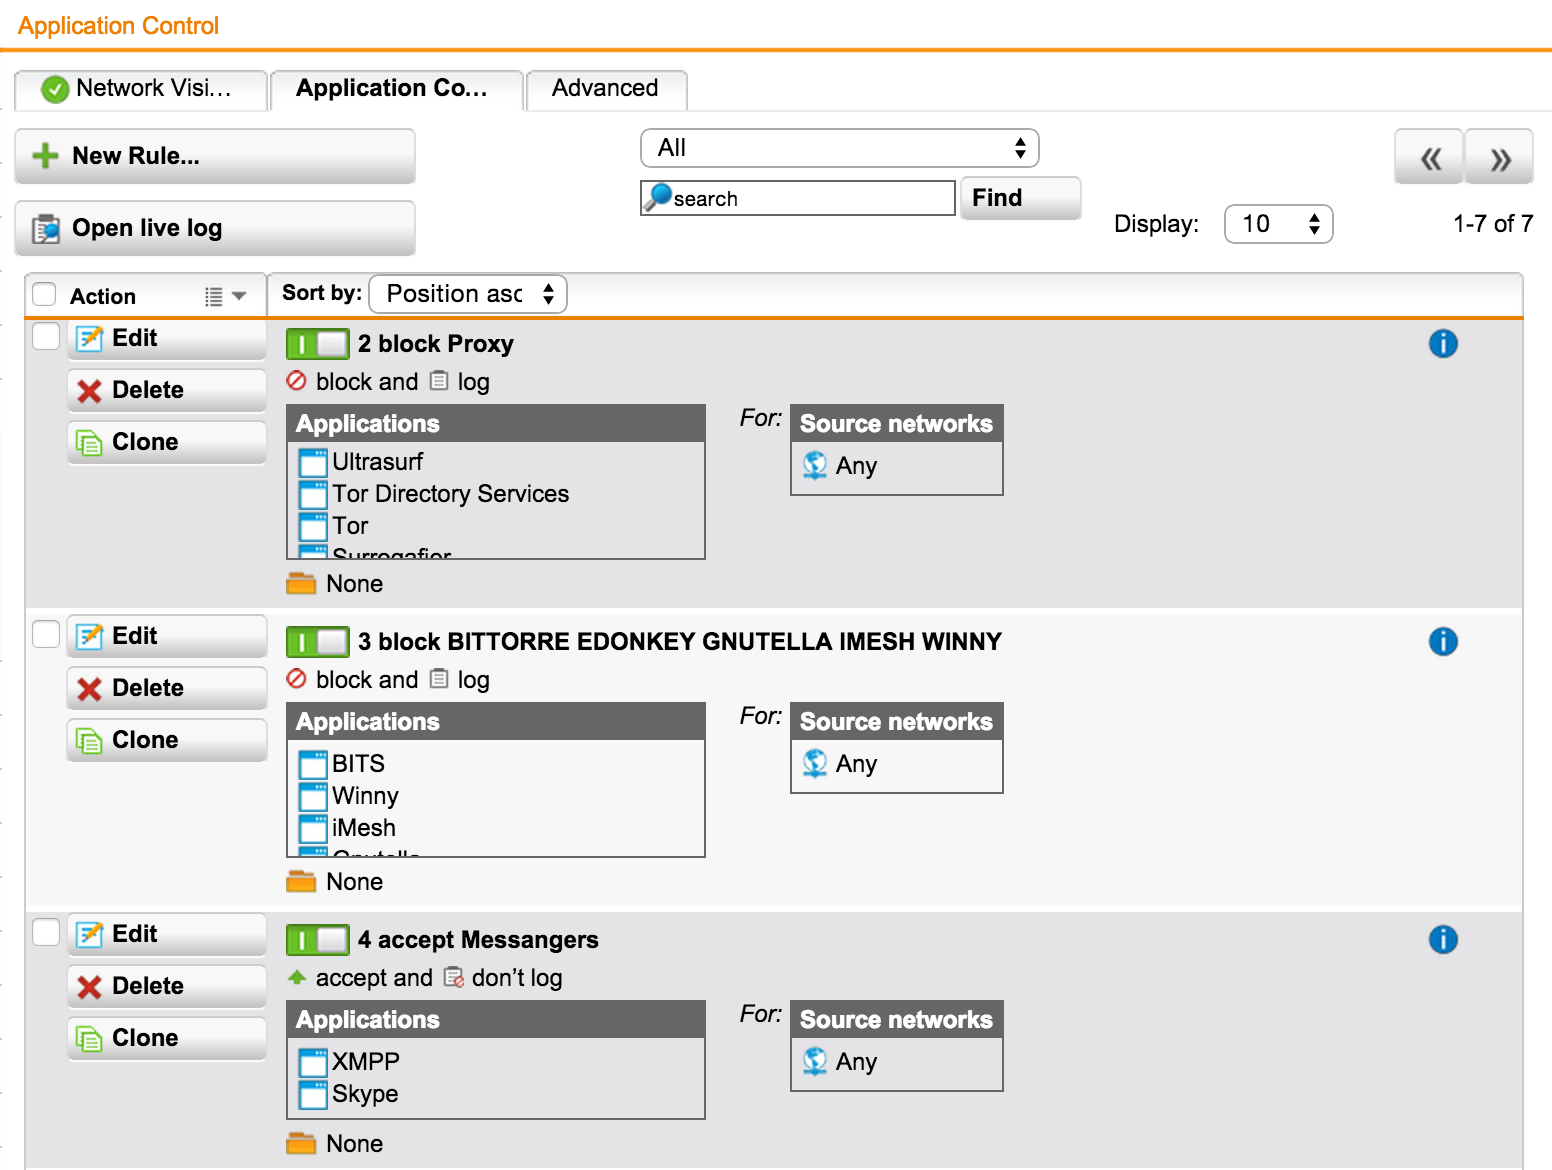
Filtering at the application level or see a black cat
Often, it is necessary to block or allow unhindered access for a particular application. Sophos UTM has a built-in DPI engine that allows you to identify a specific application. Supported> 1000 application signatures and protocols. Since different protocols use different ports, the UTM should be a Default GW (not a proxy) to handle L7 traffic other than http (s).
For example, block all proxies and torrents, but allow IM to work without user authentication:
Embedded Reports or the All-Seeing Eye
One of the important advantages of Sophos UTM in comparison with similar solutions is the large number (1000+) of embedded reports. All of them are located in the 'Logging & Reporting' menu. Reports support Cyrillic usernames.
For example, let's see a report on users for the last week by web filtering:
Let's save the resulting report and create its regular sending by mail:
Customization and Self-Service or Closer to the Heart
On the tab Management -> Customization, you can change the company logo displayed in the messages:
All messages displayed to the user can be easily changed:
Moreover, you can change the WebTemplate. Download the sample can be on the link from the help (in the upper right corner).
User Portal
The user can download the data he needs on the personal portal - 'User Portal'.
Authentication agent, CA root certificate, or VPN settings, depending on the functionality available to the user.
Configured in the menu Management -> User Portal
Result
+ Transparent User Authentication.
+ Different policies for different user groups.
+ URL filtering by category.
+ HTTPS scanning.
+ Scan downloaded files for viruses.
+ Correct definition of file types by signatures.
+ Regular and detailed reports.
+ Self-service user portal.
Problem Solving or Finding a Needle in a Haystack
If something went wrong or doesn’t work at all, I recommend using the following troubleshooting procedure:
- Test the authentication server and the user in which group it is located (see Testing in the AD Connections section).
- Check policy in policy check.
- To look at the log file, there will be information about what FilterAction and Profile have worked on this request. Perhaps simply choosing the wrong order of profiles or not the action for this group.
- With AS SSO authentication (kerberos), check the time on UTM and clients to take time from the same NTP source.
The system is self-documented - clicking on the question mark in the upper right corner brings up a context-sensitive help topic. If the system interface is in Russian, then the documentation will open in Russian. There is also a knowledge base by category .
If you have any questions, please contact us .
Bonus or This is just the beginning)
When migrating (replacing) with such solutions as TMG, PaloAlto, Fortinet, StoneSoft, CheckPoint, etc., a 20% discount is provided until the end of 2015. Details on the promotion page .
Source: https://habr.com/ru/post/266463/
All Articles