The ability to restore physical machines from backups using Veeam Endpoint Backup FREE
“How many times have they told the world” that backing up as an end in itself does not make practical sense - but it does, of course, if it is possible to recover from a backup quickly, correctly and easily. Therefore, the theme of my post today, in continuation of the previous one , will be the recovery of a physical machine from a backup copy created using Veeam Endpoint Backup FREE.
As you have probably already suggested, the restore options are closely related to the backup settings: it goes without saying that restoring the machine as a whole will not work if, say, only user folders have been backed up.
Consider these options in more detail, for which welcome under cat.
This feature can be used regardless of which backup mode has been applied. It is gratifying that in order to restore a couple of files, you don’t have to lift the entire machine from the backup. (Something reminds me of it ... as I think, all Veeam Backup & Replication users who have used it to restore individual files.)
So, how can you start file recovery:
')
Note: If necessary, you can go to the previous step of Backup Location and indicate there where the backup is located. This is convenient, for example, if the required file is located in the backup of another machine.
You can go another way: open the control panel of the Veeam Endpoint Backup Control Panel and select the desired backup in the diagram, where all of them are presented graphically in the form of rectangles. Having studied the information about the selected backup and making sure that it is from it we want to recover, click on the Restore files button.

After you clicked Restore files (or went through the wizard steps and clicked Open ), the backup file will be mounted on the file system of your currently running machine, in the C: \ VeeamFLR folder , and you can view the contents of the backup using a browser Veeam Backup Browser (or Windows browser).

The Veeam Backup Browser supports the following options when restoring:
Useful: You can choose to restore several files / folders at once by pressing CTRL + SHIFT.
Immediately I draw your attention to the fact that such a recovery will be possible only if during the backup you selected the option Entire PC (backup of the whole machine) or Volume Level Backup (backup of the volume).
Obviously, the recovery will be the entire volume.
To start the process, there are similar methods: select Veeam> Volume Restore from the Start menu, or right-click on the tray icon and select Restore - Entire Volumes , or open the application interface, select the desired backup and click Restore volumes .

Like a file, a volume can be restored to its original or new location. In the first case, the original volume will be overwritten. In the second case, you can place the volume either in the free space of the disk, or in the place of existing volumes, replacing them (ie, the data will be overwritten taken from the backup).
I draw your attention to a number of limitations to restore the volume that will occur during recovery without using Veeam Recovery Media:
These limitations can be circumvented by using recovery from the previously created bootable media Veeam Recovery Media (which was discussed here ) and running the bare metal recovery wizard Veeam Bare Metal Recovery to restore the volume (more on this later). The steps of the wizard are quite simple; Depending on the location of the backup, you choose a remote storage system or Veeam Backup & Replication server and get the opportunity to map the disk there. Select the volumes you want to restore - by default, they will be restored to their original location (to specify another, click on Customize disk mapping , then specify where the volumes should be restored).
Important! If you specify a location manually, be careful not to erase existing volumes. (Actually, the data is overwritten during the recovery, so if you change your mind about mapping at this stage, just click Cancel or close the wizard window so that nothing happens by chance.)
The following options are available for manual disk mapping:
Then you can proceed to recovery.
As mentioned above, with the help of the previously created bootable media, you can bypass some limitations when recovering the volume. But, of course, its purpose is not only in this, but in ensuring the restoration of your machine from the backup copy stored on it.
Let me remind you that a specially designed Create Recovery Media is used to create such a media. Depending on what type of media you choose, you may need to change the boot priority of the OS, specifying in the appropriate BIOS settings that the boot should be performed from this media. If everything is done correctly, then after rebooting the machine (before the OS starts), you will be prompted to press any key to boot from Veeam Recovery Media.
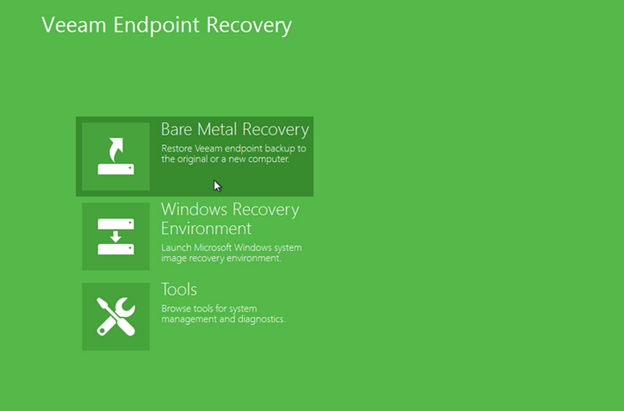
Now let's see what options Veeam Endpoint Recovery offers us in the window that appears.

Let's start in the reverse order, I mean, with the Tools option - what if you can still fix it without resorting to the radical method of “Restoration on bare iron”?
Here is what we have here:
This environment is part of the Windows installation package. If you have a Microsoft system image, you can use it to restore, using Veeam Recovery Media to launch it. (Or you can run it in the usual way; see windows.microsoft.com/en-us/windows/restore-computer-from-system-image-backup#1TC=windows-7 for details.)
After launching from our media, click on the Bare Metal Recovery icon and go through the steps of the wizard:
Let's go back a bit (at the time of the backup) and talk about what backup is on demand and backup on a schedule, and also find out who the stand-alone full backup is.
It is performed automatically according to the schedule of the backup task, whose settings you specify in the Configure backup wizard: they can include a periodic start schedule and / or start triggers.

During the first pass of the task, a full backup will be created, and at subsequent ones - increments; created restore points will be stored and deleted in accordance with the specified retention period.
Creation of backup copies will function as long as the selected storage location is operational. As for the restarting (in case of a possible error during the execution of the task), the logic is as follows: after any failure, the task will try to restart every 10 minutes for the next 23 hours, and then stop doing this by giving an error message.
The following files will be stored in the backup storage:
Backup on demand is convenient, for example, when you need to install a new software or upgrade the system. It is launched from the Veeam Endpoint Backup interface by clicking the Backup Now button.

As a result, a new incremental backup is created in the backup chain (an exception is the first run, when a full backup is created as the beginning of the chain).
Note that, unlike scheduled backup, such a backup will not restart in case of an error.
It creates a full backup, but it will not be part of the chain and, accordingly, will not fall under the storage policy.
To start creating such a backup, you need to right-click on the tray icon and select the command Backup> Standalone full backup . Such a process will also not restart in case of an error. After completion, the backup file is saved to the same location as the chain, but into a separate subfolder. In it, you will find .VBM and .VBK files - if necessary, you can recover from them (do not forget to transfer this folder with a separate backup if you shift folders with backup copies).
Now let's see what the integration of Veeam Endpoint Backup FREE with Veeam Backup & Replication gives us in terms of additional recovery options.
From the Veeam Backup & Replication console, it is very convenient to restore files and folders from our backup using the FLR mechanism (file-level restore, that is, file-level recovery), described in detail in the documentation . There is only one limitation - you cannot restore to the original location, but you can use the Copy To command in the Backup Browser and copy the necessary files to a new location.
If you back up an Active Directory, SharePoint, Exchange or SQL server using Veeam Endpoint Backup FREE, then you can restore the corresponding application objects from such a backup: just start file-level recovery from the Veeam Backup & Replication console, and then from the Backup Browser browser - the corresponding Veeam Explorer tool.

Learn more about how this is done, for example, here .
Any disk from the backup created by Veeam Endpoint Backup can be exported to a VMDK, VHD or VHDX file using the Veeam Backup & Replication console by choosing Restore> Endpoint> Export disk contents as virtual disks from the Home menu.
It should be understood that this will not be P2V recovery, so when you try to boot from such a disk in a virtual environment, errors may occur due to the presence of physical drivers. However, there are more practical scenarios - for example, the disk attachment to the VM. But here you need to remember a few points:
I recall that version 1.1 of the Veeam Endpoint Backup FREE solution was recently released, which supports Windows 10. The solution is available at http://www.veeam.com/ru/endpoint-backup-free-download.html .
Product description can be found on the page http://www.veeam.com/en/endpoint-backup-free.html .
Article on Habré with review of Veeam Endpoint Backup FREE solution: http://habrahabr.ru/company/veeam/blog/255729/
An article on Habré about backing up physical machines using Veeam Endpoint Backup FREE: http://habrahabr.ru/company/veeam/blog/261481/
As you have probably already suggested, the restore options are closely related to the backup settings: it goes without saying that restoring the machine as a whole will not work if, say, only user folders have been backed up.
Consider these options in more detail, for which welcome under cat.
Restore individual files
This feature can be used regardless of which backup mode has been applied. It is gratifying that in order to restore a couple of files, you don’t have to lift the entire machine from the backup. (Something reminds me of it ... as I think, all Veeam Backup & Replication users who have used it to restore individual files.)
So, how can you start file recovery:
- Go to the Start menu, select Veeam> Tools> File Level Restore and launch it.
- In the system tray, we find the icon of our application, click on it with the right button and select the Restore - Individual files command.
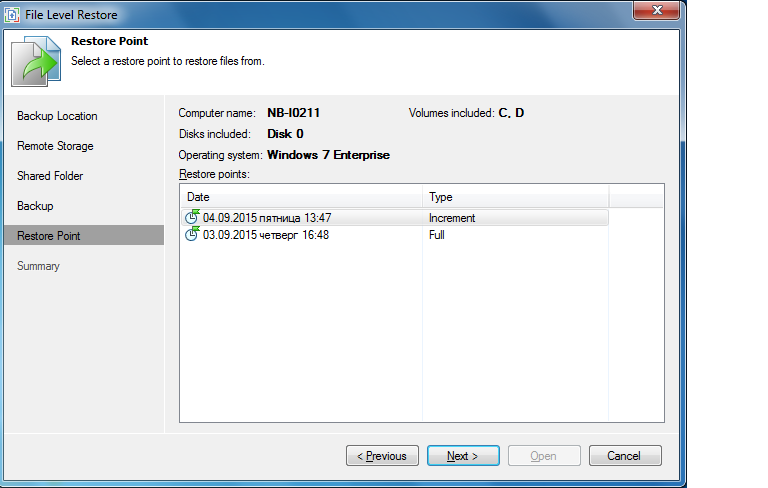
Both of these methods will take us to the master's step, dedicated to the choice of a restore point.
')
Note: If necessary, you can go to the previous step of Backup Location and indicate there where the backup is located. This is convenient, for example, if the required file is located in the backup of another machine.
You can go another way: open the control panel of the Veeam Endpoint Backup Control Panel and select the desired backup in the diagram, where all of them are presented graphically in the form of rectangles. Having studied the information about the selected backup and making sure that it is from it we want to recover, click on the Restore files button.
What happens next?
After you clicked Restore files (or went through the wizard steps and clicked Open ), the backup file will be mounted on the file system of your currently running machine, in the C: \ VeeamFLR folder , and you can view the contents of the backup using a browser Veeam Backup Browser (or Windows browser).
The Veeam Backup Browser supports the following options when restoring:
- Overwrite - the file will be restored to its original location; if that file is already there, it will be overwritten by the file from the backup.
- Keep - the file will be restored to its original location with the prefix Restored - the existing file in the original location will not be overwritten.
- Copy To - the file can be copied to another location, in addition, you can specify whether it is necessary to save the rights settings (checkbox Preserve permissions and ownership ).
Useful: You can choose to restore several files / folders at once by pressing CTRL + SHIFT.
Volume Recovery
Immediately I draw your attention to the fact that such a recovery will be possible only if during the backup you selected the option Entire PC (backup of the whole machine) or Volume Level Backup (backup of the volume).
Obviously, the recovery will be the entire volume.
To start the process, there are similar methods: select Veeam> Volume Restore from the Start menu, or right-click on the tray icon and select Restore - Entire Volumes , or open the application interface, select the desired backup and click Restore volumes .
Like a file, a volume can be restored to its original or new location. In the first case, the original volume will be overwritten. In the second case, you can place the volume either in the free space of the disk, or in the place of existing volumes, replacing them (ie, the data will be overwritten taken from the backup).
I draw your attention to a number of limitations to restore the volume that will occur during recovery without using Veeam Recovery Media:
- The system volume cannot be restored to its original location.
- You cannot restore a volume to another one that contains the paging file.
- You cannot restore a volume to another one that contains the backup file from which the recovery occurs.
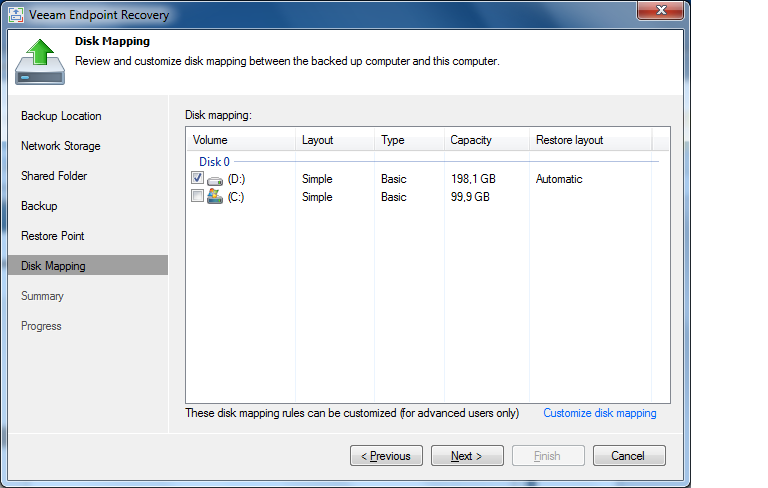
These limitations can be circumvented by using recovery from the previously created bootable media Veeam Recovery Media (which was discussed here ) and running the bare metal recovery wizard Veeam Bare Metal Recovery to restore the volume (more on this later). The steps of the wizard are quite simple; Depending on the location of the backup, you choose a remote storage system or Veeam Backup & Replication server and get the opportunity to map the disk there. Select the volumes you want to restore - by default, they will be restored to their original location (to specify another, click on Customize disk mapping , then specify where the volumes should be restored).
Important! If you specify a location manually, be careful not to erase existing volumes. (Actually, the data is overwritten during the recovery, so if you change your mind about mapping at this stage, just click Cancel or close the wizard window so that nothing happens by chance.)
The following options are available for manual disk mapping:
- Apply Backup Layout - mark up as in backup; The disk will be partitioned in the same way as it was when the backup was created.
- Apply Disk Layout - mark up as a disk; the current layout of the other disk (which you specify) will be used.
- Erase - erase; the current disk layout settings will be deleted.
Then you can proceed to recovery.
Working with Veeam Recovery Media
As mentioned above, with the help of the previously created bootable media, you can bypass some limitations when recovering the volume. But, of course, its purpose is not only in this, but in ensuring the restoration of your machine from the backup copy stored on it.
Let me remind you that a specially designed Create Recovery Media is used to create such a media. Depending on what type of media you choose, you may need to change the boot priority of the OS, specifying in the appropriate BIOS settings that the boot should be performed from this media. If everything is done correctly, then after rebooting the machine (before the OS starts), you will be prompted to press any key to boot from Veeam Recovery Media.
Now let's see what options Veeam Endpoint Recovery offers us in the window that appears.
Tools
Let's start in the reverse order, I mean, with the Tools option - what if you can still fix it without resorting to the radical method of “Restoration on bare iron”?
Here is what we have here:
- Command Prompt - well, that's obvious.
- Reset Password - a useful thing, allows you to set an empty local administrator instead of a forgotten password. If the admin account has been deactivated, no problem - the utility can turn it back on to give you the opportunity to log in. Of course, the password will need to be changed, and after you perform the necessary manipulations, return the account to its previous form (that is, deactivate it).
Important! This utility does not work on a domain controller. - Load driver - to access a network storage system or a dedicated storage system that stores backup copies, you need the appropriate driver for the OS - exactly the same is required for working with Recovery Media. If the option “ Include hardware drivers from this computer” was selected when creating the media, the drivers will be loaded automatically. You can also use this utility to download additional drivers if necessary.
- Memory diagnostics (Microsoft utility) - checking the memory of your machine and diagnosing potential problems. For more information, see http://technet.microsoft.com/en-us/magazine/2008.09.utilityspotlight.aspx
- Startup repair (Microsoft utility) - can help with fixing problems when starting Microsoft Windows (for example, missing or damaged system files or the boot sector). For more information, see http://windows.microsoft.com/en-us/windows7/products/features/startup-repair
- Export Logs - export of application logs to an external storage system; It is highly recommended to have log files in case you contact Veeam Technical Support.
Windows Recovery Environment
This environment is part of the Windows installation package. If you have a Microsoft system image, you can use it to restore, using Veeam Recovery Media to launch it. (Or you can run it in the usual way; see windows.microsoft.com/en-us/windows/restore-computer-from-system-image-backup#1TC=windows-7 for details.)
Bare metal recovery
After launching from our media, click on the Bare Metal Recovery icon and go through the steps of the wizard:
- Backup location - specify the location of the backup - it can be local storage (including removable devices) or network storage. It is likely that the wizard will recognize the backup files on the local device automatically. If you selected a network storage, then you need to specify which network adapter to use for the connection (yes, it also connects via WiFi), and if necessary, specify the network settings. Then enter the path to the shared folder or the IP address of the Veeam Backup & Replication server.
- Restore Point - select the desired restore point. This is usually the most recently created one, but you can choose any other.
- Restore Mode - we are determined with the recovery mode. The “Entire computer” and “System volume” modes (System volume) do not require manual intervention and perform automatic recovery to the original location or to an empty disk. Manual mode, as usual, is designed for advanced users - it allows you to manually perform mapping and transfer volumes from backup to an existing disk, which, on the one hand, requires certain skills and understanding of what is happening, and on the other - gives full control over volumes and their recovery.
- Summary - finally, once again we carefully check the settings and run the recovery process. If necessary, Veeam Endpoint Backup FREE will re-allocate partitions and restore data from a backup.
Important! All data on these volumes and sections will be overwritten!
A small lyrical digression about backup
Let's go back a bit (at the time of the backup) and talk about what backup is on demand and backup on a schedule, and also find out who the stand-alone full backup is.
Scheduled backup
It is performed automatically according to the schedule of the backup task, whose settings you specify in the Configure backup wizard: they can include a periodic start schedule and / or start triggers.
During the first pass of the task, a full backup will be created, and at subsequent ones - increments; created restore points will be stored and deleted in accordance with the specified retention period.
Creation of backup copies will function as long as the selected storage location is operational. As for the restarting (in case of a possible error during the execution of the task), the logic is as follows: after any failure, the task will try to restart every 10 minutes for the next 23 hours, and then stop doing this by giving an error message.
The following files will be stored in the backup storage:
- .VBM - metadata file that stores all the information about the backup chain
- .Vbk - full backup file
- .VIB - increment file
Backup on demand
Backup on demand is convenient, for example, when you need to install a new software or upgrade the system. It is launched from the Veeam Endpoint Backup interface by clicking the Backup Now button.
As a result, a new incremental backup is created in the backup chain (an exception is the first run, when a full backup is created as the beginning of the chain).
Note that, unlike scheduled backup, such a backup will not restart in case of an error.
Separate full backup
It creates a full backup, but it will not be part of the chain and, accordingly, will not fall under the storage policy.
To start creating such a backup, you need to right-click on the tray icon and select the command Backup> Standalone full backup . Such a process will also not restart in case of an error. After completion, the backup file is saved to the same location as the chain, but into a separate subfolder. In it, you will find .VBM and .VBK files - if necessary, you can recover from them (do not forget to transfer this folder with a separate backup if you shift folders with backup copies).
Integration with Veeam Backup & Replication
Now let's see what the integration of Veeam Endpoint Backup FREE with Veeam Backup & Replication gives us in terms of additional recovery options.
File recovery
From the Veeam Backup & Replication console, it is very convenient to restore files and folders from our backup using the FLR mechanism (file-level restore, that is, file-level recovery), described in detail in the documentation . There is only one limitation - you cannot restore to the original location, but you can use the Copy To command in the Backup Browser and copy the necessary files to a new location.
Restore application objects using Veeam Explorers
If you back up an Active Directory, SharePoint, Exchange or SQL server using Veeam Endpoint Backup FREE, then you can restore the corresponding application objects from such a backup: just start file-level recovery from the Veeam Backup & Replication console, and then from the Backup Browser browser - the corresponding Veeam Explorer tool.
Learn more about how this is done, for example, here .
Export Discs
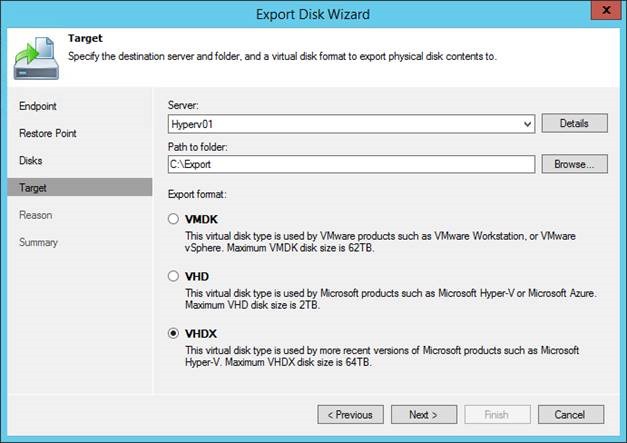
Any disk from the backup created by Veeam Endpoint Backup can be exported to a VMDK, VHD or VHDX file using the Veeam Backup & Replication console by choosing Restore> Endpoint> Export disk contents as virtual disks from the Home menu.
It should be understood that this will not be P2V recovery, so when you try to boot from such a disk in a virtual environment, errors may occur due to the presence of physical drivers. However, there are more practical scenarios - for example, the disk attachment to the VM. But here you need to remember a few points:
- The VMDK disk can be restored to the storage (datastore) in a “thin” format (thin provisioned), while recovery to the server will save the disk as a “thick” (thick provisioned).
- VHD / VHDX drives are always restored as dynamic.
Instead of conclusion
I recall that version 1.1 of the Veeam Endpoint Backup FREE solution was recently released, which supports Windows 10. The solution is available at http://www.veeam.com/ru/endpoint-backup-free-download.html .
Product description can be found on the page http://www.veeam.com/en/endpoint-backup-free.html .
Article on Habré with review of Veeam Endpoint Backup FREE solution: http://habrahabr.ru/company/veeam/blog/255729/
An article on Habré about backing up physical machines using Veeam Endpoint Backup FREE: http://habrahabr.ru/company/veeam/blog/261481/
Source: https://habr.com/ru/post/266043/
All Articles