Compiled data bindings in Windows 10 applications

One of the innovations of Windows UAP is that it has become possible to create binders that will be compiled. This innovation significantly improves the performance (including download speed) of the application. Previously, data bindings were based on reflection, and therefore slow. Plus, it has become much more convenient to debug compiled binding code.
In order to create a binding that will be formed when the application is compiled, you must use {x: Bind} instead of {Binding}.
Binding can be done both to the code-behind class and to other page controls.
For example:
<Grid x:Name="grd" Tag=" "> <TextBlock FontSize="40" Text="{x:Bind grd.Tag}" /> </Grid> If the value of {x: Bind} is simply Tag, then the binding will occur to the Tag attribute of the Page object.
Compiled binders are strongly typed (can be tied only to objects with a specific type) and are checked at compile time, which means that if an error is found somewhere, then the compilation will be interrupted.
Similar to WPF binders, various binding modes are possible: OneTime, OneWay, and TwoWay. The default mode is OneTime.
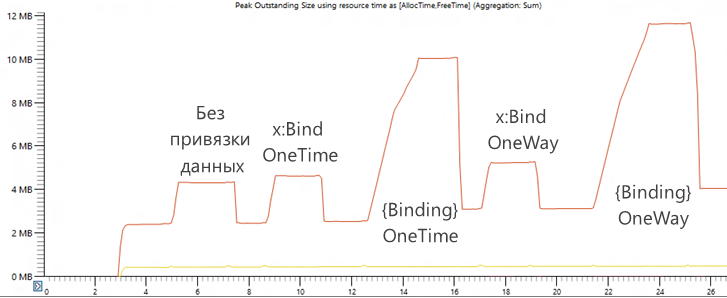
You can see a comparison of the performance of compiled binders and regular ones in the following graph:
')
In order for the application window control to change when changes are made to the anchored object, interfaces that have been well known to developers are also supported: INotifyPropertyChanged, IObservableVector, INotifyCollectionChanged.
Consider a simple example of using x: Bind
Create a simple Employee class:
public class Employee { private string _name; private string _organization; private int? _age; public string Name { get { return _name; } set { _name = value;} } public string Organization { get { return _organization; } set { _organization = value; } } public int? Age { get { return _age; } set { _age = value; } } } Add a namespace to the class of our page (by default, this is MainPage):
using System.Collections.ObjectModel; We need it to use ObservableCollection. Let's apply the ObservableCollection collection as it contains the implementation of INotifyCollectionChanged, which means that each time the elements of the collection are added and removed, the collection will be updated and the control to which the collection data is attached.
Announce a collection:
ObservableCollection<Employee> manager = new ObservableCollection<Employee>(); Add some items to the collection. We do this after initializing the page:
public MainPage() { this.InitializeComponent(); manager.Add(new Employee { Age = 45, Name = "", Organization = " " }); manager.Add(new Employee { Age = 25, Name = "", Organization = " " }); manager.Add(new Employee { Age = 22, Name = "", Organization = " " }); } Now we can use the following construction in the XAML code of our page:
<ListView ItemsSource="{x:Bind manager}" Width="200" Height="250" BorderThickness="1" BorderBrush="Black"> <ListView.ItemTemplate> <DataTemplate x:DataType="local:Employee"> <TextBlock Text="{x:Bind Name}" /> </DataTemplate> </ListView.ItemTemplate> </ListView> Here, under local: Employee , the namespace reference from the page header is used:
<Page x:Class="CompiledBindingsDemo.MainPage" xmlns="http://schemas.microsoft.com/winfx/2006/xaml/presentation" xmlns:x="http://schemas.microsoft.com/winfx/2006/xaml" xmlns:local="using:CompiledBindingsDemo" xmlns:d="http://schemas.microsoft.com/expression/blend/2008" xmlns:mc="http://schemas.openxmlformats.org/markup-compatibility/2006" mc:Ignorable="d"> As a result, we get:
The {x: Bind} values can be the following: Converter, ConverterLanguage, ConverterParameter, FallbackValue, Mode, Path, TargetNullValue
Unlike data bindings using {Binding}, the following values are not used: Source, ElementName, RelativeSource, UpdateSourceTrigger
They are no longer needed and replaced with other functionality. Let's say RelativeSource is replaced by the element name and its attribute (see the first example). Of all the possibilities of updating the source of the binding, the UpdateSourceTrigger in x: by default, only PropertyChanged remains (it updates the source of the binding immediately after changing the property of the binding object). Only TextBox.Text updates the source after losing focus.
Another great new feature is the x: Phase attribute, which allows for the progressive loading of elements.
Consider our example:
<DataTemplate x:DataType="local:Employee"> <StackPanel Orientation="Vertical"> <TextBlock Text="{x:Bind Name}" x:Phase="1" /> <TextBlock Text="{x:Bind Organisation}" x:Phase="3" /> <TextBlock Text="{x:Bind Age}" x:Phase="2" /> </StackPanel> </DataTemplate> In this case, the order of loading / drawing elements is set by force. The first will load the first TextBlock with the name, the second the third with age and the last will load the text with the name of the organization. In this case, the order is not particularly significant, but sometimes, especially when using media data, it is important. If you specify the value of x: Phase = "0" , then this will mean that this element does not specify the value of the boot order.
You can use Bindings.Initialize () to initialize data bindings, but forced initialization is not required, as it happens at page load time.
It is possible to call Bindings.Update () to update asynchronous data. The same method can be used for OneTime bindings that consume the least amount of resources.
In order to pause the data and not track changes to the data, you can call Bindings.StopTracking () . And in order to continue tracking, Update () is called.
In addition, it is now possible to use snaps for events. By default, a click event is declared as:
<Button Click="PokeEmployee">Poke Employee</Button> You can declare an event inside a class using the following event binding:
<Button Click="{x:Bind SomeDataClass.Poke}">Poke Employee</Button> The English-Russian dictionary of the word Poke gives one of the meanings "record item". So, apparently, the main purpose of event bindings is the imperative change of data.
Modifying our example:
<DataTemplate x:DataType="local:Employee"> <StackPanel Orientation="Vertical"> <TextBlock Text="{x:Bind Name}" x:Phase="1" /> <TextBlock Text="{x:Bind Organization}" x:Phase="3" /> <TextBlock Text="{x:Bind Age,Mode=OneWay}" x:Phase="2" /> <Button Click="{x:Bind Poke}" Content=" "/> </StackPanel> </DataTemplate> And in our Employee class, add:
public void Poke() { this.Age = this.Age+1; } But bad luck, when debugging, it is noticeable that the Age value increases, as expected, but the interface is not updated. This is because the ObservableCollection collection updates its binding only when adding or removing items. In order for the update to occur and when data changes, you must implement the INotifyPropertyChanged interface. This is done in the same way as was done earlier. Adding a namespace:
using System.ComponentModel; Interface declaration:
public class Employee : INotifyPropertyChanged And the implementation of the property change event:
public event PropertyChangedEventHandler PropertyChanged; protected void RaisePropertyChanged(string name) { if (PropertyChanged != null) { PropertyChanged(this, new PropertyChangedEventArgs(name)); } } Now you can call this event in the setter after setting the Age value:
public int? Age { get { return _age; } set { _age = value; RaisePropertyChanged("Age"); } } All class code:
using System; using System.Collections.Generic; using System.Linq; using System.Text; using System.Threading.Tasks; using System.ComponentModel; namespace CompiledBindingsDemo { public class Employee : INotifyPropertyChanged { private string _name; private string _organization; private int? _age; public string Name { get { return _name; } set { _name = value;} } public string Organization { get { return _organization; } set { _organization = value; } } public int? Age { get { return _age; } set { _age = value; RaisePropertyChanged("Age"); } } public void Poke() { this.Age = this.Age+1; } public event PropertyChangedEventHandler PropertyChanged; protected void RaisePropertyChanged(string name) { if (PropertyChanged != null) { PropertyChanged(this, new PropertyChangedEventArgs(name)); } } } } The bound event can be triggered as without parameters void Poke () ,
so with the void Poke parameters (object sender, RoutedEventArgs e)
or with parameters of the base event type void Poke (object sender, object e)
Overloads are not supported.
Of course, the name of the method does not have to be Poke.
{X: Bind} events can replace MVVM events like ICommand or EventToCommand, but such a parameter as CanExecute is not supported.
Compiled bindings support good old converters. That is, you can create a class that implements the IValueConverter interface and perform transformations in it.
The class might look like this:
using System; using System.Collections.Generic; using System.Linq; using System.Text; using System.Threading.Tasks; using Windows.UI.Xaml.Data; namespace CompiledBindingsDemo { class ConverterExample : IValueConverter { public object Convert(object value, Type targetType, object parameter, string language) { if (value == null) return string.Empty; // - value string newtext = value.ToString(); newtext = newtext.ToUpper(); return newtext; } public object ConvertBack(object value, Type targetType, object parameter, string language) { // throw new NotImplementedException(); } } } If we have such a class in the application, we can add it to the XAML resources of the page:
<Page.Resources> <local:ConverterExample x:Name="ThatsMyConverter"/> </Page.Resources> Now we can use the converter for data binding:
<TextBlock Text="{x:Bind Name,Converter={StaticResource ThatsMyConverter}}" /> And then the register of the text that is contained in Name, when displayed, will be changed by the converter to the upper (capital letters).
Compiled binding is not suitable for all situations. Some prefer classic data bindings using {Binding} instead of {x: Bind}
{Binding} can work together with JSON or some other untyped dictionary of objects. {x: Bind} does not work without information about a specific data type.
Duck Typing (if something walks like a duck, and quacks like a duck, then we will treat it like a duck) - the same property names for various objects work fine with {Binding}, but not with {x: Bind}. for example, Text = "{Binding Age}" will work with both the Person class and the Wine class. To use x: Bind you will have to create a base class or interface.
Programmatically creating links is only possible with {Binding}. When using {x: Bind}, it is not possible to add or remove bindings at runtime.
{x: Bind} cannot be used in style for setters, but it can be used in a DataTemplate template (as discussed above).
An example you can find on github
Source: https://habr.com/ru/post/265993/
All Articles