We write a synthesizer for the concert. PureData Field Tests
Introductory
Prerequisites
Building a synthesizer on PD is an extremely interesting exercise, however, room experiments and couch parsing of midi messages are still very different from the “combat” conditions in which you have to perform. And after the failed demonstration at LinuxFest, I seriously worried about live-performance solutions. Usually, a more or less functional midi controller (such that it uses at least two channels that you can listen to separately) is enough, however, it is quite expensive and you have to compensate for all the GUI of the synthesizer itself and rely on the mouse and keyboard.
About a month ago I was called to play in a curious St. Petersburg group, for the position of "electronic engineer." My task is to play synthesizer parts and their potential spelling. The group was actively concerting and it was necessary to prepare a solution quickly, and, having listened to their material and communicating with the members of the team, I began to search for a solution.
Formulation of the problem
The remark, anticipating the question "why?". The synthesizer, of course, is extremely simple and software, which has the same functions - the sea. However, here on the manual example, the basic principles are shown, which it is important for the PD beginner to repeat. This applies to both generators and converters. This is a base from which it is possible and necessary to work, and simplicity and dampness will make it possible to quickly disassemble the elements and serve, if not the base, then good additions to your own patches. Copy and experiment on health!
It is necessary to assemble a synthesizer, the configuration of which can change quickly and hot, as well as it should be undemanding to the controllers. And, of course, the ability to play "massive" parties, with a wide frequency band. The inspiration was served by a small modular company Korg, the model of which, alas, is unknown to me.
Having picked it up, I divided the task into parts: signal generators by shape (saw [phasor ~] , sine [osc ~] , square (not in the library) , triangle (also not in the library) ). Phase modulation module, ring modulator, overload, as well as “white” and “pink” noise generators ( [noise ~] and [pink ~], respectively) and filters for them (band [bp ~] , low [lop ~] and the top [hip ~] frequencies), and, of course, some kind of stack, which consistently sends out the parameters entered into it at a given speed (it is convenient to keep on some kind of rehearsal part, such as bass or drums).
So, in principle, that's all. It remains only to transfer this entire farm to PD and start experiments.
Syntostroy
To build backgrounds with markers in the GUI, we use standard put-> canvas or Ctrl-Shift-C , I created such a separate module for each module and assembled it as a mosaic. And then place the above objects. I got this design:
')
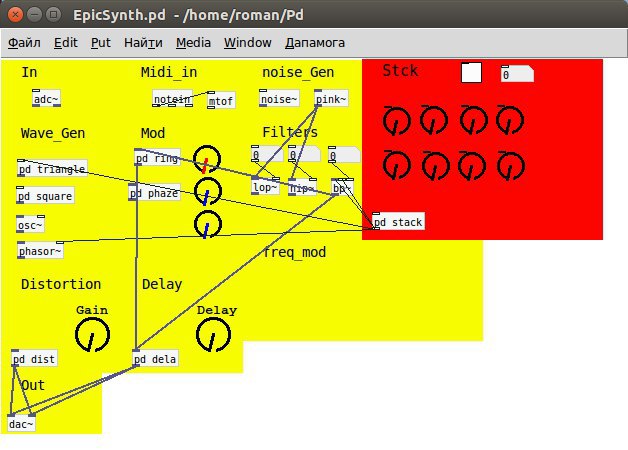
We will analyze separately:
Block in
Contains nothing interesting. [adc ~] is an input object from a microphone, line or other applications, in JACK it is displayed simply as an input. Enough informative help about channels, etc., nothing to add. But then everything is much more interesting.
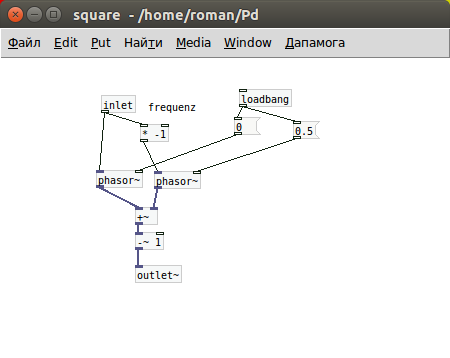
Wave_Gen block
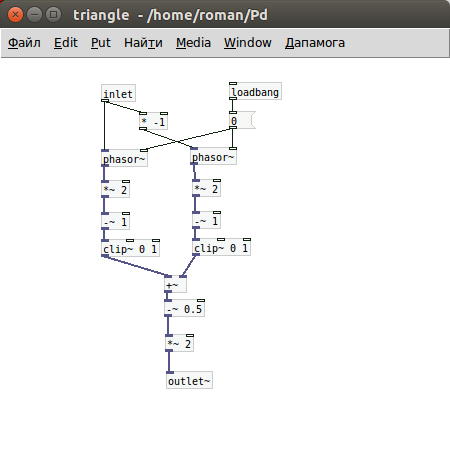
We already know the sine wave generators and the saws, but the square and the triangle (here: square and triangle, respectively) had to be sculpted from what it was. The math is simple, high school graduation classes at best. To get a square out of the saw, you can take two saws, one of them to unwind (this is done by feeding negative frequency values, that is, you need to change the sign of the original frequency), shift the phase by 0.5 (the phase shift is fed to the right input and has a range of values from 0 to 1, i.e. the shift is indicated on the ordinate axis). And now we are folding this unfolded and displaced wave with the first generator, which we did not touch. As a result, we get a superposition in the form of a square wave, working in the range from 0 to 2. Then we shift the wave so that it is in the region [-1; one]. That is, subtract 1. As a result, we will have something like this:
The triangle approach is the same. The train of thought can be restored by code:
But in general...
Instead of subtracting a fixed number, you can output a certain variable; moving the diffuser gives you very interesting overtones and glitches, which can sometimes be used in the corresponding music. But in this synthesizer I did not use it, I will definitely turn it on in the new version.
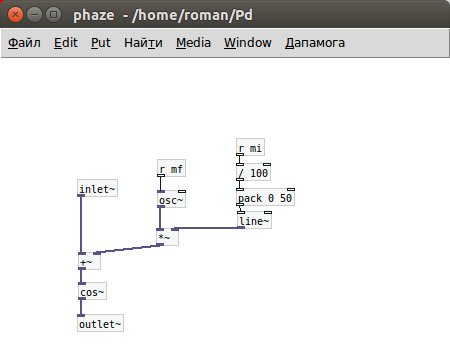
So, with the generators figured out. We will understand with converters. According to the principles of operation of the ring and the phase, it is better to visit Wikipedia, but here I just give the code as it is, since everything is based more on the principle of operation than on the mathematical justification:
Ring mod
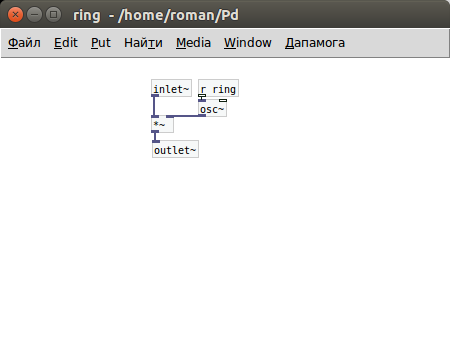
Phase mod
Block stck
Perhaps this is the case (and the only one, unfortunately), when the Russian-language information on PD is really useful.
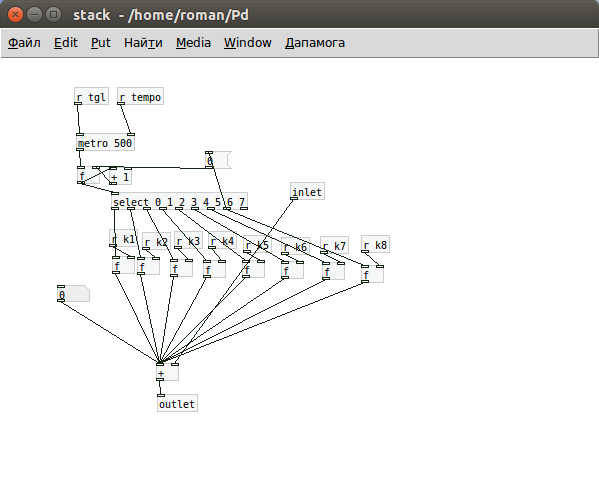
This subpatch contains only a counter and an [sel] object whose task is to send bangs to the outputs when a certain counter value is reached. In the red rectangle (directly in the interface), the offset of the notes are set with the help of knobs, the square button - the start, next to the number box, the delay in ms is indicated (that is, the duration of each section). Converting this number in order of labor will not be, I think, with this you will be able to cope on your own. Well, the number coming to the input is the original frequency. Here you can bring midi events and thus get an arpeggiator. In general, this is the arpeggiator.
I decided not to write a lot of effects, and decided to limit myself only to distortion (and don’t be confused by the delay block, in fact this is not a delay, because it was too lazy to write it and not for anything)
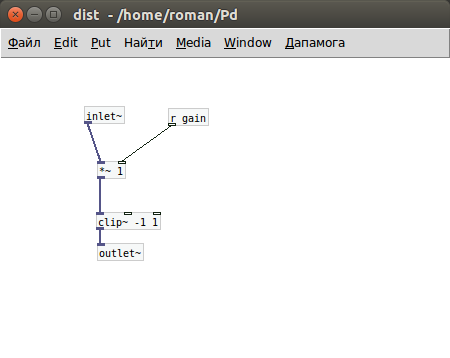
Distortion
The principle of distortion is just as simple, there is some kind of hard limitation on the strength of the signal, all that is higher is cut mercilessly. This is achieved with the help of the object [clip <range for y>] and the operation of multiplying by a number, which strengthens the signal, bringing it beyond the allowed limits. For overdrive (where the slices are curvilinear) there is an object [overdrive ~] .
Conclusion
The field trials of the concert were quite successful, the only thing that depresses me a little is the need to work a lot with the mouse and constantly look at the monitor. First of all, you don’t shake your head too much, and secondly, you don’t see comrades who perform conductor functions (yes, that’s how serious it is). And, as a result, in one of the songs I missed the moment of a sharp ending, and remained for a second to buzz alone. In addition, when it is necessary to control both the dynamics and parameters of transducers at the same time, one mouse is not enough. Therefore, in the next versions I decided to sacrifice the flexibility of the performed parts and transfer the parameters to the synthesizer using our keyboard and gamepad with DirectInput. In the next series, wait: “the controller from what is on hand” or “how to save on electronic music”
Waiting for your questions in the comments.
Source: https://habr.com/ru/post/265929/
All Articles