Say a word about poor XWiki
Prologue.
" If you are polite ,
Say: "Hello."
And if they answer you: "No",
Restrain your passion! "(C)
Once ... when once again, while performing routine work, you will waste time remembering which of the project options and for what reason changes were made in the calculations, design or text ... o User - know that it’s time for you to combat Passion for Structuring! Structuring, or the strategy of organizing disparate information, rests on the capabilities and abilities of a particular person, whose productivity depends entirely on the tools he uses for these purposes, be it a notebook or an automated control system .
')
Today, there are a huge number of such tools that directly and indirectly solve this problem, with varying degrees of efficiency, but in my opinion, the future behind products integrates not only the input, sorting, presentation and data design tools, but also contains analytics and programming tools and search. XWiki, as a representative of such a direction, will be devoted to sowing an article, which will include a review, installation and configuration of a wiki engine, which will be interesting both for beginners and advanced users.
Welcome to Cut (caution - traffic, pictures)
Exposition
There is almost nothing about the XWiki wiki engine in the Russian-speaking segment of the Internet, except general information and a couple of manuals, which in my opinion is absolutely wrong, because it is a great tool and helper, with its pluses and minuses, of course. XWiki is a second-generation wiki engine characterized by the ability to structure information and programmatic access to the wiki database. Written in Java, the license of the LGPL distribution, the functionality includes a blog, API tools, comments, LDAP authentication , page export to PDF. Used by many companies around the world. 25 interface languages, including Russian. Also in more detail anyone can compare on wikimatrix with the most common wiki engines in RuNet: DokuWiki and MediaWiki .
Outset
Download the latest, at the time of this writing, version of XWiki 7.1.2 at the following link: http://enterprise.xwiki.org/xwiki/bin/view/Main/Download
Installation options support: Windows, Debian, web container (web server) - * .war, multisystem format - *. Jar and a portable version of the wiki based on the Jetty + HSQLDB combination, which, IMHO, is most convenient for user setup / operation in both Windows and Linux. About her and will be discussed.
In order to install Xwiki, it is necessary that Java be installed on the system, as well as unpack files from the ZIP archive to the root of the disk (it is also recommended to rename the folder to a shorter path, like so: " D: \ xwiki-7.1.2 "). Start is carried out by the start_xwiki.bat file in which all necessary settings are already registered.

Now we need to open a web browser window (the console window is absolutely not recommended to close), and enter the specified URL from the console, in our case it is: panther.itme.info : 8080 / xwiki / bin / view / Main /
Here it is also worth adding that the default port from which XWiki starts is 8080, if for one reason or another it is busy with you, you can change it by editing start_xwiki.bat using Notepad.
After loading the following window will open in the browser:

Of the interesting things here, the link to the guide in English is Documentation , but we will be interested in something completely different, namely, in the upper right corner click on the Log-in and enter to enter the admin area:
Login: Admin
Password: admin
It is worth noting that in this place the register matters!

Here I want to dwell on the following:
1. Side panels acquired additional functionality that is configured by the User.
2. The functionality in XWiki allows you to edit not only text on pages, using a regular or WYSIWYG editor, displaying it in columns using the editing of the Inline form, but also inserting gadgets on the page. A gadget in XWiki is Macro that is displayed in a certain area, i.e. calling one or a sequence of commands, in particular, it can be a link to another page or even a blog feed, a tag cloud, forms for sending messages, etc. etc.
Macros in XWiki are essentially the basis of this engine , it is thanks to them that the User can customize almost everything, be it: his own mini-application, the appearance of pages and panels, or the integration of his own extension (plug-in).
Development
Here you need to digress a bit and talk about the organizational structure of XWiki, namely about the life cycle of wiki pages . Here there is one subtlety, namely: The user can create the Page and Space , and if everything is more or less clear with the Page 's, then when creating the Space , the Header of the area is created, inside which the Page machine will be created with the name WebHome , but it will be displayed everywhere is the title of the area, and the addressing will be on WebHome, which can create some difficulties when linking to the page. At the same time there are no restrictions on the level of investments that can be made both to Space and to Page.
Macros.
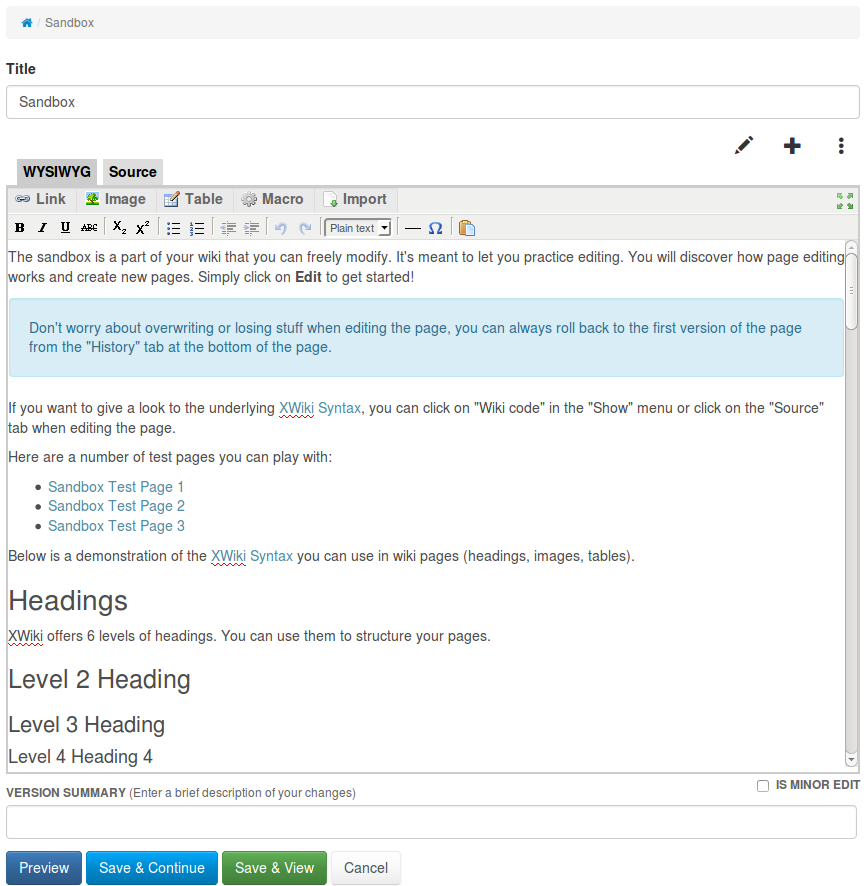
First you need to select a page to edit and enter the editor.

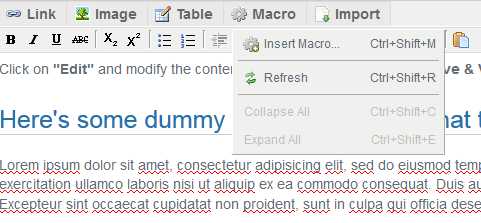
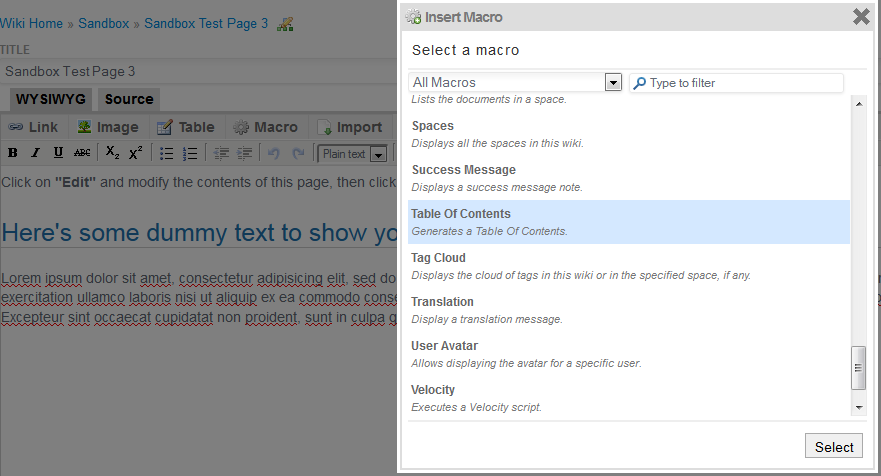
Then it is necessary to type either the macro itself in text mode, along with the parameters, or, using the graphical interface, select the required macro from the list.
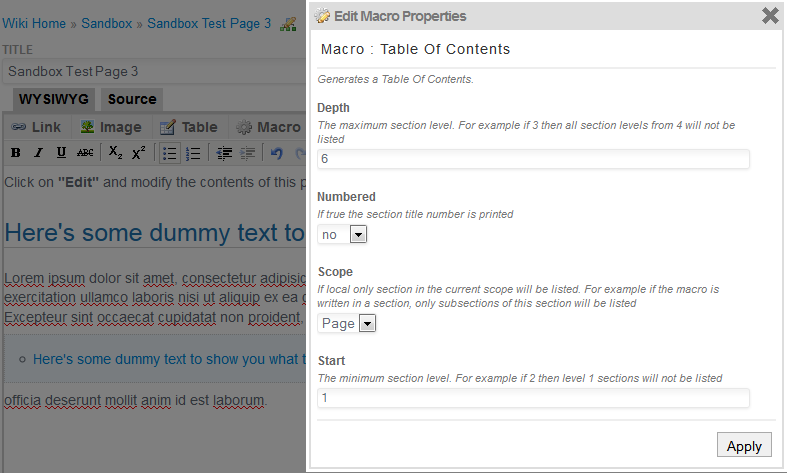
and fill in the required fields:
But it was all the lyrics, let's move on to practice and we begin with the interface settings. To do this, click on the Panels icon in the left pane and launch Panel Wizard in the page that opens. You will see the administrator settings interface, opened in the Panel Wizard tab. An alternative and basic way to go to the XWiki settings is to click on the arrow in the top drop-down list next to Home and select Administer Wiki .

The tab on the settings page of the Page Layout panel allows you to customize the location, number and width of the columns of our wiki. The adjacent side of the Panel List tab includes applications (macros), which can be located on our fields, while they include a preview window, as well as control elements for enabling / excluding and editing content and functions. Preview for the corresponding applications, which are in the form of buttons and functionality in the fields, is turned off. In order to customize the functionality of the application - you need to click on Edit , to delete the macro - click on Delete , to remove / place the application / functionality on the panel - drag using the Drag and Drop method.
Now we will make the right navigation pane, to do this, remove the Quick Links and My Recent Modifications from the right pane and add Tag Cloud, Navigation and Create Page , click on Save the New Layout and go to the Navigation edit and paste the following code that will make our surfing more convenient:
What does this give us? This gives the mapping a tree structure for navigating between attachments, Pages and Spaces , without displaying additional distracting information. Now it’s time to bring in colors to our new site and get away from the flat interface. To do this, select the Presentation item in the LOOK & FEEL menu . Here we change Icon Theme to Silk and Color Theme to Garden .
Voila

Now it's time to think about media tools, namely, what kind of blog without a gallery and graphics? Unfortunately, XWiki has no built-in gallery, so you have to work hard to install and configure Extensions . To do this, go to the EXTENSION MANAGER menu item Add Extensions . Here you can install the necessary add-ons from the web repository, in this case we will be interested in the Lightbox Macro plug-in, with which you can conveniently organize a slide show, as well as combine pictures into groups. To install, enter the word lightbox in the search bar and click install in the result of the search.

Now go to the main page of our XWiki and here in the Navigation panel we will find 2 new Space Lightbox and LightboxMacro . So it's time to apply the macro to the business, for this we create a test Space under the name Test page and in the Attachments tab we upload pictures for testing the gallery, in our case these will be photos from the day of the celebration of May 9, 2014 taken on an unremarkable china phone on Android Jiayu G3.
The text of the code is interpreted as follows: a list of attachments is placed on the $ myArray array on the page, then sorted by name (for those cases if the downloaded files from the camera were downloaded to each other, but at the same time the date and time of the shooting were stored in the file name, or at least numbering sequence pictures). After that, for each attachment, if it is an image, a miniature is displayed with a height of 20% of the original. Here you also need to say that the macro parameters include the following items:

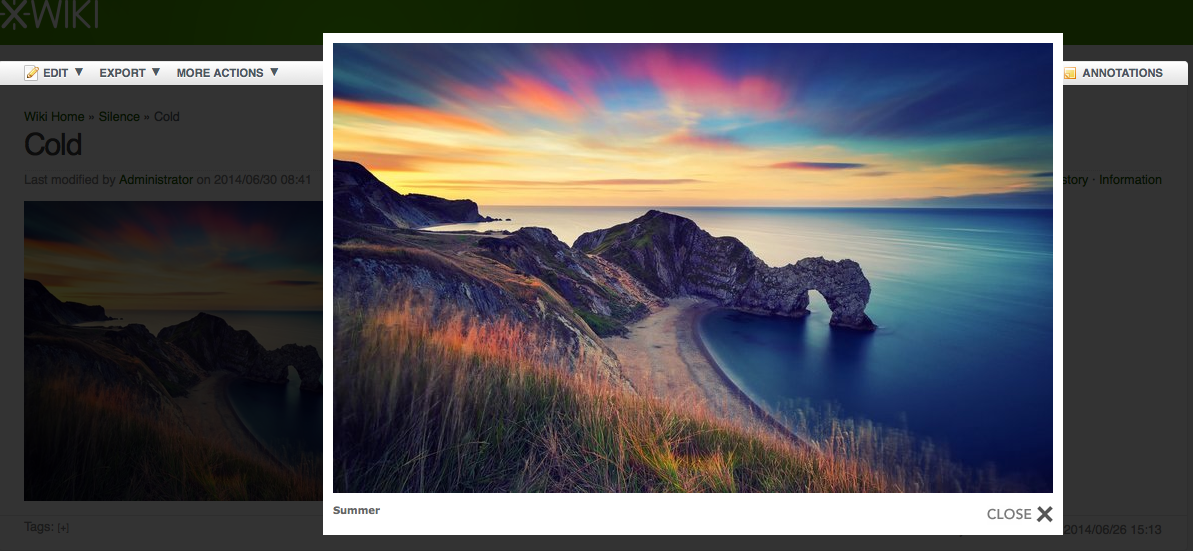
What is convenient this macro? The fact that automates the process of displaying attachments, regardless of how many, what images and under what name were loaded. You can also click on any of the thumbnails and in the pop-up window you will see the photo you like, which is also an undoubted advantage. But in this case the spoon of tar will be the fact that in the pop-up window the image will be opened in its original size, which is not always convenient, especially if this resolution exceeds the working resolution of the monitor screen. In this case, do the following:
1. Follow the link to the Macro Lightbox page;
2. Click on the arrow of the Edit menu and in the drop-down list that appears, select Objects ;
3. In the new window, go to the code by expanding the lists of Objects of type XWiki.JavaScriptExtension (1) and Objects of type XWiki.StyleSheetExtension (1) ;
4. Now we make the following changes to the JS code:
Now rule Objects of type XWiki.StyleSheetExtension (1)
So what has been changed here? XWiki.Style transfers the image dimensions to the JS code, and then scaling it to a height of 640 pixels (but you can also change the value at any time to fit you), this is because my wife has a laptop display with a resolution of 1360x768 pixels. How to do so from the OS to get user permission to the code - I do not know. Warning further comments on the quality of edits in the code - these edits were made by me on the basis of the knowledge gained in school during computer lessons in QBasic 4.5 and Borland Pascal 7.0.
Climax
Now we have a wiki engine including functionality:
- Blog;
- WYSIWIG editor;
- Image galleries;
- Ability to edit and create new macros;
- The ability to program and support the syntax of popular wiki engines;
- Integration with Open Office (!) ( Although for this you need to install and start the service or use crutches );
Here's what I got as an example of a test corporate site:

" If you are polite ,
Say: "Hello."
And if they answer you: "No",
Restrain your passion! "(C)
Once ... when once again, while performing routine work, you will waste time remembering which of the project options and for what reason changes were made in the calculations, design or text ... o User - know that it’s time for you to combat Passion for Structuring! Structuring, or the strategy of organizing disparate information, rests on the capabilities and abilities of a particular person, whose productivity depends entirely on the tools he uses for these purposes, be it a notebook or an automated control system .
')
Today, there are a huge number of such tools that directly and indirectly solve this problem, with varying degrees of efficiency, but in my opinion, the future behind products integrates not only the input, sorting, presentation and data design tools, but also contains analytics and programming tools and search. XWiki, as a representative of such a direction, will be devoted to sowing an article, which will include a review, installation and configuration of a wiki engine, which will be interesting both for beginners and advanced users.
Welcome to Cut (caution - traffic, pictures)
Exposition
There is almost nothing about the XWiki wiki engine in the Russian-speaking segment of the Internet, except general information and a couple of manuals, which in my opinion is absolutely wrong, because it is a great tool and helper, with its pluses and minuses, of course. XWiki is a second-generation wiki engine characterized by the ability to structure information and programmatic access to the wiki database. Written in Java, the license of the LGPL distribution, the functionality includes a blog, API tools, comments, LDAP authentication , page export to PDF. Used by many companies around the world. 25 interface languages, including Russian. Also in more detail anyone can compare on wikimatrix with the most common wiki engines in RuNet: DokuWiki and MediaWiki .
Outset
Download the latest, at the time of this writing, version of XWiki 7.1.2 at the following link: http://enterprise.xwiki.org/xwiki/bin/view/Main/Download
Installation options support: Windows, Debian, web container (web server) - * .war, multisystem format - *. Jar and a portable version of the wiki based on the Jetty + HSQLDB combination, which, IMHO, is most convenient for user setup / operation in both Windows and Linux. About her and will be discussed.
In order to install Xwiki, it is necessary that Java be installed on the system, as well as unpack files from the ZIP archive to the root of the disk (it is also recommended to rename the folder to a shorter path, like so: " D: \ xwiki-7.1.2 "). Start is carried out by the start_xwiki.bat file in which all necessary settings are already registered.
Now we need to open a web browser window (the console window is absolutely not recommended to close), and enter the specified URL from the console, in our case it is: panther.itme.info : 8080 / xwiki / bin / view / Main /
Here it is also worth adding that the default port from which XWiki starts is 8080, if for one reason or another it is busy with you, you can change it by editing start_xwiki.bat using Notepad.
After loading the following window will open in the browser:
Of the interesting things here, the link to the guide in English is Documentation , but we will be interested in something completely different, namely, in the upper right corner click on the Log-in and enter to enter the admin area:
Login: Admin
Password: admin
It is worth noting that in this place the register matters!
Here I want to dwell on the following:
1. Side panels acquired additional functionality that is configured by the User.
2. The functionality in XWiki allows you to edit not only text on pages, using a regular or WYSIWYG editor, displaying it in columns using the editing of the Inline form, but also inserting gadgets on the page. A gadget in XWiki is Macro that is displayed in a certain area, i.e. calling one or a sequence of commands, in particular, it can be a link to another page or even a blog feed, a tag cloud, forms for sending messages, etc. etc.
Macros in XWiki are essentially the basis of this engine , it is thanks to them that the User can customize almost everything, be it: his own mini-application, the appearance of pages and panels, or the integration of his own extension (plug-in).
Development
Here you need to digress a bit and talk about the organizational structure of XWiki, namely about the life cycle of wiki pages . Here there is one subtlety, namely: The user can create the Page and Space , and if everything is more or less clear with the Page 's, then when creating the Space , the Header of the area is created, inside which the Page machine will be created with the name WebHome , but it will be displayed everywhere is the title of the area, and the addressing will be on WebHome, which can create some difficulties when linking to the page. At the same time there are no restrictions on the level of investments that can be made both to Space and to Page.
Macros.
First you need to select a page to edit and enter the editor.
Then it is necessary to type either the macro itself in text mode, along with the parameters, or, using the graphical interface, select the required macro from the list.
and fill in the required fields:
But it was all the lyrics, let's move on to practice and we begin with the interface settings. To do this, click on the Panels icon in the left pane and launch Panel Wizard in the page that opens. You will see the administrator settings interface, opened in the Panel Wizard tab. An alternative and basic way to go to the XWiki settings is to click on the arrow in the top drop-down list next to Home and select Administer Wiki .
The tab on the settings page of the Page Layout panel allows you to customize the location, number and width of the columns of our wiki. The adjacent side of the Panel List tab includes applications (macros), which can be located on our fields, while they include a preview window, as well as control elements for enabling / excluding and editing content and functions. Preview for the corresponding applications, which are in the form of buttons and functionality in the fields, is turned off. In order to customize the functionality of the application - you need to click on Edit , to delete the macro - click on Delete , to remove / place the application / functionality on the panel - drag using the Drag and Drop method.
Now we will make the right navigation pane, to do this, remove the Quick Links and My Recent Modifications from the right pane and add Tag Cloud, Navigation and Create Page , click on Save the New Layout and go to the Navigation edit and paste the following code that will make our surfing more convenient:
code for content
{{velocity}} #panelheader($services.localization.render('xe.panels.navigation')) ## Escape special characters in macro parameter values. #set ($openToDoc = $doc.documentReference.toString().replaceAll('([~"])', '~$1')) {{documentTree showSpaces="false" showWikis="true" showTranslations="false" showAttachments="true" showChildDocuments="true" compact="true" openTo="document:$openToDoc" /}} #panelfooter() {{/velocity}} What does this give us? This gives the mapping a tree structure for navigating between attachments, Pages and Spaces , without displaying additional distracting information. Now it’s time to bring in colors to our new site and get away from the flat interface. To do this, select the Presentation item in the LOOK & FEEL menu . Here we change Icon Theme to Silk and Color Theme to Garden .
Voila
Now it's time to think about media tools, namely, what kind of blog without a gallery and graphics? Unfortunately, XWiki has no built-in gallery, so you have to work hard to install and configure Extensions . To do this, go to the EXTENSION MANAGER menu item Add Extensions . Here you can install the necessary add-ons from the web repository, in this case we will be interested in the Lightbox Macro plug-in, with which you can conveniently organize a slide show, as well as combine pictures into groups. To install, enter the word lightbox in the search bar and click install in the result of the search.
Now go to the main page of our XWiki and here in the Navigation panel we will find 2 new Space Lightbox and LightboxMacro . So it's time to apply the macro to the business, for this we create a test Space under the name Test page and in the Attachments tab we upload pictures for testing the gallery, in our case these will be photos from the day of the celebration of May 9, 2014 taken on an unremarkable china phone on Android Jiayu G3.
Gallery code
{{velocity}} #set($myArray=$doc.AttachmentList) #set($myArray=$sorttool.sort($myArray, 'filename')) #foreach ($item in $myArray)#if($item.isImage()){{lightbox image=$item.filename title="Hello" width="20%" group="d1" height="20%"/}}#end#end {{/velocity}} The text of the code is interpreted as follows: a list of attachments is placed on the $ myArray array on the page, then sorted by name (for those cases if the downloaded files from the camera were downloaded to each other, but at the same time the date and time of the shooting were stored in the file name, or at least numbering sequence pictures). After that, for each attachment, if it is an image, a miniature is displayed with a height of 20% of the original. Here you also need to say that the macro parameters include the following items:
| Param | Description |
|---|---|
| image (required) | An url or the attached image file. For example, "cat.jpg" or "xwiki: Space.Page@cat.jpg" or " www.google.com/logos/wateronmoon09-hp.gif" |
| title | A short description |
| width | The width of the image. |
| height | The height of the image. |
| group | A string that identify. A group of images can be viewed as a series of slides. |
What is convenient this macro? The fact that automates the process of displaying attachments, regardless of how many, what images and under what name were loaded. You can also click on any of the thumbnails and in the pop-up window you will see the photo you like, which is also an undoubted advantage. But in this case the spoon of tar will be the fact that in the pop-up window the image will be opened in its original size, which is not always convenient, especially if this resolution exceeds the working resolution of the monitor screen. In this case, do the following:
1. Follow the link to the Macro Lightbox page;
2. Click on the arrow of the Edit menu and in the drop-down list that appears, select Objects ;
3. In the new window, go to the code by expanding the lists of Objects of type XWiki.JavaScriptExtension (1) and Objects of type XWiki.StyleSheetExtension (1) ;
4. Now we make the following changes to the JS code:
JS code changes
+ resizeSpeed: 10, // controls the image resizing animations (1 = slowest and 10 = fastest)
...
+ var maxheight = 640;
+ if (imgPreloader.height> maxheight)
+ {
+ var scale = imgPreloader.height / maxheight
+ imgPreloader.height = maxheight;
+ imgPreloader.width = imgPreloader.width / scale;
+}
...
...
+ var maxheight = 640;
+ if (imgPreloader.height> maxheight)
+ {
+ var scale = imgPreloader.height / maxheight
+ imgPreloader.height = maxheight;
+ imgPreloader.width = imgPreloader.width / scale;
+}
...
Full code with fixes
// ------------------------------------------------ ----------------------------
//
// Lightbox v2.04
// by Lokesh Dhakar - http://www.lokeshdhakar.com
//
// Licensed under the Creative Commons Attribution 2.5 License - http://creativecommons.org/licenses/by/2.5/
// - Free for use in both personal and commercial projects
// - Attribution requires leaving the name, author link, and the license info intact.
//
// Cleaned up using jslint.
// ------------------------------------------------ ----------------------------------
/ * global LightboxOptions, Lightbox, Builder, Class, Prototype, $, $$, $ w, Effect * /
LightboxOptions = Object.extend ({
fileLoadingImage: '$ doc.getAttachmentURL ("loading.gif")',
fileBottomNavCloseImage: '$ doc.getAttachmentURL ("closelabel.gif")',
overlayOpacity: 0.8, // controls transparency of shadow overlay
animate: true, // toggles resizing animations
resizeSpeed: 10, // controls the image resizing animations (1 = slowest and 10 = fastest)
borderSize: 10, // if you adjust the padding in the CSS,
// When grouping images this is used to write: Image # of #.
// Change it for non-english localization
labelImage: "Image",
labelOf: "of"
}, window.LightboxOptions || {});
// ------------------------------------------------ -----------------------------------
var Lightbox = Class.create ();
Lightbox.prototype = {
imageArray: [],
activeImage: undefined
// initialize ()
// Constructor runs on completion of the DOM loading. Calls updateImageList and then
// the function inserts html
// overlay and the image container.
//
initialize: function () {
this.updateImageList ();
this.keyboardAction = this.keyboardAction.bindAsEventListener (this);
if (LightboxOptions.resizeSpeed> 10) {
LightboxOptions.resizeSpeed = 10;
}
if (LightboxOptions.resizeSpeed <1) {
LightboxOptions.resizeSpeed = 1;
}
this.resizeDuration = LightboxOptions.animate? ((11 - LightboxOptions.resizeSpeed) * 0.15): 0;
this.overlayDuration = LightboxOptions.animate? 0.2: 0; // shadow fade in / out duration
// When the lightbox starts up the current image dimension.
// If animations are turned off
// white 250 by 250 box.
var size = (LightboxOptions.animate? 250: 1) + 'px';
// This is what it looks like:
//
// <div id = "overlay"> </ div>
// <div id = "lightbox">
// <div id = "outerImageContainer">
// <div id = "imageContainer">
// <img id = "lightboxImage">
// <div style = "" id = "hoverNav">
// <a href="#" id="prevLink"> </a>
// <a href="#" id="nextLink"> </a>
// </ div>
// <div id = "loading">
// <a href="#" id="loadingLink">
// <img src = "images / loading.gif">
// </a>
// </ div>
// </ div>
// </ div>
// <div id = "imageDataContainer">
// <div id = "imageData">
// <div id = "imageDetails">
// <span id = "caption"> </ span>
// <span id = "numberDisplay"> </ span>
// </ div>
// <div id = "bottomNav">
// <a href="#" id="bottomNavClose">
// <img src = "images / close.gif">
// </a>
// </ div>
// </ div>
// </ div>
// </ div>
var objBody = $$ ('body') [0];
objBody.appendChild (Builder.node ('div', {id: 'overlay'}));
objBody.appendChild (Builder.node ('div', {id: 'lightbox'}, [
Builder.node ('div', {id: 'outerImageContainer'},
Builder.node ('div', {id: 'imageContainer'}, [
Builder.node ('img', {id: 'lightboxImage'}),
Builder.node ('div', {id: 'hoverNav'}, [
Builder.node ('a', {id: 'prevLink', href: '#'}),
Builder.node ('a', {id: 'nextLink', href: '#'})
])
Builder.node ('div', {id: 'loading'},
Builder.node ('a', {id: 'loadingLink', href: '#'},
Builder.node ('img', {src: LightboxOptions.fileLoadingImage})
)
)
])
),
Builder.node ('div', {id: 'imageDataContainer'},
Builder.node ('div', {id: 'imageData'}, [
Builder.node ('div', {id: 'imageDetails'}, [
Builder.node ('span', {id: 'caption'}),
Builder.node ('span', {id: 'numberDisplay'})
])
Builder.node ('div', {id: 'bottomNav'},
Builder.node ('a', {id: 'bottomNavClose', href: '#'},
Builder.node ('img', {src: LightboxOptions.fileBottomNavCloseImage})
)
)
])
)
]));
$ ('overlay'). hide (). observe ('click', (function () {
this.end ();
}). bind (this));
$ ('lightbox'). hide (). observe ('click', (function (event) {
if (event.element (). id == 'lightbox') {
this.end ();
}
}). bind (this));
$ ('outerImageContainer'). setStyle ({width: size, height: size});
$ ('prevLink'). observe ('click', (function (event) {
event.stop ();
this.changeImage (this.activeImage - 1);
}). bindAsEventListener (this));
$ ('nextLink'). observe ('click', (function (event) {
event.stop ();
this.changeImage (this.activeImage + 1);
}). bindAsEventListener (this));
$ ('loadingLink'). observe ('click', (function (event) {
event.stop ();
this.end ();
}). bind (this));
$ ('bottomNavClose'). observe ('click', (function (event) {
event.stop ();
this.end ();
}). bind (this));
var th = this;
(function () {
var ids =
'overlay lightbox outerImageContainer imageContainer lightboxImage hoverNav prevLink nextLink loading loadingLink' +
'imageDataContainer imageData imageDetails caption numberDisplay bottomNav bottomNavClose';
$ w (ids) .each (function (id) {
th [id] = $ (id);
});
}). defer ();
},
//
// updateImageList ()
// Loops through anchor tags
// events to appropriate links. You can rerun after dynamically adding images w / ajax.
//
updateImageList: function () {
this.updateImageList = Prototype.emptyFunction;
document.observe ('click', (function (event) {
var target = event.findElement ('a [rel ^ = lightbox]') || event.findElement ('area [rel ^ = lightbox]');
if (target) {
event.stop ();
this.start (target);
}
}). bind (this));
},
//
// start ()
// Display overlay and lightbox. If image is part of a set, add siblings to imageArray.
//
start: function (imageLink) {
$$ ('select', 'object', 'embed'). each (function (node) {
node.style.visibility = 'hidden';
});
// stretch overlay to fill page and fade in
var arrayPageSize = this.getPageSize ();
$ ('overlay'). setStyle ({width: arrayPageSize [0] + 'px', height: arrayPageSize [1] + 'px'});
var effect = new Effect.Appear (this.overlay, {duration: this.overlayDuration, from: 0.0, to: LightboxOptions.overlayOpacity});
this.imageArray = [];
var imageNum = 0;
if ((imageLink.rel == 'lightbox')) {
// if image is set, add image to imageArray
this.imageArray.push ([imageLink.href, imageLink.title]);
} else {
// if image is part of a set ..
this.imageArray =
$$ (imageLink.tagName + '[href] [rel = "' + imageLink.rel + '"]').
collect (function (anchor) {
return [anchor.href, anchor.title];
}).
uniq ();
while (this.imageArray [imageNum] [0]! = imageLink.href) {
imageNum ++;
}
}
// calculate top and left offset for the lightbox
var arrayPageScroll = document.viewport.getScrollOffsets ();
var lightboxTop = arrayPageScroll [1] + (document.viewport.getHeight () / 10);
var lightboxLeft = arrayPageScroll [0];
this.lightbox.setStyle ({top: lightboxTop + 'px', left: lightboxLeft + 'px'}). show ();
this.changeImage (imageNum);
},
//
// changeImage ()
// Hide most elements and preload image in preparation for resizing image container.
//
changeImage: function (imageNum) {
this.activeImage = imageNum; // update global var
// hide elements during transition
if (LightboxOptions.animate) {
this.loading.show ();
}
this.lightboxImage.hide ();
this.hoverNav.hide ();
this.prevLink.hide ();
this.nextLink.hide ();
// HACK: Opera9 does not currently support scriptaculous opacity and appear fx
this.imageDataContainer.setStyle ({opacity: 0.0001});
this.numberDisplay.hide ();
var imgPreloader = new Image ();
// once image is preloaded, resize image container
imgPreloader.onload = (function () {
var maxheight = 640;
if (imgPreloader.height> maxheight)
{
var scale = imgPreloader.height / maxheight
imgPreloader.height = maxheight;
imgPreloader.width = imgPreloader.width / scale;
}
this.lightboxImage.src = this.imageArray [this.activeImage] [0];
this.resizeImageContainer (imgPreloader.width, imgPreloader.height);
}). bind (this);
imgPreloader.src = this.imageArray [this.activeImage] [0];
},
//
// resizeImageContainer ()
//
resizeImageContainer: function (imgWidth, imgHeight) {
// get current width and height
var widthCurrent = this.outerImageContainer.getWidth ();
var heightCurrent = this.outerImageContainer.getHeight ();
// get new width and height
var widthNew = (imgWidth + LightboxOptions.borderSize * 2);
var heightNew = (imgHeight + LightboxOptions.borderSize * 2);
// scalars based on old to new
var xScale = (widthNew / widthCurrent) * 100;
var yScale = (heightNew / heightCurrent) * 100;
// calculate the size difference between the necessary and old image
var wDiff = widthCurrent - widthNew;
var hDiff = heightCurrent - heightNew;
if (hDiff! = 0) {
var scaleXEffect = new Effect.Scale (this.outerImageContainer, yScale, {scaleX: false, duration: this.resizeDuration, queue: 'front'});
}
if (wDiff! = 0) {
var scaleYEffect = new Effect.Scale (this.outerImageContainer, xScale, {scaleY: false, duration: this.resizeDuration, delay: this.resizeDuration});
}
// if there is a transition, it’s necessary,
// do a quick pause to prevent image flicker.
var timeout = 0;
if ((hDiff == 0) && (wDiff == 0)) {
timeout = 100;
if (Prototype.Browser.IE) {
timeout = 250;
}
}
(function () {
this.prevLink.setStyle ({height: imgHeight + 'px'});
this.nextLink.setStyle ({height: imgHeight + 'px'});
this.imageDataContainer.setStyle ({width: widthNew + 'px'});
this.showImage ();
}). bind (this) .delay (timeout / 1000);
},
//
// showImage ()
// Display image and begin preloading neighbors.
//
showImage: function () {
this.loading.hide ();
var effectAppear = new Effect.Appear (this.lightboxImage, {
duration: this.resizeDuration,
queue: 'end',
afterFinish: (function () {
this.updateDetails ();
}). bind (this)
});
this.preloadNeighborImages ();
},
//
// updateDetails ()
// Display caption, image number, and bottom nav.
//
updateDetails: function () {
// if caption is not null
if (this.imageArray [this.activeImage] [1]! = "") {
this.caption.update (this.imageArray [this.activeImage] [1]). show ();
}
// if image is part of set display 'Image x of x'
if (this.imageArray.length> 1) {
this.numberDisplay.update (LightboxOptions.labelImage + '' + (this.activeImage + 1) + '' + LightboxOptions.labelOf + '' + this.imageArray.length) .show ();
}
var effectParallel = new Effect.Parallel (
[
new Effect.SlideDown (this.imageDataContainer, {sync: true, duration: this.resizeDuration, from: 0.0, to: 1.0}),
new Effect.Appear (this.imageDataContainer, {sync: true, duration: this.resizeDuration})
],
{
duration: this.resizeDuration,
afterFinish: (function () {
// update overlay size and update nav
var arrayPageSize = this.getPageSize ();
this.overlay.setStyle ({height: arrayPageSize [1] + 'px'});
this.updateNav ();
}). bind (this)
}
);
},
//
// updateNav ()
// Display appropriate previous and next hover navigation.
//
updateNav: function () {
this.hoverNav.show ();
// if not first image in set, display prev image button
if (this.activeImage> 0) {
this.prevLink.show ();
}
// if not last image in set, display next image button
if (this.activeImage <(this.imageArray.length - 1)) {
this.nextLink.show ();
}
this.enableKeyboardNav ();
},
//
// enableKeyboardNav ()
//
enableKeyboardNav: function () {
document.observe ('keydown', this.keyboardAction);
},
//
// disableKeyboardNav ()
//
disableKeyboardNav: function () {
document.stopObserving ('keydown', this.keyboardAction);
},
//
// keyboardAction ()
//
keyboardAction: function (event) {
var keycode = event.keyCode;
var escapeKey;
if (event.DOM_VK_ESCAPE) {// mozilla
escapeKey = event.DOM_VK_ESCAPE;
} else {// ie
escapeKey = 27;
}
var key = String.fromCharCode (keycode) .toLowerCase ();
if (key.match (/ x | o | c /) || (keycode == escapeKey)) {// close lightbox
this.end ();
} else if ((key == 'p') || (keycode == 37)) {// display previous image
if (this.activeImage! = 0) {
this.disableKeyboardNav ();
this.changeImage (this.activeImage - 1);
}
} else if ((key == 'n') || (keycode == 39)) {// display next image
if (this.activeImage! = (this.imageArray.length - 1)) {
this.disableKeyboardNav ();
this.changeImage (this.activeImage + 1);
}
}
},
//
// preloadNeighborImages ()
// Preload previous and next images.
//
preloadNeighborImages: function () {
var preloadNextImage, preloadPrevImage;
if (this.imageArray.length> this.activeImage + 1) {
preloadNextImage = new Image ();
preloadNextImage.src = this.imageArray [this.activeImage + 1] [0];
}
if (this.activeImage> 0) {
preloadPrevImage = new Image ();
preloadPrevImage.src = this.imageArray [this.activeImage - 1] [0];
}
},
//
// end ()
//
end: function () {
this.disableKeyboardNav ();
this.lightbox.hide ();
var effectFade = new Effect.Fade (this.overlay, {duration: this.overlayDuration});
$$ ('select', 'object', 'embed'). each (function (node) {
node.style.visibility = 'visible';
});
},
//
// getPageSize ()
//
getPageSize: function () {
var xScroll, yScroll, pageHeight, pageWidth, windowWidth, windowHeight;
if (window.innerHeight && window.scrollMaxY) {
xScroll = window.innerWidth + window.scrollMaxX;
yScroll = window.innerHeight + window.scrollMaxY;
} else if (document.body.scrollHeight> document.body.offsetHeight) {// all but Explorer Mac
xScroll = document.body.scrollWidth;
yScroll = document.body.scrollHeight;
} else {// Explorer Mac ... would also work in Explorer 6 Strict, Mozilla and Safari
xScroll = document.body.offsetWidth;
yScroll = document.body.offsetHeight;
}
if (self.innerHeight) {// all except Explorer
if (document.documentElement.clientWidth) {
windowWidth = document.documentElement.clientWidth;
} else {
windowWidth = self.innerWidth;
}
windowHeight = self.innerHeight;
} else if (document.documentElement && document.documentElement.clientHeight) {// Explorer 6 Strict Mode
windowWidth = document.documentElement.clientWidth;
windowHeight = document.documentElement.clientHeight;
} else if (document.body) {// other Explorers
windowWidth = document.body.clientWidth;
windowHeight = document.body.clientHeight;
}
// for small pages with the viewport
if (yScroll <windowHeight) {
pageHeight = windowHeight;
} else {
pageHeight = yScroll;
}
// for the viewport
if (xScroll <windowWidth) {
pageWidth = xScroll;
} else {
pageWidth = windowWidth;
}
return [pageWidth, pageHeight];
}
};
document.observe ('dom: loaded', function () {
var lightbox = new Lightbox ();
});
Now rule Objects of type XWiki.StyleSheetExtension (1)
Changes in XWiki.Style
we change
- # lightbox {position: absolute; left: 0; width: 100%; z-index: 1001; text-align: center; line-height: 0;} # lightbox img {width: auto; height: auto;} # lightbox a img {border: none; }
on
+ # lightbox {position: absolute; left: 0; width: 100%; z-index: 1001; text-align: center; line-height: 0;} # lightbox img {max-height: 640px;} # lightbox a img {border: none; }
Final XWiki.Style
#lightbox {
position: absolute;
left: 0;
width: 100%;
z-index: 1001;
text-align: center;
line-height: 0;
}
#lightbox img {max-height: 640px;}
#lightbox a img {border: none; }
#outerImageContainer {
position: relative;
background-color: #fff;
width: 250px;
height: 250px;
margin: 0 auto;
}
#imageContainer {
padding: 10px;
}
#loading {
position: absolute;
top: 40%;
left: 0%;
height: 25%;
width: 100%;
text-align: center;
line-height: 0;
}
#hoverNav {
position: absolute;
top: 0;
left: 0;
height: 100%;
width: 100%;
z-index: 10;
}
#imageContainer> #hoverNav {
left: 0;
}
#hoverNav a {
outline: none;
}
#prevLink, #nextLink {
width: 49%;
height: 100%;
background-image: url (data: image / gif; base64, AAAA); / * Trick IE into showing hover * /
display: block;
}
#prevLink {
left: 0;
float: left;
}
#nextLink {
right: 0;
float: right;
}
#prevLink: hover, #prevLink: visited: hover {
background: url ($ doc.getAttachmentURL ("prevlabel.gif")) left 15% no-repeat;
}
#nextLink: hover, #nextLink: visited: hover {
background: url ($ doc.getAttachmentURL ("nextlabel.gif")) right 15% no-repeat;
}
#imageDataContainer {
font: 10px Verdana, Helvetica, sans-serif;
background-color: #fff;
margin: 0 auto;
line-height: 1.4em;
overflow: auto;
width: 100%;
}
#imageData {
padding: 0 10px;
color: # 666;
}
#imageData #imageDetails {
width: 70%;
float: left;
text-align: left;
}
#imageData #caption {
font-weight: bold;
}
#imageData #numberDisplay {
display: block;
clear: left;
padding-bottom: 1.0em;
}
#imageData #bottomNavClose {
width: 66px;
float: right;
padding-bottom: 0.7em;
outline: none;
}
#overlay {
position: absolute;
top: 0;
left: 0;
z-index: 90;
width: 100%;
height: 500px;
background-color: # 000;
}
/ * IE7 hack * /
* + html #overlay {
position: fixed;
}
position: absolute;
left: 0;
width: 100%;
z-index: 1001;
text-align: center;
line-height: 0;
}
#lightbox img {max-height: 640px;}
#lightbox a img {border: none; }
#outerImageContainer {
position: relative;
background-color: #fff;
width: 250px;
height: 250px;
margin: 0 auto;
}
#imageContainer {
padding: 10px;
}
#loading {
position: absolute;
top: 40%;
left: 0%;
height: 25%;
width: 100%;
text-align: center;
line-height: 0;
}
#hoverNav {
position: absolute;
top: 0;
left: 0;
height: 100%;
width: 100%;
z-index: 10;
}
#imageContainer> #hoverNav {
left: 0;
}
#hoverNav a {
outline: none;
}
#prevLink, #nextLink {
width: 49%;
height: 100%;
background-image: url (data: image / gif; base64, AAAA); / * Trick IE into showing hover * /
display: block;
}
#prevLink {
left: 0;
float: left;
}
#nextLink {
right: 0;
float: right;
}
#prevLink: hover, #prevLink: visited: hover {
background: url ($ doc.getAttachmentURL ("prevlabel.gif")) left 15% no-repeat;
}
#nextLink: hover, #nextLink: visited: hover {
background: url ($ doc.getAttachmentURL ("nextlabel.gif")) right 15% no-repeat;
}
#imageDataContainer {
font: 10px Verdana, Helvetica, sans-serif;
background-color: #fff;
margin: 0 auto;
line-height: 1.4em;
overflow: auto;
width: 100%;
}
#imageData {
padding: 0 10px;
color: # 666;
}
#imageData #imageDetails {
width: 70%;
float: left;
text-align: left;
}
#imageData #caption {
font-weight: bold;
}
#imageData #numberDisplay {
display: block;
clear: left;
padding-bottom: 1.0em;
}
#imageData #bottomNavClose {
width: 66px;
float: right;
padding-bottom: 0.7em;
outline: none;
}
#overlay {
position: absolute;
top: 0;
left: 0;
z-index: 90;
width: 100%;
height: 500px;
background-color: # 000;
}
/ * IE7 hack * /
* + html #overlay {
position: fixed;
}
So what has been changed here? XWiki.Style transfers the image dimensions to the JS code, and then scaling it to a height of 640 pixels (but you can also change the value at any time to fit you), this is because my wife has a laptop display with a resolution of 1360x768 pixels. How to do so from the OS to get user permission to the code - I do not know. Warning further comments on the quality of edits in the code - these edits were made by me on the basis of the knowledge gained in school during computer lessons in QBasic 4.5 and Borland Pascal 7.0.
Climax
Now we have a wiki engine including functionality:
- Blog;
- WYSIWIG editor;
- Image galleries;
- Ability to edit and create new macros;
- The ability to program and support the syntax of popular wiki engines;
- Integration with Open Office (!) ( Although for this you need to install and start the service or use crutches );
Here's what I got as an example of a test corporate site:
To be continued...
Source: https://habr.com/ru/post/265811/
All Articles