Webpack for Single Page App
Hello!

The fanfare died down, the ringing in my ears from the tortures of “evangelists”, mods in the field of frontend development. Someone went to the sprockets , someone broke off and began writing his bikes or expanding the functionality of gulp or grunt . But articles about popular tools to automate the build process - it has become significantly less and this is a fact! It's time to fill the vacated space with something substantially different.
')
I am sure many have heard of the webpack . Someone thought “he takes on too much of himself” and did not even finish reading the introductory article on the official website of the project. Some decided to try, but when faced with a small number of tuning examples, he rejected the tool and decided to wait a couple of years. But in general, there is a lot of talk "around". In this article - I want to debunk some doubts. Maybe someone will be interested and go to the "bright side." Generally wishing under the cat.
Honestly, to actively work with this powerful tool, I started at the beginning of this year. First, of course the “wow” effect. Which was quickly replaced by the pain of terribly inconvenient documentation. But having overcome this stage, I honestly forgot about many typical problems, I was amazed at the speed and convenience. I will not bore, let's deal with ...
Mechanics
The logic of the work is very simple, but effective
Webpack accepts one or several files, so-called (entry points) using paths from the configuration file, then loads it.
The collector - during processing, meeting the require () function familiar to him, wraps the contents of the called file into a function. Which returns its context.
You do not need to worry about the “race download”. All that you require will be delivered in the right order!
It is important to note that during development, when webpack-dev-server is running, intermediate files (chunks) fall into RAM. The browser, on the other hand , receives them via the webpack: // protocol directly from the container.
Also dev-server - raises the simplest web server to port 8080, which can be reached at localhost: 8080
This content management approach, as you understand, speeds up the intermediate assembly time by a significant number of seconds. That within the framework of the working day saves a lot of your time.
As for the final assembly, webpack using the same config only performs the stage when files are decomposed into folders in the file system, ready to work for your benefit.
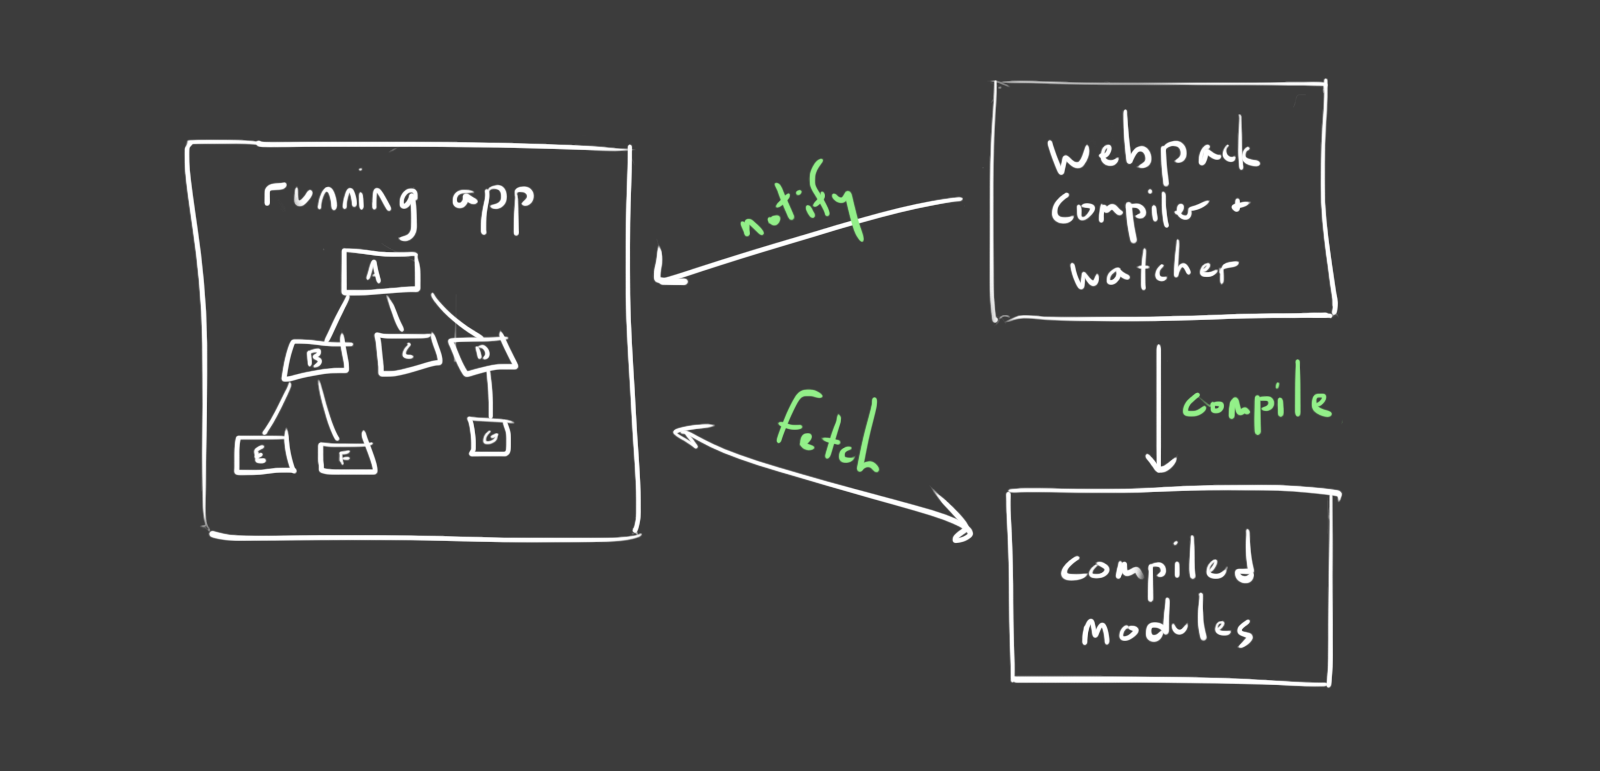
source: jlongster.com/Backend-Apps-with-Webpack--Part-III
Training
It's all quite trivial. All we need is node.js and npm . Then just follow the simple commands:
$ mkdir app $ cd $_ $ npm init & npm i webpack webpack-dev-server --save-dev # dev dependencies As if it did not sound, but more than half you have already done. Let's go to the project configuration.
To do this, you need to determine what exactly you want to see and what tools to use. We agree on this:
- Common js
- Stylus
- Jade
- Autoprefixer
We supply the rest as needed.
Customization
By default, webpack accepts a configuration file executed in JSON format. It should be in the project directory and called webpack.config.js
For more convenient work with the launch of tasks, and there will be two:
- Build the finished project
- Development mode
We use the script section of the package.json file, adding the following lines:
"scripts": { "dev": "NODE_ENV=development webpack-dev-server --progress", "build": "NODE_ENV=production webpack --progress" } After that, being in the project directory, the following commands will be available to you:
$ npm run dev # http://localhost:8080 $ npm run build # ./dist Create the terminal magic configuration files:
$ touch webpack.config.js # webpack $ mkdir config # $ cd $_ # $ touch global.js # , $ mkdir env && cd $_ $ touch development.js # '' webpack $ touch production.js # Let's move on to setting up the environment, to do this, open the ./webpack.config.js file and fill it with the following contents:
'use strict'; var _ = require('lodash'); var _configs = { global: require(__dirname + '/config/global'), production: require(__dirname + '/config/env/production'), development: require(__dirname + '/config/env/development') }; var _load = function(environment) { // if (!environment) throw 'Can\'t find local environment variable via process.env.NODE_ENV'; if (!_configs[environment]) throw 'Can\'t find environments see _config object'; // load config file by environment return _configs && _.merge( _configs[environment](__dirname), _configs['global'](__dirname) ); }; /** * Export WebPack config * @type {[type]} */ module.exports = _load(process.env.NODE_ENV); As you noticed lodash , correct its absence by executing the following command:
$ npm i lodash --save-dev A little clever, we can use the merge method of the lodash library, “glue” the original configuration we need, using 2 files for this. As a function argument, take process.env .
./config/global.js
The file contains
'use strict' var path = require('path'); var webpack = require('webpack'); var Manifest = require('manifest-revision-webpack-plugin'); var TextPlugin = require('extract-text-webpack-plugin'); var HtmlPlugin = require('html-webpack-plugin'); module.exports = function(_path) { //define local variables var dependencies = Object.keys(require(_path + '/package').dependencies); var rootAssetPath = _path + 'app'; return { // entry: { application: _path + '/app/app.js', vendors: dependencies }, // , output: { path: path.join(_path, 'dist'), filename: path.join('assets', 'js', '[name].bundle.[chunkhash].js'), chunkFilename: '[id].bundle.[chunkhash].js', publicPath: '/' }, // , resolve: { extensions: ['', '.js'], modulesDirectories: ['node_modules'], // - ex. require('_modules/test/index') alias: { _svg: path.join(_path, 'app', 'assets', 'svg'), _data: path.join(_path, 'app', 'data'), _fonts: path.join(_path, 'app', 'assets', 'fonts'), _modules: path.join(_path, 'app', 'modules'), _images: path.join(_path, 'app', 'assets', 'images'), _stylesheets: path.join(_path, 'app', 'assets', 'stylesheets'), _templates: path.join(_path, 'app', 'assets', 'templates') } }, // , module: { loaders: [ { test: /\.jade$/, loader: 'jade-loader' }, { test: /\.(css|ttf|eot|woff|woff2|png|ico|jpg|jpeg|gif|svg)$/i, loaders: ['file?context=' + rootAssetPath + '&name=assets/static/[ext]/[name].[hash].[ext]'] }, { test: /\.styl$/, loader: TextPlugin.extract('style-loader', 'css-loader!autoprefixer-loader?browsers=last 5 version!stylus-loader') } ] }, // plugins: [ new webpack.optimize.CommonsChunkPlugin('vendors', 'assets/js/vendors.[hash].js'), new TextPlugin('assets/css/[name].[hash].css'), new Manifest(path.join(_path + '/config', 'manifest.json'), { rootAssetPath: rootAssetPath }), // "" index.html new HtmlPlugin({ title: 'Test APP', chunks: ['application', 'vendors'], filename: 'index.html', template: path.join(_path, 'app', 'index.html') }) ] } }; Attension gentlemen!
There are new dependencies that need to be delivered to the project by the following command:
$ npm i path manifest-revision-webpack-plugin extract-text-webpack-plugin html-webpack-plugin --save-dev Development
By trial and error, the optimal development mode config for me began to look like this:
'use strict'; /** * Development config */ module.exports = function(_path) { return { context: _path, debug: true, devtool: 'eval', devServer: { contentBase: './dist', info: true, hot: false, inline: true } } }; Final build
But the final assembly setting is still in the “change” stage. Although working on 5+
'use strict'; /** * Production config */ module.exports = function(_path) { return { context: _path, debug: false, devtool: 'cheap-source-map', output: { publicPath: '/' } } } index.html
This template, we put in the folder ./app/index.html - he will give the correct path to the hashed statics, after the final assembly.
<!DOCTYPE html> <html{% if(o.htmlWebpackPlugin.files.manifest) { %} manifest="{%= o.htmlWebpackPlugin.files.manifest %}"{% } %}> <head> <meta charset="UTF-8"> <title>{%=o.htmlWebpackPlugin.options.title || 'Webpack App'%}</title> {% for (var css in o.htmlWebpackPlugin.files.css) { %} <link href="{%=o.htmlWebpackPlugin.files.css[css] %}" rel="stylesheet"> {% } %} </head> <body> {% for (var chunk in o.htmlWebpackPlugin.files.chunks) { %} <script src="{%=o.htmlWebpackPlugin.files.chunks[chunk].entry %}"></script> {% } %} </body> </html> In custody
I would like to thank the developers of webpack for such a powerful tool.
The speed of its work is really amazing, even on large volumes of source files.
Oh yes. In order to use underscore in your project, it is enough to install it with the usual npm command
$ npm i underscore --save After execution, the library will fall into dependencies - hence the webpack, will put its contents into the vendors file. [Hash] .js while hashing the file name obtained from md5 source size + time of the last change.
For what it is necessary, I will not explain.
That's all, try, write comments.
Thank.
Links
Here you can see the code given in the article.
And then read the project documentation
Well, here is an article that will help decompose everything again.
Source: https://habr.com/ru/post/265801/
All Articles