Using Intel HAXM when developing applications for Android Wear and TV
Android has a long way to go. It all started with smartphones, then there were tablets, then devices running Google TV, Android Wear, Android TV (instead of Google TV), and finally Android Auto. Building and testing applications that are designed for all of this diversity can be challenging for developers. And if you add here the various form factors and screen resolutions of devices, you can quickly face the problem of comprehensive testing and testing programs. How to be? Fortunately, we have Intel HAXM .

Intel Hardware Accelerated Execution Manager (HAXM) is an Android emulator that supports hardware virtualization. It creates a low load on the system, has excellent performance and fast interface.
Using Intel HAXM, you can run multiple instances of the Android emulator on one computer without worrying about performance, system load, or interface “brakes”. Such an approach can be very useful in an iterative process of creating and testing applications, it can give a huge increase in developer productivity.
Android emulator images designed for non-x86 architectures can run slowly and respond to user commands with a delay. In addition, unlike some third-party Android emulators, using Intel HAXM you get the opportunity to work with the latest APIs and Android platforms immediately after their release.
')
Here you can find a detailed guide to working with HAXM.
In this article we will talk about how to use the capabilities of Intel HAXM when creating applications designed for all sorts of Android platform options. Such applications can work on ordinary smartphones of various form factors, and on devices that carry onboard Android Wear and Android TV.
Google has recently released an application , which shows how to cover many different Android devices with one codebase.
The example demonstrates advanced approaches to the development of universal applications. To build the project, follow the instructions that can be found at the above link. We, in this practical guide, will experience an example on x86 HAXM emulators of Android TV, Wear and smartphone.
The project can be imported into Android Studio and use the capabilities of this environment to build and run the application on the emulator. If you prefer to work with another IDE, then what will be discussed further will also be useful.
If you are familiar with the command line interface, you can simply run a Gradle script to build the application from the folder with the source code of the example.
The resulting APK file can be found in the “mobile / build / outputs / apk / mobile-debug.apk” folder.
First you need to make sure that we have the latest images of emulators for the platforms Android TV, Wear, as well as for ordinary smartphones.
Open the Android SDK Manager. It can be launched from the Android Studio interface or from the command line (the <Android-SDK> / tools folder should be specified in the environment variables) with the following command:
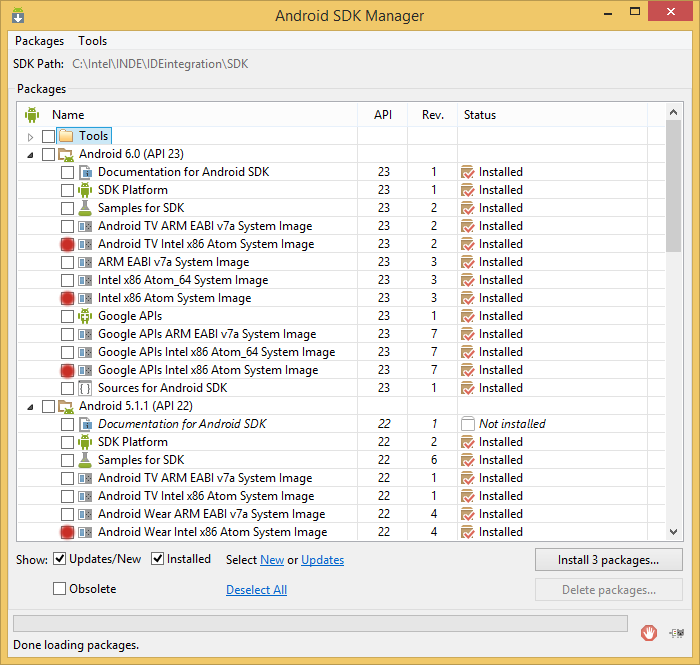
Window Android SDK Manager. The images of the systems you want to download are highlighted.
After the necessary packages are loaded, it is necessary, to use the corresponding system images, to configure the emulator configurations (that is, to create an AVD set). For this we need the Android Virtual Device Manager. Run it from the command line:

The Android Virtual Device Manager window, here you can create new AVDs and customize existing ones.
Create a virtual device configuration for Android Wear as shown in the figure below.
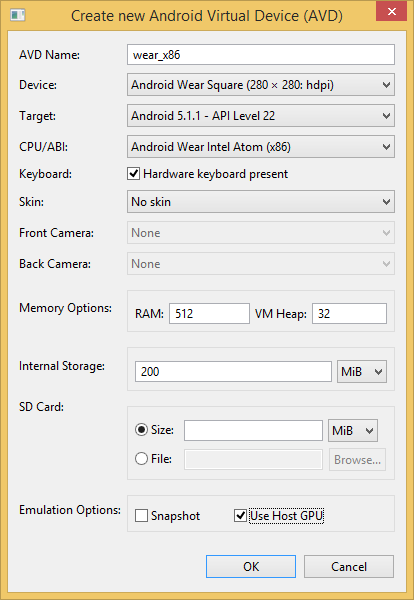
Configuring emulator configuration for Android Wear
After the settings are made, click the OK button, after which we will start the emulator. To do this, select it in the AVD Manager window and click the Start button. This is what the emulator window looks like.
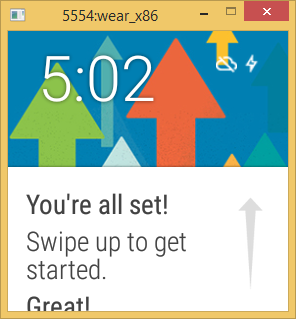
Android Wear emulator window
In order for the smartphone to interact with the device running Android Wear (or with the appropriate emulator), you need an additional application . The only way to install this app on your device is to download from the Google Play Store. Accordingly, we need an Android smartphone that has access to the Store.
The device must be available for ADB. In order for it to be able to connect to the emulator, it is necessary that both the smartphone and the emulator are present in the list of devices, which can be obtained with the following command:

A list of connected devices
Now we redirect TCP ports with this command:
Now everything is ready for pairing the Android Wear emulator and the hardware device. It remains only to run on the smartphone application Android Wear, and, from its menu, execute the command to connect to the emulator. If the connection is successful, the emulator screen will look like the one shown on the left side of the figure. The right side shows the emulator screen that is not connected to the smartphone.
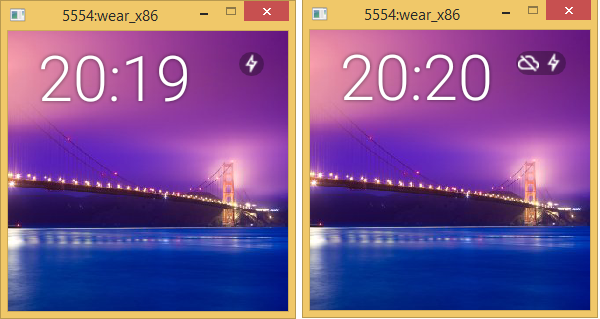
Android Wear emulator screens in connected (left) and unconnected (right) state
Details on creating applications for Android Wear can be found here . The APK file of the test application is no different from other APKs, it can be installed on the Android Wear emulator using ADB.
You can check whether the application is installed on the emulator using the following command:

Installing the application on the emulator and checking the installation
The sample application package name (com.example.android.uamp) is listed. From the command line, you can run the application:
Now the application is running on the Android Wear emulator
Create a virtual device configuration for Android TV as shown in the figure below.
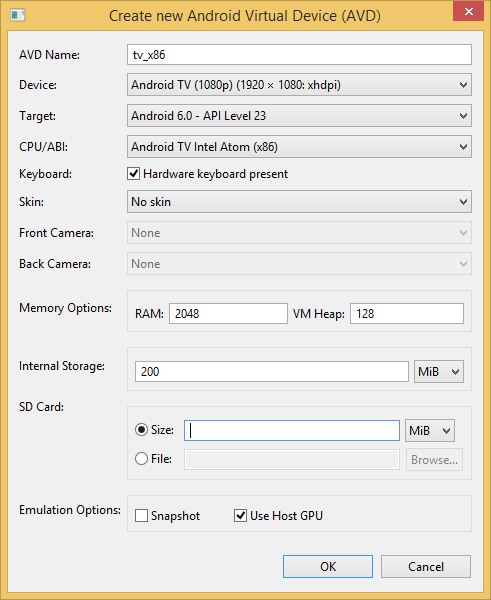
Configuring emulator configuration for Android TV
After setting, click on the OK button and launch the emulator with the Start button in the ADV Manager window.
You can check the availability of the emulator for ADB with the following command:
Write down or remember the identifier of the emulator (something like emulator-55xx). You will need it to specify the target device when working with the emulator using ADB. To install the application on the emulator, you can use the following command:
You can run the application on the Android TV emulator like this:
Here is how the application looks on the emulator screen.
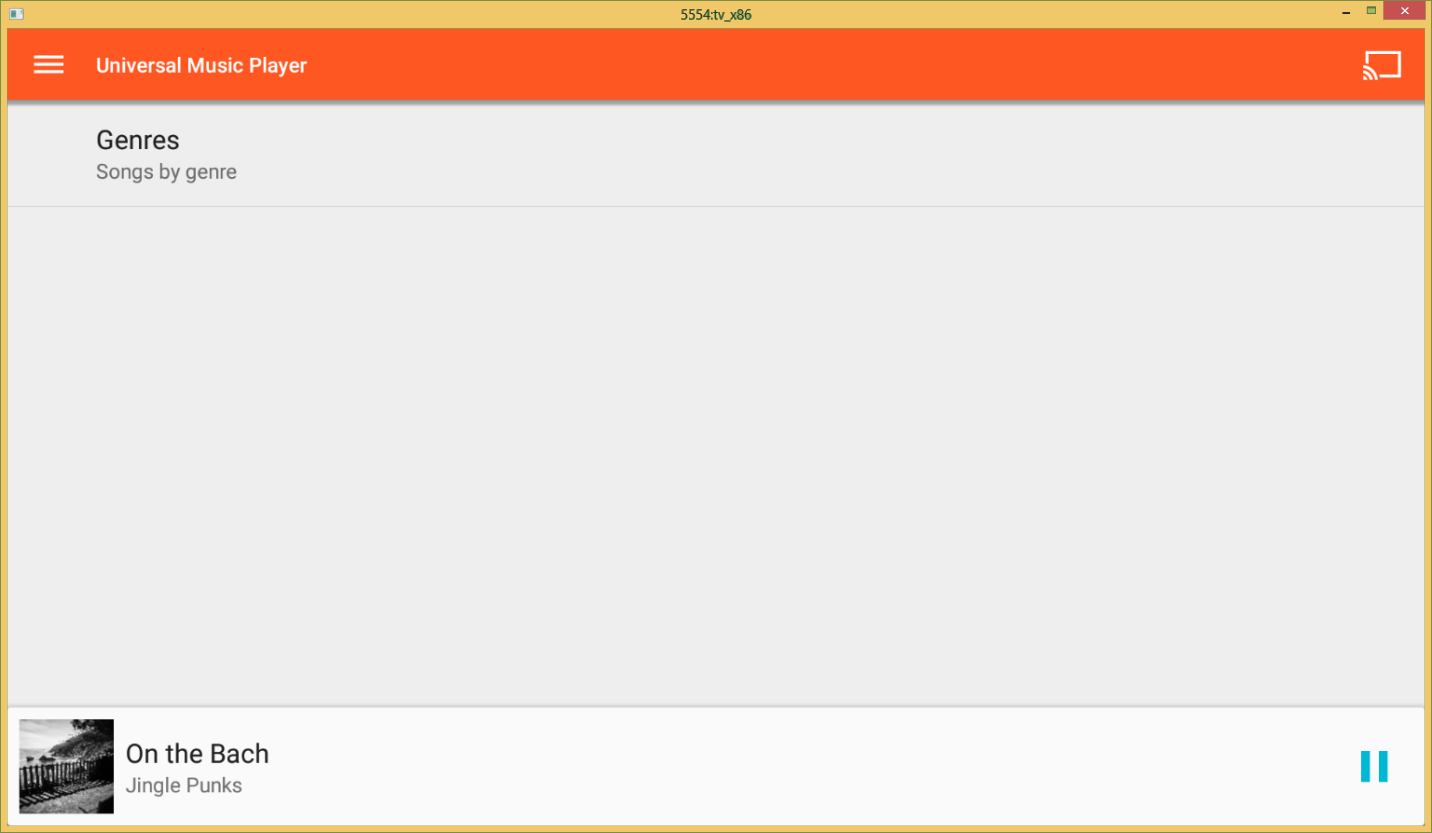
Application running on the Android TV emulator
If, during the development and testing of an application, it becomes necessary to create and run multiple instances of emulators - all this is achievable using Intel HAXM. When installing HAXM, you can adjust the amount of RAM that is allocated for its operation. Here is a set of AVD configurations for Android Wear, TV and a smartphone.
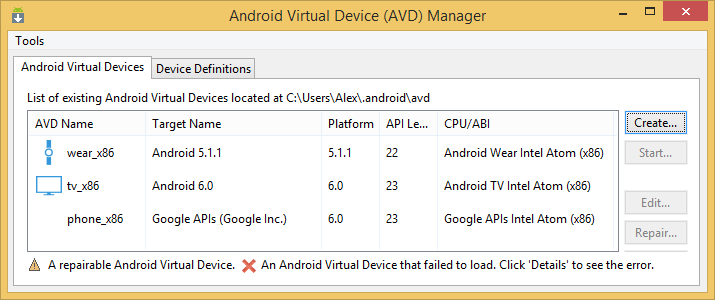
List of Android Virtual Devices
Below you can see an example application running simultaneously on three virtual devices (Android TV, Wear and a smartphone emulator). It also shows information about the use of CPU. As you can see, all these instances of the emulator do not create excessive load on the system.

Three simultaneously running emulators and information about the load on the system they create
During the work, you can customize the allocation of memory for emulators, optimizing their consumption of system resources. In order to reconfigure the memory allocation parameters set during HAXM installation, you need to re-launch its installation and specify the necessary parameters.
In this article, we demonstrated the main features of Intel HAXM. Here you can find details about using and configuring Android emulators. In order to verify the installation of HAXM, as well as whether it is used when working with emulators, refer to this material . We hope that Intel HAXM will become your reliable assistant in the development of Android applications for a wide variety of devices running on this platform.
Preliminary Information
Intel Hardware Accelerated Execution Manager (HAXM) is an Android emulator that supports hardware virtualization. It creates a low load on the system, has excellent performance and fast interface.
Using Intel HAXM, you can run multiple instances of the Android emulator on one computer without worrying about performance, system load, or interface “brakes”. Such an approach can be very useful in an iterative process of creating and testing applications, it can give a huge increase in developer productivity.
Android emulator images designed for non-x86 architectures can run slowly and respond to user commands with a delay. In addition, unlike some third-party Android emulators, using Intel HAXM you get the opportunity to work with the latest APIs and Android platforms immediately after their release.
')
Here you can find a detailed guide to working with HAXM.
In this article we will talk about how to use the capabilities of Intel HAXM when creating applications designed for all sorts of Android platform options. Such applications can work on ordinary smartphones of various form factors, and on devices that carry onboard Android Wear and Android TV.
Work with the universal Android sample application
Google has recently released an application , which shows how to cover many different Android devices with one codebase.
The example demonstrates advanced approaches to the development of universal applications. To build the project, follow the instructions that can be found at the above link. We, in this practical guide, will experience an example on x86 HAXM emulators of Android TV, Wear and smartphone.
The project can be imported into Android Studio and use the capabilities of this environment to build and run the application on the emulator. If you prefer to work with another IDE, then what will be discussed further will also be useful.
If you are familiar with the command line interface, you can simply run a Gradle script to build the application from the folder with the source code of the example.
gradlew assembleDebug The resulting APK file can be found in the “mobile / build / outputs / apk / mobile-debug.apk” folder.
Create AVD for Android TV and Wear
First you need to make sure that we have the latest images of emulators for the platforms Android TV, Wear, as well as for ordinary smartphones.
Open the Android SDK Manager. It can be launched from the Android Studio interface or from the command line (the <Android-SDK> / tools folder should be specified in the environment variables) with the following command:
> android Window Android SDK Manager. The images of the systems you want to download are highlighted.
After the necessary packages are loaded, it is necessary, to use the corresponding system images, to configure the emulator configurations (that is, to create an AVD set). For this we need the Android Virtual Device Manager. Run it from the command line:
> android avd The Android Virtual Device Manager window, here you can create new AVDs and customize existing ones.
Android Wear Emulation
Create a virtual device configuration for Android Wear as shown in the figure below.
Configuring emulator configuration for Android Wear
After the settings are made, click the OK button, after which we will start the emulator. To do this, select it in the AVD Manager window and click the Start button. This is what the emulator window looks like.
Android Wear emulator window
In order for the smartphone to interact with the device running Android Wear (or with the appropriate emulator), you need an additional application . The only way to install this app on your device is to download from the Google Play Store. Accordingly, we need an Android smartphone that has access to the Store.
The device must be available for ADB. In order for it to be able to connect to the emulator, it is necessary that both the smartphone and the emulator are present in the list of devices, which can be obtained with the following command:
> adb devices A list of connected devices
Now we redirect TCP ports with this command:
> adb -d forward tcp:5601 tcp:5601 Now everything is ready for pairing the Android Wear emulator and the hardware device. It remains only to run on the smartphone application Android Wear, and, from its menu, execute the command to connect to the emulator. If the connection is successful, the emulator screen will look like the one shown on the left side of the figure. The right side shows the emulator screen that is not connected to the smartphone.
Android Wear emulator screens in connected (left) and unconnected (right) state
Details on creating applications for Android Wear can be found here . The APK file of the test application is no different from other APKs, it can be installed on the Android Wear emulator using ADB.
> adb -s emulator-5554 install -r mobile\build\outputs\apk\mobile-debug.apk You can check whether the application is installed on the emulator using the following command:
> adb -s emulator-5554 shell pm list packages | grep example Installing the application on the emulator and checking the installation
The sample application package name (com.example.android.uamp) is listed. From the command line, you can run the application:
> adb -s emulator-5554 shell monkey -p com.example.android.uamp -c android.intent.category.LAUNCHER 1 Now the application is running on the Android Wear emulator
Emulate Android TV
Create a virtual device configuration for Android TV as shown in the figure below.
Configuring emulator configuration for Android TV
After setting, click on the OK button and launch the emulator with the Start button in the ADV Manager window.
You can check the availability of the emulator for ADB with the following command:
> adb devices Write down or remember the identifier of the emulator (something like emulator-55xx). You will need it to specify the target device when working with the emulator using ADB. To install the application on the emulator, you can use the following command:
> adb -s emulator-55xx install -r mobile/build/outputs/apk/mobile-debug.apk You can run the application on the Android TV emulator like this:
> adb -s emulator-55xx shell monkey -p com.example.android.uamp -c android.intent.category.LAUNCHER 1 Here is how the application looks on the emulator screen.
Application running on the Android TV emulator
Creating and running the required number of emulator instances
If, during the development and testing of an application, it becomes necessary to create and run multiple instances of emulators - all this is achievable using Intel HAXM. When installing HAXM, you can adjust the amount of RAM that is allocated for its operation. Here is a set of AVD configurations for Android Wear, TV and a smartphone.
List of Android Virtual Devices
Below you can see an example application running simultaneously on three virtual devices (Android TV, Wear and a smartphone emulator). It also shows information about the use of CPU. As you can see, all these instances of the emulator do not create excessive load on the system.
Three simultaneously running emulators and information about the load on the system they create
During the work, you can customize the allocation of memory for emulators, optimizing their consumption of system resources. In order to reconfigure the memory allocation parameters set during HAXM installation, you need to re-launch its installation and specify the necessary parameters.
Results
In this article, we demonstrated the main features of Intel HAXM. Here you can find details about using and configuring Android emulators. In order to verify the installation of HAXM, as well as whether it is used when working with emulators, refer to this material . We hope that Intel HAXM will become your reliable assistant in the development of Android applications for a wide variety of devices running on this platform.
Source: https://habr.com/ru/post/265791/
All Articles