SpiderTest: use the power of CI

This article is a sequel to SpiderTest: DIY Self-Testing . However, the first part of the review for this application was more focused on the desktop interface. In the same way, I would like to talk about exotics: the connection of tests with CI-server and GitHub.
A question may arise: “Why is all this necessary? We wrote a test, drove it in the right browsers and we have enough "and in general it is quite reasonable! Indeed, for normal testing, running autotests from the SpiderTest application itself is in most cases enough. But what if we want to run tests in IE9-11, Opera, FireFox and Google Chrome of different versions? It is impossible to do this on one machine, and creating a bunch of virtual machines and tiring each one in turn is tedious (and in general it is a crutch).
And if we want to conduct smoke testing? Or do we want to run tests not only in different browsers, but also in different operating systems (Windows OS, Linux OS)?
The most optimal answer to the above questions is to use a continuous integration server. In this article I will discuss the configuration of SpiderTest and Jenkins. It is fair to say that you can run tests on bamboo and on teamcity, but Jenkins is simple and free, so consider it.
Configuring Jenkins for Windows OS and Linux OS.
Before you begin, you need to install the Jenkins distribution, download the Apache Maven Project , JDK 7 and Git and set them in the system variables.
Now you can proceed to setting up Jenkins. And the first thing to begin with is to install the necessary plugins.
')

To do this, go to "Customize Jenkins" (1), and then in "Manage Plugins" (2).
• GitHub plugin - plugin for working with GitHub
• JUnit Plugin - plugin for running unit tests
• Allure Jenkins Plugin - Yandex plugin for creating reports.
After installation, you need to restart the server, this can be done by entering localhost : 8080 / restart, in the address bar.
Then go to the "System Configuration" (3). In the window that opens, fill in the blocks "Git", "Jenkins Location" and "Allure Plugin".
You should specify two "Git installations" for WindowsOS and LinuxOS, it is better to do as in the screenshot.

It is also not superfluous to prescribe "Jenkins Location" so that you can enter Jenkins from the outside.

And finally, complete the "Allure Plugin"

After configuration, you need to restart the server again.
Git Version Control System
For testing to be very serious, as in severe programmers, it is not superfluous for the testers team to use a version control system. It’s not for me to explain that “the version control system takes only a little time, but the whole carriage benefits from it” (c) Koroviev “Master and Margarita”.
In general, we create a profile on the githaba and upload the following files there from those that are in the SpiderTest folder:
• Config - folder where settings are specified, lists of steps and elements are stored
• Data - folder with class templates, maven project methods
• Lib - folder with the library SpiderTestCILib.jar
• Add-lib.bat - an executable file that adds libraries to the local maven repository
• Add-lib.sh is the same, but for LinuxOS.
• SpiderTestCI.jar - Jar-nickname, which creates a maven-project.
• Start-test.bat - executable file that launches SpiderTestCI.jar.
• Start-test.sh - the same, but for LinuxOS.
• TestKit - autotest folder.
I would like to say a few words about SpiderTestCI.jar separately, but a little later.
Creating a test build plan
After the Jenkins CI is configured, you can start building an assembly plan.

The build plan consists of the steps you need to take during the build. We first describe the project so that it is clear why it was created, and we specify where to get the files with the tests (profile on github).

Git executable select the "default" Windows. And start adding assembly steps.


The first step in creating the build plan is to add the library to the local maven repository by running add-lib.bat (or add-lib.sh on LinuxOS).
The second step is to create a maven build project and run tests. To do this, run start-test.bat [arg] (or start-test.sh [arg]), where [arg] is the path to the file, or the path to the test folder.

And finally, add the post-assembly step of the Allure Jenkins Plugin with the version of the report.
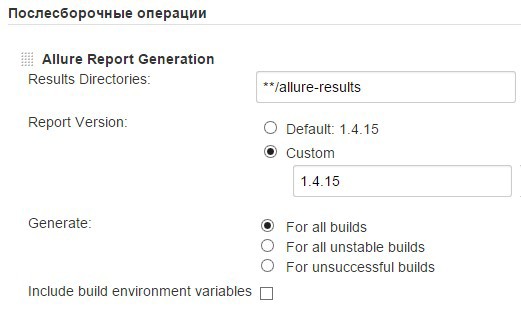
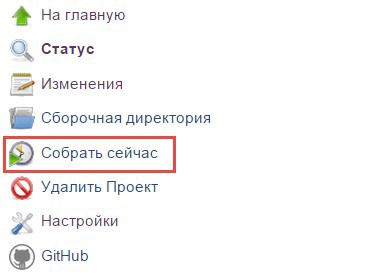
Now it only remains to do the assembly by clicking "Assemble Now".
The first build will be quite long, due to downloading project dependencies. The build history and report can be viewed here.

The beautiful Allure Plugin Yandex plugin has become a sponsor of the beautiful report.

Algorithm SpiderTestCI.jar
When executing start-test.bat, SpiderTestCI.jar verifies that it was passed as an argument: a file or folder with files. If a folder is transferred, it will look for files with the .sff extension in it (there should be only test files in the .sff extension in the folder, otherwise the jarnik will swear). So, SpiderTestCI.jar reads the test file, finds frequently used steps and elements and pulls them up from config \ namespaces \, then from the config \ config.cfg file reads the path to the browsers (if specified), then looks at the variables (if they are specified), then reads the maven-project templates from the data folder and, finally, at the output we get a maven-project with tests that are ready to run, which consists of three objects:
• environment.xml
• pom.xml
• src directory
Setup of the collector on LinuxOS
Now we will configure another slave collector to run tests on LinuxOS.
Before you start configuring another collector, you need to make some presets on the Linux machine. Namely:
• JDK7 - to perceive jar-nicknames.
• Git - so that Linux can take the source from a githaba.
sudo apt-get install git
It will be useful to check that git is registered in the system variables. To do this, type git on the command line. There is a lot of text? Wonderful)
• SSH client so that Jenkins can connect to his collector using the ssh protocol.
sudo apt-get install openssh-client
sudo apt-get install openssh-server
• slave.jar - jar-nickname started by jenkins on the slave machine
You can download it by entering localhost : 8080 / jnlpJars / slave.jar
Then throw it into a folder, for example \ home \ user \ slave and give all rights to the folder type
chmod –R 777
And only now you can configure a new node in Jenkins.

Enter the ssh access settings. You should make sure that you can connect to the virtual machine from the outside, for example, using Putty. By the way, it is worth giving an adequate name to the collector so that when switching from one to another it is correct to identify.

Then enable the subordinate node to the master. For the first time, the new collector will be turned on for as long as the “master”. It's all in the same maven libraries.

To run the build on LinuxOS, do the following:
1. In the settings of the build plan, select the artist (the machine on which the Jenkins - master is deployed, and the names of all the assemblers are set independently).

2. Switch between the builders in the "Source Code Management" block.

3. Correct the build command so that Linux executable files are involved:

And run the build again. It would be superfluous to mention that all browsers that we use in tests and drivers of these browsers are registered in system variables should be installed on virtual machines.
This article completes the review of the SpiderTest tool, but this does not mean that it will stop its development. You need more people who will use SpiderTest to move the application to a new level. Subscribe to new versions, comment, offer.
PS Since the release of the previous article already released 3 versions of SpiderTest. The latest version 1.1.1 is already available for download. The next release is just around the corner and there will be additions that you add to the comments.
PPS practice has shown that you need to very consciously use lists of steps and elements. They are saved in a special “config / namespaces” folder and if you delete / transfer or somehow change files from the namespaces folder, then tests that use them will not be executed. So please be careful.
Source: https://habr.com/ru/post/265773/
All Articles