Infobox VPS Review
Some time ago we opened for order new generation virtual servers (VPS NG) , available in St. Petersburg and Amsterdam.
They differ from classic VPS in that they are physically created in the cloud infrastructure of InfoboxCloud , receiving some of its advantages:
The task of the new generation VPS : to provide the user with the most affordable, reliable and fast virtual server.

')
In this article we will look at the capabilities of the new generation VPS.
At the end of the article you will learn how to get trial versions of VPS NG for free to try them in your real project.
This article will be useful to users of classic VPS from Infobox, because the VPS NG control interface has been completely rewritten and new features have appeared at the request of users.
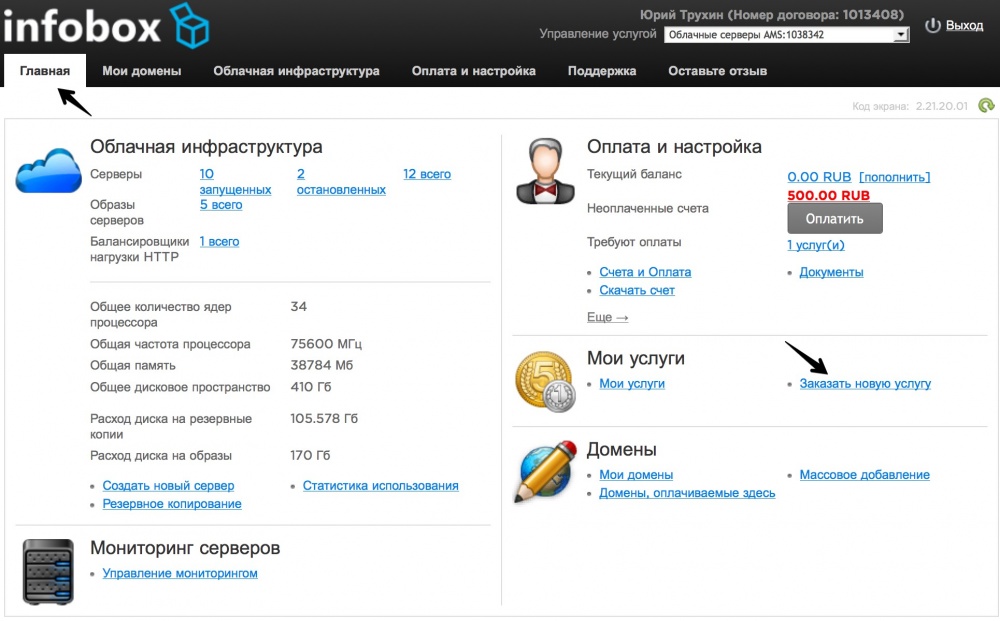
To get started with the new generation VPS, go to the control panel .
Select the ordered server in the top right drop-down menu of the control panel and go to the VPS section.

When you first enter this section, you will be asked to set a password on the server. Do this by clicking on the "Set Password" link.
If you see an error message when you click on the set password link, it means that you have just ordered a VPS and the server is still in the process of being created. Wait a bit and you can set the password to the server.

Enter the new password for the server and click "Send". Use complex long passwords with large and small English letters and punctuation marks - this will complicate the password selection process.
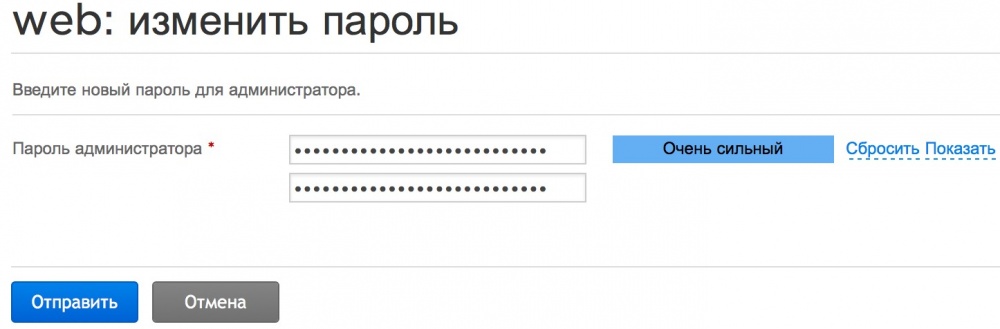
After that, the password will be successfully set.
To connect to the server, use:
More about SSH connectivity has already been explained in this article .
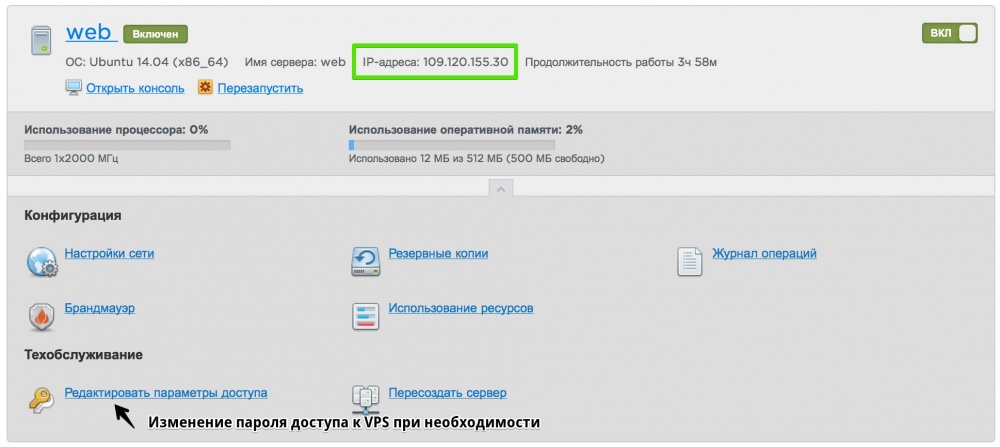
If necessary, you can change the password for accessing the VPS in the control panel by clicking “Edit access parameters”.
To restart the server, click "Restart". To turn off - slide the on / off switch in the upper right corner.
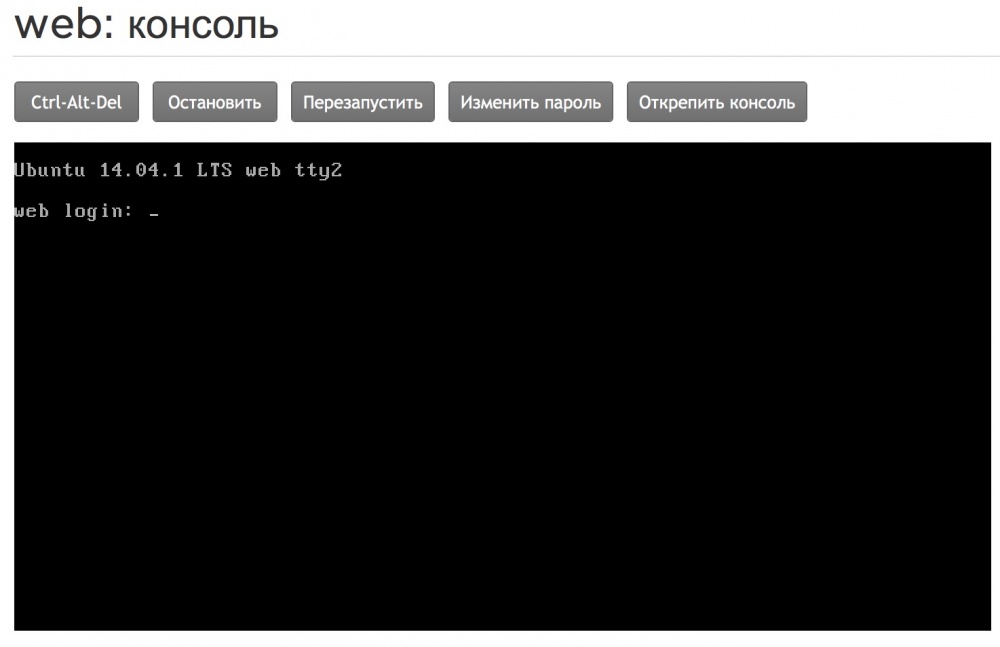
The control panel has a built-in console, but its work requires an installed Java plugin for the browser (the developers are aware that this is not convenient for everyone and are working to improve the built-in console). To launch the built-in console, it is recommended to use the Firefox browser. You can start it by clicking on the "Open console" button.
In the section "VPS" -> "Network Settings" you can change the server name (hostname) and add the required number of external ip – addresses for the server.

The first external IP – address is automatically assigned to the server at creation and there is no additional money. The cost of an additional IPv4 – address is 90 rubles per month.
An additional IP address may be needed, for example, if you have several services that need to work on the same port.
Backup is not needed to ensure data integrity (safety is guaranteed by triple replication of all new generation VPS data). Backups are useful to undo a change that a user or software did on the server by mistake.
In the section “VPS” -> “Backup” you can schedule automatic backups.
The backup space is not included in the VPS price, but you can simply add and use it.
To add backup space, go to the main page of the control panel and click "My Services".

Find your new generation VPS and click on it.

Go to the Resources section.

In the section that opens, all the resources available for your VPS are displayed. To add a PACI Backup Space resource (backup location), click “Upgrade Resources”.
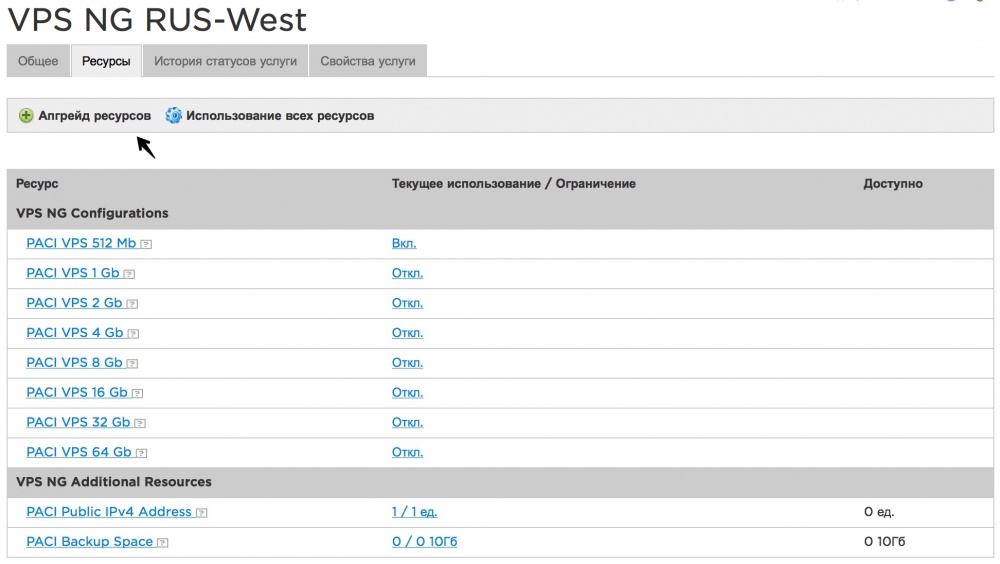
In this section, you can switch to the older VPS configuration, if necessary, add IP addresses for the server and a place to store backup copies (PACI Backup Space).
Add the required amount of backup space (but not less than the volume of the VPS disk). For example, the VPS – 512 has a disk capacity of 25 GB, therefore you need to add 30 GB of space for creating backup copies (otherwise no backup will be created).

After adding the necessary space for backups, click "Next" -> "Add order" -> "Completion".
Now go back to the “VPS” -> “Backups” section.

You can create a backup manually or set up a schedule.

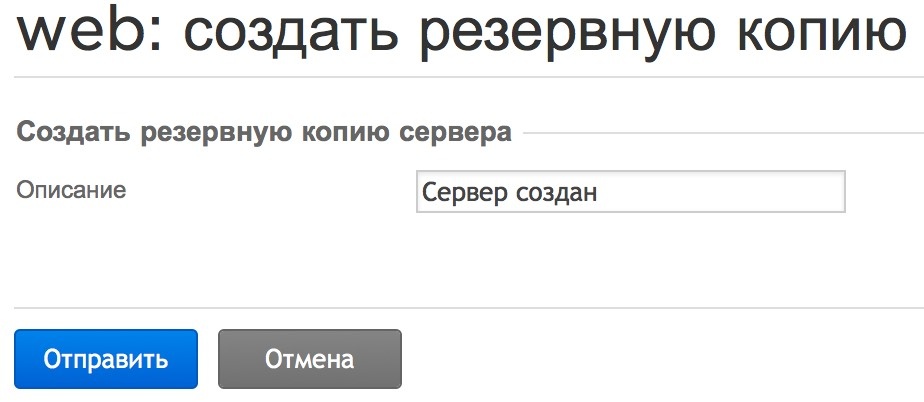
To manually create a backup, click “Create a new backup”, enter a description of the backup, and click “Submit” (for execution).
During the backup, information will be displayed in the VPS section. During the backup, the server will be fully accessible.

Go back to the section "VPS" -> "Backups".
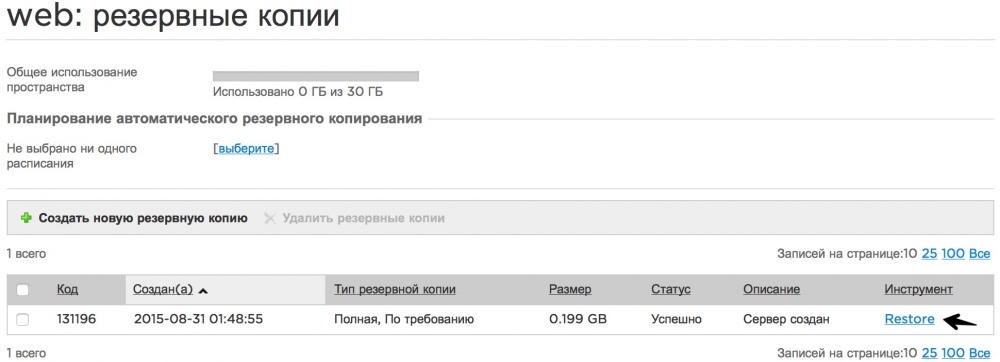
You will see a successfully created backup. In our case, it takes 200 megabytes, which means the purchased backup space is enough for a long time. If you need to recover it, click Restore.
To do this, select a schedule from the section "VPS" -> "Backups".

Backup copies can be created weekly (weekly), daily (daily) and hourly (hourly).
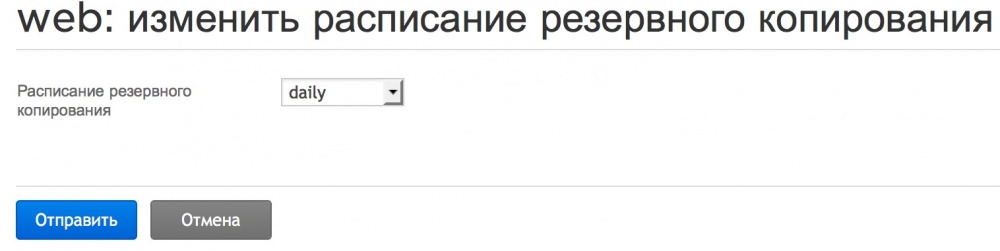
After selecting the schedule, click "Send".
The schedule will be applied and backups will be created according to the selected schedule.
Existing schedule options:
The transaction log is available in the section “VPS” -> “Transaction log”. The log shows events that occurred with the server.

The firewall is needed in order to control and filter the network packets passing through it in accordance with the specified rules.
Firewall built into the infrastructure - replacement of a dedicated solution. It does not consume server resources and works in the Infobox infrastructure, ensuring the security of your server.
You can edit the settings in the section VPS -> Firewall (a more correct term, but less popular among technicians).
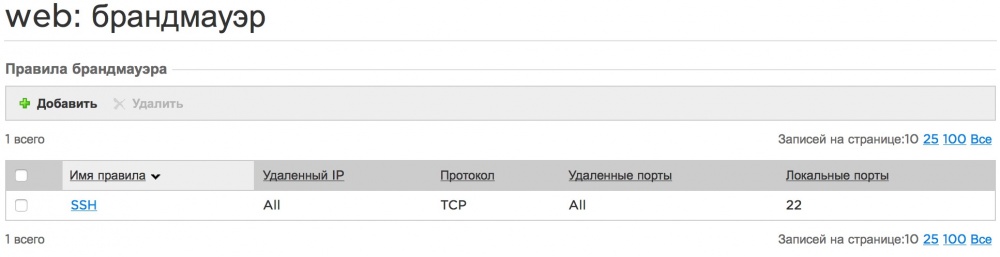
Not a single firewall rule has been applied yet - it is disabled.
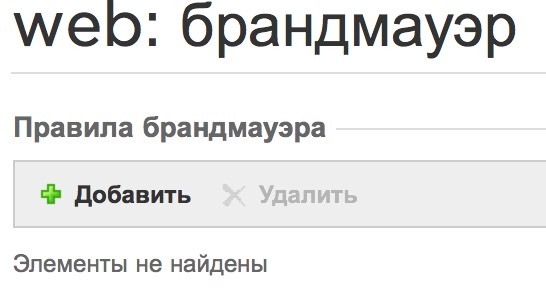
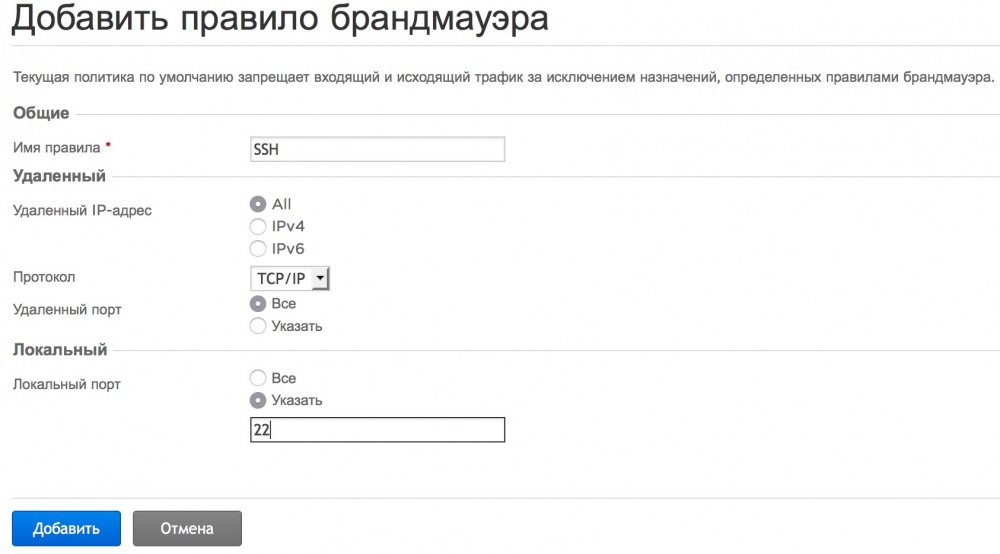
New rules are added by clicking on the "Add" button.
After adding the first rule, the firewall blocks everything that is not allowed.
The current values of CPU and memory consumption are transferred directly to the VPS section of the control panel.

Detailed statistics on time is available in the section “VPS” -> “Resource Usage”.
In this section you can see diagrams:

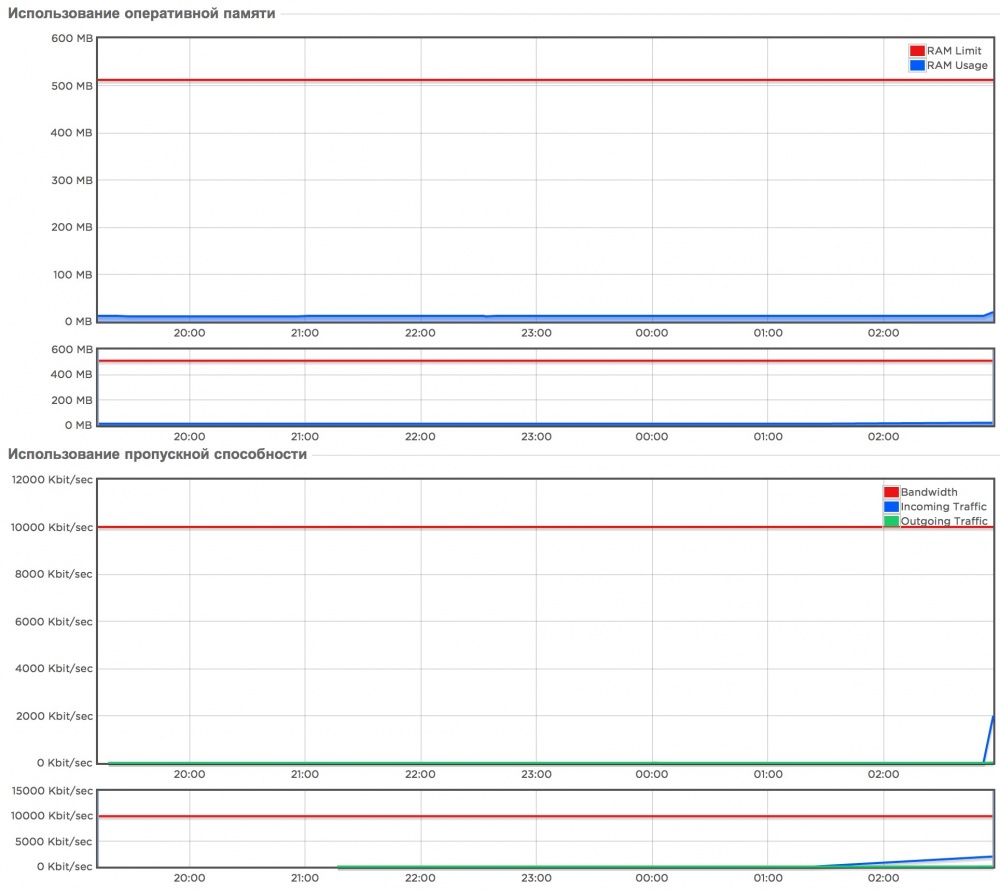
Charts are updated every 5 minutes.
If you need to look more closely at any interval, select it in the lower graph and see the result in the upper one. In this case, the interval will be displayed on the other graphs, which is quite convenient.
Charts will help to notice the shortage of resources in a timely manner and switch to a senior VPS tariff plan with a large amount of resources.
If you need to change the OS - you need to re-create the server. This can be done in the section “VPS” -> “Re-create server”.
Attention! This operation will result in the loss of data and the removal of all backups. Do it only if you are sure that you have nothing to lose on the server and in server backups! In the InfoboxCloud cloud, you can create a server template and roll back to it if necessary, even when the server is deleted. For VPS, this functionality is not available yet.
Select the required OS from which you need to re-create the server. Set a password and click "Delete and create server".

After that, the server will be recreated with the desired operating system.
New generation VPSs allow users to work with a fault-tolerant server with triple data replication and Enterprise SSD caching at affordable prices of regular VPS. In addition, users get advanced backup features and built-in firewall.
If you need the ability to change the amount of processor, memory or disk at any time, use autoscaling and not worry about resources running out, have the ability to create server templates, use a private network and high speed external network - use the InfoboxCloud cloud.
If you can not leave comments on Habré - write to us in the Community .
To get a trial version of VPS NG for free, contact us .
In the letter specify:
Contact details are needed solely to protect against repeated registrations. We will not contact you.
The offer to get a trial VPS NG for free is valid until September 15, 2015.
Successful projects!
They differ from classic VPS in that they are physically created in the cloud infrastructure of InfoboxCloud , receiving some of its advantages:
- Triple replication of all data : virtual server data is stored on at least 3 different physical servers simultaneously for maximum reliability;
- enterprise SSD – caching : the disk subsystem is accelerated by using high-performance PCI – Express SSD and Datacenter SSDs;
- The ability to create backup copies;
- The ability to use multiple public IP addresses;
- Built-in firewall;
- The ability to easily change the OS used on the VPS.
The task of the new generation VPS : to provide the user with the most affordable, reliable and fast virtual server.
')
In this article we will look at the capabilities of the new generation VPS.
At the end of the article you will learn how to get trial versions of VPS NG for free to try them in your real project.
This article will be useful to users of classic VPS from Infobox, because the VPS NG control interface has been completely rewritten and new features have appeared at the request of users.
Beginning of work
How to order VPS NG (for new users)
If you do not yet have access to the Infobox control panel, you can order VPS NG on the official website . Available configurations from 512MB of RAM to 64GB (in the tariff section "Pro"). The banner shows the price for the year, if you click on it - you can see the price for a shorter period of time (it is more profitable to buy VPS for a year - the price already contains the maximum possible discount).
If you do not know what size you need a VPS - ask us .
You can test ping to a VPS in each of the regions before the servers:
Once you have decided on the desired configuration of the VPS, click the "Order" button.

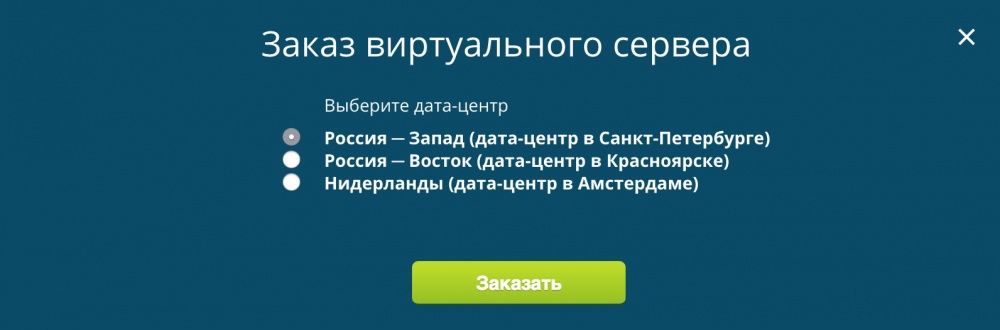
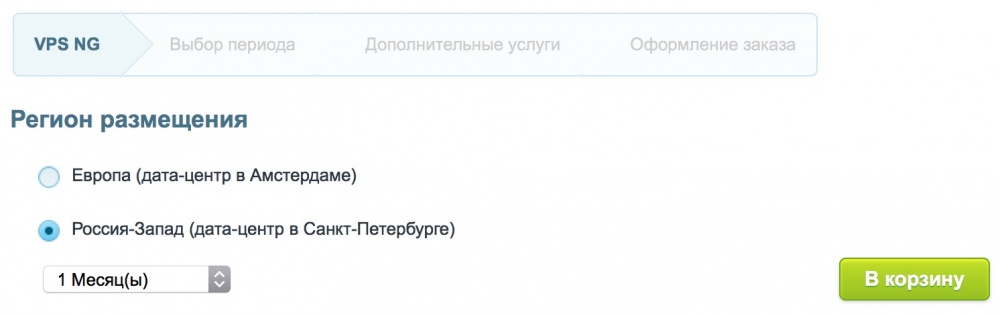
A selection of VPS region will be offered. Please note that the new generation VPS is still being created only in St. Petersburg and Amsterdam. Classic VPS are being created in Krasnoyarsk. After selecting a region, click "Order".
On the next page, specify the region and period for which the VPS is purchased and click the “Add to Cart” button.

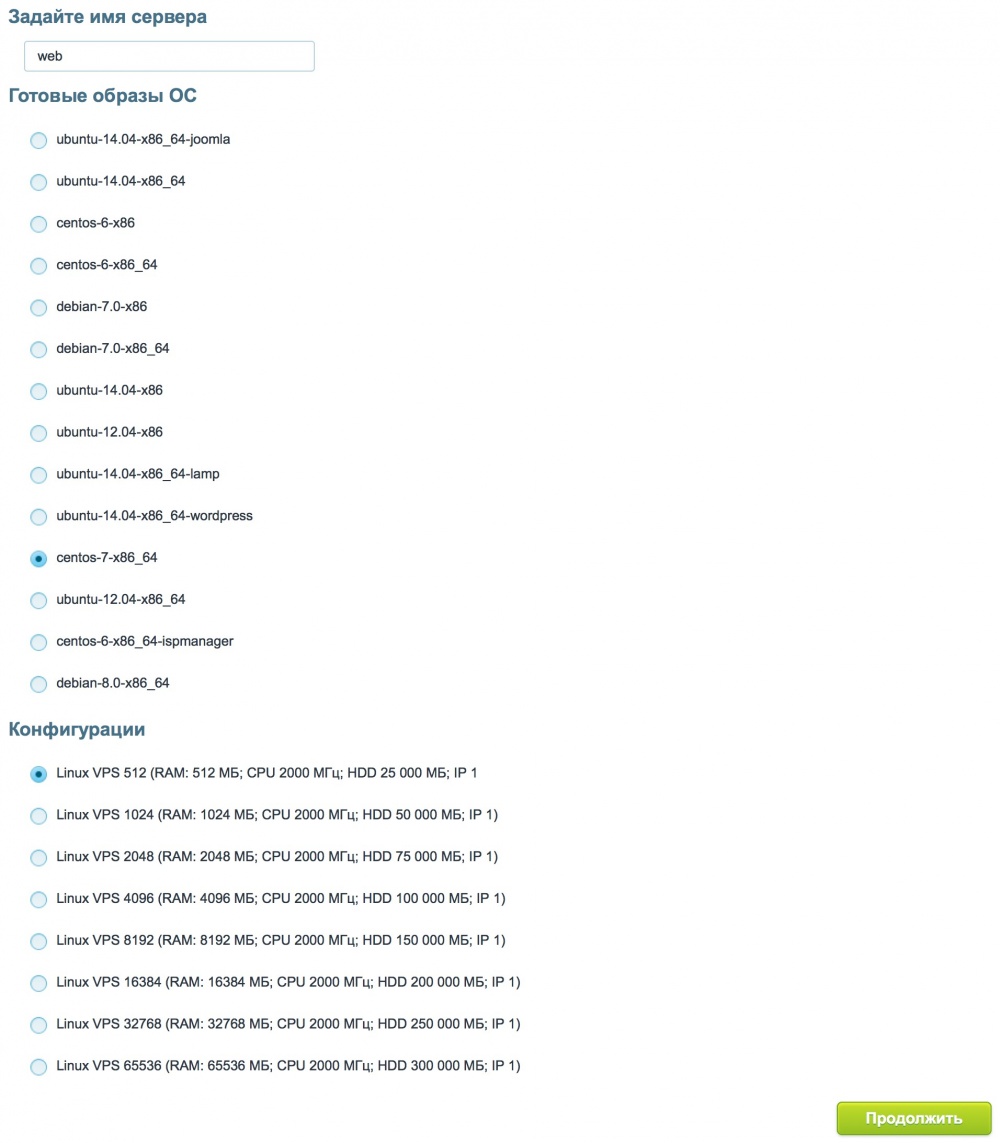
Specify the name of the server to be created, the required OS (it can be changed if necessary, recreating the server from the control panel) and the required amount of server resources.
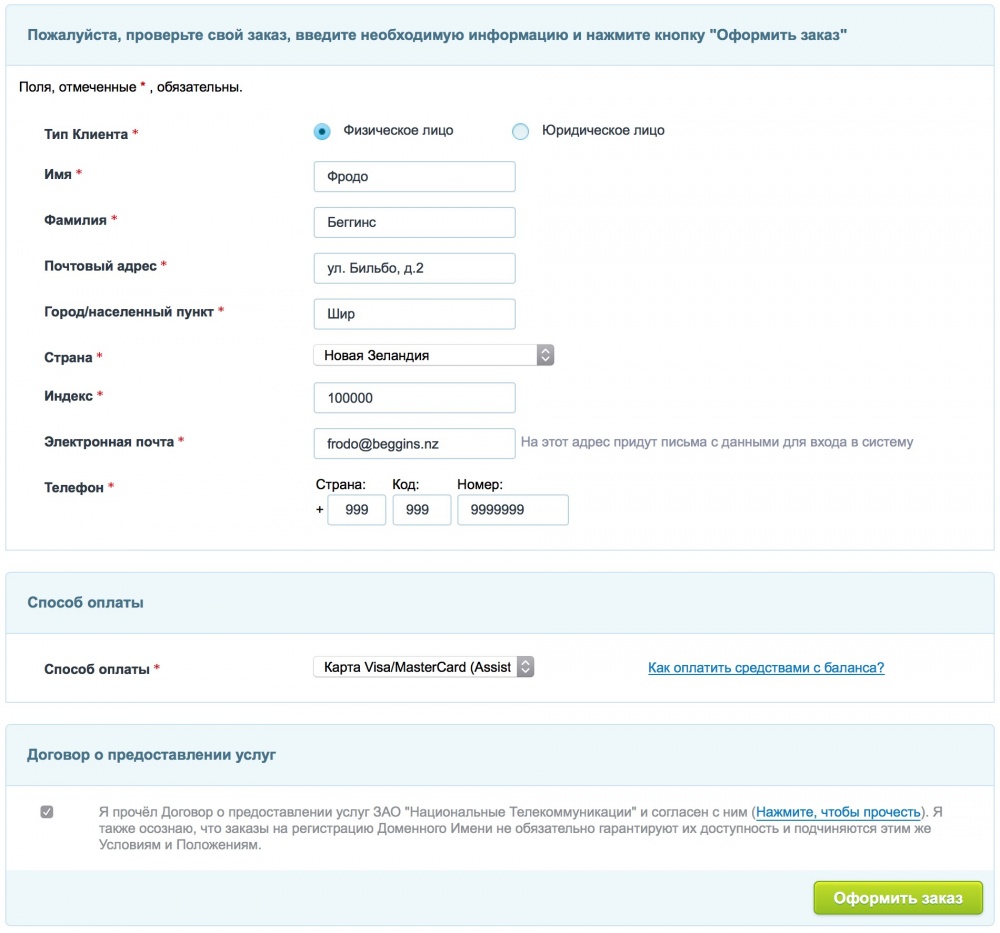
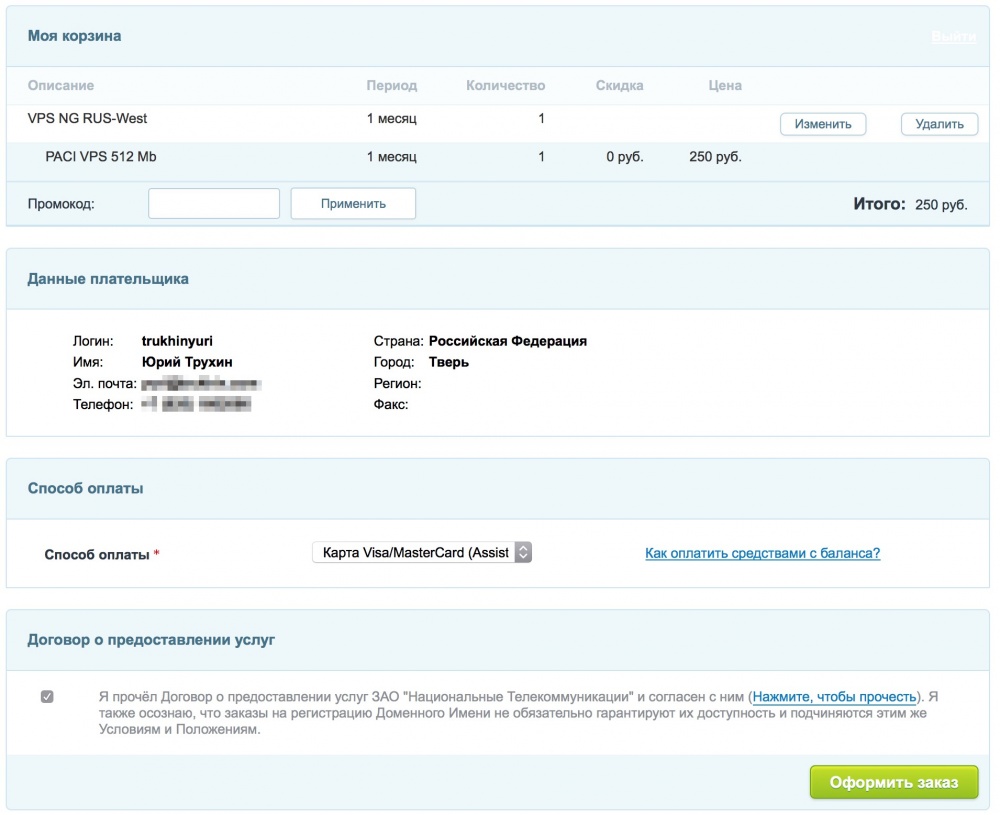
Fill in the real data about yourself, select the appropriate payment method, agree to the service agreement and click "Checkout".
After payment of the order, you will receive data for access to the control panel at your e-mail address.
If you do not know what size you need a VPS - ask us .
You can test ping to a VPS in each of the regions before the servers:
- spb.sandbox.infobox.ru - VPS in St. Petersburg
- ams.sandbox.infobox.ru - VPS in Amsterdam
- krs.sandbox.infobox.ru - VPS in Krasnoyarsk
Once you have decided on the desired configuration of the VPS, click the "Order" button.
A selection of VPS region will be offered. Please note that the new generation VPS is still being created only in St. Petersburg and Amsterdam. Classic VPS are being created in Krasnoyarsk. After selecting a region, click "Order".
On the next page, specify the region and period for which the VPS is purchased and click the “Add to Cart” button.
Specify the name of the server to be created, the required OS (it can be changed if necessary, recreating the server from the control panel) and the required amount of server resources.
Fill in the real data about yourself, select the appropriate payment method, agree to the service agreement and click "Checkout".
After payment of the order, you will receive data for access to the control panel at your e-mail address.
How to order VPS NG (if you already have access to panel.infobox.ru)
Log into the control panel .
Go to the main page and click "Order a new service."
Select the Linux VPS service. VPS of new generation are available only in Amsterdam and St. Petersburg, classic VPS are being created in Krasnoyarsk.

You can test ping to a VPS in each of the regions before the servers:
Select the region of placement and the validity period of the VPS and add the order to the basket.
Specify the name of the server to be created, the required OS (it can be changed if necessary, recreating the server from the control panel) and the required amount of server resources.
Agree to the service contract. Here you can choose a suitable payment method, including payment with funds from the balance in the control panel.
Click “Checkout” to complete the order.
Go to the main page and click "Order a new service."
Select the Linux VPS service. VPS of new generation are available only in Amsterdam and St. Petersburg, classic VPS are being created in Krasnoyarsk.
You can test ping to a VPS in each of the regions before the servers:
- spb.sandbox.infobox.ru - VPS in St. Petersburg
- ams.sandbox.infobox.ru - VPS in Amsterdam
- krs.sandbox.infobox.ru - VPS in Krasnoyarsk
Select the region of placement and the validity period of the VPS and add the order to the basket.
Specify the name of the server to be created, the required OS (it can be changed if necessary, recreating the server from the control panel) and the required amount of server resources.
Agree to the service contract. Here you can choose a suitable payment method, including payment with funds from the balance in the control panel.
Click “Checkout” to complete the order.
To get started with the new generation VPS, go to the control panel .
Select the ordered server in the top right drop-down menu of the control panel and go to the VPS section.
When you first enter this section, you will be asked to set a password on the server. Do this by clicking on the "Set Password" link.
If you see an error message when you click on the set password link, it means that you have just ordered a VPS and the server is still in the process of being created. Wait a bit and you can set the password to the server.
Enter the new password for the server and click "Send". Use complex long passwords with large and small English letters and punctuation marks - this will complicate the password selection process.
After that, the password will be successfully set.
The basics
To connect to the server, use:
- ip – server address specified in the VPS section of the control panel;
- root login;
- password set by you.
More about SSH connectivity has already been explained in this article .
If necessary, you can change the password for accessing the VPS in the control panel by clicking “Edit access parameters”.
To restart the server, click "Restart". To turn off - slide the on / off switch in the upper right corner.
The control panel has a built-in console, but its work requires an installed Java plugin for the browser (the developers are aware that this is not convenient for everyone and are working to improve the built-in console). To launch the built-in console, it is recommended to use the Firefox browser. You can start it by clicking on the "Open console" button.
Network settings
In the section "VPS" -> "Network Settings" you can change the server name (hostname) and add the required number of external ip – addresses for the server.
The first external IP – address is automatically assigned to the server at creation and there is no additional money. The cost of an additional IPv4 – address is 90 rubles per month.
An additional IP address may be needed, for example, if you have several services that need to work on the same port.
Backup
Backup is not needed to ensure data integrity (safety is guaranteed by triple replication of all new generation VPS data). Backups are useful to undo a change that a user or software did on the server by mistake.
In the section “VPS” -> “Backup” you can schedule automatic backups.
The backup space is not included in the VPS price, but you can simply add and use it.
Add VPS NG resources
To add backup space, go to the main page of the control panel and click "My Services".
Find your new generation VPS and click on it.
Go to the Resources section.
In the section that opens, all the resources available for your VPS are displayed. To add a PACI Backup Space resource (backup location), click “Upgrade Resources”.
In this section, you can switch to the older VPS configuration, if necessary, add IP addresses for the server and a place to store backup copies (PACI Backup Space).
Add the required amount of backup space (but not less than the volume of the VPS disk). For example, the VPS – 512 has a disk capacity of 25 GB, therefore you need to add 30 GB of space for creating backup copies (otherwise no backup will be created).
After adding the necessary space for backups, click "Next" -> "Add order" -> "Completion".
Now go back to the “VPS” -> “Backups” section.
You can create a backup manually or set up a schedule.
Create a backup manually
To manually create a backup, click “Create a new backup”, enter a description of the backup, and click “Submit” (for execution).
During the backup, information will be displayed in the VPS section. During the backup, the server will be fully accessible.
Go back to the section "VPS" -> "Backups".
You will see a successfully created backup. In our case, it takes 200 megabytes, which means the purchased backup space is enough for a long time. If you need to recover it, click Restore.
Schedule automatic backups
To do this, select a schedule from the section "VPS" -> "Backups".
Backup copies can be created weekly (weekly), daily (daily) and hourly (hourly).
After selecting the schedule, click "Send".
The schedule will be applied and backups will be created according to the selected schedule.
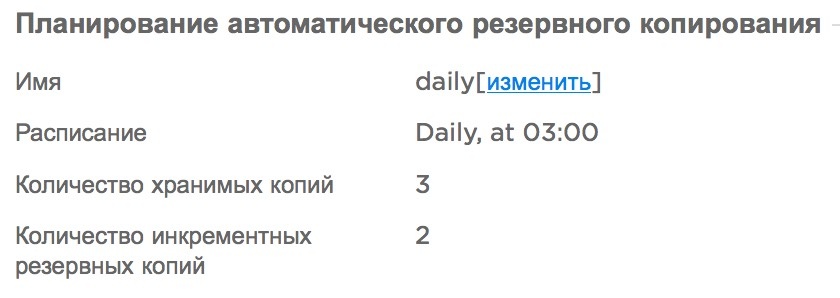
Existing schedule options:
- weekly : 1 backup will be stored and re-created once a week on Sundays at 6 am
- daily : 3 backups and 2 incremental backups will be stored and will be created every day at 3 am.
- hourly : 24 backups and 4 incremental backups will be stored.
- Daily : 30 backups and 5 incremental backups will be stored. This option was created additionally at the request of users.
Transaction log
The transaction log is available in the section “VPS” -> “Transaction log”. The log shows events that occurred with the server.
Built-in firewall (firewall)
The firewall is needed in order to control and filter the network packets passing through it in accordance with the specified rules.
Firewall built into the infrastructure - replacement of a dedicated solution. It does not consume server resources and works in the Infobox infrastructure, ensuring the security of your server.
You can edit the settings in the section VPS -> Firewall (a more correct term, but less popular among technicians).
Not a single firewall rule has been applied yet - it is disabled.
New rules are added by clicking on the "Add" button.
After adding the first rule, the firewall blocks everything that is not allowed.
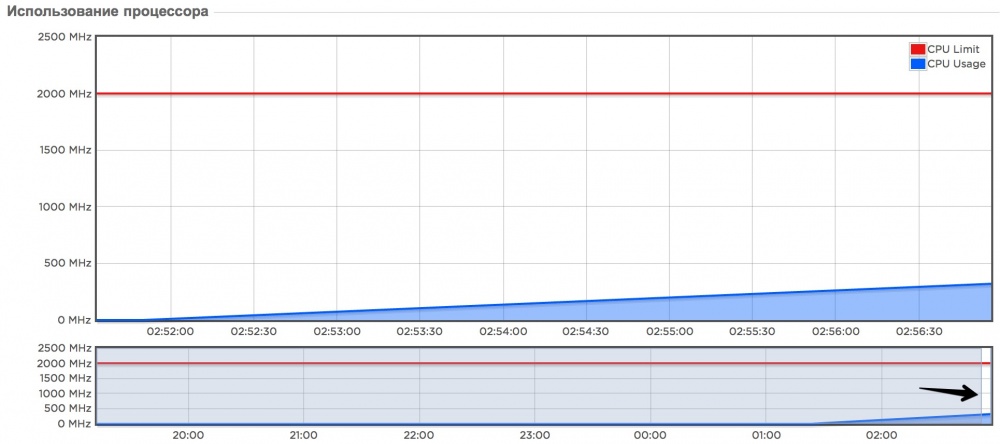
Resource Usage Charts
The current values of CPU and memory consumption are transferred directly to the VPS section of the control panel.
Detailed statistics on time is available in the section “VPS” -> “Resource Usage”.
In this section you can see diagrams:
- CPU load;
- random access memory;
- network bandwidth.
Charts are updated every 5 minutes.
If you need to look more closely at any interval, select it in the lower graph and see the result in the upper one. In this case, the interval will be displayed on the other graphs, which is quite convenient.
Charts will help to notice the shortage of resources in a timely manner and switch to a senior VPS tariff plan with a large amount of resources.
Rebuilding the server
If you need to change the OS - you need to re-create the server. This can be done in the section “VPS” -> “Re-create server”.
Attention! This operation will result in the loss of data and the removal of all backups. Do it only if you are sure that you have nothing to lose on the server and in server backups! In the InfoboxCloud cloud, you can create a server template and roll back to it if necessary, even when the server is deleted. For VPS, this functionality is not available yet.
Select the required OS from which you need to re-create the server. Set a password and click "Delete and create server".
After that, the server will be recreated with the desired operating system.
Conclusion
New generation VPSs allow users to work with a fault-tolerant server with triple data replication and Enterprise SSD caching at affordable prices of regular VPS. In addition, users get advanced backup features and built-in firewall.
If you need the ability to change the amount of processor, memory or disk at any time, use autoscaling and not worry about resources running out, have the ability to create server templates, use a private network and high speed external network - use the InfoboxCloud cloud.
If you can not leave comments on Habré - write to us in the Community .
Trial version of VPS NG for free
To get a trial version of VPS NG for free, contact us .
In the letter specify:
- name and surname
- phone number
- region (St. Petersburg or Amsterdam)
- desired OS.
Contact details are needed solely to protect against repeated registrations. We will not contact you.
The offer to get a trial VPS NG for free is valid until September 15, 2015.
Successful projects!
Source: https://habr.com/ru/post/265751/
All Articles