AutoCAD Architecture: First project
In the product line from Autodesk, in addition to the basic AutoCAD, there are many specialized products that are optimized for various areas of design. One such product is AutoCAD Architecture (ACA). Similar to AutoCAD, for AutoCAD Architecture it is possible to write plug-ins in .NET. In addition to libraries from Autodesk to work with objects AutoCAD Architecture can use the C ++ library Teigha Architecture from the Open Design Alliance, which allows you to download, draw and manipulate architectural objects.
I want to write a series of tutorials that demonstrate how to work with architectural objects using the Autodesk .NET API and Teigha Architecture. Let's start with the basics: let's collect and make the “your first project” exercise work from the ACA documentation, and then slightly expand it to use Autodesk.Aec.Arch.DatabaseServices.Wall objects.
For experienced programmers, the description will seem long, but I think that the first steps should be described in detail in order to exclude discrepancies and allow a person to start at least the simplest application without any problems. With further work, problems with the ACA .NET API will be enough.
')
My previous article describing the basics of ACAflew like plywood over Yaroslavl into Geektimes and is available here: Introduction to AutoCAD Architecture . From it you can get a superficial idea of what AutoCAD Architecture is, what objects it implements and what are their features.
I will write a plugin in VS2010 and check the work in ACA 2013 x64. Different versions of ACA may require different versions of the .NET Framework, besides this plug-in built for x32 will not load ACA x64.
Create a Visual C # class library project called AcaSample1 as shown in the screenshot. We will have the .NET Framework version 4.

Documentation advises to immediately add references acmgd.dll and acdbmgd.dll with the necessary example classes from ACA. These files are in the root of the folder where the ACA is installed. I have this C: \ Program Files \ Autodesk \ AutoCAD 2013
Add the necessary libraries as shown in the screenshots (References -> Add reference -> browse tab)


If everything is done correctly, two new libraries will appear in the References list:

Next, select the two added references, right click on them, go to the properties and set the copy local property to false. This is necessary to avoid hard-to-catch glitches in the future. Here is what the documentation on this subject writes:

Let's try to create a command code in the way the documentation suggests. The sample from ACA for some reason operates with the MText object and not with architectural primitives. Let's follow the example.
Add using directives:
Add the code:
Here AdskGreeting is the name of the team. Subsequently, this name will need to be entered on the ACA command line in order to execute the AdskGreeting () function code.
We are trying to knock down ... well, of course, it does not build :)

The reason is that we do not have enough references in which the CommandClass, CommandMethod, etc. are defined - accoremgd.dll
This library also lies in the root of the folder where ACA is installed. Add this reference and set its copy local to false:

We try to run the build: the library should be built without errors. As a result, we have AcaSample1.dll
Now we need to pay attention to the platform. For example, the default platform in 2010 studio Debug \ AnyCPU, and I have Win 7 x64 and ACA x64. When you try to download this ACA x64 dll will give an error. Therefore, I need to change the target platform:

Rebuild the project. At this stage, AcaSample1.dll should appear in AcaSample1 \ AcaSample1 \ bin \ x64 \ Debug
Documentation still advises checking the target framework
but we exhibited it in the first step when creating a project.

We try to load our plugin into ACA and execute the command. Open ACA 2013 and enter netload on the command line (the command line can be called with the ctrl + 9 combination if it is hidden). The dialog box for selecting the plug-in opens (although if the FILEDIA variable is set to 0, then the window will not open, but you will be prompted to type in the command line dll before the plug-in). Go to the folder with the solution, look for AcaSample1.dll (I have AcaSample1 \ bin \ x64 \ Debug) and press open:

If there were no errors, ACA will keep silent. We type the team AdskGreeting. If there were no errors, the autocad will keep silent again, and, most likely, nothing will change on the screen. This is because the text is too small or out of the area the camera is pointing at. To see it, use the zoom extents command from the panel (view tab):

As a result, should see this:

OK. With minor additions, we managed to build and run a basic example from the documentation for AutoCAD Architecture.
Now let's try to make a command that uses the ACA objects themselves. For example, walls. To do this, we replace the entire code of the example with the following (code is crooked, use only for the sample):
We wrote a new team CreateHouse, which creates a "house" of the four walls. In this case, we have already started using ACA objects, so the directive was added
Aec.Arch is already an area of architectural objects.
Teams
rotate the view into an isometric view and call zoom_extents, which we previously did with our hands in the ACA UI.
To build this project in the references you need to add libraries in which ACA objects are implemented. In this example, we will need AecBaseMgd.dll and AecArchMgd.dll. Do not forget to also set them Copy local property to false.
I have these libraries in C: \ Program Files \ Autodesk \ AutoCAD 2013 \ ACA \

Everything that starts at Aec refers to ACA.

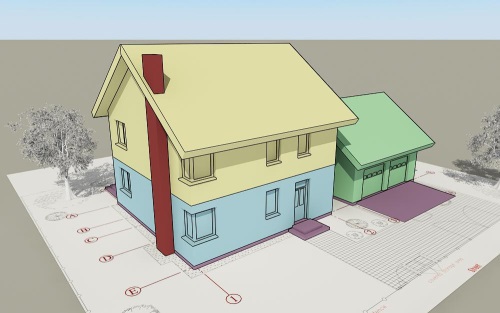
We build the project, load it with the help of netload in AutoCAD Architecture 2013 and execute the CreateHouse command. It should turn out like this:

In this article, I tried to give step-by-step instructions for the first attempts at programming under ACA. I know that there are similar articles about using the .NET API, but in this case I wanted to explain all the steps to use the architectural API.
In the following articles, I will show how to make your first application using Teigha Architecture, and then proceed to the analysis of what happens in these examples: what is dwg, what is the database where we add walls, the differences of architectural objects from the basic autocade primitives in work plan with them. Then I hope to consider more common scenarios: how to render architectural objects in the right view, how to get their geometry for conversion to other formats, how to work with them, and so on.
I want to write a series of tutorials that demonstrate how to work with architectural objects using the Autodesk .NET API and Teigha Architecture. Let's start with the basics: let's collect and make the “your first project” exercise work from the ACA documentation, and then slightly expand it to use Autodesk.Aec.Arch.DatabaseServices.Wall objects.
For experienced programmers, the description will seem long, but I think that the first steps should be described in detail in order to exclude discrepancies and allow a person to start at least the simplest application without any problems. With further work, problems with the ACA .NET API will be enough.
')
My previous article describing the basics of ACA
I will write a plugin in VS2010 and check the work in ACA 2013 x64. Different versions of ACA may require different versions of the .NET Framework, besides this plug-in built for x32 will not load ACA x64.
Step 1
Create a Visual C # class library project called AcaSample1 as shown in the screenshot. We will have the .NET Framework version 4.
Step 2
Documentation advises to immediately add references acmgd.dll and acdbmgd.dll with the necessary example classes from ACA. These files are in the root of the folder where the ACA is installed. I have this C: \ Program Files \ Autodesk \ AutoCAD 2013
Add the necessary libraries as shown in the screenshots (References -> Add reference -> browse tab)
If everything is done correctly, two new libraries will appear in the References list:
Next, select the two added references, right click on them, go to the properties and set the copy local property to false. This is necessary to avoid hard-to-catch glitches in the future. Here is what the documentation on this subject writes:
Microsoft Visual Studio to set the referenced DLL in the build output for the project. If the referenced DLL is copied to the build output folder
Step 3
Let's try to create a command code in the way the documentation suggests. The sample from ACA for some reason operates with the MText object and not with architectural primitives. Let's follow the example.
Add using directives:
using Autodesk.AutoCAD.Runtime; using Autodesk.AutoCAD.ApplicationServices; using Autodesk.AutoCAD.DatabaseServices; Add the code:
[assembly: CommandClass(typeof(AcaSample1.Class1))] namespace AcaSample1 { public class Class1 { [CommandMethod("AdskGreeting")] public void AdskGreeting() { // Get the current document and database, and start a transaction Document acDoc = Application.DocumentManager.MdiActiveDocument; Database acCurDb = acDoc.Database; // Starts a new transaction with the Transaction Manager using (Transaction acTrans = acCurDb.TransactionManager.StartTransaction()) { // Open the Block table record for read // BlockTable acBlkTbl; acBlkTbl = acTrans.GetObject(acCurDb.BlockTableId, OpenMode.ForRead) as BlockTable; // Open the Block table record Model space for write BlockTableRecord acBlkTblRec; acBlkTblRec = acTrans.GetObject(acBlkTbl[BlockTableRecord.ModelSpace], OpenMode.ForWrite) as BlockTableRecord; /* Creates a new MText object and assigns it a location, * text value and text style */ MText objText = new MText(); // Specify the insertion point of the MText object objText.Location = new Autodesk.AutoCAD.Geometry.Point3d(2, 2, 0); // Set the text string for the MText object objText.Contents = "Greetings, Welcome to the AutoCAD .NET Developer's Guide"; // Set the text style for the MText object objText.TextStyleId = acCurDb.Textstyle; // Appends the new MText object to model space acBlkTblRec.AppendEntity(objText); // Appends to new MText object to the active transaction acTrans.AddNewlyCreatedDBObject(objText, true); // Saves the changes to the database and closes the transaction acTrans.Commit(); } } } } Here AdskGreeting is the name of the team. Subsequently, this name will need to be entered on the ACA command line in order to execute the AdskGreeting () function code.
We are trying to knock down ... well, of course, it does not build :)
The reason is that we do not have enough references in which the CommandClass, CommandMethod, etc. are defined - accoremgd.dll
This library also lies in the root of the folder where ACA is installed. Add this reference and set its copy local to false:
We try to run the build: the library should be built without errors. As a result, we have AcaSample1.dll
Step 4
Now we need to pay attention to the platform. For example, the default platform in 2010 studio Debug \ AnyCPU, and I have Win 7 x64 and ACA x64. When you try to download this ACA x64 dll will give an error. Therefore, I need to change the target platform:
Rebuild the project. At this stage, AcaSample1.dll should appear in AcaSample1 \ AcaSample1 \ bin \ x64 \ Debug
Documentation still advises checking the target framework
On the Applications tab, Target Framework drop-down list, select .NET Framework 4.0
but we exhibited it in the first step when creating a project.
Step 5
We try to load our plugin into ACA and execute the command. Open ACA 2013 and enter netload on the command line (the command line can be called with the ctrl + 9 combination if it is hidden). The dialog box for selecting the plug-in opens (although if the FILEDIA variable is set to 0, then the window will not open, but you will be prompted to type in the command line dll before the plug-in). Go to the folder with the solution, look for AcaSample1.dll (I have AcaSample1 \ bin \ x64 \ Debug) and press open:
If there were no errors, ACA will keep silent. We type the team AdskGreeting. If there were no errors, the autocad will keep silent again, and, most likely, nothing will change on the screen. This is because the text is too small or out of the area the camera is pointing at. To see it, use the zoom extents command from the panel (view tab):
As a result, should see this:
OK. With minor additions, we managed to build and run a basic example from the documentation for AutoCAD Architecture.
Step 6
Now let's try to make a command that uses the ACA objects themselves. For example, walls. To do this, we replace the entire code of the example with the following (code is crooked, use only for the sample):
using System; using System.Collections.Generic; using System.Linq; using System.Text; using Autodesk.AutoCAD.Runtime; using Autodesk.AutoCAD.ApplicationServices; using Autodesk.AutoCAD.DatabaseServices; using Autodesk.AutoCAD.Geometry; using Autodesk.Aec.Arch.DatabaseServices; [assembly: CommandClass(typeof(AcaSample2_Walls.Class1))] namespace AcaSample2_Walls { public class Class1 { [CommandMethod("CreateHouse")] public static void CreateHouse() { Document acDoc = Application.DocumentManager.MdiActiveDocument; Database acCurDb = acDoc.Database; acDoc.Editor.WriteMessage("\n CreateHouse command"); using (Transaction acTrans = acCurDb.TransactionManager.StartTransaction()) { // Open the Block table record for read BlockTableRecord acModelSpace = GetModelSpaceRecord(acCurDb, acTrans, OpenMode.ForWrite); AddWallToModelSpace(new Point3d(0, 0, 0), new Point3d(5000, 0, 0), acModelSpace, acTrans); AddWallToModelSpace(new Point3d(5000, 0, 0), new Point3d(5000, 5000, 0), acModelSpace, acTrans); AddWallToModelSpace(new Point3d(5000, 5000, 0), new Point3d(0, 5000, 0), acModelSpace, acTrans); AddWallToModelSpace(new Point3d(0, 5000, 0), new Point3d(0, 0, 0), acModelSpace, acTrans); acTrans.Commit(); } acDoc.SendStringToExecute("_-VIEW _SWISO ", true, false, false); acDoc.SendStringToExecute("_.zoom _all ", true, false, false); } public static BlockTableRecord GetModelSpaceRecord(Database acDb, Transaction acTrans, OpenMode om) { // Open the Block table record for read BlockTable acBlkTbl; acBlkTbl = acTrans.GetObject(acDb.BlockTableId, OpenMode.ForRead) as BlockTable; // Open the Block table record Model space for read BlockTableRecord acBlkTblRec; acBlkTblRec = acTrans.GetObject(acBlkTbl[BlockTableRecord.ModelSpace], om) as BlockTableRecord; return acBlkTblRec; } private static void AddWallToModelSpace(Point3d ptS, Point3d ptE, BlockTableRecord acModelSpace, Transaction acTrans) { Wall w = new Wall(); w.Set(ptS, ptE, new Vector3d(0, 0, 1)); w.BaseHeight = 2500; w.InstanceWidth = 300; acModelSpace.AppendEntity(w); acTrans.AddNewlyCreatedDBObject(w, true); } } } We wrote a new team CreateHouse, which creates a "house" of the four walls. In this case, we have already started using ACA objects, so the directive was added
using Autodesk.Aec.Arch.DatabaseServices; Aec.Arch is already an area of architectural objects.
Teams
acDoc.SendStringToExecute("_-VIEW _SWISO ", true, false, false); acDoc.SendStringToExecute("_.zoom _all ", true, false, false); rotate the view into an isometric view and call zoom_extents, which we previously did with our hands in the ACA UI.
To build this project in the references you need to add libraries in which ACA objects are implemented. In this example, we will need AecBaseMgd.dll and AecArchMgd.dll. Do not forget to also set them Copy local property to false.
I have these libraries in C: \ Program Files \ Autodesk \ AutoCAD 2013 \ ACA \
Everything that starts at Aec refers to ACA.
We build the project, load it with the help of netload in AutoCAD Architecture 2013 and execute the CreateHouse command. It should turn out like this:
Conclusion
In this article, I tried to give step-by-step instructions for the first attempts at programming under ACA. I know that there are similar articles about using the .NET API, but in this case I wanted to explain all the steps to use the architectural API.
In the following articles, I will show how to make your first application using Teigha Architecture, and then proceed to the analysis of what happens in these examples: what is dwg, what is the database where we add walls, the differences of architectural objects from the basic autocade primitives in work plan with them. Then I hope to consider more common scenarios: how to render architectural objects in the right view, how to get their geometry for conversion to other formats, how to work with them, and so on.
Source: https://habr.com/ru/post/265617/
All Articles