How I use PostCSS
 CSS preprocessors at one time greatly facilitated the work of writing CSS code. However, in some ways they were all imperfect and had significant flaws in their work. That is why PostCSS post-preprocessor replaced preprocessors.
This is quite a powerful tool that facilitates working with CSS. Post-processor today is used in such large companies as Twitter and Google. In addition, according to Bootstap developers, the fifth version of the CSS framework will most likely also be written in PostCSS.
Many here are probably already familiar with the simplest preprocessing. Someone is already actively using PostCSS in all their projects, someone is planning to start using it.
To speed up work in the field of web development, I wrote my own Yeoman generator, which is called a generator-alchemist. About him and about my development of Internet sites will be discussed in this article.
')
Composition
Jade

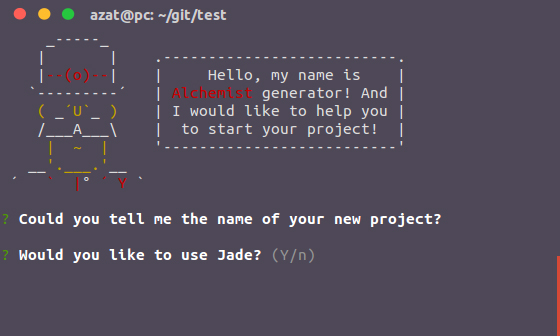
Using the Jade template engine is optional. Yeoman generator when installing allows us to choose whether we want to use Jade in our new project or not.
After installation, write your Jade code in the / src / jade / folder and it will automatically be compiled into HTML.
HTML
HTML Hint
After compiling Jade, the HTML file is placed in the / src / html / folder, where the W3C code validates and is sent to the / dist / folder. In the event that you do not use Jade, you write the HTML code in the / src / html / folder.
CSS
The original CSS file includes several basic things:
Normalize CSS
Grid system
<div class="container"> <div class="row"> <div class="col-8"> Content block </div> <div class="col-4"> Right sidebar </div> </div> </div> Postcss
And here the most interesting begins. Building the project includes a large number of PostCSS plugins that allow you to write CSS quickly and efficiently. Below is a list of plugins that I use:
Clearfix
Adds Clearfix attributes to clear floating elements.
It was:
.foo { clear: fix; } .bar { clear: fix-legacy; } It became:
.foo:after{ content: ''; display: table; clear: both; } .bar { clear: fix-legacy; } .bar:before, .bar:after { content: ''; display: table; } .bar:after { clear: both; } .bar { zoom: 1; } Color short
Allows you to abbreviate color names.
It was:
.hello { border-bottom: 1px solid rgb(200); background: #20; color: #f; box-shadow: 0 1px 5px rgba(0, 0.5); } It became:
.hello { border-bottom: 1px solid rgb(200, 200, 200); background: #202020; color: #fff; box-shadow: 0 1px 5px rgba(0, 0, 0, 0.5); } CSS Mqpacker
Groups media queries and puts them at the end of a CSS document.
CSS Nano
Extremely powerful tool for minifying CSS code for production.
CSS Next
Allows you to use the features of CSS-4 today.
About the possibilities of CSS Next can be read in this article .
Discard Comments
Removes all comments from the CSS code. Previously, the CSS Nano plugin did a great job with this task, but after upgrading PostCSS to version 5.0.x this feature stopped working. I hope this problem will be fixed soon by the developers.
Focus
Adds the: focus pseudo-element to all selectors where: hover is used.
It was:
.button:hover { background: red; } It became:
.button:hover, .button:focus { background: red; } PreCSS
Allows you to use Sass syntax in working with CSS: nesting, variables, and more. More information about all the features of PreCSS can be found on the plugin page.
It was:
$blue: #056ef0; $column: 200px; header { background: $blue; width: $column; h1 { font-size: 18px; } } It became:
header { background: #056ef0; width: 200px; } header h1 { font-size: 18px; } PxtoRem
Plugin that generates rem and em from px.
It was:
p { font-size: 16px; } It became:
p { font-size: 1rem; } Short
Another powerful PostCSS plugin that allows you to shorten the writing of CSS code.
It was:
.section { margin: 40px; text: bold center uppercase dimgrey 1.25em 1.5 .05em; } .section.inset { margin: * auto; } It became:
.section { margin: 40px; color: dimgrey; font-weight: bold; text-align: center; text-transform: uppercase; font-size: 1.25em; line-height: 1.5; letter-spacing: .05em; } .section.inset { margin-right: auto; margin-left: auto; } Size
Adds the size property of the CSS to indicate the width and height of the element.
It was:
.two { size: 20px 10px; } .one { size: 10px; } It became:
.two { width: 20px; height: 10px; } .one { width: 10px; height: 10px; } Javascript
Uglify
Minifies the JavaScript code located in the / src / js / folder and sends the minified file to the / dist / js / folder.
Images
Imagemin
It minimizes images that are in the / src / images / folder and sends them to the / dist / images / folder.
Server
Simultaneously with the launch of Gulp.js, you run a local server using BrowserSync, available at:
http://localhost:3000 Installation
Before installing the generator, you need to have the following installed on your computer:
If you have already installed all of the above, run the following command in the terminal to globally install the generator:
$ sudo npm install -g generator-alchemist After that, initialize the generator to the folder of the future project:
$ yo alchemist That's all. All the necessary files for starting the project are installed. It remains only to run Gulp:
$ gulp Write your Jade / HTML code in the / src / jade / or / src / html / folder
Write your CSS code in the / src / css / folder
Write your javascript code in / src / js / folder
Place your images in the / src / images / folder
And all files will be automatically optimized to publish to the / dist / folder going to production.
Thank you for your attention!
github.com/azat-io/generator-alchemist
Source: https://habr.com/ru/post/265449/
All Articles