Windows 10 through 10. Issue # 1. How to increase the visibility and frequency of installations
Welcome to the first article in the Windows 10 to 10 series . We will start the series from where your interaction with users begins - from the Windows Store.
To make sure that your applications are located and started by users of Windows 10, we recommend doing three exercises right now:
Even if you just spend one hour this week , you will not only improve your representation in Windows 10, but you will also be able to determine for yourself the basic indicators that you can build on as your application develops and improves.
')
So let's start by presenting your application in the Windows Store, this is where users spend their time looking at your offer and deciding whether to click a button to install your Windows application and give you a chance. This is the first place to interact with your user.
In order to properly be presented in the search results in the store, you should follow our recommendations for choosing keywords : you can use up to 8 keywords that really describe your application. If you do not have a relationship with Facebook or Twitter, you should not waste words on pretending that you have.
We also built in the display of the description from the store inside the various elements of Windows, helping users find applications and games that are relevant to their current tasks. For example, when searching with Cortana, the results show not only installed applications and available documents, but also relevant results from the Windows Store and the Internet - thus helping you to increase the number of your users on Windows 10. Keep these scenarios in mind when deciding what keywords to use to describe the application.
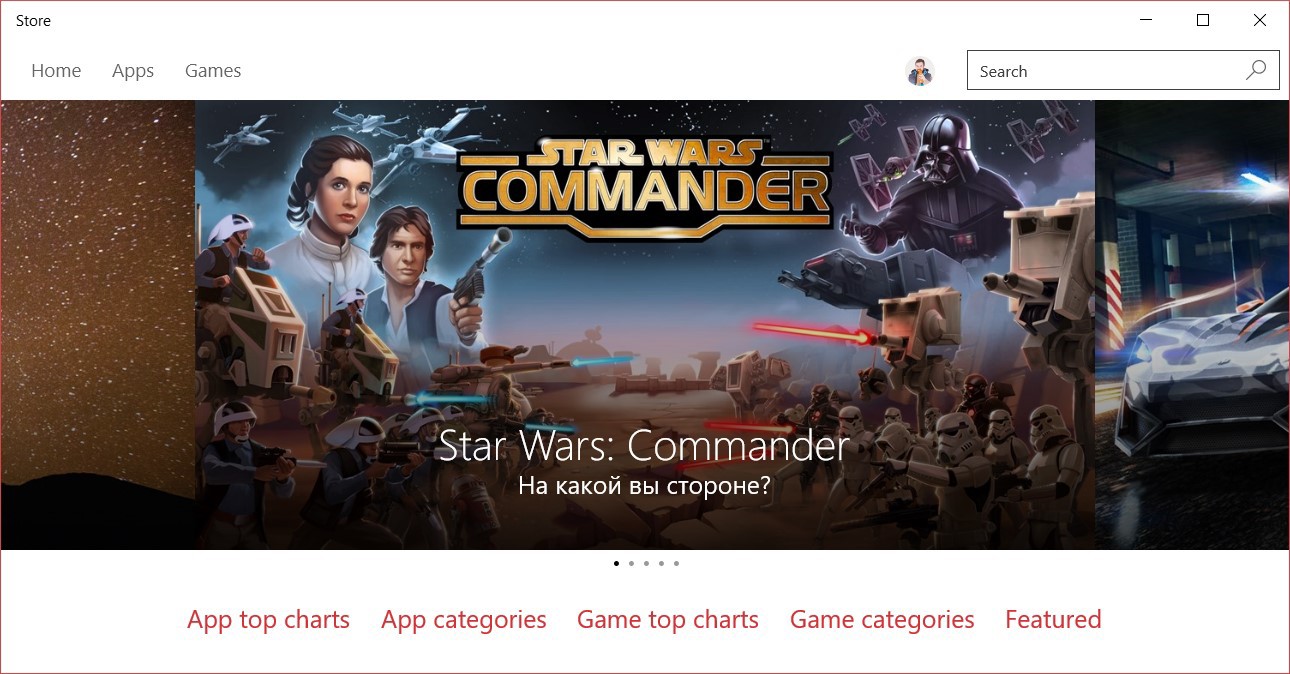
We also highly recommend providing promotional images as part of your store description. These images are used to promote your applications in various places, if it has been selected for the application selection (feature). If you have not provided such images, no matter how good your application would be, it will not be put into promotion. For Windows 10, we added a new image format 2400x1200px, which the store team uses in promotional campaigns and, in particular, as the main image in the “Spotlight” collection. If you want your application to be considered for promotion, take a little time this week and add advertising images to the description, especially the size of 2400x1200px.
And while we are not moving far away from this topic, review the other requirements for inclusion in consideration for promotion in the Windows Store . However, it is important to note here that adding all the necessary images and meeting all the requirements for promotion are not yet a guarantee that they will put you in the promo; However, not meeting the requirements means that you will not be considered.
Fine! Suppose you managed to get a fraction of the users' attention, and they went over to the description of your application in the store. What will they see there?
The description page for your application is the first place where your potential users will make their initial opinion about the application and decide whether they want to install it or not. Here you "sell" your decision to the whole world. A simple analogy is the cover of a book. If you can’t visually tell you exactly what you are proposing using just a few words, chances are great that the user will move on to someone else.
Surprisingly, most developers pay very little attention to the description of their applications in the store. To prepare new users for the first meeting with your application, it's time to revise your description, using a number of fresh tips:
Similar to the case of the lack of advertising images, a huge number of applications in the store went past promotion opportunities due to the fact that they did not have an adequate description or their screen shots were just header frames. Do not let this happen with your application!
Now that you've figured out the description page in the store and convinced users to try your app or your game, let's see how you understand that your “sale” was successful. In the Developer Center for Windows, we recently made several important updates, improving the ability to work with reports. In the article we will look at two of them: application usage reports and the ability to track campaigns , which will be available soon.
The usage report provides a detailed look at how your application is used and by whom. If you go to the Dashboard and look at the report today, you will find that it is now empty, and also that it asks you to install the Visual Studio Application Insights SDK in your application. For those who are not familiar with Application Insights, this is a service for collecting telemetry from your application, using Azure for storing (free of charge) and presenting information. The Windows Developer Center has access to this information and therefore has the ability to show you how users are using your application.
In Visual Studio 2015 or 2013, you can add Application Insights to your application in literally 10 minutes. To get started, open your Windows application (Windows 8 or 10 - for a desktop or smartphone), and do the following:
After that, you can watch almost in real time in Azure how many people are using your application. The collected telemetry can tell you a lot about your application, in particular, where to direct development efforts, since you can measure how the specific functionality of the application is used, how many people and how long.
As soon as you publish the application to the store and enable the setting of the telemetry collection of the application in the information panel in the Windows developer center (in the account settings), the data will also be visible in the usage reports .
You can also use the TelemetryClient class to collect additional data, such as page views (or even use tabs in the pivot and hub controls), events you would like to monitor, and exceptions. In addition to basic telemetry through the pages that you receive using Application Insights, you can use exception tracking to find out in real-time about user problems (especially useful in the public release of the next update). Below is a sample code to collect exception information:
As you become comfortable with analytics connectivity, you can begin to measure any parameters of interest to you. For example, the code below measures how long it takes to complete a task:
For my personal application (it is heavily tied to a web service), I found it useful to keep track of when web service calls result in poor evaluations and in which countries there are most problems with the application. Over time, while I tried different approaches on the service side (server error collection, caching, etc.), I also used telemetry to track the impact on user involvement (for example, by time spent in the application) and overall application satisfaction (improvements rating in specific regions). All this allows you to better measure the success of the application.
More details about working with telemetry can be found in last year's article from the engineering team, written by Craig Brokshmidt . (Just keep in mind that at the time of this writing, we were still developing Application Insights. Today, when the service is widely available, working with it is much easier!)
Having a basic understanding of your users, it's time to turn off the tap and send traffic to your application. When you plan this, pay attention to the following possibilities opened to you by the app store:
Taking advantage of campaign tracking is perhaps the easiest way to understand where new users are coming from. This functionality works in the same way as URL redirection services (for example, bit.ly) that are often used to analyze user traffic:
Note : channel and conversion reports will be available to all developers in the coming weeks.
Another interesting parameter for research is to understand whether the campaign could lead to a good conversion to users. The report allows you to understand whether users have purchased the application (or embedded purchase) within 24 hours after clicking on the link, based on the Microsoft account that the user used when entering the link.
As soon as you upgrade your application to a UWP application under Windows 10, you can take advantage of the additional campaign tracking functionality through the CurrentApp.getAppPurchaseCampaignIdAsync () method, which during the operation of the application can tell if a user came from a campaign and, if so, then what In other words, you can customize a game or application to better fit the user's arrival channel, for example, by making additional offers for different partners or by highlighting specific shopping options for specific users.
In addition to trying to make it easier for you to understand where your users come from, we also invest in new ways for users to come to the store, including expanding the Microsoft Affiliate program to include Windows Store content: applications, games, music, video, etc. .
The program helps any partners to earn a commission from promoting the content of the Windows Store. The infrastructure of the affiliate program works in the same way as the campaign tracking system, with the only difference being that it aims to allow third-party players to generate traffic to your application in the Windows Store and earn a commission from referral purchases. Affiliate earns a 7% commission on all paid purchases within 24 hours, inline purchases within 14 days and monthly from renewable subscriptions for 6 months.
If you are doing app reviews and games on your website or blog (for example, via Twitter), I recommend that you join the affiliate program and use the appropriate links when you send users to the Windows Store.
Finally, we continue to make it easier to get more users by adding the ability to create ad campaigns for your application . Using the “Promote your app” section in the development center, you can create and run two types of ads:
After adding an advertising campaign, you can use the installation report through advertising to evaluate how your campaign works (impressions, clicks and installations), and then adjust the promotion strategy as necessary.
We hope you enjoyed the first article in the Windows 10 to 10 series. In the following weeks, we will focus on what you can do to increase the engagement of your users in the interaction with the application.
But before that, we recommend that you spend an hour updating your application description:
The next time you update the application, we highly recommend adding Application Insights to it. Understanding how users work with your application is really enlightening, it is even more interesting to watch it almost live through telemetry, especially when running regular updates, when possible exceptions and crashes may be critical for success.
As always, we welcome your feedback in the comments and on Twitter @WindowsDev . During this week, use the hashtag # win10x10 - from tips on working with telemetry to reviews on what has worked to promote your application - to discuss on Twitter the topic of promoting applications.
To make sure that your applications are located and started by users of Windows 10, we recommend doing three exercises right now:
- Update the in-store description to increase the app's chances of being installed.
- Start tracking application usage with Visual Studio Application Insights and new usage reports.
- Learn how to use new store features to track campaign success.
Even if you just spend one hour this week , you will not only improve your representation in Windows 10, but you will also be able to determine for yourself the basic indicators that you can build on as your application develops and improves.
')
Update your application description
So let's start by presenting your application in the Windows Store, this is where users spend their time looking at your offer and deciding whether to click a button to install your Windows application and give you a chance. This is the first place to interact with your user.
Make it easy to find your application for potential users.
In order to properly be presented in the search results in the store, you should follow our recommendations for choosing keywords : you can use up to 8 keywords that really describe your application. If you do not have a relationship with Facebook or Twitter, you should not waste words on pretending that you have.
We also built in the display of the description from the store inside the various elements of Windows, helping users find applications and games that are relevant to their current tasks. For example, when searching with Cortana, the results show not only installed applications and available documents, but also relevant results from the Windows Store and the Internet - thus helping you to increase the number of your users on Windows 10. Keep these scenarios in mind when deciding what keywords to use to describe the application.
We also highly recommend providing promotional images as part of your store description. These images are used to promote your applications in various places, if it has been selected for the application selection (feature). If you have not provided such images, no matter how good your application would be, it will not be put into promotion. For Windows 10, we added a new image format 2400x1200px, which the store team uses in promotional campaigns and, in particular, as the main image in the “Spotlight” collection. If you want your application to be considered for promotion, take a little time this week and add advertising images to the description, especially the size of 2400x1200px.
And while we are not moving far away from this topic, review the other requirements for inclusion in consideration for promotion in the Windows Store . However, it is important to note here that adding all the necessary images and meeting all the requirements for promotion are not yet a guarantee that they will put you in the promo; However, not meeting the requirements means that you will not be considered.
Make sure your application will want to install
Fine! Suppose you managed to get a fraction of the users' attention, and they went over to the description of your application in the store. What will they see there?
The description page for your application is the first place where your potential users will make their initial opinion about the application and decide whether they want to install it or not. Here you "sell" your decision to the whole world. A simple analogy is the cover of a book. If you can’t visually tell you exactly what you are proposing using just a few words, chances are great that the user will move on to someone else.
Surprisingly, most developers pay very little attention to the description of their applications in the store. To prepare new users for the first meeting with your application, it's time to revise your description, using a number of fresh tips:
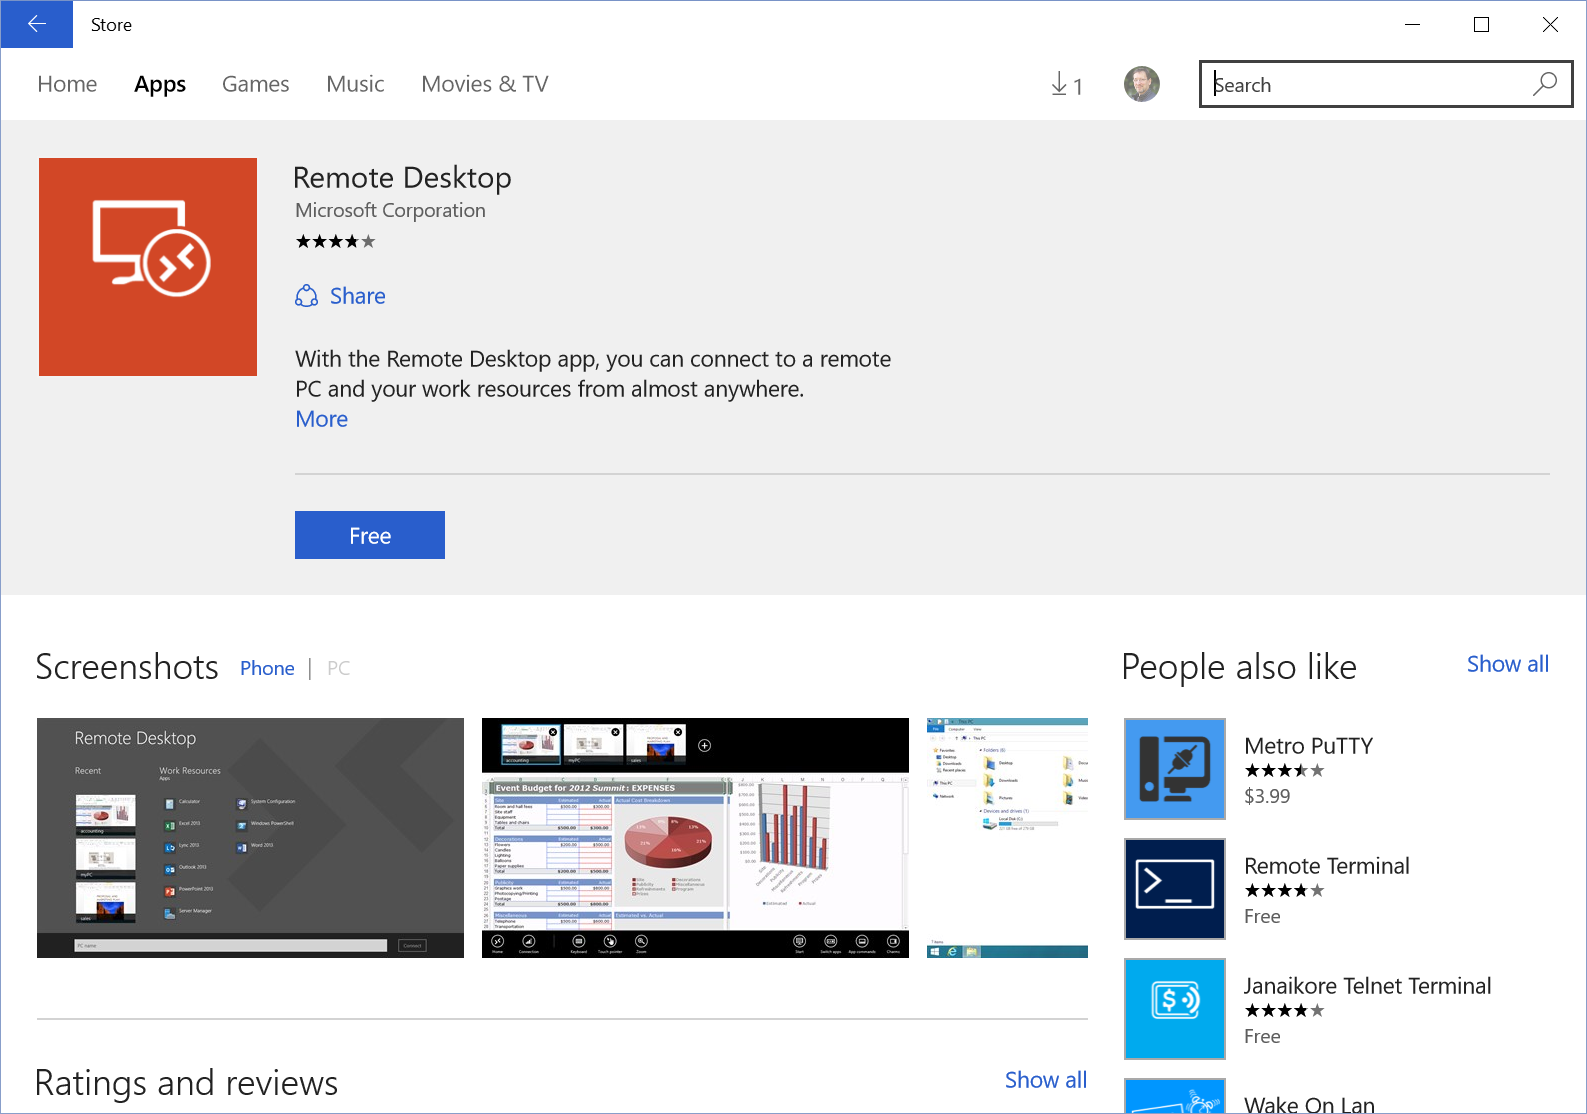
- The application description should explain the advantages of the application in the very first sentences. The store usually cuts the descriptions and shows only the first few lines (see screenshot with the Remote Desktop app above). Make sure that all the key thoughts reach the “cut line” so that users are interested in reading the details.
- Your screenshots should be interesting and understandable - especially the very first shot (do not use the title screen for it with the title). Make sure the images properly describe your application or game. You can also add explanatory text to images to better explain to users what they are looking at. To make good images, you may need tools: you can use any suitable product — from free Paint.net and GIMP to paid products like Adobe Photoshop / Illustrator.
- If your application is localized in many markets, make sure that screenshots and descriptions are also translated. (As an additional tip, if you already have Windows applications and want to localize it to new markets, you can get substantial discounts on localization services from Lionbridge as part of the Dev Center Benefits program.)
Similar to the case of the lack of advertising images, a huge number of applications in the store went past promotion opportunities due to the fact that they did not have an adequate description or their screen shots were just header frames. Do not let this happen with your application!
Start measuring success
Now that you've figured out the description page in the store and convinced users to try your app or your game, let's see how you understand that your “sale” was successful. In the Developer Center for Windows, we recently made several important updates, improving the ability to work with reports. In the article we will look at two of them: application usage reports and the ability to track campaigns , which will be available soon.
The usage report provides a detailed look at how your application is used and by whom. If you go to the Dashboard and look at the report today, you will find that it is now empty, and also that it asks you to install the Visual Studio Application Insights SDK in your application. For those who are not familiar with Application Insights, this is a service for collecting telemetry from your application, using Azure for storing (free of charge) and presenting information. The Windows Developer Center has access to this information and therefore has the ability to show you how users are using your application.
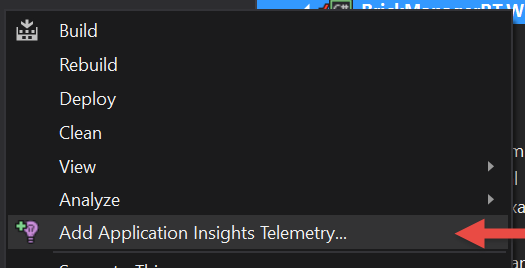
In Visual Studio 2015 or 2013, you can add Application Insights to your application in literally 10 minutes. To get started, open your Windows application (Windows 8 or 10 - for a desktop or smartphone), and do the following:
- Right-click the project in Visual Studio and select 'Add Application Insights Telemetry ...'
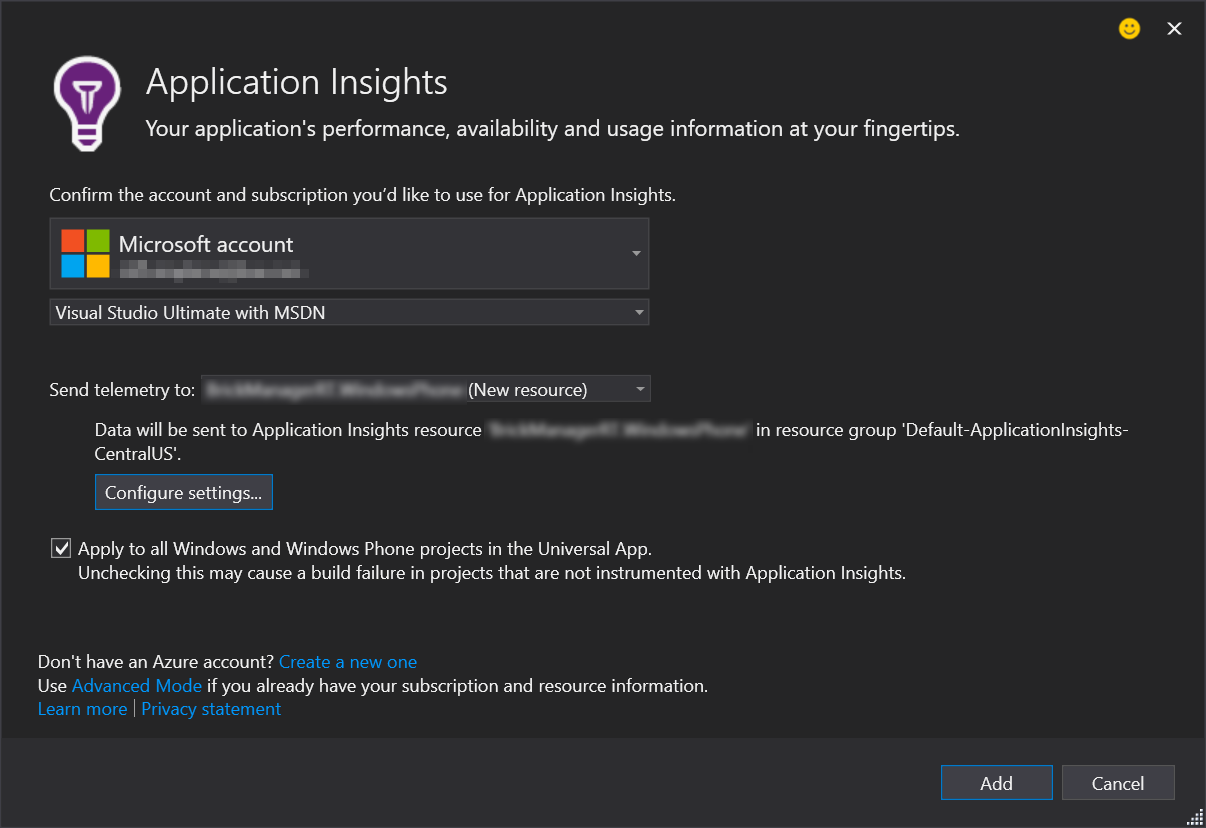
- Application Insights will launch a wizard to help you add a service to Windows. As part of this process, he will ask you where you want to save your data (if you do not have a free Azure account, you will need to create it).
- Once you have completed all the steps with an assistant, he will set up your project to collect telemetry.
After that, you can watch almost in real time in Azure how many people are using your application. The collected telemetry can tell you a lot about your application, in particular, where to direct development efforts, since you can measure how the specific functionality of the application is used, how many people and how long.
As soon as you publish the application to the store and enable the setting of the telemetry collection of the application in the information panel in the Windows developer center (in the account settings), the data will also be visible in the usage reports .
You can also use the TelemetryClient class to collect additional data, such as page views (or even use tabs in the pivot and hub controls), events you would like to monitor, and exceptions. In addition to basic telemetry through the pages that you receive using Application Insights, you can use exception tracking to find out in real-time about user problems (especially useful in the public release of the next update). Below is a sample code to collect exception information:
try { // ... } catch (Exception ex) { var TelemetryClient telemetry = new TelemetryClient(); telemetry.TrackException(ex); } As you become comfortable with analytics connectivity, you can begin to measure any parameters of interest to you. For example, the code below measures how long it takes to complete a task:
var stopwatch = System.Diagnostics.Stopwatch.StartNew(); // ... perform the timed action ... stopwatch.Stop(); var metrics = new Dictionary <string, double> {{"processingTime", stopwatch.Elapsed.TotalMilliseconds}}; // Set up some properties: var properties = new Dictionary <string, string> {{"signalSource", currentSignalSource.Name}}; // Send the event: var TelemetryClient telemetry = new TelemetryClient(); telemetry.TrackEvent("SignalProcessed", properties, metrics); For my personal application (it is heavily tied to a web service), I found it useful to keep track of when web service calls result in poor evaluations and in which countries there are most problems with the application. Over time, while I tried different approaches on the service side (server error collection, caching, etc.), I also used telemetry to track the impact on user involvement (for example, by time spent in the application) and overall application satisfaction (improvements rating in specific regions). All this allows you to better measure the success of the application.
More details about working with telemetry can be found in last year's article from the engineering team, written by Craig Brokshmidt . (Just keep in mind that at the time of this writing, we were still developing Application Insights. Today, when the service is widely available, working with it is much easier!)
Start promoting yourself
Having a basic understanding of your users, it's time to turn off the tap and send traffic to your application. When you plan this, pay attention to the following possibilities opened to you by the app store:
- When starting your promotion campaigns, start using the campaign tracking mechanism (roll out for developers this month) to understand which one brings the most users.
- Join the Microsoft Affiliate program , which enables you to receive a 7% commission from payments in the Windows Store at the expense of referral links.
- Windows Developer Center makes it easy to run ad campaigns to promote your applications.
Analysis of the success of promotion
Taking advantage of campaign tracking is perhaps the easiest way to understand where new users are coming from. This functionality works in the same way as URL redirection services (for example, bit.ly) that are often used to analyze user traffic:
- Add an ID to track the “campaign” at the end of the address of your application in the store (you can find it in the application management section on the application identification information page in the developer center). Tracking IDs are a simple string and can be anything that makes sense to you.
- Start using such links by adding at the end of the ID, the corresponding parameters in the following format:
www.microsoft.com/store/apps/yourAppName/yourAppProductID?cid=yourCampaignID
For example, you want to promote Skype (with a Product ID of 9wzdncrfj364) and you plan to use different channels. You can run, say, the following three campaigns:- Blog: www.microsoft.com/store/apps/skype/9wzdncrfj364?cid=app_blog
- Twitter: www.microsoft.com/store/apps/skype/9wzdncrfj364?cid=app_twitter
- Review of the application on a website with reviews www.microsoft.com/store/apps/skype/9wzdncrfj364?cid=rev_HotApps
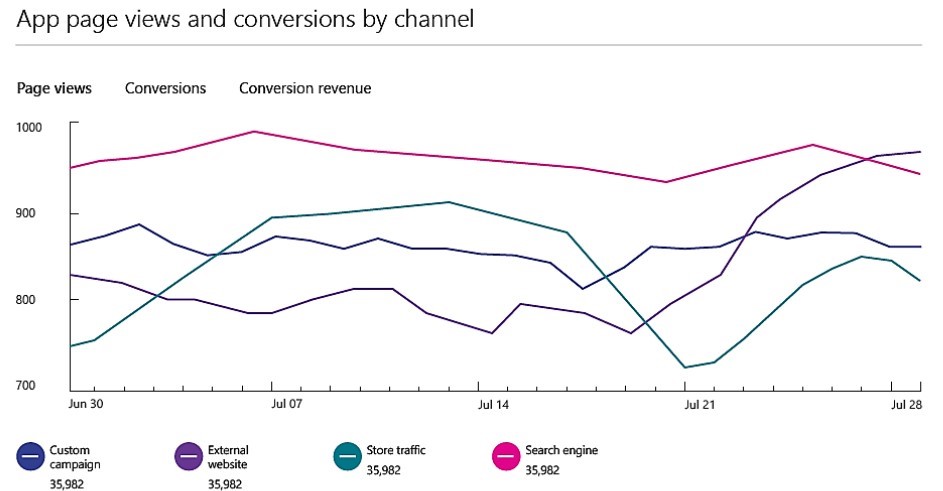
- In the report on channels and conversions in the Windows developer dashboard, you can examine the results (below is an example of a report):
Note : channel and conversion reports will be available to all developers in the coming weeks.
Another interesting parameter for research is to understand whether the campaign could lead to a good conversion to users. The report allows you to understand whether users have purchased the application (or embedded purchase) within 24 hours after clicking on the link, based on the Microsoft account that the user used when entering the link.
As soon as you upgrade your application to a UWP application under Windows 10, you can take advantage of the additional campaign tracking functionality through the CurrentApp.getAppPurchaseCampaignIdAsync () method, which during the operation of the application can tell if a user came from a campaign and, if so, then what In other words, you can customize a game or application to better fit the user's arrival channel, for example, by making additional offers for different partners or by highlighting specific shopping options for specific users.
Join Affiliate program
In addition to trying to make it easier for you to understand where your users come from, we also invest in new ways for users to come to the store, including expanding the Microsoft Affiliate program to include Windows Store content: applications, games, music, video, etc. .
The program helps any partners to earn a commission from promoting the content of the Windows Store. The infrastructure of the affiliate program works in the same way as the campaign tracking system, with the only difference being that it aims to allow third-party players to generate traffic to your application in the Windows Store and earn a commission from referral purchases. Affiliate earns a 7% commission on all paid purchases within 24 hours, inline purchases within 14 days and monthly from renewable subscriptions for 6 months.
If you are doing app reviews and games on your website or blog (for example, via Twitter), I recommend that you join the affiliate program and use the appropriate links when you send users to the Windows Store.
Promote apps using ads
Finally, we continue to make it easier to get more users by adding the ability to create ad campaigns for your application . Using the “Promote your app” section in the development center, you can create and run two types of ads:
- Paid advertising within other applications targeting the right device families and application categories.
- Free " own " advertising inside your other applications - for those devices on which your applications or games are not yet installed.
After adding an advertising campaign, you can use the installation report through advertising to evaluate how your campaign works (impressions, clicks and installations), and then adjust the promotion strategy as necessary.
Do this week: take an hour to update the description of your app in the store
We hope you enjoyed the first article in the Windows 10 to 10 series. In the following weeks, we will focus on what you can do to increase the engagement of your users in the interaction with the application.
But before that, we recommend that you spend an hour updating your application description:
- Spend 20 minutes updating the application description.
- Spend another 20 minutes to update the screenshots and add a promotional image of 2400x1200px.
- Finally, check how you link to your application and start using campaign IDs to collect installation source information.
The next time you update the application, we highly recommend adding Application Insights to it. Understanding how users work with your application is really enlightening, it is even more interesting to watch it almost live through telemetry, especially when running regular updates, when possible exceptions and crashes may be critical for success.
As always, we welcome your feedback in the comments and on Twitter @WindowsDev . During this week, use the hashtag # win10x10 - from tips on working with telemetry to reviews on what has worked to promote your application - to discuss on Twitter the topic of promoting applications.
Source: https://habr.com/ru/post/265445/
All Articles