How to create interactive tabs in an email
In our blog, we have repeatedly talked about creating interactive email newsletters using CSS and HTML. Today we bring to your attention an adapted translation of Justin Koo’s note on how to create interactive tabs that will work in iOS, Android, and popular web applications.
Radio elements, labels and pseudo-class: checked
On the Internet there is a lot of content on creating tabs on CSS , unfortunately, not all of the described techniques adequately work with the weirdness of CSS processors of web-based email clients.
')
Typically, these examples use a combination of radio buttons, labels, and the pseudo-class CSS3
:checked . Here's what it looks like: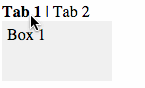
And here is the code:
<style> /* hide radio element */ .myradio { display:none; height:0px; visibility:hidden; } .mybox { width:100px; height:50px; background-color: #eeeeee; display:none; padding:5px; } /* change tab to bold */ .myradio:checked + label { font-weight: bold; } /* show content */ #radio1:checked ~ .box1, #radio2:checked ~ .box2 { display:block; } </style> <input name="myradio" type=radio id="radio1" class="myradio" checked> <label for="radio1">Tab 1</label> | <input name="myradio" type=radio id="radio2" class="myradio"> <label for="radio2">Tab 2</label> <div class="mybox box1">Box 1</div> <div class="mybox box2">Box 2</div> The headings of the tabs are wrapped with labels and placed under the associated radio element, which is hidden by styles. Next, the header is associated with the radio element with the help of the for attribute - as a result, clicking on the header activates the radio element with an id that matches the value of the for attribute.
Then using the pseudo-class
:checked and related selectors, adjacent (+) and general (~), you can selectively highlight in bold type the name and display the associated content of the tab.This simple technique works on mobile clients and webkit-based email programs, such as applications in iOS and Android. However, it needs more work to display in web clients.
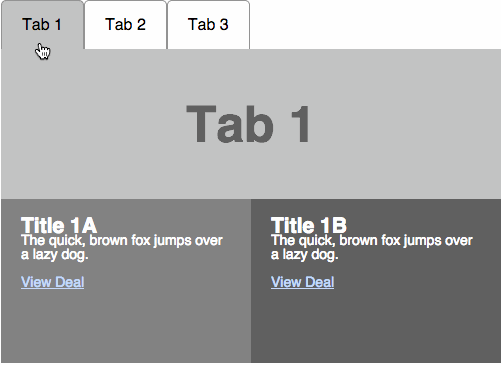
Interactive tabs on the web
In the web, the problem is the inability to use certain CSS styles. For example, Gmail cuts classes and id, Outlook.com does not support
:checked pseudo-class, and Yahoo! Mail cuts a selector (~) and renames id and classes when rendering, making the for attribute useless.Implement support for Yahoo! Mail and Gmail can be done with the following tricks:
1) The radio element and the content of the tab must be placed inside the label. This will eliminate the use of the for attribute - clicking on the label will automatically activate the radio element embedded in it.
2) Labels, inputs and content will be invested in the style of nesting dolls. This will allow the use of a selector (+), which requires that the activated and target elements are linked to each other — in our case, this radioinput and the wrapper span.
<label><input type=radio name="tab" id="tab1" checked> <span><div class="title1">Tab 1</div> <!-- NESTED TAB 2 --> <label><input type=radio name="tab" id="tab2"> <span><div class="title2">Tab 2</div> <!-- NESTED TAB 3 --> <label><input type=radio name="tab" id="tab3"> <span><div class="title3">Tab 3</div> <div class="content3"> Tab 3 Content </div></span> </label> <!-- /NESTED TAB 3 --> <div class="content2"> Tab 2 Content </div></span> </label> <!-- /NESTED TAB 2 --> <div class="content1"> Tab 1 Content </div></span> </label> 3) Finally, we will use the lang technique (we described it earlier ), which will allow the use of styles in the Gmail web client.
Work with unsupported clients
We also need to make sure that users of unsupported mail programs will not see a broken email. In order to achieve this, you can use two strategies. The easiest way is to completely hide everything related to tabs (this will require, in particular, wrapping the content in conditional Outlook comments - you did not think it would work in the desktop Outlook client?)
One way this can be hidden for clients who do not support the: checked pseudo-class is to wrap the content of tabs in a div container that will already be hidden. Then the selected radio path is placed before the div element, and a selector is added to the style block, which with the help of
:checked displays the div container if the selector is the same: <style> .tabcheck:checked + div { display:block !important; max-height: none !important; height: auto !important; } </style> <input type=radio class="tabcheck" style="display:none !important;" checked> <div style="height:0px;max-height:0px;overflow:hidden;"> TABBED CONTENT </div> Full content hiding is not an ideal way out. So you can also extract the content of the first tab and display it by default, but wrap it in a fixed-height div with overlay on the hidden content. If the second tab is activated, the content of the first tab is still displayed, but is invisible, since it is pushed out of the limits of the visible part of the height-limited div.
Another way out is to completely hide the tabs and display instead a non-interactive template (an example is described in this text ).
The full code of the example is located under the spoiler (you can work with it on the Codepen ):
Sample code
<!DOCTYPE html PUBLIC "-//W3C//DTD XHTML 1.0 Transitional//EN" "http://www.w3.org/TR/xhtml1/DTD/xhtml1-transitional.dtd"> <html xmlns="http://www.w3.org/1999/xhtml"> <head> <meta http-equiv="Content-Type" content="text/html; charset=UTF-8" /> <title>Interactive Tabs for Email</title> <style> * { font-family: Helvetica, sans-serif; margin:0; padding:0; } body { -webkit-text-size-adjust:100%; } .tab, .tabcheck { display: none; } .tabcheck { height:0px; visibility:hidden; } .title1,.title2,.title3 { background-color:#ffffff; float: left; padding:15px 20px 15px 20px; border: 1px solid #888888; border-bottom: 0px; cursor: pointer; border-radius: 5px 5px 0px 0px; } .tabcheck:checked + #container { height: 363px !important; max-height: 363px !important; } .tabcheck:checked + div, #tab2:checked + span .content2, #tab3:checked + span .content3 { display:block !important; max-height: none !important; height: auto !important; } #tab1:checked + span .title1, #tab2:checked + span .title2, #tab3:checked + span .title3 { background-color:#bbbbbb; } /* GMAIL [lang] fix */ .gfix{} * [lang=x-title1], * [lang=x-title2], * [lang=x-title3]{ background-color:#ffffff; float: left; padding:15px 20px 15px 20px; border: 1px solid #888888; border-bottom: 0px; cursor: pointer; border-radius: 5px 5px 0px 0px; } * [lang=x-tabcheck]:checked + [lang=x-container] { height: 363px !important; max-height: 363px !important; } * [lang=x-tabcheck]:checked + div, * [lang=x-tab2]:checked + span [lang=x-content2], * [lang=x-tab3]:checked + span [lang=x-content3] { display:block !important; max-height: none !important; height: auto !important; } * [lang=x-tab1]:checked + span [lang=x-title1], * [lang=x-tab2]:checked + span [lang=x-title2], * [lang=x-tab3]:checked + span [lang=x-title3]{ background-color:#bbbbbb; } </style> </head> <body bgcolor="#ffcc00"> <table width="100%" height="100%"> <tr> <td></td> <td bgcolor="#ffcc00"> <div class="content"> <table> <tr> <td> <form> <!--[if !mso]><!-- --> <input type=radio class="tabcheck" lang="x-tabcheck" style="display:none !important;" checked> <!--<![endif]--> <div id="container" lang="x-container" style="width:500px;height:310px;max-height:310px;overflow:hidden;"> <!--[if !mso]><!-- --> <input type=radio class="tabcheck" lang="x-tabcheck" style="display:none !important;" checked> <div style="height:0px;max-height:0px;overflow:hidden;"> <label><input type=radio name="tab" class="tab" lang="x-tab1" id="tab1" style="display:none !important;" checked><span><div class="title1" lang="x-title1" >Tab 1</div> <!-- NESTED TAB 2 --> <label><input type=radio name="tab" class="tab" lang="x-tab2" id="tab2" style="display:none !important;"><span><div class="title2" lang="x-title2">Tab 2</div> <!-- NESTED TAB 3 --> <label><input type=radio name="tab" class="tab" lang="x-tab3" id="tab3" style="display:none !important;"><span><div class="title3" lang="x-title3">Tab 3</div> <div class="content3" lang="x-content3" style="height:0px;max-height:0px;overflow:hidden;clear:left;"> <table cellpadding="0" cellspacing="0"> <tr> <td colspan="2" height="150" width="500" bgcolor="#bbbbbb" valign=center align=center style="font-size:50px;color:#555555;"><b>Tab 3</b></td> </tr><tr> <td width="250" height="170" valign="top" style="background: #777777; font-family: Helvetica; font-size: 14px; line-height: 100%; color: #ffffff;"><div style="padding:20px;"> <H2>Title 3A</H2> <p>The quick, brown fox jumps over a lazy dog. <a href="#" style="color: #BDD4FC;">View Deal</a> </p> </div></td> <td width="250" height="170" valign="top" style="background: #555555; font-family: Helvetica; font-size: 14px; line-height: 100%; color: #ffffff;"><div style="padding:20px;"> <h2>Title 3B</h2> <p>The quick, brown fox jumps over a lazy dog. <a href="#" style="color: #BDD4FC;">View Deal</a> </p> </div></td> </tr> </table> </div></span> </label> <!-- END NESTED TAB 3 --> <div class="content2" lang="x-content2" style="height:0px;max-height:0px;overflow:hidden;clear:left;"> <table cellpadding="0" cellspacing="0"> <tr> <td colspan="2" height="150" width="500" bgcolor="#bbbbbb" valign=center align=center style="font-size:50px;color:#555555;"><b>Tab 2</b></td> </tr> <tr> <td width="250" height="170" valign="top" style="background: #777777; font-family: Helvetica; font-size: 14px; line-height: 100%; color: #ffffff;"><div style="padding:20px;"> <H2>Title 2A</H2> <p>The quick, brown fox jumps over a lazy dog. <a href="#" style="color: #BDD4FC;">View Deal</a> </p> </div></td> <td width="250" height="170" valign="top" style="background: #555555; font-family: Helvetica; font-size: 14px; line-height: 100%; color: #ffffff;"><div style="padding:20px;"> <h2>Title 2B</h2> <p>The quick, brown fox jumps over a lazy dog. <a href="#" style="color: #BDD4FC;">View Deal</a> </p> </div></td> </tr> </table> </div> </span> </label> <!-- END NESTED TAB 2 --> <!-- TAB 1 Content originally here --> </span></label> </div> <!--<![endif]--> <!-- TAB 1 Content moved outside nested labels for fallback for non supported clients: Outlook.com/Outlook --> <table cellpadding="0" cellspacing="0"> <tr> <td colspan="2" height="150" width="500" bgcolor="#bbbbbb" valign=center align=center style="font-size:50px;color:#555555;"><b>Tab 1</b></td> </tr> <tr> <td width="250" height="170" valign="top" style="background: #777777; font-family: Helvetica; font-size: 14px; line-height: 100%; color: #ffffff;"><div style="padding:20px;"> <H2>Title 1A</H2> <p>The quick, brown fox jumps over a lazy dog. <a href="#" style="color: #BDD4FC;">View Deal</a> </p> </div></td> <td width="250" height="170" valign="top" style="background: #555555; font-family: Helvetica; font-size: 14px; line-height: 100%; color: #ffffff;"><div style="padding:20px;"> <h2>Title 1B</h2> <p>The quick, brown fox jumps over a lazy dog. <a href="#" style="color: #BDD4FC;">View Deal</a> </p> </div></td> </tr> </table> </div> </form> </td> </tr> </table> </div> </td> <td></td> </tr> </table> </body> </html> Other materials about the layout of letters in the Pechkin blog:
Source: https://habr.com/ru/post/265409/
All Articles