Ruby on Rails and interaction with REST Qiwi Shop
I have a great desire to talk about how easy it is to work with the QIWI Shop using Ruby on Rails.
What is QIWI Shop for? For example, you have your own online store and you need to accept payments from users. Qiwi is quite common in the world. He does not require a personal certification for withdrawal of funds, as, for example, require WebMoney. Therefore, QIWI is attractive enough for integration into online stores.

Pros:
- Qiwi payment service is represented in 8 countries: Russia, Kazakhstan, Moldova, Romania, Belarus, USA, Brazil, Jordan.
- Thousands of terminals throughout the country (Russia), which facilitates the replenishment of wallets without additional interest.
- A person does not need to be familiar with the Internet in order to pay for the purchase in a minute or replenish the balance from another city - it is enough to walk to the terminal in the nearest store.
- Lack of interest between transfers from one wallet to another.
- An additional level of protection with one-time SMS passwords.
- Free notification of transactions with Qiwi wallet.
')
I am developing on Ruby on Rails, so the examples I’ll give will be in Ruby.
Qiwi offers several ways to integrate:
REST protocol
HTTP protocol
Billing form
SOAP protocol (obsolete)
A few words about each method:
Form - allows you to generate the HTML code of a form that can be placed on the website of your online store, without resorting to programming. After that, the status of the account can be monitored in the personal account of the store, or by receiving email notifications.
HTTP protocol - allows you to create accounts using regular HTTP requests. It is a simple request using the GET method, which is formed on the website of the online store based on the list of products selected by the user. Easy to implement in any programming language sites. Account status can also be monitored in your account, or by receiving email notifications.
REST protocol is the most complete protocol. Provides all available functionality for online stores. Supports the implementation of a REST server on the side of a store that supports automated ordering logic. Implementation can be done, for example, using Java, C #, PHP, Ruby, and others.
Consider REST, which provides many functions and allows you to comfortably work with the store Qiwi.
Functions that we consider:
- Create an account.
- Poll account status.
It makes no sense to consider all the methods, because in their likeness, they can be easily realized. As the documentation of Qiwi itself says, the complexity of implementing REST is high, but nothing of the kind, everything looks quite simple and concise. Consider an example.
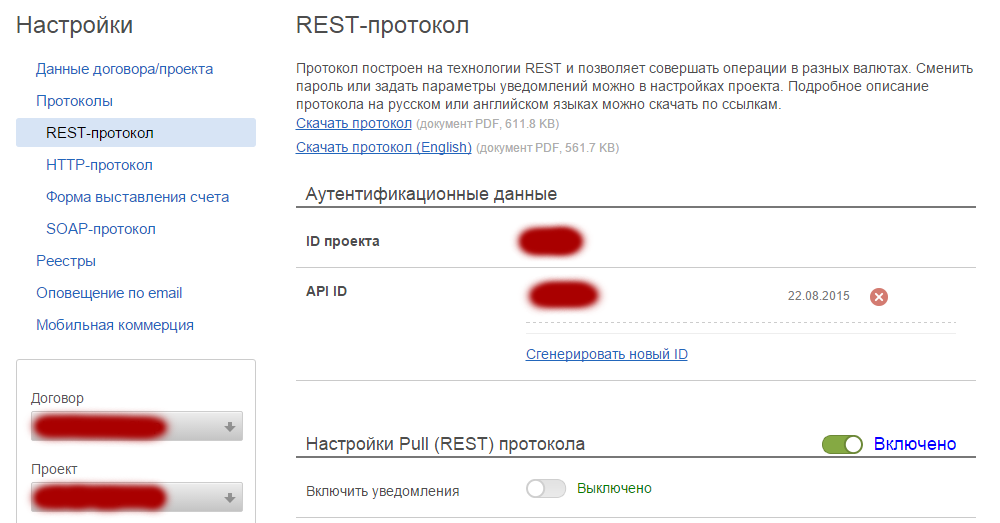
To get started, you need to get your APP_ID and APP_PASSWORD and SHOP_ID in your Qiwi Shop personal account, and for this you need to register with the Qiwi Shop and wait for approval from Qiwi.
For authorization, you need to encrypt the store data in base64 as follows:
user_creds = Base64.encode64 (Codename :: Application :: APP_ID + ':' + Codename :: Application :: APP_PASSWORD)
In the future, these data will be transmitted in the header for authorization. After encryption, you need to create headers for authorization in the system:
You also need an account id, which is the usual unique line by which it will be possible to identify the payment for further operations (check the payment on the account, mark the account, etc.). Form:
In my case, the formation of bills_id is as follows.
The first part of the user's email is taken and a unique string is added to it with a hyphen. It turns out at the output: 'snowacat-03a765e046'. We form a link to create an account:
Payment Lifetime (time during which payment can be made):
Important: lifetime should be in iso8601 format.
In our case, the payment time is week:
Other required parameters:
Form the request body:
Perform a transaction using the Rest Client gem:
That's all. All major actions dismantled. Now consider the additional and necessary to understand the full method of creating an account.
Model Payment:
Table structure:
The complete code of the method in which an unpaid invoice is canceled, if the user has one.
Explanations:
To cancel the account, use the previously generated bill_id and patch request.
After successful invoicing, you need to check the payment. To do this, create a payment_grabber.rb model with the self.get_payments method, which will be called by the scheduler (for example, using the rufus-sheduler scheduler).
We receive all unpaid invoices from the database and check them:
Scheduler Code:
Variables that are stored in application.rb
This article will help Rails developers integrate Qiwi Shop into online stores. At the time of this writing, examples of ready-made code on Ruby On Rails were not (not found) on the network, and in Qiwi ready-made solutions there was only a list of CMS.
Thank you for your attention, that's all.
What is QIWI Shop for? For example, you have your own online store and you need to accept payments from users. Qiwi is quite common in the world. He does not require a personal certification for withdrawal of funds, as, for example, require WebMoney. Therefore, QIWI is attractive enough for integration into online stores.
Pros:
- Qiwi payment service is represented in 8 countries: Russia, Kazakhstan, Moldova, Romania, Belarus, USA, Brazil, Jordan.
- Thousands of terminals throughout the country (Russia), which facilitates the replenishment of wallets without additional interest.
- A person does not need to be familiar with the Internet in order to pay for the purchase in a minute or replenish the balance from another city - it is enough to walk to the terminal in the nearest store.
- Lack of interest between transfers from one wallet to another.
- An additional level of protection with one-time SMS passwords.
- Free notification of transactions with Qiwi wallet.
')
I am developing on Ruby on Rails, so the examples I’ll give will be in Ruby.
Qiwi offers several ways to integrate:
REST protocol
HTTP protocol
Billing form
SOAP protocol (obsolete)
A few words about each method:
Form - allows you to generate the HTML code of a form that can be placed on the website of your online store, without resorting to programming. After that, the status of the account can be monitored in the personal account of the store, or by receiving email notifications.
HTTP protocol - allows you to create accounts using regular HTTP requests. It is a simple request using the GET method, which is formed on the website of the online store based on the list of products selected by the user. Easy to implement in any programming language sites. Account status can also be monitored in your account, or by receiving email notifications.
REST protocol is the most complete protocol. Provides all available functionality for online stores. Supports the implementation of a REST server on the side of a store that supports automated ordering logic. Implementation can be done, for example, using Java, C #, PHP, Ruby, and others.
Consider REST, which provides many functions and allows you to comfortably work with the store Qiwi.
Functions that we consider:
- Create an account.
- Poll account status.
It makes no sense to consider all the methods, because in their likeness, they can be easily realized. As the documentation of Qiwi itself says, the complexity of implementing REST is high, but nothing of the kind, everything looks quite simple and concise. Consider an example.
To get started, you need to get your APP_ID and APP_PASSWORD and SHOP_ID in your Qiwi Shop personal account, and for this you need to register with the Qiwi Shop and wait for approval from Qiwi.
For authorization, you need to encrypt the store data in base64 as follows:
user_creds = Base64.encode64 (Codename :: Application :: APP_ID + ':' + Codename :: Application :: APP_PASSWORD)
Codename::Application::APP_ID - application.rb In the future, these data will be transmitted in the header for authorization. After encryption, you need to create headers for authorization in the system:
headers = { :accept => :json, :authorization => 'Basic ' + user_creds, :content_type => 'application/x-www-form-urlencoded; charset=utf-8' } You also need an account id, which is the usual unique line by which it will be possible to identify the payment for further operations (check the payment on the account, mark the account, etc.). Form:
bill_id = current_user.email.split("@").first + '-' + SecureRandom.hex(5) In my case, the formation of bills_id is as follows.
The first part of the user's email is taken and a unique string is added to it with a hyphen. It turns out at the output: 'snowacat-03a765e046'. We form a link to create an account:
url = "https://w.qiwi.com/api/v2/prv/" + Codename::Application::SHOP_ID + "/bills/" + bill_id Payment Lifetime (time during which payment can be made):
life_time = Time.now.utc + Codename::Application::PAYMENTS_DAYS.day Important: lifetime should be in iso8601 format.
In our case, the payment time is week:
Codename::Application::PAYMENTS_DAYS.day = 7 Other required parameters:
phone_number = '+79181234567' amount = 50 Form the request body:
data = { user: 'tel:' + phone_number, amount: amount, ccy: 'RUB', comment: 'User email: ' + current_user.email, lifetime: life_time.iso8601, pay_source: 'qw', prv_name: 'Super Mortal Kombat Shop' } Perform a transaction using the Rest Client gem:
begin result = RestClient.put url, data, headers rescue => e payments_logger.info('Creating bill failed! Email: ' + current_user.email + ' Error: ' + e.message ) flash[:error] = ' . : ' + e.message redirect_to action: :pay return end That's all. All major actions dismantled. Now consider the additional and necessary to understand the full method of creating an account.
Model Payment:
class Payment < ActiveRecord::Base STATUSES = [DEFAULT = 0, PAID = 1] belongs_to :user validates :amount, :numericality => { greater_than: 0 } end Table structure:
class CreatePayments < ActiveRecord::Migration def change create_table :payments do |t| t.integer :user_id, :null => false t.foreign_key :users t.float :amount, :default => 0.0, :null => false t.string :bill_id, :limit => 256, :null => false t.string :phone_number, :limit => 256, :null => false t.integer :status, :limit => 1, :default => 0, :null => false t.timestamps null: false end end end The complete code of the method in which an unpaid invoice is canceled, if the user has one.
def create_bill require 'rest-client' require 'base64' require 'securerandom' user_creds = Base64.encode64(Codename::Application::APP_ID + ':' + Codename::Application::APP_PASSWORD) headers = { :accept => :json, :authorization => 'Basic ' + user_creds, :content_type => 'application/x-www-form-urlencoded; charset=utf-8' } # Delete old bill, if current user have it bill = current_user.payments.where(status: Payment::DEFAULT).first if bill # Cancel bill url = "https://w.qiwi.com/api/v2/prv/" + Codename::Application::SHOP_ID + "/bills/" + bill.bill_id data = { status: 'rejected' } begin RestClient.patch url, data, headers bill.delete rescue => e payments_logger.info('Cancelling bill failed! Email: ' + current_user.email + ' Error: ' + e.message ) flash[:error] = ' . . : ' + e.message redirect_to action: :pay return end end bill_id = current_user.email.split("@").first + '-' + SecureRandom.hex(5) payment = current_user.payments.new( amount: params[:amount], bill_id: bill_id, phone_number: params[:user_phone] ) # Validate data if payment.invalid? flash[:error] = ' ' redirect_to action: :pay return end url = "https://w.qiwi.com/api/v2/prv/" + Codename::Application::SHOP_ID + "/bills/" + payment.bill_id life_time = Time.now.utc + Codename::Application::PAYMENTS_DAYS.day data = { user: 'tel:' + payment.phone_number, amount: payment.amount, ccy: 'RUB', comment: 'User email: ' + current_user.email, lifetime: life_time.iso8601, pay_source: 'qw', prv_name: ' Super Mortal Kombat Shop' } # Start transaction begin result = RestClient.put url, data, headers rescue => e payments_logger.info('Creating bill failed! Email: ' + current_user.email + ' Error: ' + e.message ) flash[:error] = ' . : ' + e.message payment.delete redirect_to action: :pay return end result = JSON.parse(result) if result["response"]["result_code"] == 0 payment.save flash[:notice] = ' ' redirect_to action: :pay else payment.delete flash[:error] = ' . : ' + result["response"]["result_code"] redirect_to action: :pay end end Explanations:
To cancel the account, use the previously generated bill_id and patch request.
After successful invoicing, you need to check the payment. To do this, create a payment_grabber.rb model with the self.get_payments method, which will be called by the scheduler (for example, using the rufus-sheduler scheduler).
def self.get_payments ... ... end We receive all unpaid invoices from the database and check them:
# Get all payments with default statuses bills = Payment.where(status: Payment::DEFAULT) bills.each do |bill| url = "https://w.qiwi.com/api/v2/prv/" + Codename::Application::SHOP_ID + "/bills/" + bill.bill_id begin bill_status = RestClient.get url, headers rescue => e grabber_logger.info('Check bill failed! Error: ' + e.message) next end bill_status = JSON.parse(bill_status) if bill_status["response"]["bill"]["status"] == 'paid' bill.update(status: Payment::PAID) user = User.find_by_id(bill.user_id) new_amount = user.money_real + bill.amount user.update_attribute(:money_real, new_amount) elsif bill_status["response"]["bill"]["status"] == 'waiting' next elsif bill_status["response"]["bill"]["status"] == 'expired' || bill_status["response"]["bill"]["status"] == 'unpaid' || bill_status["response"]["bill"]["status"] == 'rejected' bill.delete else next end Scheduler Code:
scheduler.every Codename::Application::GRABBER_INTERVAL do PaymentGrabber.get_payments end Variables that are stored in application.rb
SHOP_ID = '111111' APP_ID = '00000000' APP_PASSWORD = 'XXXXXXXXXXXX' # Count days for payments PAYMENTS_DAYS = 7 # Grabber interval in minutes. How othen sheduler will check payments GRABBER_INTERVAL = '3m' This article will help Rails developers integrate Qiwi Shop into online stores. At the time of this writing, examples of ready-made code on Ruby On Rails were not (not found) on the network, and in Qiwi ready-made solutions there was only a list of CMS.
Thank you for your attention, that's all.
Source: https://habr.com/ru/post/265391/
All Articles