How to configure the iOS device and RAD Studio XE8 (Delphi, C ++ Builder)
Today we will “make friends” or configure a real iOS device and a RAD Studio XE8 (or Delphi, or C ++ Builder, or Appmethod).
As a result, we will be able to run our applications not only in the Window, Android, OS X, iOS simulator environment, but also on real iOS devices from the same source code.
Action plan:
- setup macbook + developer.apple.com;
- Configure RAD Studio XE8;
- running your application on an iOS device.

')
We have already done some of the work on connecting a real iOS device in the last post, when we set up Mac OS X and the iOS simulator (I strongly recommend that you read it again). Earlier, we also learned how to configure Android devices and RAD Studio . And today we will talk about setting up iOS devices and RAD Studio.
In order to accomplish this task, I used:
- Dell Latitude E7240 (my laptop);
- MacBook Pro;
- usb cable;
- iOS device (or several);
- Apple’s developer certificate.
The setup process requires accuracy and patience. I will try to describe in detail all the steps step by step with screenshots.
- make sure that you have configured Mac OS X and RAD Studio XE8 ;
- connected their iOS devices via usb cables to mabuku;
- make sure that the MacBook sees the iOS devices, and the MacBook and the PC with RAD Studio are on the same network.
I have this:
- laptop: Windows 8 64x + RAD Studio XE8;
- MacBook: OS X Yosemite 10.10.2;
- the laptop is connected via LAN to the router, and the MacBook is via WiFi to the router, both are on the same network;
- iPhone 5, iPad 2, iPad mini, iPad Air 2.
Here the paths go alongside:
- if you are an individual developer, then register yourself and pay for the developer certificate yourself;
developer.apple.com/programs/ios
- if you are a corporate developer, then your company should have a corporate account on developer.apple.com, contact your group administrator in order to add you there, before that you need to register on developer.apple.com and inform it your email
Further on, I will look at connecting iOS devices through a corporate account, but this is very similar to what an individual developer should do.
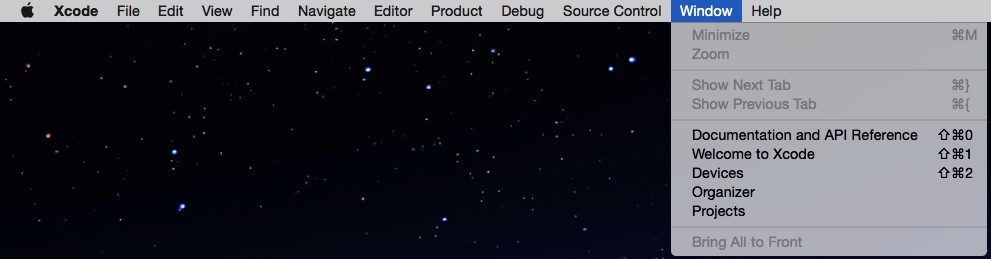
Each iOS device has its own ID. To define it, we connect iOS devices to the MacBook, run xCode, and through the Windows → Devices menu we get into a special form. Here, in the “Devices” list, all connected iOS devices are visible, click on each device and copy its identifier from the properties.
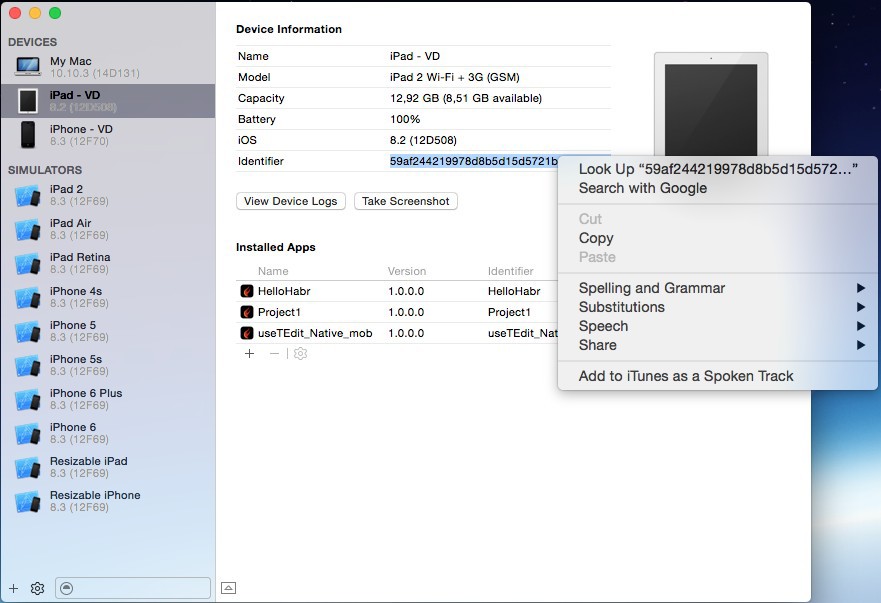
The list of identifiers of iOS devices will need to be reported to the group administrator or independently entered into developer.apple.com.
On the MacBook, launch the “Programs” application → “Utilities” → “Keychain binding”.
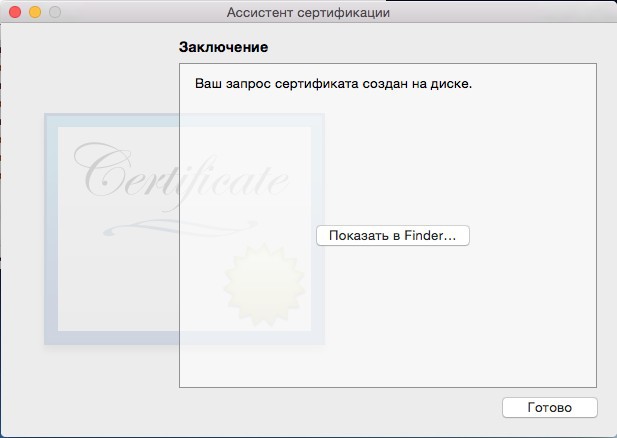
Using the “Keychain” menu → “Certification Assistant” → “Request a certificate from a certification authority”, we create our public key by going through the settings wizard.

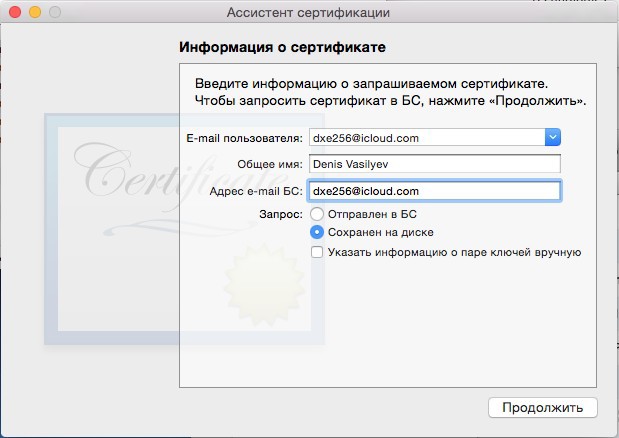
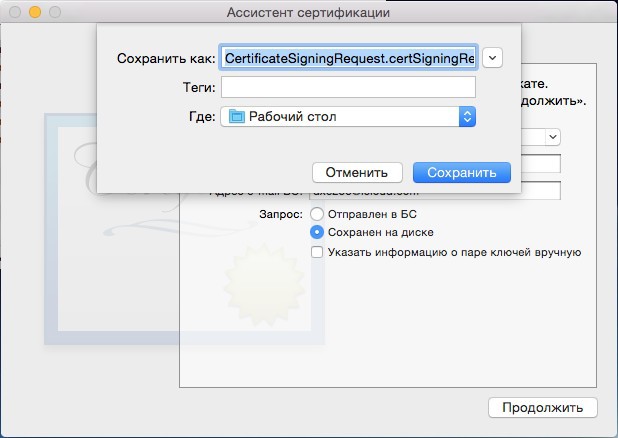
We will need this file soon.
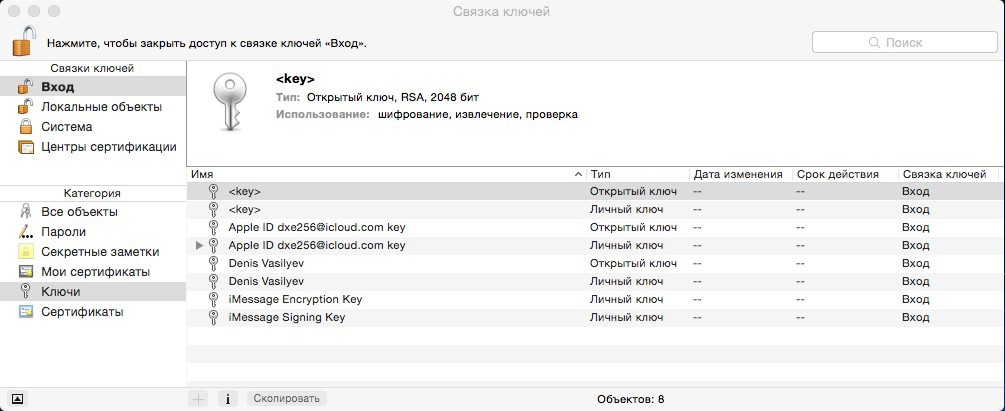
We see that there are changes in the “Keychain”.
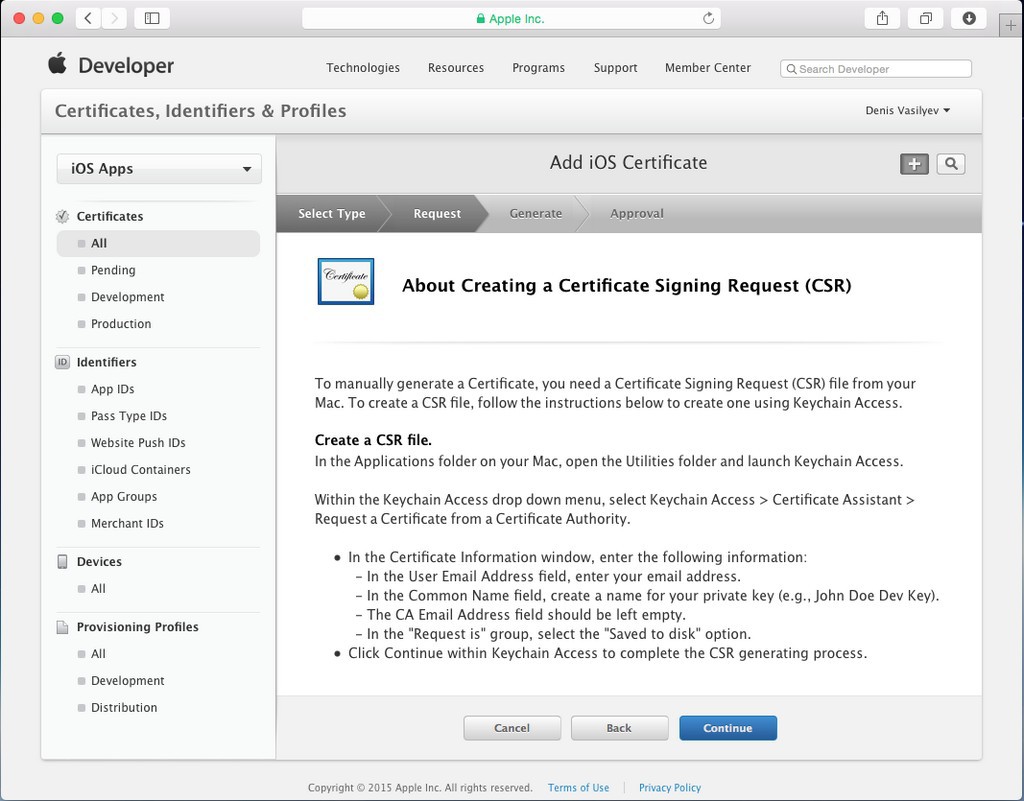
Go to the site developer.apple.com, click on “Certificates, Identifiers & Profiles”, and then in the new form that appears, click on “Certificates”.
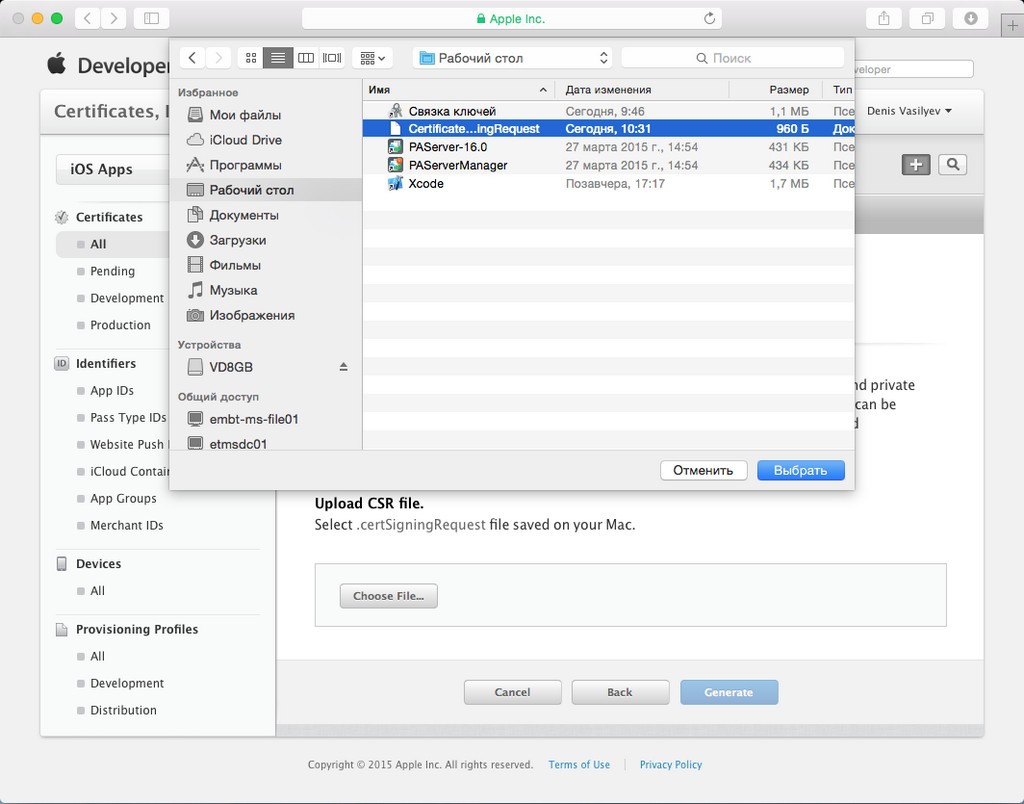
Next, go to the page to add the iOS certificate and go through the settings wizard.

Click the “Choose File ..” button and select the newly created public key. Next, click on the button “Generate”.
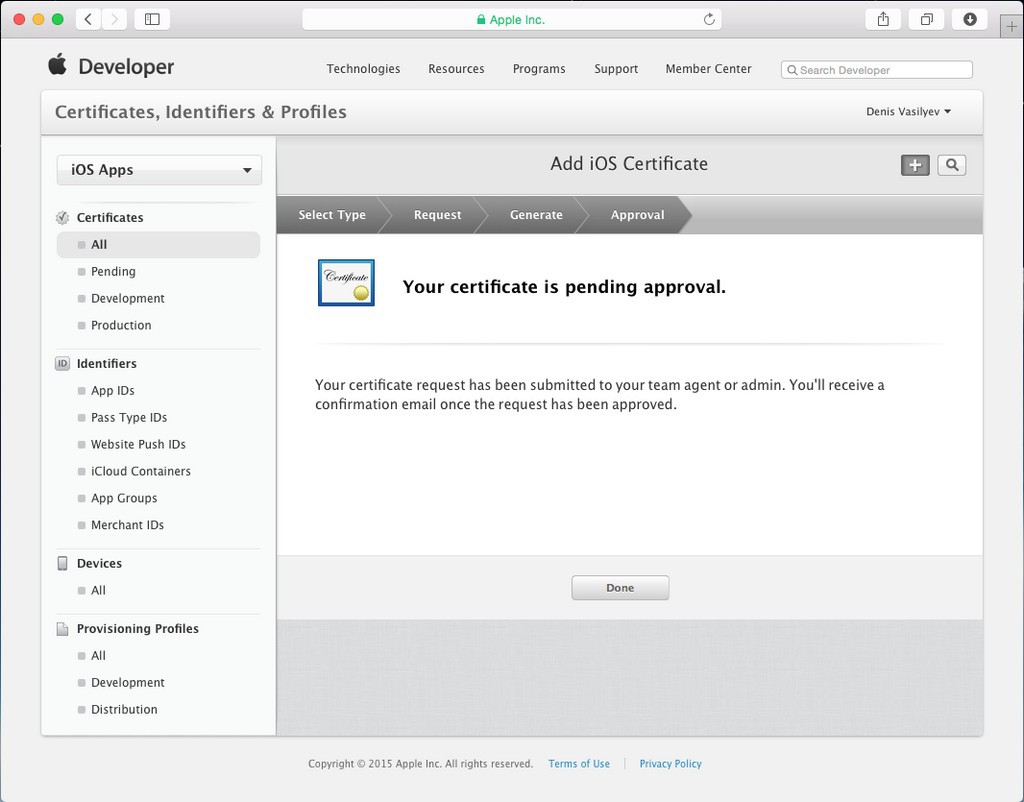
After that, our certificate will appear in the list of certificates, which will wait for confirmation from the group administrator.
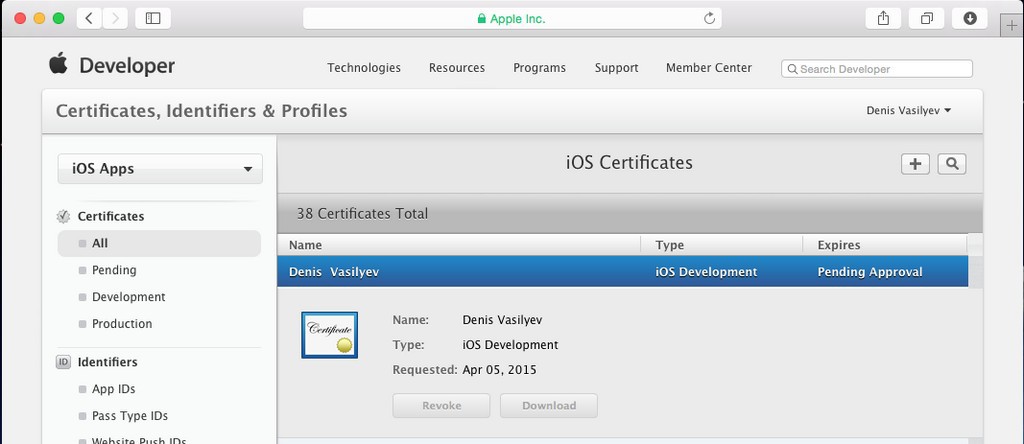
At this stage, you must contact the administrator of the group and report the confirmation of the certificate. We are waiting for confirmation.
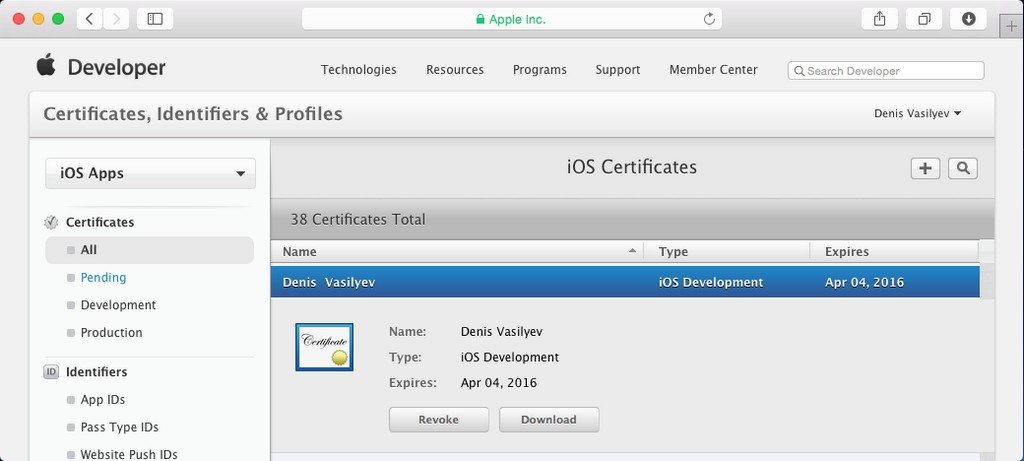
From the list of all certificates we find our “iOS Certificate”, which by this moment should pass the confirmation and click on the “Download” button.
The file is saved in the MacBook downloads. Next, double-click to start the installation process.
In “Keychain” we make sure that the certificate is installed.
Via Macbook, go to the site developer.apple.com and then to the “Certificates” tab.
Download the “iOS Team Provisioning Profile” by clicking on the “Download” button (you need to check with your group administrator what profile you need to download).
The file is saved in the MacBook downloads.

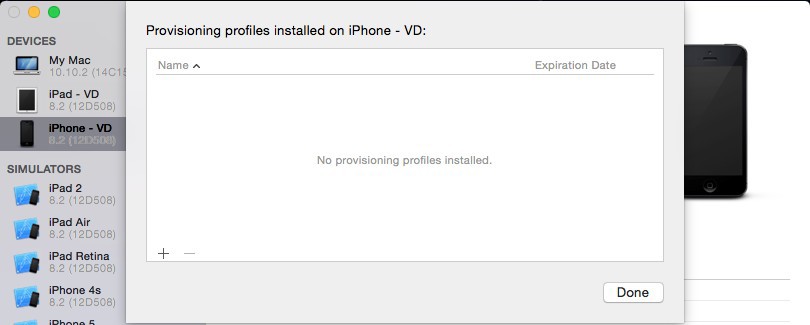
Next, open xCode, right-click on the device you need and select “Show Provisiong Profiles ...”.
Most likely, you will see an empty form, click on the small plus sign on the left at the end of the list.
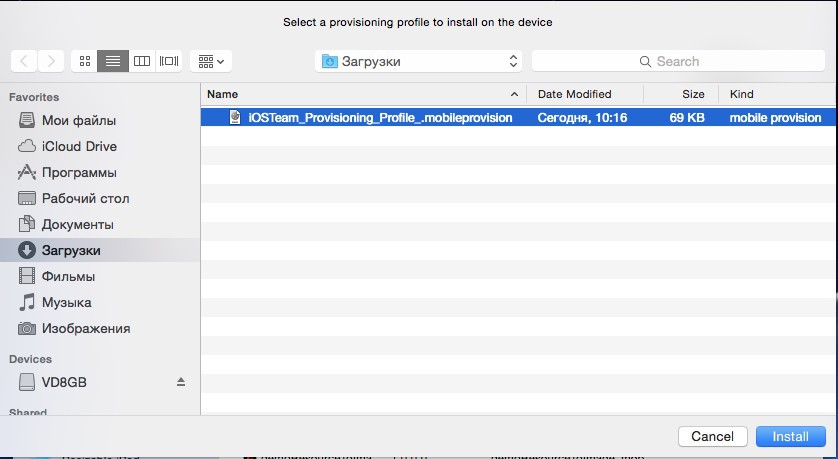
We recently find the file “Provisioning Profiles” in the “Downloads” folder and click “Install”.
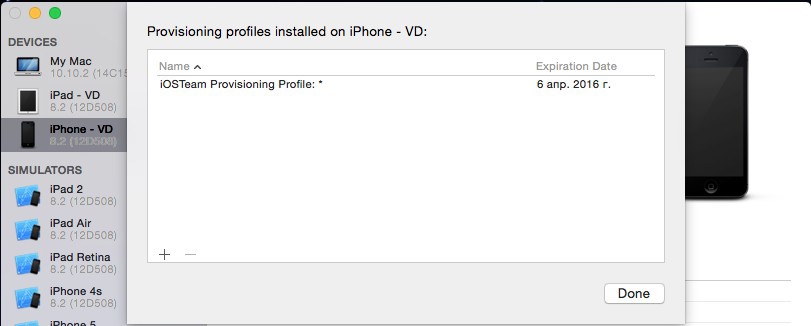
After installation we will see our added profile.
For all iOS devices, repeat this item.
Now we are switching to RAD Studio.
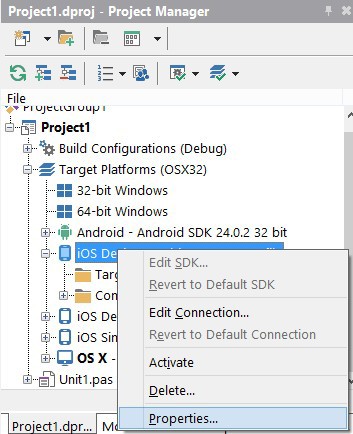
Launch RAD Studio and create a new project “Multi-Device Application”. We look at the “Project Manager”, open the “Target Platforms” list, find “iOS Device 32-bit”, right-click on it and select “Properties ...” from the drop-down list.
I draw your attention to the fact that we configured the MacOS profile in the previous post , so now we only configure the SDK.
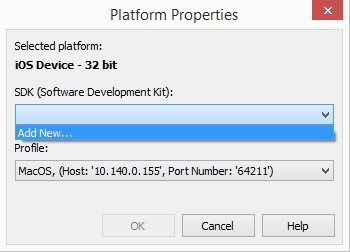
Check the SDK version and profile name.
Next will start the installation process.
After the installation is complete, we get this form, click OK on it.
If necessary, the same actions are repeated for “iOS Device 64-bit”.
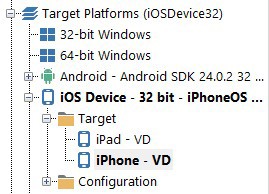
Now in the “Target Platforms” group we find “iOS Device 32-bit”, then in “Target” we select our device, double-click to make a selection. If devices are not immediately displayed, right-click on “Target” and on “Refresh”.
Then we start the project build, transfer our view to the MacBook and wait for the request to use the key. As soon as the message appears, feel free to click on the button “Allow always”.

After some time, the created application should start on the iOS device.
The same is repeated for other iOS devices.
That's all.
I hope this post will be useful for you and will help you discover new horizons.
Thank you all, good luck and, of course, great patience. :)
UPDATE1 :
During the writing of the article there were several updates, as a result, now I have installed software with such versions, where everything also works flawlessly:
- RAD Studio XE8 update 1;
- OS X 10.10.5;
- all iOS devices from 8.4.1.
UPDATE2
- replaced “MacOS” with “Mac OS X”
As a result, we will be able to run our applications not only in the Window, Android, OS X, iOS simulator environment, but also on real iOS devices from the same source code.
Action plan:
- setup macbook + developer.apple.com;
- Configure RAD Studio XE8;
- running your application on an iOS device.
')
We have already done some of the work on connecting a real iOS device in the last post, when we set up Mac OS X and the iOS simulator (I strongly recommend that you read it again). Earlier, we also learned how to configure Android devices and RAD Studio . And today we will talk about setting up iOS devices and RAD Studio.
In order to accomplish this task, I used:
- Dell Latitude E7240 (my laptop);
- MacBook Pro;
- usb cable;
- iOS device (or several);
- Apple’s developer certificate.
The setup process requires accuracy and patience. I will try to describe in detail all the steps step by step with screenshots.
1. Preliminary training.
- make sure that you have configured Mac OS X and RAD Studio XE8 ;
- connected their iOS devices via usb cables to mabuku;
- make sure that the MacBook sees the iOS devices, and the MacBook and the PC with RAD Studio are on the same network.
I have this:
- laptop: Windows 8 64x + RAD Studio XE8;
- MacBook: OS X Yosemite 10.10.2;
- the laptop is connected via LAN to the router, and the MacBook is via WiFi to the router, both are on the same network;
- iPhone 5, iPad 2, iPad mini, iPad Air 2.
2. Registration iOS developer with Apple.
Here the paths go alongside:
- if you are an individual developer, then register yourself and pay for the developer certificate yourself;
developer.apple.com/programs/ios
- if you are a corporate developer, then your company should have a corporate account on developer.apple.com, contact your group administrator in order to add you there, before that you need to register on developer.apple.com and inform it your email
Further on, I will look at connecting iOS devices through a corporate account, but this is very similar to what an individual developer should do.
3. Determination of identifiers of connected iOS devices.
Each iOS device has its own ID. To define it, we connect iOS devices to the MacBook, run xCode, and through the Windows → Devices menu we get into a special form. Here, in the “Devices” list, all connected iOS devices are visible, click on each device and copy its identifier from the properties.
The list of identifiers of iOS devices will need to be reported to the group administrator or independently entered into developer.apple.com.
4. Creating a public key (certSigningRequest).
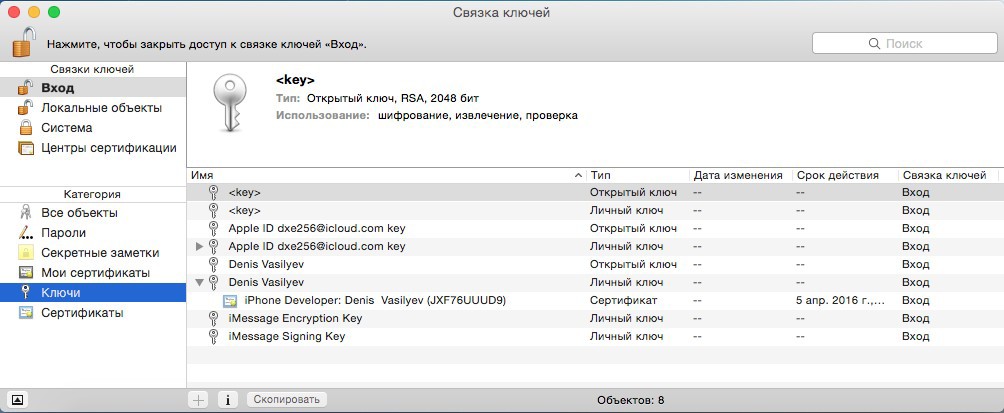
On the MacBook, launch the “Programs” application → “Utilities” → “Keychain binding”.
Using the “Keychain” menu → “Certification Assistant” → “Request a certificate from a certification authority”, we create our public key by going through the settings wizard.
We will need this file soon.
We see that there are changes in the “Keychain”.
5. Creating a certificate.
Go to the site developer.apple.com, click on “Certificates, Identifiers & Profiles”, and then in the new form that appears, click on “Certificates”.
Next, go to the page to add the iOS certificate and go through the settings wizard.
Click the “Choose File ..” button and select the newly created public key. Next, click on the button “Generate”.
After that, our certificate will appear in the list of certificates, which will wait for confirmation from the group administrator.
At this stage, you must contact the administrator of the group and report the confirmation of the certificate. We are waiting for confirmation.
6. Install the certificate.
From the list of all certificates we find our “iOS Certificate”, which by this moment should pass the confirmation and click on the “Download” button.
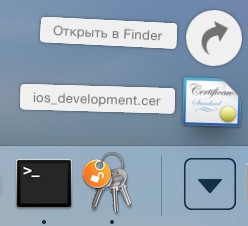
The file is saved in the MacBook downloads. Next, double-click to start the installation process.
In “Keychain” we make sure that the certificate is installed.
7. Configure “iOS Provisioning Profiles”.
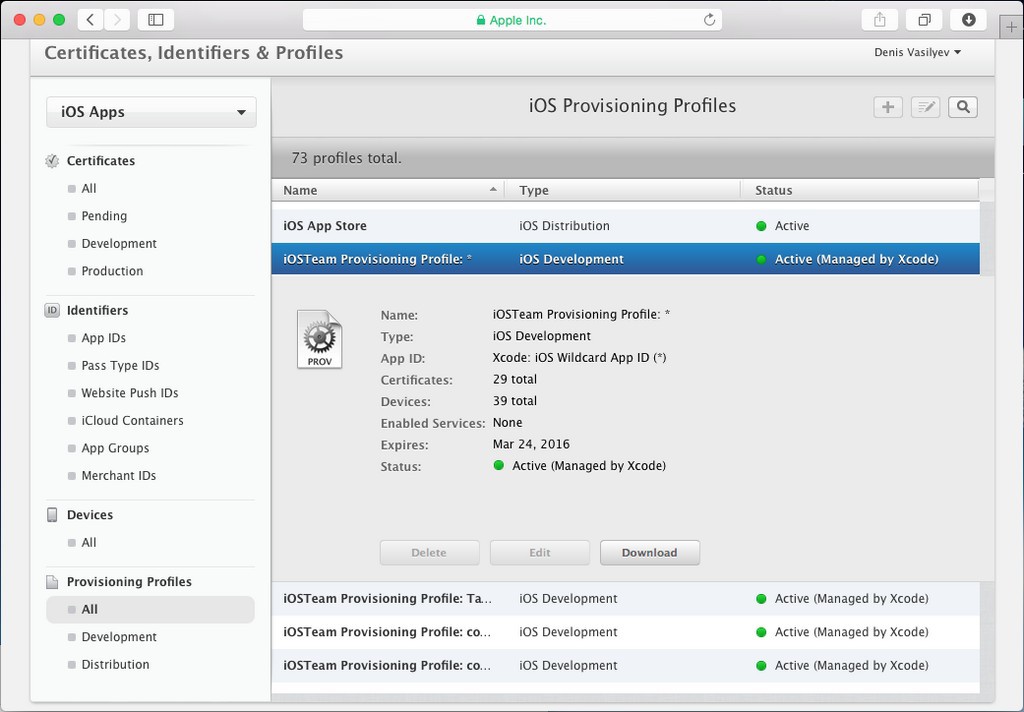
Via Macbook, go to the site developer.apple.com and then to the “Certificates” tab.
Download the “iOS Team Provisioning Profile” by clicking on the “Download” button (you need to check with your group administrator what profile you need to download).
The file is saved in the MacBook downloads.
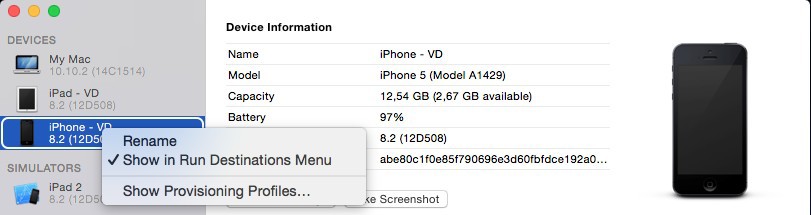
Next, open xCode, right-click on the device you need and select “Show Provisiong Profiles ...”.
Most likely, you will see an empty form, click on the small plus sign on the left at the end of the list.
We recently find the file “Provisioning Profiles” in the “Downloads” folder and click “Install”.
After installation we will see our added profile.
For all iOS devices, repeat this item.
Now we are switching to RAD Studio.
8. Configuring SDK for iOS devices.
Launch RAD Studio and create a new project “Multi-Device Application”. We look at the “Project Manager”, open the “Target Platforms” list, find “iOS Device 32-bit”, right-click on it and select “Properties ...” from the drop-down list.
I draw your attention to the fact that we configured the MacOS profile in the previous post , so now we only configure the SDK.
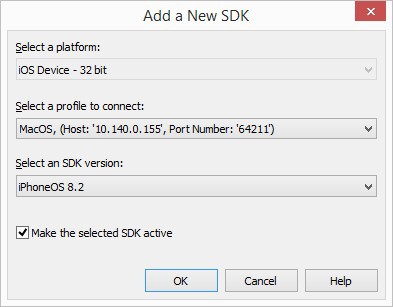
Check the SDK version and profile name.
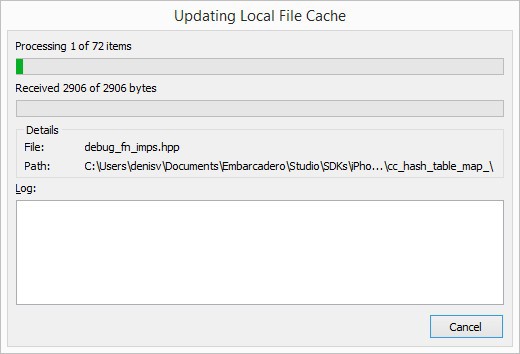
Next will start the installation process.
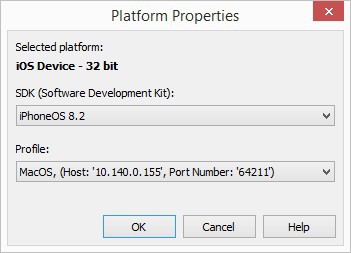
After the installation is complete, we get this form, click OK on it.
If necessary, the same actions are repeated for “iOS Device 64-bit”.
9. Confirmation of the use of the key for the signature.
Now in the “Target Platforms” group we find “iOS Device 32-bit”, then in “Target” we select our device, double-click to make a selection. If devices are not immediately displayed, right-click on “Target” and on “Refresh”.
Then we start the project build, transfer our view to the MacBook and wait for the request to use the key. As soon as the message appears, feel free to click on the button “Allow always”.
After some time, the created application should start on the iOS device.
The same is repeated for other iOS devices.
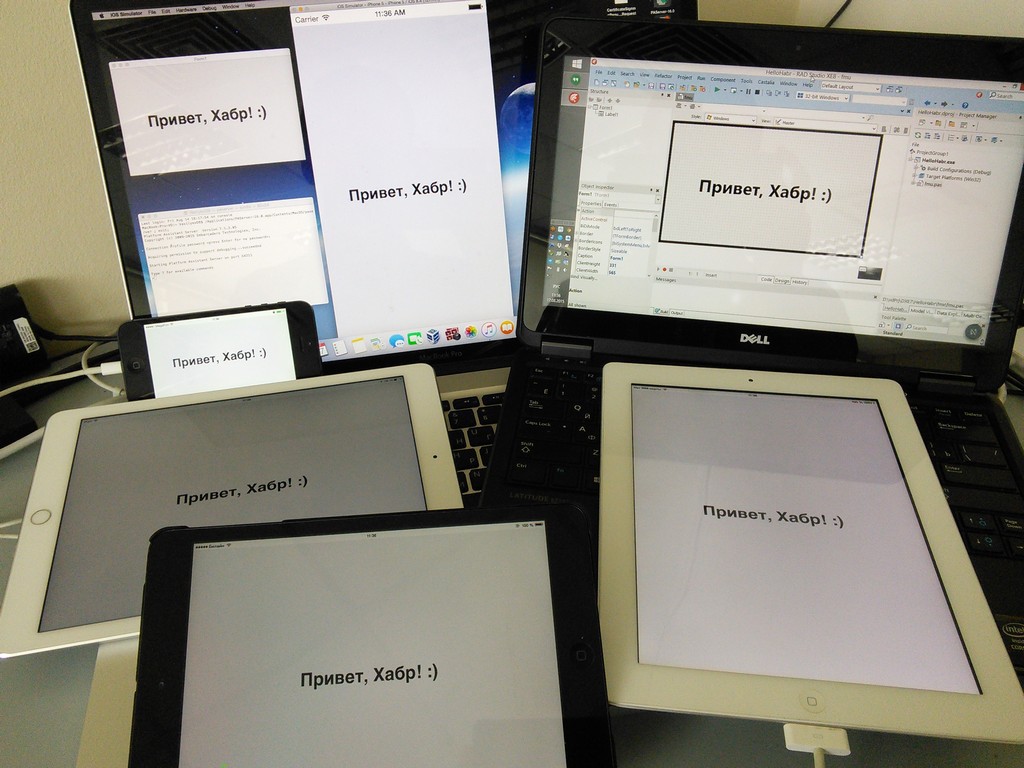
10. And now the traditional "family photo".
That's all.
I hope this post will be useful for you and will help you discover new horizons.
Thank you all, good luck and, of course, great patience. :)
UPDATE1 :
During the writing of the article there were several updates, as a result, now I have installed software with such versions, where everything also works flawlessly:
- RAD Studio XE8 update 1;
- OS X 10.10.5;
- all iOS devices from 8.4.1.
UPDATE2
- replaced “MacOS” with “Mac OS X”
Source: https://habr.com/ru/post/265313/
All Articles