Customizing the manual sorting of UITableView on Xamarin
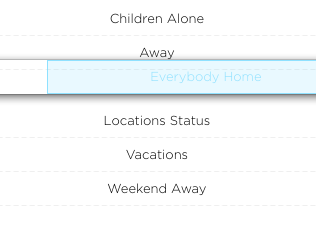
This article will look at how to modify the UITableView to transfer table cells. Recall that Apple offers us cells for strictly allocated space:

I don’t know what it’s all about, but I didn’t like it, so it was decided to spend some time on solving this problem, please under the cat.
Let's start. We have the usual such UITableView with property
Also, in the UITableViewSource we have an overridden method
If we run the application, we will see that with this property we can move the table cells within the frame of the table itself.
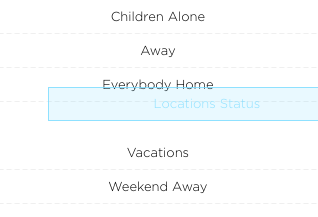
Now let us ask ourselves how to make the lines move not only along the tap to that small area allotted to the deprived user, but across the entire cell.
The solution to the problem is as follows:
Next was the task to set the style of the cell during its transfer. Here there was a question with a shadow cast by a portable cell, this shadow did not want to disappear. After long attempts to find the most cherished subwoofer, still managed to find her somewhere in the bowels of the table, under the monotonous knocking of a tambourine.
')
This is done in the overridden methods of the UITableView itself.
This code is suitable for any version of IOS, from 6 and up.
Before:
After:
When transferring the cell becomes transparent, so if you want to tint it or somehow stylize it, do it with the help of cell.BackgroundView.
In my opinion, the code looks quite simple and understandable. Most likely, I did not discover America’s experienced developers, but it will be useful for newbies to know, and there aren’t too many articles about Xamarin development. So, if the topic is relevant, I can cut on interesting tricks with Xamarin.IOS / Android interfaces and not only.
That's all, if possible I will answer in the comments.
I don’t know what it’s all about, but I didn’t like it, so it was decided to spend some time on solving this problem, please under the cat.
Let's start. We have the usual such UITableView with property
tableView.Editing = true; Also, in the UITableViewSource we have an overridden method
public override bool CanMoveRow (UITableView tableView, NSIndexPath indexPath) => true; If we run the application, we will see that with this property we can move the table cells within the frame of the table itself.
Spoiler
By the way, the edit control on the left is removed like this:
public override UITableViewCellEditingStyle EditingStyleForRow (UITableView tableView, NSIndexPath indexPath) =>UITableViewCellEditingStyle.None; Now let us ask ourselves how to make the lines move not only along the tap to that small area allotted to the deprived user, but across the entire cell.
inb4
You can’t just change the frame of this control itself, it works a little differently than you can imagine, if you are interested in someone, I’ll tell you in the next post.
The solution to the problem is as follows:
foreach (var item in cell.Subviews) { if (item.Description.Contains ("UITableViewCellReorderControl")) { UIView resizedGripView = new UIView(new CGRect(0,0,item.Frame.GetMaxX(),item.Frame.GetMaxY())); resizedGripView.AddSubview(item); cell.AddSubview(resizedGripView); CGSize sizeDifference = new CGSize(resizedGripView.Frame.Size.Width - item.Frame.Size.Width, resizedGripView.Frame.Size.Height - item.Frame.Size.Height); CGSize transformRatio = new CGSize(resizedGripView.Frame.Size.Width / item.Frame.Size.Width, item.Frame.Size.Height / item.Frame.Size.Height); CGAffineTransform transform = CGAffineTransform.MakeIdentity(); transform = CGAffineTransform.Scale(transform, transformRatio.Width, transformRatio.Height); nfloat two = new nfloat (2.0); nfloat df = -sizeDifference.Width / two; nfloat dff = -sizeDifference.Height / two; transform = CGAffineTransform.Translate(transform, df,dff); resizedGripView.Transform = transform; item.Subviews [0].RemoveFromSuperview (); } } Next was the task to set the style of the cell during its transfer. Here there was a question with a shadow cast by a portable cell, this shadow did not want to disappear. After long attempts to find the most cherished subwoofer, still managed to find her somewhere in the bowels of the table, under the monotonous knocking of a tambourine.
')
This is done in the overridden methods of the UITableView itself.
UIView wrapperview; public override UIView[] Subviews { get { foreach (var item in base.Subviews) { if (item.Description.Contains("UITableViewWrapperView")) { wrapperview = item; } if (item.Description.Contains("UIShadowView")) { item.Hidden = true; } } return base.Subviews; } } public override void LayoutSubviews () { base.LayoutSubviews (); foreach (var item in wrapperview.Subviews) { if (item.Description.Contains("UIShadowView")) { item.Hidden = true; item.Layer.ShadowColor = UIColor.White.CGColor; } } } This code is suitable for any version of IOS, from 6 and up.
Before:
After:
When transferring the cell becomes transparent, so if you want to tint it or somehow stylize it, do it with the help of cell.BackgroundView.
In my opinion, the code looks quite simple and understandable. Most likely, I did not discover America’s experienced developers, but it will be useful for newbies to know, and there aren’t too many articles about Xamarin development. So, if the topic is relevant, I can cut on interesting tricks with Xamarin.IOS / Android interfaces and not only.
That's all, if possible I will answer in the comments.
Source: https://habr.com/ru/post/265171/
All Articles