Stabilization of time-lapse video on a calculator (IPython + OpenCV)
Like many natural and seasonal lovers of astrophotography, this August I caught Perseids at night. There is a small catch, but now it’s not about him, but about the fact that a series of photos has become a side effect of such fishing, which suggested that you make a time-lapse of them. But here's the ill luck: the installation of the camera was not as tough as we would like, and a slight shift appeared between the frames. I tried to fix it with VirtualDub plug-in de-shaking, but the results were not pleased. Then it was decided to make your bike: more details about the results and how they are obtained - under the cut.
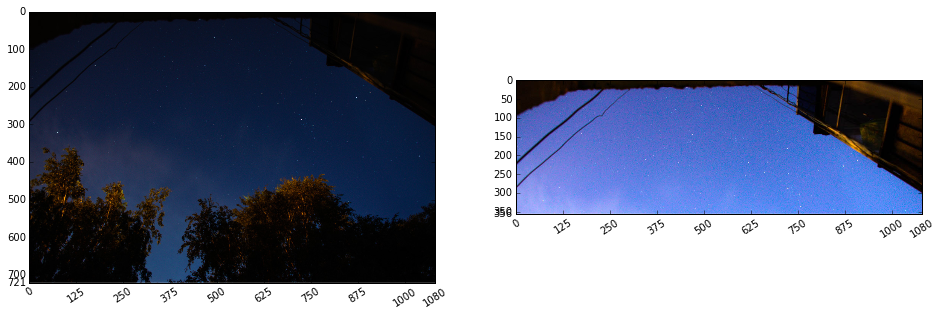
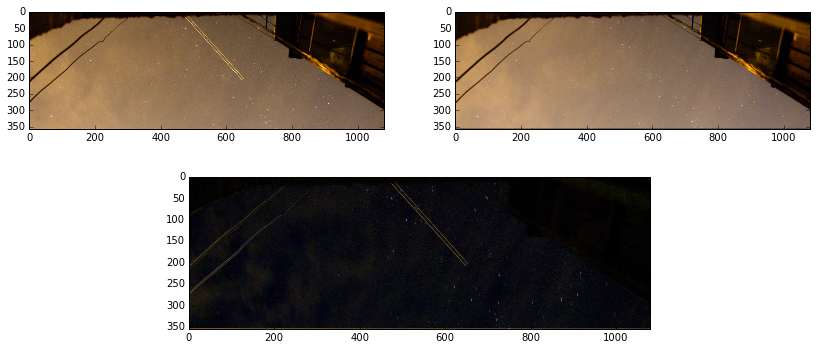
The traditional “before” and “after” (a small fragment is shown here). The picture is reduced, but even here you can see the “camera shake”:

After treatment:
')

What everything will be done: IPython notebook + NumPy + OpenCV.
Necessary warning: in the post there will be neither a new word in signal processing, nor a new one about the designated language and libraries; except that novices will find here an example of “how not to program”, but “how can you quickly come up with and test your algorithm in IPython notebook”. Professionals, however, propose to admire the stars.
To improve the visibility of fixed objects, it was decided to create a special version of all the images and then to find the offset already on it. What was done in each frame:
This is how the pre-processed frames looked like (to the right) compared to the original (left):
We will read the source files (which were previously prepared for estimating the displacement from them). For simplicity, the working directory selected the same one where these frames lie, so just read their names in the sampledata array. I will not give the details of such a serving code in a post so as not to clutter up. They, as well as some functions written in the process of working macros, can be viewed in the original document IPython notebook .
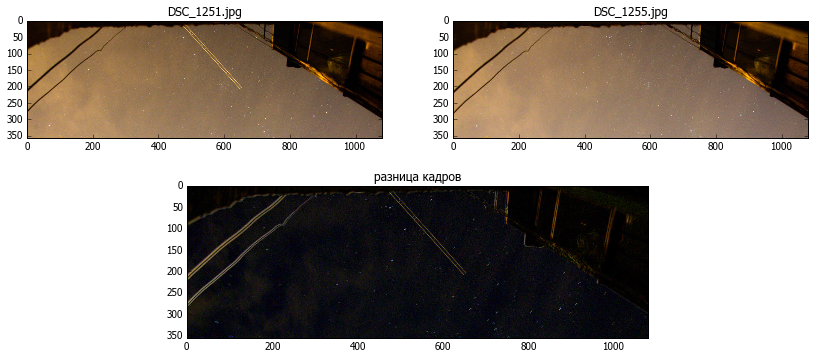
Take a couple of frames in order to test everything on them (albeit 0 and 4). Let us show these frames and the difference between them by simply subtracting cv2.absdiff ():
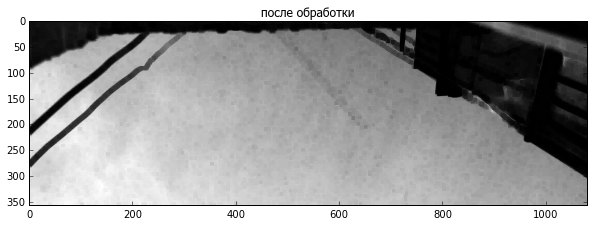
The frame shift is visible by the way the edges of fixed objects appear, but the moving stars are not helpful in assessing the camera shift. So if possible get rid of them with the operation erode. Kernel size is chosen by practical consideration.
It can be seen that on the frame well fixed objects, to which it will be possible to attach.
Finding matching points on neighboring images will be done as shown in the example find_obj.py from opencv: we will find distinguishable fragments using the Scale Invariant Feature Transform (SIFT) , and then we will match and filter the resulting array.
The resulting arrays p1, p2 are sets of x, y coordinates of coinciding points on frames 1 and 2, respectively.
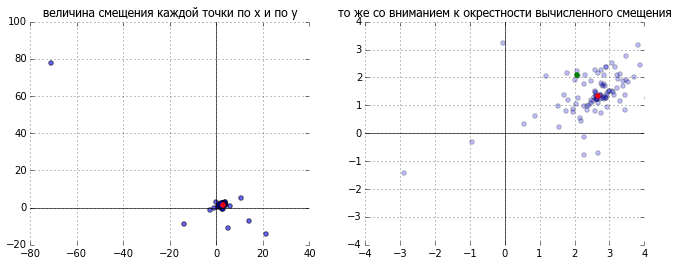
If we take the difference between them, we get an array of frame offsets according to the version of each of the points. At this stage, you can make another filtering (sometimes some points due to an erroneous match are very strongly knocked out of the series), but if you use the median instead of the mean, then all these erroneous values are simply not important. This is clearly seen in the picture: the blue represents the offset for each of the pairs of points, the selected value is indicated by red, and for comparison green is a simple average.
It remains to make the actual offset. We will build the affine transformation matrix manually, simply making the appropriate values to the right place. One could use special functions from opencv for this, but the matrix looks quite simple for rotation and displacement:
%20%26%20%20-sin%20(%5Cphi)%20%26%20%20dx%20%20%5C%5C%20%0A%20sin(%20%5Cphi%20)%20%26%20%20cos%20(%5Cphi)%20%26%20%20dy%0A%5Cend%7Bbmatrix%7D%0A)
Where - the angle of rotation, and
  and
and  - corresponding offset values
and actually run the conversion
Let's look at the result, comparing, as in the beginning, by simple subtraction:
Voila! What was required was blackness in the place of all motionless objects. So the frames were combined.
Everything is working. Can you arrange processing ... or not? There are a few details left:
We take into account all this and write.
That's all - the result is obtained: fixed objects - like glued, the stars spin as they should, the clouds float about their business, and I think about what else to remove this - already specifically for the time-lapse.
Result on youtube.com:
Link to a copy of IPython notebook, in which everything was done
Also my thanks
The traditional “before” and “after” (a small fragment is shown here). The picture is reduced, but even here you can see the “camera shake”:
After treatment:
')
What everything will be done: IPython notebook + NumPy + OpenCV.
Necessary warning: in the post there will be neither a new word in signal processing, nor a new one about the designated language and libraries; except that novices will find here an example of “how not to program”, but “how can you quickly come up with and test your algorithm in IPython notebook”. Professionals, however, propose to admire the stars.
Why is a "calculator", and also about why I had to make my bike - lyrical digression
Having decided to refuse, whenever possible, from paid programs for which there are free analogues, I began to look for, among other things, a replacement for the matlabu. And stopped at a bunch of IPython + SciPy [+ OpenCV]. However, I use them precisely as a large and very convenient, but calculator: for rapid prototyping of any ideas and solutions or for one-time processing, when it is easier for the computer to explain what I need from it than to look for a suitable program that may still be paid or do a little bit not what I need - this is about this case I want to tell in the post.
Preliminary data preparation
To improve the visibility of fixed objects, it was decided to create a special version of all the images and then to find the offset already on it. What was done in each frame:
- increased background brightness and contrast between it and dark fixed objects
- the trimming of the frame excludes trees; they are not a pattern of immobility
- file names remain unchanged - just for convenience
This is how the pre-processed frames looked like (to the right) compared to the original (left):
Reading and advanced frame processing
We will read the source files (which were previously prepared for estimating the displacement from them). For simplicity, the working directory selected the same one where these frames lie, so just read their names in the sampledata array. I will not give the details of such a serving code in a post so as not to clutter up. They, as well as some functions written in the process of working macros, can be viewed in the original document IPython notebook .
Take a couple of frames in order to test everything on them (albeit 0 and 4). Let us show these frames and the difference between them by simply subtracting cv2.absdiff ():
The frame shift is visible by the way the edges of fixed objects appear, but the moving stars are not helpful in assessing the camera shift. So if possible get rid of them with the operation erode. Kernel size is chosen by practical consideration.
like this
qx,qy=4,4 k=ones((qx,qy)) im1g=cv2.erode(im1g,k) im2g=cv2.erode(im2g,k) show1(im1g,u" ") It can be seen that on the frame well fixed objects, to which it will be possible to attach.
Estimation of the shift between images
Finding matching points on neighboring images will be done as shown in the example find_obj.py from opencv: we will find distinguishable fragments using the Scale Invariant Feature Transform (SIFT) , and then we will match and filter the resulting array.
where does that come from
the `filter_matches` function is directly used from the example ,` detectandselectmatches` also borrows its functionality in many ways. All rights to them are for the respective authors. I will not dwell on their work in detail now, those who wish can always look at the help - everything is written there, and it’s pretty intuitive to drive an example .
detector = cv2.SIFT() norm = cv2.NORM_L2 matcher = cv2.BFMatcher(norm) def filter_matches(kp1, kp2, matches, ratio = 0.75): mkp1, mkp2 = [], [] for m in matches: if len(m) == 2 and m[0].distance < m[1].distance * ratio: m = m[0] mkp1.append( kp1[m.queryIdx] ) mkp2.append( kp2[m.trainIdx] ) p1 = np.float32([kp.pt for kp in mkp1]) p2 = np.float32([kp.pt for kp in mkp2]) kp_pairs = zip(mkp1, mkp2) return p1, p2, kp_pairs def detectandselectmatches(fr1a,fr2a): kp1, desc1 = detector.detectAndCompute(fr1a, None) kp2, desc2 = detector.detectAndCompute(fr2a, None) raw_matches = matcher.knnMatch(desc1, trainDescriptors = desc2, k = 2) #2 p1, p2, kp_pairs = filter_matches(kp1, kp2, raw_matches) return p1, p2 p1, p2 = detectandselectmatches(im1g,im2g) The resulting arrays p1, p2 are sets of x, y coordinates of coinciding points on frames 1 and 2, respectively.
for example
 [665.927307129,17.939201355] [668.513000488.19.468919754]
 [744.969177246,60.6581344604] [747.49786377,61.8129844666]
 [746.388549805,77.1945953369] [749.15411377,78.5462799072]
 [892.944763184,169.295532227] [895.570373535,170.530929565]
 [906.57824707,185.634231567] [908.093933105,186.593307495]
 ...
If we take the difference between them, we get an array of frame offsets according to the version of each of the points. At this stage, you can make another filtering (sometimes some points due to an erroneous match are very strongly knocked out of the series), but if you use the median instead of the mean, then all these erroneous values are simply not important. This is clearly seen in the picture: the blue represents the offset for each of the pairs of points, the selected value is indicated by red, and for comparison green is a simple average.
dp=p2-p1 mx,my=np.median(dp[:,0]),np.median(dp[:,1]) dx = 2.68393 dy = 1.34059
Reverse shear
It remains to make the actual offset. We will build the affine transformation matrix manually, simply making the appropriate values to the right place. One could use special functions from opencv for this, but the matrix looks quite simple for rotation and displacement:
Where
def getshiftmatrix( (dx,dy)): return array([[ 1., 0, dx], [ 0, 1., dy]]) and actually run the conversion
def shiftimg(im2,shift): tr1=getshiftmatrix(shift) return cv2.warpAffine(im2,tr1,tuple(reversed(im2.shape[:2]) )) im2r= shiftimg(im2,tuple(-array(shift))) Let's look at the result, comparing, as in the beginning, by simple subtraction:
Voila! What was required was blackness in the place of all motionless objects. So the frames were combined.
Processing all frames
Everything is working. Can you arrange processing ... or not? There are a few details left:
- the offset was calculated on a specially processed and cropped frame, and it should be produced on the main one;
- after the offset along the edges of the frame, the black stripes will remain where the picture has been shifted from. They can cover up from the next frame.
We take into account all this and write.
# basepath4orig arshifts=[] im1= cv2.imread(sampledata[0]) # base frame im1g = preprocess(im1) kp1, desc1 = detector.detectAndCompute(im1g, None) imgprev=cv2.imread(basepath4orig+sampledata[0]) #base original frame for i,x in enumerate(sampledata): print x, im2g = preprocess(cv2.imread(x)) kp2, desc2 = detector.detectAndCompute(im2g, None) raw_matches = matcher.knnMatch(desc1, trainDescriptors = desc2, k = 2) #2 p1, p2, kp_pairs = filter_matches(kp1, kp2, raw_matches) dp=p2-p1 if len(dp)<=0: shift=0,0 else: dx,dy=np.median(dp[:,0]),np.median(dp[:,1]) print dx,dy #process original frame imgr= shiftimg(cv2.imread(basepath4orig+x),(-dx,-dy)) if -dy>0: imgr[:int(ceil(abs(dy))),:,:] = imgprev[:int(ceil(abs(dy))),:,:] if -dy<0: imgr[-int(ceil(abs(dy))):,:,:] = imgprev[-int(ceil(abs(dy))):,:,:] if -dx>0: imgr[:,:int(ceil(abs(dx))),:] = imgprev[:,:int(ceil(abs(dx))),:] if -dx<0: imgr[:,-int(ceil(abs(dx))):,:] = imgprev[:,-int(ceil(abs(dx))):,:] imgprev=imgr cv2.imwrite('shifted_'+x+'.JPG',imgr) That's all - the result is obtained: fixed objects - like glued, the stars spin as they should, the clouds float about their business, and I think about what else to remove this - already specifically for the time-lapse.
Result on youtube.com:
***
The most attentive ones could notice that the previous version got into youtube, without correcting the black bars along the edges, I will not replace them anymore, in the gifs in the post a normal version has already been given
Link to a copy of IPython notebook, in which everything was done
Materials and tools used:
Also my thanks
Source: https://habr.com/ru/post/265155/
All Articles