Migrating from 3CX v12 Cloud Server to 3CX v14 Virtual PBX Server
Introduction
This guide describes the process of migration of entities (tenants) 3CX v12 Cloud Server to 3CX v14 Virtual PBX Server without changing the SIP ports that have already been assigned to 3CX v12 entities.
In order to transfer 3CX v12 Cloud Server entities to 3CX v14 Virtual PBX Server, while maintaining the already configured SIP ports, you need to perform the following steps:
- Install software required for migration
- Back up data
- Prepare data for recovery
- Recover data on 3CX v14 Virtual PBX Server
- Repeat auto configuration / configuration of IP phones and gateways
Important: this guide is additionally tested by our developers, but at the moment there are no serious problems identified, and it can be used for successful migration.
Migration software
For successful migration, download the BulkBackup140.zip ZIP archive, unpack it and run it on the server with 3CX v14 Virtual PBX Server installed but not configured and run cloudbackup.bat .
')
Data backup
In 3CX v12 Cloud Server, back up all entities using the Backup and restore tool. Pay attention to the order of the entities and the SIP ports assigned to them. For example, the entity stefant1 has SIP port 5060, the entity tomt2 is 6060. It is necessary to restore the entities in the same sequence to save the SIP ports assigned to them - this will simplify the migration of end devices (SIP phones).

After all 3CX v12 entities have been saved to the folder, transfer the files to 3CX v14.

Preparing data for recovery
Assigning FQDN names
The name of the ZIP file affects the FQDN names assigned to new entities. For example, if all restored entities will work on the common domain contoso.com , you need to
- use a self-signed or purchased certificate for the domain mask * .contoso.com
- take into account that the names of subdomains of entities in the contoso.com domain will correspond to the names of the ZIP files. For example, the zip file stefant1.zip forms the subdomain stefant1.contoso.com .
If you need other subdomain names for the entities, just rename the ZIP archives. For example, if you rename stefant1.zip to stefan.zip , this entity will be assigned the subdomain stefan.comtoso.com .
Entity order
Restoration of entities in 3CX v14 should be performed in the same order in which they were located on the 3CX v12. Thus, the first entity stefant1 (or renamed stefan ) will receive port 5060, which was on her old server. This is necessary, first of all, to simplify the configuration of SIP phones connected to this entity.
To start the migration, copy the corresponding entity files into the folder instance1 , instance2 , etc. that are inside the archive file RestoreV14.zip . This file is created when unpacking the BulkBackup140.zip archive . In our example, stefan.zip should be located in the folder instance1 , etc., and these folders and files should be included in the RestoreV14.zip archive.
Important: you should not leave the files of the archives of entities outside the folders, as well as empty folders of entities. Entity numbers must increase sequentially. The archive RestoreV14.zip contains folders before instance11 .
- You can increase the number of entity folders to instance24 .
- If you transfer fewer entities than created folders, delete unnecessary folders.
Data Recovery on 3CX v14 Virtual PBX Server
After creating the RestoreV14.zip archive, transfer it to the new server at the root of drive C and run the command in the command line:
- C: \ Program Files \ 3CX Phone System \ Bin> BulkBackup.exe restore c: \ RestoreV14.zip
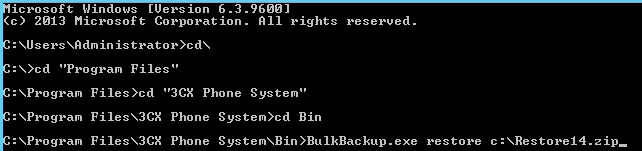
Recovery time will depend on the number of extensions, the amount of call history and call records of all entities.
Validation Recovery
After the restoration of the configuration and data is completed, launch the 3CX Virtual PBX Manager utility on the new server and make sure that all the entities have been restored in the correct order.

Now you can log into the management console of each entity using the name created by FQDN. The login account is the same as the one on the old server.
Important: The SysAdmin account is no longer used in the 3CX v14 Virtual PBX.
Autotune / configure IP phones and gateways
DNS changes
In 3CX v12 Cloud Server, the installed entity was accessed at
- http (s): //pbx.contoso.com/ [tenant-name] / mangement , where [tenant-name] is the name of the entity. In our example, this is stefant1 . After switching to 3CX v14 Cloud PBX and possibly changing the name of the entity (in our example, stefant1 has been renamed stefan ), the new address of the entity management interface will be:
- http (s): // [tenant-name] .contoso.com / management . In our example, this is http (s): //stefan.contoso.com/management .
Since the 3CX v14 Cloud PBX uses a call to an entity by the name of a subdomain, you must make the appropriate changes to the DNS server records. The procedure for setting up a DNS server is described in the document How to Create an FQDN to 3CX Phone System that resolves externally .
Important: The IIS web server binds the subdomain name (entity name) to the interface IP address and does not process requests for other, clearly not defined subdomains.
Autotune SIP devices
3CXPhone clients
For autoconfiguration of 3CXPhone clients, it is enough to resend the 3CX Welcome e-mail and import the autotune file to the clients. In this case, the 3CXPhone configuration will be updated and it will be re-registered on the new 3CX v14 Virtual PBX server.
Important: Before autotuning, 3CXPhone clients should upgrade to v14. V12 clients will not work with the new server. See the 3CXPhone client installation instructions for Windows , Android , iOS , Mac .
PSTN gateways
To configure PSTN gateways, simply go to their web-interface settings and specify the IP address of the new server. If the gateway is connected via VPN, specify the internal address of the 3CX v14 Virtual PBX server.
IP phones
For all IP phones connected via auto-configuration, regardless of how they are connected (local lan, stun or SBC), you must copy the auto-configuration files (files, not folders) from the new v14 server to the old v12 server. It is recommended to pre-save a backup copy of the original v12 autotune files.
In our example, you need to copy the autotune files from:
- C: \ ProgramData \ 3CX \ Instance1 \ Data \ Http \ Interface \ provisioning \ 8c6n1icg0k on the new server
at:
- C: \ ProgramData \ 3CXstefant1 \ Data \ Http \ Interface \ provisioning \ 8c6n1icg0k on the old server, replacing the original files.
After that, without logging into the management console of the old server (old entities), reboot the IP phones. If you log into the management console of the old server, the autotune files will be overwritten! Phones will receive a new configuration from the old server and switch to the new 3CX v14 Virtual PBX server.
When all IP phones are connected to the new server, the old server can be disconnected.
3CX SBC
The 3CX v14 Virtual PBX Server requires the installation of an updated 3CX SBC session border controller. To install 3CX SBC on a Windows system and Raspberry PI, read the relevant instructions:
- Installing 3CX Session Border Controller for Windows
- Installing 3CX SBC Session Border Controller for Raspberry Pi
After updating 3CX SBC (this is usually done on the user side of 3CX v14 Virtual PBX Server), set the IP and FQDN addresses of the new 3CX v14 Virtual PBX Server in its settings. After that, the new connected phones will work immediately, and the old IP phones must be reconfigured, as indicated above in the IP Phones section.
Source: https://habr.com/ru/post/265091/
All Articles