Office as Platform issue 3: Power BI. Get data from REST API
This is our next post in the “ Office as Platform ” column . This time, we welcome Dmitry Solovyov ( dmitriysolovev ), the head of the Office 365 support center at AstroSoft, the author of several articles on PowerBI technology. In this article, Dmitry will talk about how to use the REST API to get data from external sources for visualization and analysis in PowerBI. - Vladimir Yunev

Hello! On Habré there were already several posts on Power BI . Judging by the comments, at least several readers have a current topic of getting data from REST web services. Today we will consider it on the example of receiving and processing data from the open data portal of St. Petersburg ( http://data.gov.spb.ru/) . The data of technical and economic passports of apartment buildings will be executed ( http://data.gov.spb.ru/datasets/69/) . Excel 2016 will play the role of a “torture tool”, which now includes Power Query by default.
Introduction
In general, Power Query allows you to receive data from open and not very sources in various ways (Fig. 1):
- Getting data "from the Internet." In this case, it suffices to specify the URL of the page on which the data we are interested in and to load it. Among the shortcomings - it works stably only on pages using a table layout; you have to write functions if the data is paginated; site administrators may ban you if there are too many requests (and they will be if there are many pages);
- Getting data from the OData channel. This option is suitable for various LOB applications that support OData;
- Write a request from scratch, using the capabilities of the language "M". Just this option I will use in this case.
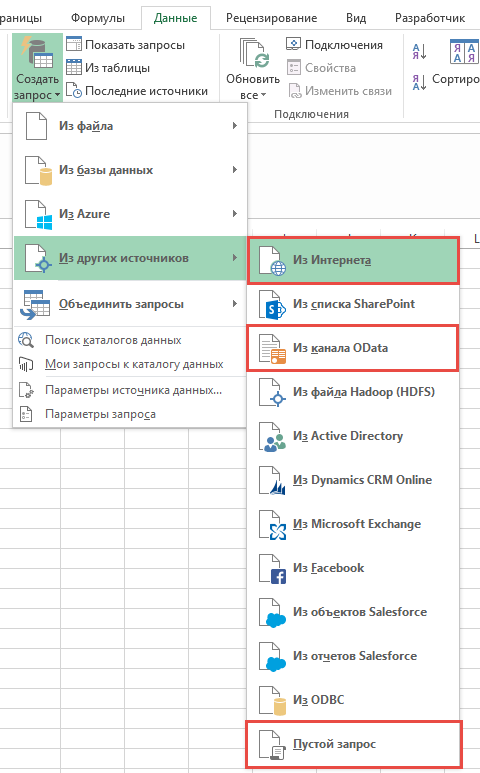
Fig.1. - Power Query data source options
')
Part 1. Taste service
In most cases, in order to work with the REST API, you need to get the Token API. To receive it on the website of open data of St. Petersburg, you need to register a developer account, then the token will be displayed in your account. Also on the site you can find a brief instruction on the use of API ( http://data.gov.spb.ru/developers/ ). I pay attention to the token transfer format, since I will need this information to access the information I need (Fig. 2).
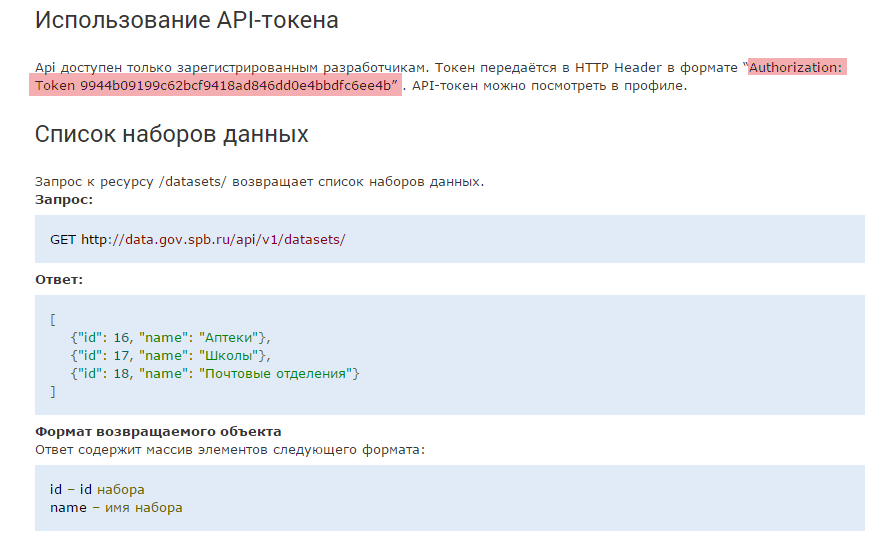
Fig.2. - API documentation
So, I have an example of using the API, there is a token and now you can try to get trial information from the open data site of St. Petersburg. First of all, I select the type of request “From the Internet” and in the opened window I specify the address: http://data.gov.spb.ru/api/v1/datasets/ (Fig. 3).
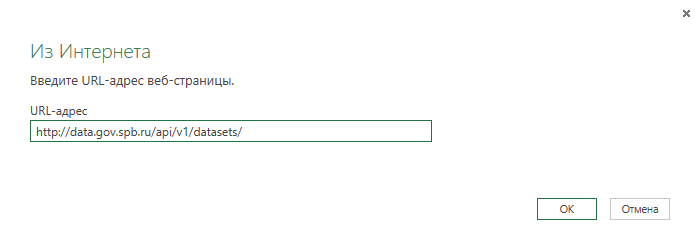
Fig.3. - Request data from the Internet
After clicking the “OK” button, I expectedly see an authorization window with a message stating that invalid credentials are being used. By the way, Power Query supports several types of credentials when working with external requests, among which are the Web API. This type of authorization allows you to transfer a token, which I will try to do. After a bit of thinking, Power Query again reports that I am using the wrong credentials. Later it will be necessary to analyze - in what format Power Query transfers the API key and what can be done with it (Fig. 4).

Fig.4. - Error authoring Power Query
Since the simple way to connect to the API did not bring a result, you will have to go more complicated and form a request manually. To do this, create an empty query and open the advanced editor (Fig. 5):
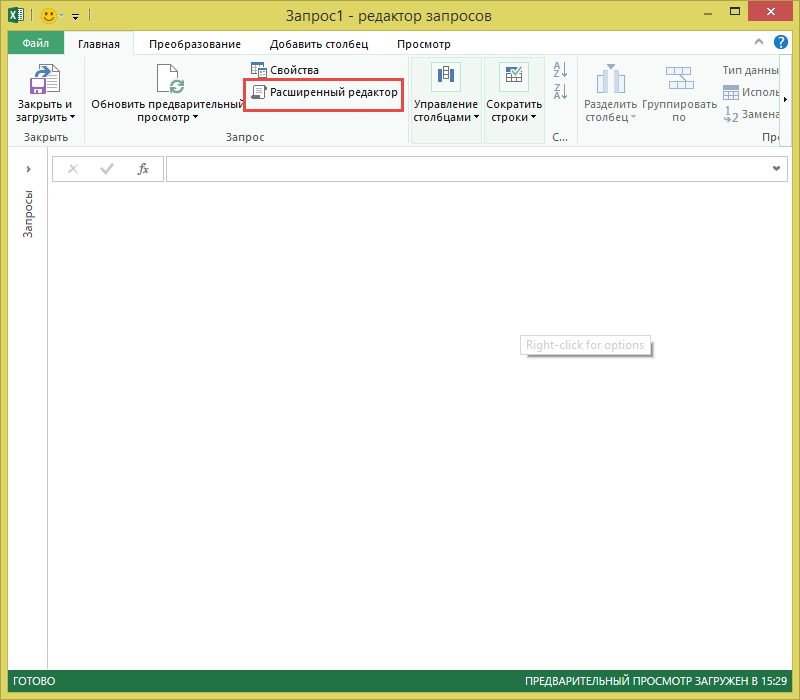
Fig.5. - Run advanced query editor
As you already know, “behind the outer shell” of Power Query lies its own M programming language. To retrieve data from web sources, the Web.Contents function is used, which takes two parameters — the website Url and the set of request parameters (API key, connection timeout request headers, etc.). This function returns a set of binary data, which can then be processed using other functions of the M language. Let's form a test query that should return the set of data sets available on the portal:
Web.Contents("http://data.gov.spb.ru/api/v1/datasets/ ", [Headers=[#"Authorization"="Token c81a**************************fe3"]]) After entering the text of the request, you need to click the "Finish" button and view the result (Fig.6).
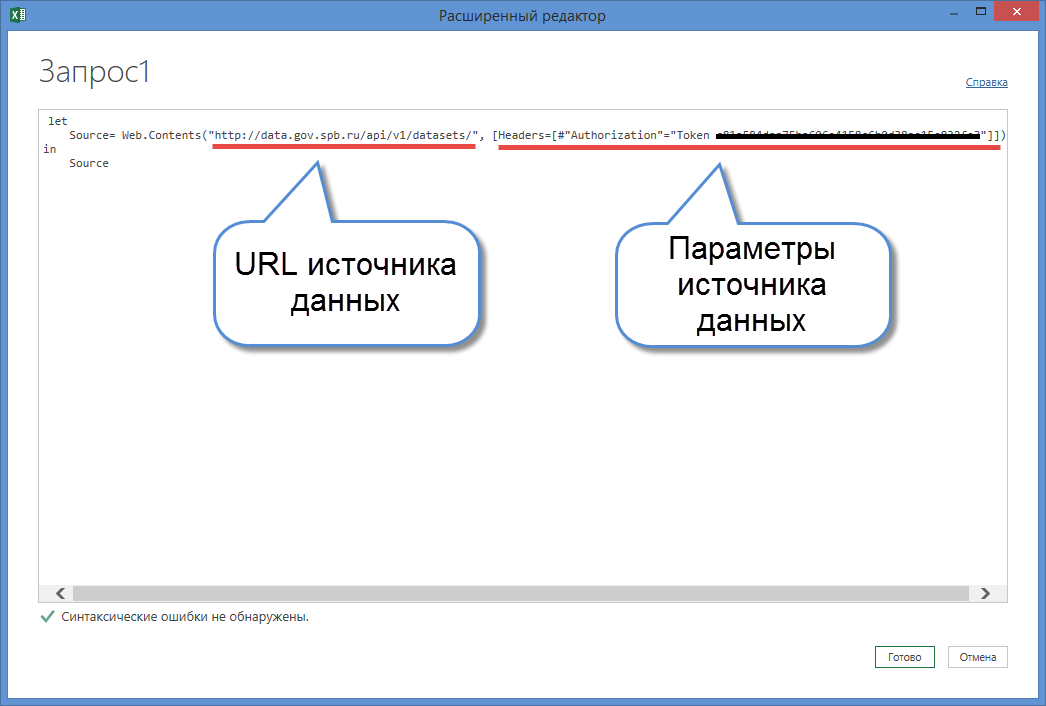
Fig.6. - An example of a test request to the API
The results of the test query are shown in Figure 7. Since the Web.Contents function returns the result of its work as binary data, it is logical that we see an icon on the screen, not numbers. In order to see the results in a more accessible form for a person, you need to double click on the icon (Fig.7 and Fig.8).

Fig.7. - Results of the test request to the API
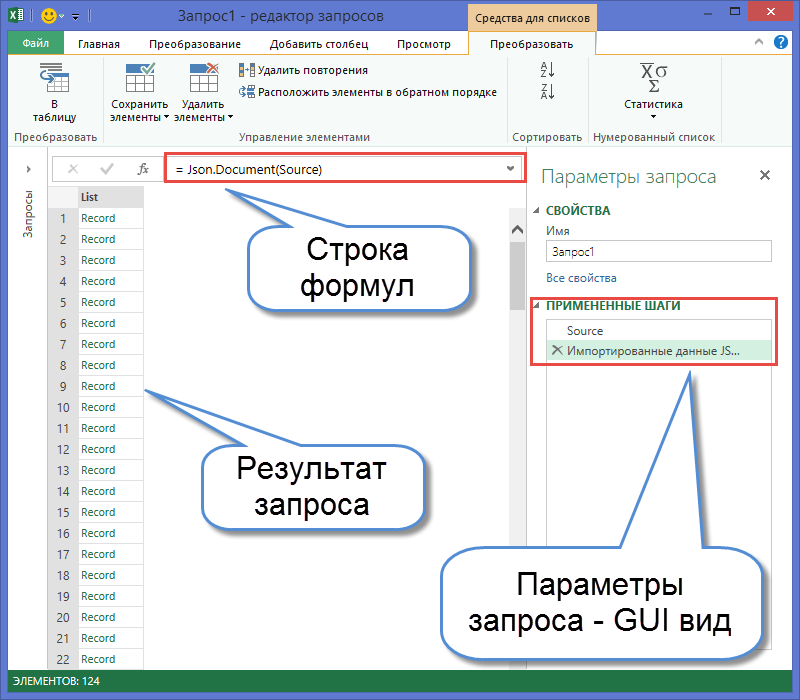
Fig.8. - Deployed binary data
The appearance of the query editor after “dropping” into the results of the Web.Contents function can be seen in Figure 8. Pay attention to the formula line in which the Json.Document (Source) function is visible. The Json.Document function returns the contents of the Json document, and the result of the previous step with the name “Source” is passed to it as an argument. Yes, the M language performs step-by-step code processing, with each step must have its own name. In the case of working with queries in the normal editor mode, all steps are displayed on the right side of the screen and can be changed if necessary. The truth with the change is to be more careful, because in case of successive steps, this is the same as interfering with the past, with all the ensuing consequences.
The result of the query is “List”. In this article, we do not understand the differences between lists and tables in Power Query, so I’ll say that in order to continue working with data, we will need to convert the results of the query into a table and then expand the contents of the columns. The final appearance of the data obtained is shown in Figure 10. As promised in the API documentation, we received a complete list of data sets and their identifiers (Fig.9 and Fig.10).
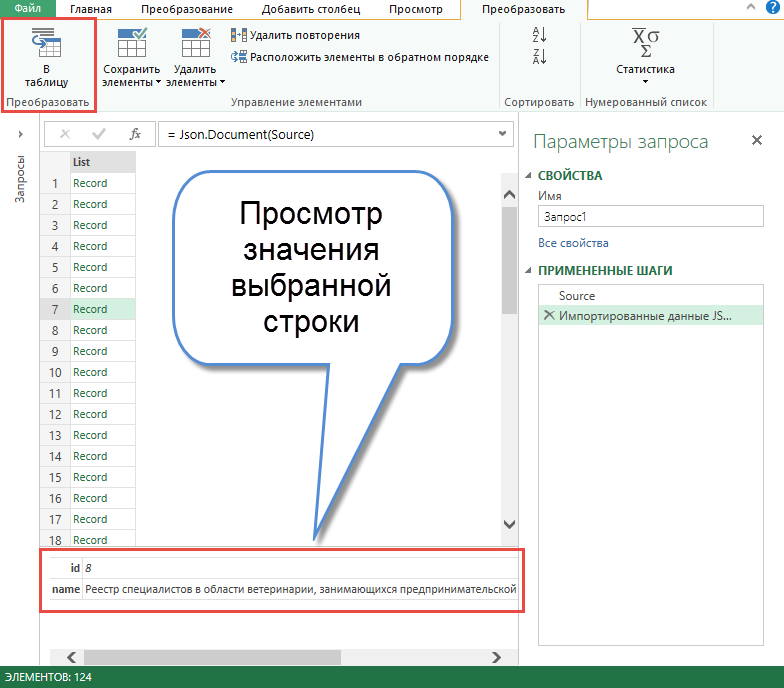
Fig.9. - Conversion to table
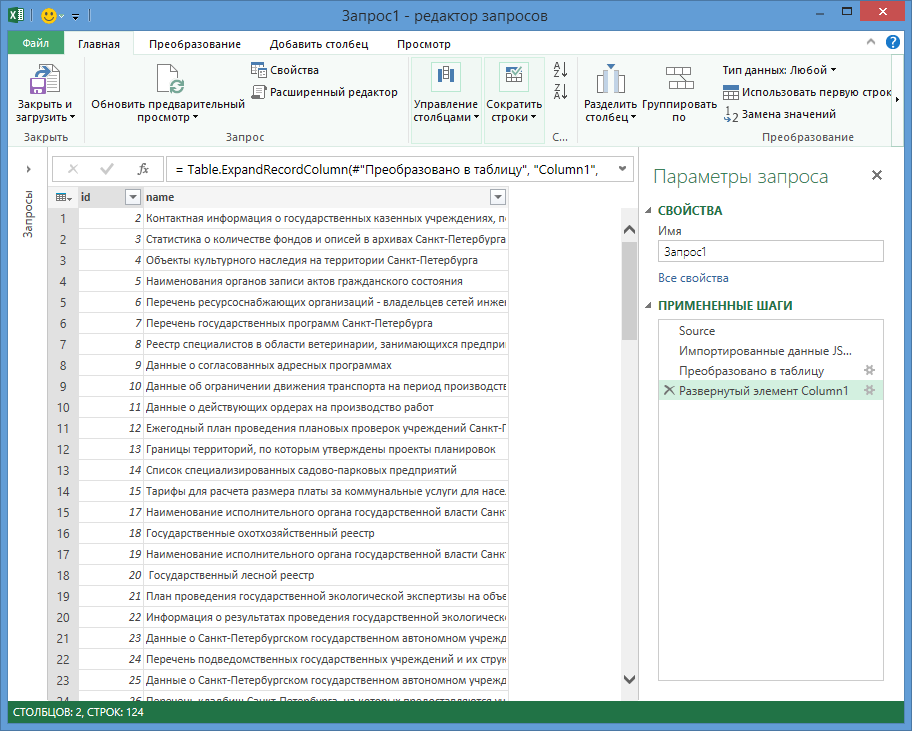
Fig.10 - List of data sources with their identifiers
If you open the advanced query editor, we will see that for all the steps we performed, the code in the M language was automatically generated (Fig. 11).
let Source= Web.Contents("http://data.gov.spb.ru/api/v1/datasets/", [Headers=[#"Authorization"="Token c81*******************************fe3"]]), #" JSON" = Json.Document(Source), #" " = Table.FromList(#" JSON", Splitter.SplitByNothing(), null, null, ExtraValues.Error), #" Column1" = Table.ExpandRecordColumn(#" ", "Column1", {"id", "name"}, {"id", "name"}) in #" Column1" 
Fig.11. - Code in the advanced query editor
This concludes the first API sample and proceeds to the formation of the second request.
Part 2. We obtain the data of TEP houses of St. Petersburg
After a brief examination of the API documentation, it became clear that in order to obtain the necessary data we would need two requests to the API:
- http://data.gov.spb.ru/api/v1/datasets/69/versions/latest/ - returns the description of the data in the latest version of the data set
- http://data.gov.spb.ru/api/v1/datasets/69/versions/latest/data/ - returns the data contained in the latest version.
In this case, 69 is the identifier of the data set, which we can get either in the results of our first request to the API, or by opening the page of the desired set in the browser and viewing the URL (Fig. 12).
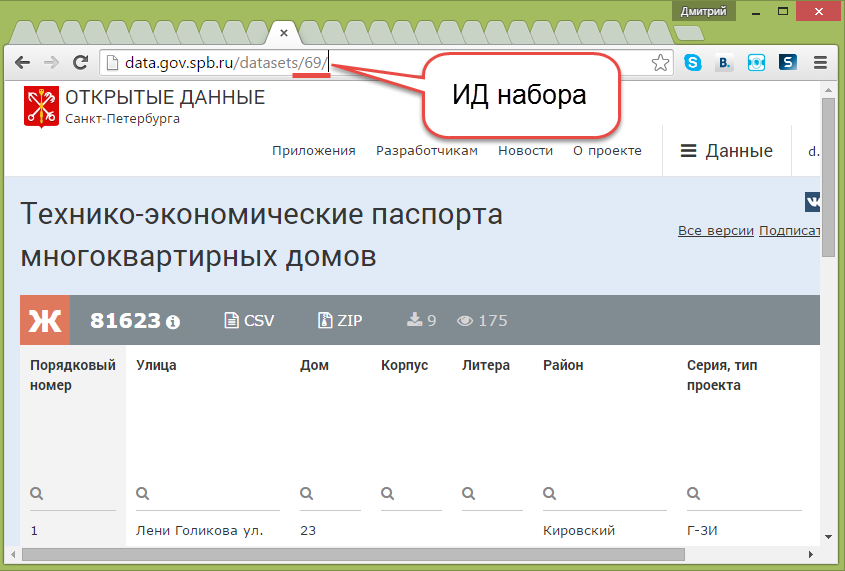
Fig.12. - dataset id in url
As a result, I get data describing the fields of the dataset and the dataset on the technical and economic passports of houses, which after cleaning can be visualized in Power BI or analyzed using Power Pivot and summary tables in Excel (Fig.13 and Fig.14) .

Fig.13. - Description of the data set
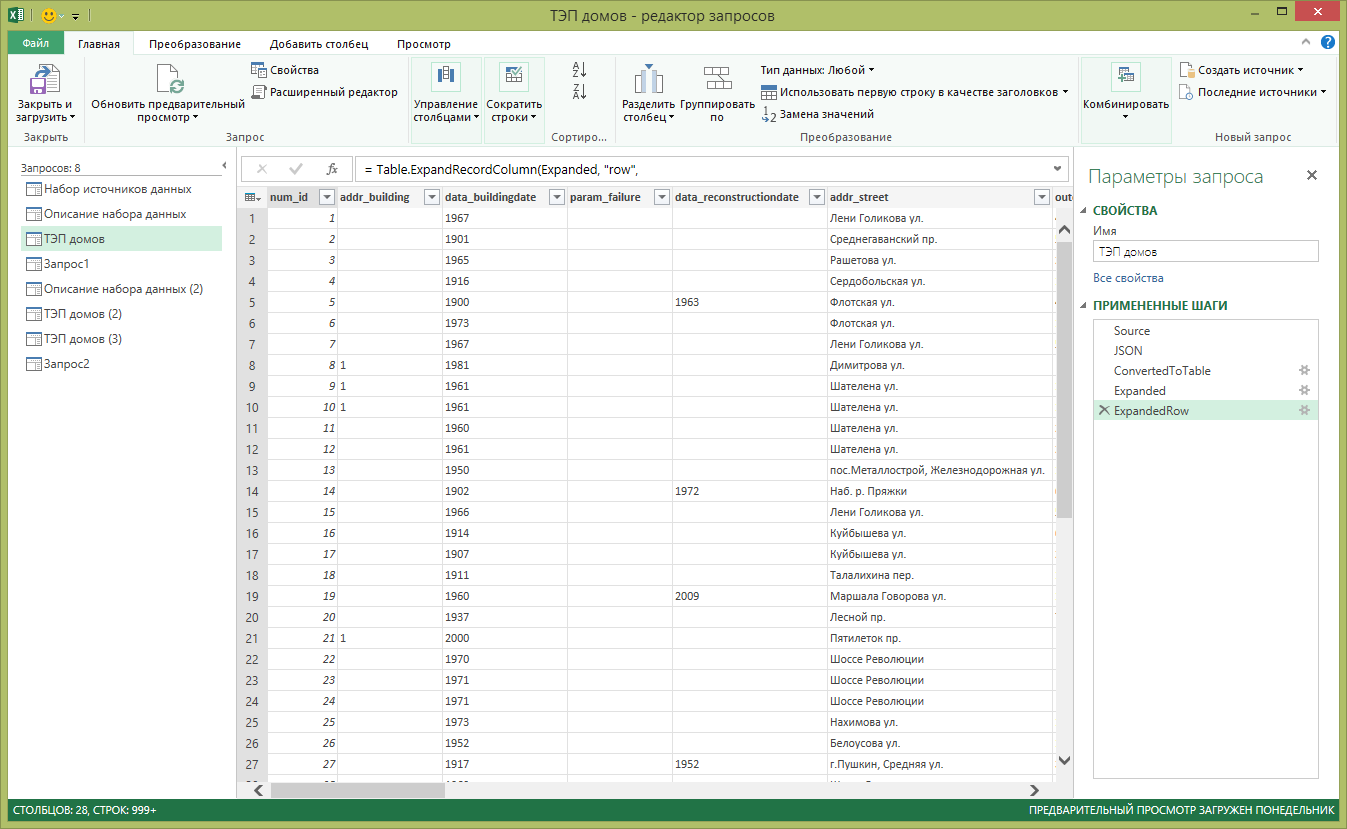
Fig.14. - A set of data TEP houses of St. Petersburg
This part of the article dedicated to the execution of basic queries from Power Query to the REST API is completed. In the following parts, we’ll take a closer look at the Power Query features that will be useful when building requests for web services in real life — functions, parameter passing, and more.
Additional links
You can view the main documentation for creating office applications on the Office Development Center portal , or you can download examples of ready-made applications.
A lot of interesting information, news and descriptions of working with various data sources using PowerBI can be found in the developers blog .
about the author

Dmitry Solovyov (MCSA, MCITP, MCT)
Head of Office 365 Support Center at AstroSoft.
dmitriysolovev
About 10 years he worked with Microsoft products as an engineer, developer and trainer. The last four years specializes in the implementation of systems based on SharePoint, Exchange, Office 365, Microsoft Azure. Master of the specialty "Technical maintenance of aircraft and their systems"
Source: https://habr.com/ru/post/264645/
All Articles