Channel Status Protocols and Single-Zone OSPF (Part 2)
 Continuing to translate the chapter from the book by Chris Bryant "CCNP Route Study Guide". His site is thebryantadvantage.com . The book is available on amazon .
Of all the videos viewed, read books to prepare for CCNP ROUTE, the material from this seemed the easiest to learn. Allows you to sort everything out. In addition to theory, I also liked practical examples. At the end of each chapter there are links to youtube lessons.
Part 1 .
Types of OSPF networks
Why types of OSPF networks are important
By default, the type of OSPF network depends on the type of network segment. Different types of OSPF networks have different values for hello- and dead-timers, and these are one of the values that must be the same to establish a neighborhood between two routers. In addition, some types of OSPF networks do not have DR and BDR, while others have special conditions that must be met.
Besides, they are all the same, right? :)
')
Don't worry, we’ll cover every type of OSPF network you need to take the CNP ROUTE exam!
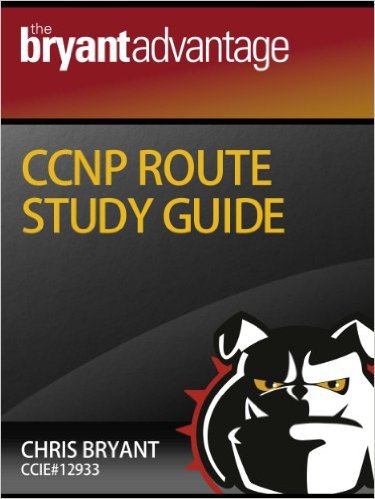
Unless otherwise noted, the network segment is in zone 0, the main zone.
The subnet address of the broadcast network is 10.1.1.0/24. The last octet of each IP address will be the router number. Each router has a loopback interface, with a router number in each octet. (Loopback interface for R1 - 1.1.1.1/32, etc.)
OSPF Broadcast Network
The OSPF configuration in the Ethernet segment for the broadcast network will be left by default, DR and BDR will also be selected, and the ip ospf priority command can be used to influence the choice of DR / BDR.
For a large network segment, it is a good idea to use powerful routers to perform these roles (DR / BDR), as this entails a load on the CPU. As always, everything we do on the router comes at a price.
The output of the show ip ospf interface ethernet0 command on router R1 shows us the type of network, as well as a lot of other information. Notice that the default values for the hello and dead timers of the broadcast network are 10 and 40 seconds, respectively. By default, dead time is equal to four times hello time.
R1#show ip ospf interface ethernet0 Ethernet0 is up, line protocol is up Internet Address 10.1.1.1/24, Area 0 Process ID 1, Router ID 1.1.1.1, Network Type BROADCAST, Cost: 10 Transmit Delay is 1 sec, State BDR, Priority 1 Designated Router (ID) 8.8.8.8, Interface address 10.1.1.5 Backup Designated Router (ID) 1.1.1.1, Interface address 10.1.1.1 Timer Intervals configured, Hello 10, Dead 40, Wait 40, Retransmit 5 Hello due in 00:00:04 Index 1/1, flood queue length 0 Next 0x0(0)/0x0(0) Last flood scan length is 1, maximum is 2 Last flood scan time is 0 msec, maximum is 4 msec Neighbor Count is 1, Adjacent neighbor count is 1 Adjacent with neighbor 8.8.8.8 (Designated Router) Supress hello for 0 neighbor(s) For a broadcast segment, it is not necessary to make a specific DR or BDR router, but for our next example, this is not the case.
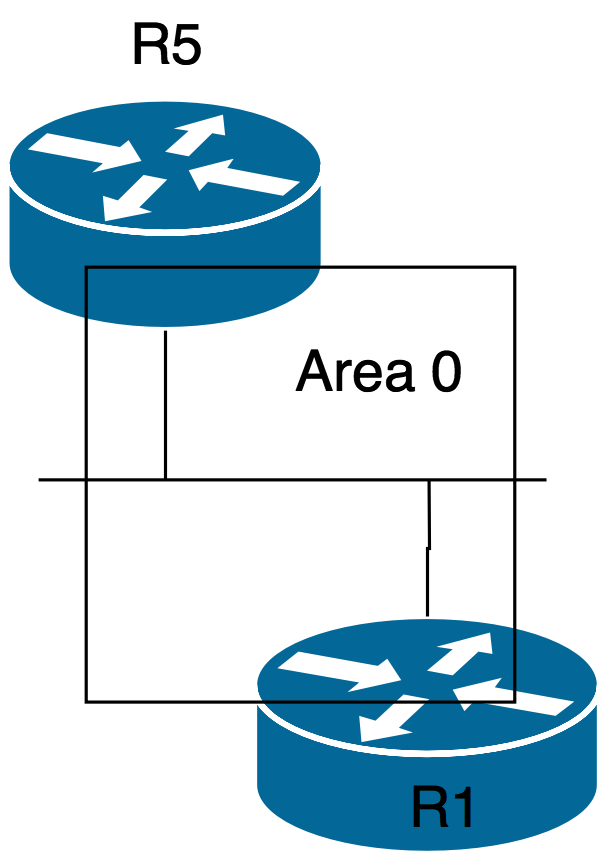
OSPF NBMA network
Now we will add another segment to the existing network, on the frame relay. The new segment uses the address 172.12.123.0/24. There are two PVCs from R1 to R2 and R3; there is no PVC between the “spokes”. The Serial0 interface of each router is in zone 0.
Serial interfaces in this new segment will default to non-broadcasting multiple access (NBMA). Since the network nodes do not form a fully-meshed network, the hub router R1 should be DR and there may not be a BDR here.
Why? DR and any potential BDR should be able to receive multicasts from all other routers on the network. In the “star” topology, the spoke-router does not have the ability to receive broadcast or multicast traffic from another spoke-router, since all traffic passes through the hub - and routers do not redirect broadcast or multicast traffic!
Before setting up any OSPF configuration over frame relay, make sure the broadcast option is on!
Otherwise, OSPF packets will not be transmitted via frame relay.
R1(config-if)#frame map ip 172.12.123.2 122 broadcast R1(config-if)#frame map ip 172.12.123.3 123 broadcast R1#show frame map Serial0(up): ip 172.12.123.2 dlci 122(0x7A,0x1CA0),static, broadcast, CISCO, status defined, active Serial0(up): ip 172.12.123.3 dlci 123(0x7B,0x1CB0),static, broadcast, CISCO, status defined, active It is not enough just to make sure that R1 has become DR - we must prevent the possibility of becoming DR / BDR for R2 and R3! To do this, change the priority from the default value (1) to 0.
R2(config)#int s0 R2(config-if)#ip ospf priority 0 R3(config)#int s0 R3(config-if)#ip ospf priority 0 The router with the highest priority of the interface on which OSPF is enabled becomes DR. If the priority values are equal, then the identifiers of the routers (RID) are compared, the winner is the highest.
In fact, we cheat with the choice of DR, leaving no chance for spoke-routers, even if the hub disappears! Setting the priority to 0 for spoke-routers does not allow them to become DR if the hub router is restarted.
“NB” in the word NBMA means “non-broadcasting”, so when configuring the hub router, you must manually specify the neighbors, as shown below. For spoke routers this is not required.
R1#conf t Enter configuration commands, one per line. End with CTRL+Z. R1(config)#router ospf 1 R1(config-router)#network 172.12.123.0 0.0.0.255 area 0 R1(config-router)#neighbor 172.12.123.2 R1(config-router)#neighbor 172.12.123.3 R1#show ip ospf interface serial0 Serial0 is up, line protocol is up Internet Address 172.12.123.1/24, Area 0 Process ID 1, Router ID 1.1.1.1, Network Type NON_BROADCAST, Cost: 64 Transmit Delay is 1 sec, State DR, Priority 1 Designated Router (ID) 1.1.1.1, Interface address 172.12.123.1 No backup designated router on this network Timer intervals configured, Hello 30, Dead 120, Wait 120, Retransmit 5 Hello due to 00:00:11 Index 2/2, flood queue length 0 Next 0x0(0)/0x0(0) Last flood scan length is 1, maximum is 2 Last flood scan time is 4 msec, maximum is 4 msec Neighbor Count is 2, Adjacent neighbor count is 2 Adjacent with neighbor 3.3.3.3 Adjacent with neighbor 2.2.2.2 Supress hello for 0 neighbor(s) You may have a NBMA network with DR and BDR, but they both must be hub routers. A network with two hubs can use one as DR, the other as BDR. Each DR or BDR must have statically configured neighbors; this setting is not needed on other routers. (If you have many hub routers, one of them may be BDR).
Notice the hello and dead timers are 30 and 120, respectively. Dead-timer again four times more than hello.
Serial interfaces are by default NBMA, but you can change the type of network OSPF interface with the command ip ospf network .
R1(config-if)#ip ospf network ? broadcast Specify OSPF broadcast multi-access network non-broadcast Specify OSPF NBMA network point-to-multipoint Specify OSPF point-to-multipoint network point-to-point Specify OSPF point-to-point network OSPF Point-To-Point and Point-To-Multipoint Network Types
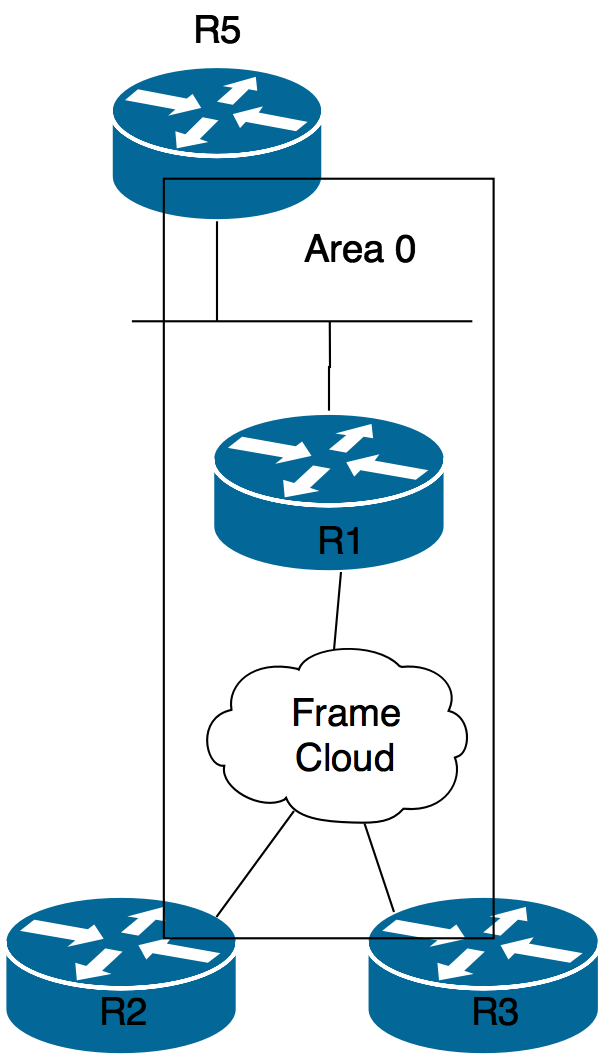
Now we will add a direct connection between R1 and R3, but locate it in zone 13. The subnet number is 172.12.13.0/27. The Serial1 interfaces of both routers are in this zone 13.
All non-backbone zones must have a router with a logical or physical interface in the main zone 0. In zone 13 there are two such routers, so the configuration is correct.
show ip ospf interface serial1 will show this OSPF segment by default for the OSPF network type point-to-point. This output also shows the default hello and dead timers for this type of network - 10 and 40 seconds, respectively.
R1#show ip ospf interface serial1 Serial1 is up, line protocol is up Internet Address 172.12.13.3/27, Area 13 Process ID 1, Router ID 3.3.3.3, Network Type POINT_TO_POINT, Cost: 64 Transmit Delay is 1 sec, State POINT_TO_POINT, Timer intervals configured, Hello 10, Dead 40, Wait 40, Retransmit 5 Hello due to 00:00:08 Index 1/2, flood queue length 0 Next 0x0(0)/0x0(0) Last flood scan length is 1, maximum is 1 Last flood scan time is 0 msec, maximum is 0 msec Neighbor Count is 1, Adjacent neighbor count is 1 Adjacent with neighbor 1.1.1.1 Supress hello for 0 neighbor(s) Note that the list does not include DR and BDR. There are only two routers on the point-to-point link. Therefore, it is not even necessary to have a DR or BDR, and no router will be selected as such.
show ip ospf neighbor shows dashes at the place where the neighbor’s role is usually indicated. The DR / BDR selection process is omitted in point-to-point and point-to-multipoint networks. The neighbor command is usually not needed on these networks. Below, R3 sees R1 as DR in the NBMA network, while it also sees the point-to-point network without a role.
R3#show ip ospf neighbor Neighbor ID Pri State Dead Time Address Interface 1.1.1.1 1 FULL/DR 00:01:46 172.12.123.1 Serial0 1.1.1.1 1 FULL/- 00:00:35 172.12.13.1 Serial1 A dash after FULL / indicates that the neighbor is neither DR, nor BDR, nor DROther, which means that there was no DR / BDR selection process. You will see a similar situation in the OSPF network point-to-multipoint that OSPF perceives as a set of point-to-point channels.
For example, we can go back and reconfigure the frame relay network OSPF as a point-to-multipoint network using the ip ospf network point-to-multipoint network command on the R1 serial interface. DR / BDR will not be selected and the neighbor command is not needed.
Now point-to-multipoint OSPF network offers two options - broadcast and not.
Point-to-Multipoint Broadcast OSPF Configuration
This type of network does not require the neighbor command, but you can determine the cost for a given neighbor.
R1#ip ospf network point-to-multipoint ? non-broadcast Specify non-broadcast point-to-multipoint network <cr> Note that the broadcast option is not available, since the default point-to-multipoint networks are broadcast.
R1(config-if)#router ospf 1 R1(config-router)#neighbor 172.12.123.2 ? cost OSPF cost for point-to-multipoint neighbor database- Filter OSPF LSA during synchronization and flooding for point-to-multipoint filter neighbor poll-interval OSPF dead-router polling interval priority OSPF priority of non-broadcast neighbor <cr> R1(config-router)#neighbor 172.12.123.2 cost ? <1-65535> metric R1(config-router)#neighbor 172.12.123.2 cost 20 Non-Broadcast OSPF Point-To-Multipoint Network
On the other hand, in a non-broadcast point-to-multipoint network, the neighbor command is required. You can add cost to a neighbor, but neighbors must be statically defined for this type of network.
R1(config-if)#ip ospf network point-to-multipoint non-broadcast R1(config-router)#neighbor 172.12.123.2 cost 15 R1(config-router)#neighbor 172.12.123.3 cost 25 Launch OSPF Broadcast Networks over the NBMA Topology
The fact that you can do something does not mean that you should do it!
We should use the ip ospf network broadcast command on all the frame relay network routers, and since the network is fully connected, everything should technically work and the routers will behave as if they were on a LAN network.
In real life, using the broadcast OSPF network in the NBMA segment can lead to unpredictable results, and I personally would not do that.
Why waste time troubleshooting when you can stick to the default settings?
OSPF virtual link
The OSFP settings of the network running through frame relay have been restored to default values for the NBMA network and will remain so until the end of this section.
We will now add router R4 to our network. R4 and R3 will be neighbors through zone 34, R4 will have a loopback interface in zone 4. The subnet address for the segment between R3 and R4 is 172.12.34.0/24, the ethernet segment.

The result of this configuration is incomplete routing tables, which leads us to another type of OSPF network. There are no problems with zone 34 - one of the routers with an interface in this zone also has a physical interface in the main zone (R3).
But in zone 4 there is not a single router with an interface in zone 0. So you need to configure a logical connection with zone 0 - virtual link .
Since router R3 has an interface in zone 0, launching a virtual link between R3 and R4 will allow complete connectivity on the network. The problem is that R1 does not have a route to the loopback R4 interface, despite the fact that this interface was included in OSPF.
R4: router ospf 1 network 4.4.4.4 0.0.0.255 area 4 network 172.23.23.0 0.0.0.31 area 34 R1#show ip route ospf 6.0.0.0/32 is subnetted, 1 subnets O 6.6.6.6[110/11] via 10.1.1.5, 01:05:45, Eternet0 172.23.0.0/27 is subnetted, 1 subnets O IA 172.23.23.0[110/74] via 172.12.123.3, 00:04:14, Serail0 7.0.0.0/32 is subnetted, 1 subnets O 7.7.7.7[110/11] via 10.1.1.5, 01:05:45, Ethernet0 The zone through which the virtual channel passes is called the transit area , it cannot be a stub-zone of any type (stub, total stub, nssa) (If all these names annoy you, don’t worry, there will be a lot of information in this course by him!).
Here are the commands for creating a virtual channel:
R4(config)#router ospf 1 R4(config-router)#area 34 virtual link 3.3.3.3 Virtual circuits must be configured at both ends of the transit zone. We now turn to R3 and complete the configuration.
R3(config)#router ospf 1 2d07h: %OSPF-4-ERRRCV: Recieved invalid packet: mismatch area ID, from backbone area must be virtual-link but not found from 172.23.23.4 Ethernet0 R3(config)#router ospf 1 R3(config-router)#area 34 virtual-link 4.4.4.4 R3(config-router)#^Z 2d07h: %OSPF-5-ADJCHG: Process 1, Nbr 4.4.4.4 on OSPF_VLo from LOADING to FULL, Loading Done And a few more details ...
- The virtual link command uses the remote device's RID, not necessarily the IP address of the interface located in the transit zone. Follow this - this is a very common mistake. Check RID!
- Also, do not worry about error messages in the output of R3 commands, this is normal, you will see such messages until you finish configuring the virtual channel. But if error messages appear after setting up, then you have a problem.
Always check the virtual channel with the show ip ospf virtual-link command. If everything is set up correctly, then it should rise in seconds.
R3#show ip ospf virtual-link Virtual Link OSPF_VLo to router 4.4.4.4 is up Run as demand circuit DoNotAge LSA allowed. Transit area 34, via interface Ethernet0, Cost of using 10 Transmit Delay is 1 sec, State POINT_TO_POINT Timer intervals configured, Hello 10, Dead 40, Wait 40, Retransmit 5 Hello due in 00:00:00 Adjacency State FULL (Hello supressed) Index 2/4, retransmission queue length 1, number of retransmition 1 First 0x2C8F8E(15)/0x0(0) Next 0x2C8F8E(15)/0x0(0) Last retransmission scan length is 1, maximum is 1 Last retramsmission scan time is 0 msec, maximum is 0 msec Link State retransmission due in 3044 msec Virtual channels are easy to set up, but for some reason they scare people. In my experience, the error message, as for router R3, causes a panic, but all that means such a message is only that the configuration of the virtual channel is not complete.
Knowledge dispel fear and panic.
99% errors when setting up a virtual channel cause the following actions:
--use of wrong RID value
- an attempt to use the stub-zone as a transit
- error while configuring authentication for virtual channel, in case when zone 0 uses authentication.
This third case is highlighted. The latter is always forgotten! A virtual channel is an extension of zone 0, and if zone 0 uses authentication, it must be configured for the virtual channel too.
In this section, we looked at a lot of OSPF commands, but don't forget your old friend — show ip protocols . Whatever the network type, this command will show you routed networks, authentication information for the channel, and more. This is a great command to start troubleshooting for any routing protocol.
R3#show ip protocols Routing Protocol is "ospf 1" Outgoing update filter list for all interfaces is not set Incoming update filter list for all interfaces is not set Router ID 3.3.3.3 It is an area border router Number of areas in this router is 3. 3 normal 0 stub 0 nssa Maximum path: 4 Routing for networks: 172.12.13.0 0.0.0.31 area 13 172.12.123.0 0.0.0.255 area 0 172.23.23.0 0.0.0.31 area 34 Routing Information Sources: Gateway Distance Last Update 4.4.4.4 110 00:28:41 8.8.8.8 110 00:28:41 1.1.1.1 110 00:28:41 3.3.3.3 110 00:35:30 Distance: (default is 110) github .
Source: https://habr.com/ru/post/264633/
All Articles