OTRS 4.0.10. We put on Ubuntu + AD + Kerberos + SSO (Part One)
Vidu that the article and so it turned out too big, and besides, I want to add to it her a couple of nuances break it into several parts, and I will publish further additions as separate parts.
Part One: System Preparation
Part Two: Installing and Configuring OTRS
Part three: fix the shoals fasten buns
Any sufficiently large organization sooner or later faces the need to introduce a ticket or helpdesk system. And our organization is no exception, in connection with which the management has been tasked to select and implement a system.
')
Frankly speaking, there were no doubts about the choice, for personal reasons the choice fell on OTRS. Powerful and flexible with a huge number of reports that management loves so much. But as it turned out, to introduce it is a completely non-trivial task. The torture lasted for two weeks, tons of information were shoveled, a bunch of different manuals were tried, and I had the impression that I was either a complete idiot or one of two, because in all the manuals and in a bunch of reviews they all said in one voice that everything worked and was well placed and is configured, but I do not like.
In fact, the problem with all these manuals is that everything seems to be the same as yours, but somewhere a little bit the wrong version of the package, a little bit less structured AD, etc. That's because of all these little almost does not fold the stone flower. In a word, by trial and error, reading the documentation and analyzing manuals, I developed my own, quite working method, which I would like to explain.
Here is the standard set of requirements, as I already said, corporate mail and Jabber work in the network, and an additional requirement was to integrate OTRS and with them too. But since the article turned out so great about integrating OTRS with them, I’ll tell you when I will write about them.
In fact, it is not difficult to put OTRS and even integrates with AD at times, the whole snag was in pass-through authorization or (SSO). A bunch of manuals were found on the network in this regard, but none came up to me for various reasons, in one OTRS was installed on Windows, in the other too old version of OTRS, in the third one used an adapter module written by who and when.
In general, I will say that there are 4 ways to implement pass-through authorization.
Here is the last in my opinion (and I think many will agree with me) is the most correct and safe. So, the source data:
Another configuration is also possible from the OTRS config. You will understand how to configure it for other locations of users and agents.
The OTRS server will read the information from LDAP on behalf of the user otrs.admin, for the period of the configuration we will give it domain administrator rights, after the configuration we will select them and even the right to log in on the machines, it just needs to be able to read the information from LDAP.
At the final stage, the installation will ask if we want to preinstall any software, choose the installation of the OpenSSH server.
We agree to accept the key and enter the password for helpdesk
Raise rights to root
! ATTENTION! All further actions are performed from su, and after system reboots, we do not forget to again raise the rights to root.
We check the relevance of the information in the / etc / hostname and / etc / hosts files: in the first one there should be the name of our machine in large letters, in the second there should be an entry like: 127.0.0.1 helpdesk.domain.ru helpdesk
If something is wrong - fix it. Now we try to ping all domain controllers by IP, full and abbreviated name. Must ping for everyone. If not, we understand the network settings.
for the inexperienced, you can execute commands in turn
An excellent article on this subject is on the Ubuntu tech support site: help.ubuntu.ru/wiki/%D0%B2%D0%B2%D0%BE%D0%B4_%D0%B2_%D0%B4%D0%BE%D0% BC% D0% B5% D0% BD_windows
Put the necessary packages:
It is very important for Kerberos to work so that the clock on the computers goes synchronously and the time difference does not exceed 5 minutes. Configure time synchronization with the domain controller in the /etc/ntp.conf file
As the name implies, the file is responsible for setting the ntp daemon, which periodically adjusts the system clock. The time server is set by the server directive, so we need to comment out all the lines indicating the time servers that are there and enter our own.
We comment on all the deadlines starting with server:
And we write our own:
I have two domain controllers and an exact time service is raised on each one. After that, save the file and restart the daemon with the new settings:
The output should be:
The daemon is launched with new settings and synchronizes the clock. Kerberos is configured by editing the krb5.conf file:
First of all, let's turn on the logs, for this we will add a section to the very beginning of the file:
And then we need to explain kerberos in which domain (in Kerberos terminology - in which realm) it works and who rules this realm. To do this, rule the sections:
Now we need to check the performance of our config, for this we will try to get a kerberos ticket in the domain for some user:
After that, she will request a password and try to get a ticket. If everything went well, the command will remain silent, that is, the output will be empty. Something like this:
Check if we got the ticket, enter:
And we see something like this:
As you can see, we received the ticket successfully and everything is OK. So the config works. Now we crash the ticket until we need it.
The output is also empty, and that means the ticket has been destroyed (note that the command destroys ALL tickets in the cache).
To do this, edit the file /etc/samba/smb.conf :
Here we rule the [global] section:
Check the configuration correctness with the command:
The output will be something like this:
By pressing Enter, we will see the compiled smb.conf (that is, no comments):
The message “rlimit_max: increasing rlimit_max (1024) to minimum Windows limit (16384)” occurs due to the difference in the pool of limits between Windows and Ubuntu, we will get rid of it a little later, when we correct the limits.
Now we try to directly enter the domain. To do this, execute the command:
She first asks for the user's password and if everything is OK, then the output will be like this:
You can check the correctness of connection to the domain with the command:
Her output should be:
You can check the settings at this stage by trying to index the shared resources of any machine in the domain. We get a ticket:
And we try to look at the resources of any machine, for example a file server:
The -k key says that you need to use kerberos, File-server is the name of the machine in the domain that has shared resources. In the output of the command, you should see a list of common resources of the specified machine, if yes, everything is ok, so far everything has been done correctly. Then we destroy the tickets with the command:
To do this, we rule the same /etc/samba/smb.conf and add the following lines to the [global] section:
We check the correctness of our configuration:
And if everything is ok, we restart the daemons (in exactly the following sequence):
If the services are restarted, the normal output will be approximately as follows:
Do you have the same? Then we go further. It's time to fix the limits on which the samba swears. They are governed in the /etc/security/limits.conf file. It is necessary to add two lines to the end of the file:
After this operation, you must restart the machine:
or
Who like?
After the reboot, check if our machine has established a trust relationship with the domain:
The output should be like this:
Let me remind you that all commands are executed by root. At first, I had a gag at this stage, because after the reboot I forgot to raise the rights to su. All secrets (tickets, etc.) are stored in samba databases /var/lib/samba/private/*.tdb which only root can access. So do not forget after the reboots to increase the rights and all commands are executed from the superuser. We also check that winbind sees users and groups in the domain:
and
Since we’ve entered the machine into the domain, we’ll add the ability to log in to the machine under the domain accounts. To do this, add the winbind data source in the /etc/nsswitch.conf file. It will also give us the opportunity to work with domain users as local, and therefore assign them as owners of objects and give access rights. That will give the opportunity to raise the balls on the Linux machine. Here are the lines:
to mind
It is also recommended to add a line to the end of the file:
This stage is checked by querying the list of users and groups:
and
In the output, we are looking for domain users and groups, and if we find them, then everything is ok. And the last thing: let's give the opportunity to open sessions to domain users, in previous versions of Ubunt, non-trivial dances with a percussion instrument were needed for this, but now PAM.D does a great job with our task, we add the line to the /etc/pam.d/common-session file :
Now reboot and try to log in under the domain register, if it works, then all the previous steps are done correctly.
I spent the next 3 stages for 2 weeks, until I figured out what was happening. As is often the case, everything turned out to be quite simple and started up the first time; it was just necessary to analyze a ton of information and put it into a single sequence
At this three stages , this article helped me a lot.
So, the Kerberos protocol, is a network authentication protocol based on the principle of trust to a third party, the directory says so to us. What does it mean? This means that in the authentication process there is a third party that the interaction participants trust by default, such a party is called the Key Distribution Center, if the client sends a message to the KDC before the server goes to the server, and the KDC sends the session copy to each participant in the session key, valid for a short period of time. The purpose of these keys is to authenticate the client and server.
For people familiar with cryptography, I’ll say that the entire Kerberos mechanism slightly more than completely copies the PKI mechanism. In fact, he is only sharpened for other tasks. Only instead of the certificate authority in this case is the Key Distribution Center (KDC). Usually located on a domain controller.
The new word “principled”, in the terminology of Kerberos, is the name of the participants in the network interaction, that is, those who apply to the KDC for keys.
You can perform this step in two ways, complicated and simpler. For some reason, all the manuals on the network describe a more complicated method, namely, creating a Kerberos key on a domain controller using the ktpass utility (a terrible beast with an incredible number of keys) and then copying it to a Linux machine. I do not deny the canonical correctness of this path, but if you please, the command is obtained in several lines and I did not comprehend Zen when using it.
As it turned out, there is a simpler way - creating a key directly on a Linux machine. In the network, I found only one mention of it, maybe I looked badly, but it works.
Also, in order to control the accuracy at this stage, we will need to do something on the domain controller.
First we go to the controller and open the “AD-users and computers” snap-in, open the container with computers and look for our Linux-machine, it should appear there after we included it into the domain. Found - approx. Go ahead.
Now we need an ADSI editor, open the command line, type:
And click inter. We see the console tree copying the AD console in its structure. Here we find our car, open its properties and look for the servicePrincipalName attribute in the list. Now there should be two entries of the type HOST / hepldesk.domain.ru and HOST / helpdesk .
Both start on HOST in one full in another abbreviated name of our machine, this means that now our machine is HOST, that is, an ordinary machine in the domain.
Now we go to the Linux machine and execute the command:
The output of the command is empty, but after execution the file /etc/krb5.keytab should be created, or any other one, depending on what you specified in the smb.conf file in the dedicated keytab file directive . But after all, OTRS, this is a web application and our Linux machine will provide http services, which means we need to add HTTP as well. No sooner said than done:
If you now look at the list of principals, in the properties of the machine on the domain, you will notice that there are two more added - " HTTP / helpdesk.domain.ru " and " HTTP / helpdesk " (a small nuance: the information in the ADSI Edit window is not updated automatically, so close the properties of the machine, press F5 and open them again).
In principle, this already means that the addition was successful. However, let's see what is now in the keytab:
For complete confidence, you can get a Kerberos ticket from the KDC for the newly established principals:
We look tickets team:
The output will be a complete list of tickets currently available, and among them should be HTTP tickets, if there is, then everything is OK, and if you are not a perfectionist, you can proceed to the next step.
And for the rest I will say, I am just a perfectionist and I consider it somewhat incorrect to store all the keys in one file, let's select everything related to HTTP into a separate key file. You can do this with the help of ktutil . It does not support advanced editing functions, so it can be launched via rlwrap .
Load the containment of the keytab file:
Let's see what we have now in it:
We are interested in everything that starts with HTTP, we delete everything that is superfluous:
It should be something like this:
Now save all that remains in a separate file:
And exit the utility:
Excellent manual for setting up services in Ubuntu 14 here
.
I don’t know how for you, but for me if the web server is LAMP , so we put the whole stack at once, especially since we already need MySQL and Apache, and php has a convenient function phpinfo (); with which we will monitor environment variables.
During the installation of the mysql-server, it will ask you to set a password for the mysql superuser ( root @ localhost ), ask not to be confused with the system superuser, even though they are both root , they are different users. Although no one forbids to specify the same passwords for them. So we indicate this password and remember it, we will still need it.
After all the packages have been delivered, we will need to configure MySQL a little at once, to do this, open the /etc/mysql/my.cnf file:
We find two lines in the file indicating the maximum size of received packets. Lines begin with max_allowed_packet . By default, this item is set to 16 megabytes, change to 20 MB in both lines:
And you also need to change the size of the log file innodb , as I understand it is an analogue of the transaction log in MS SQL. To do this, find the following string:
And after it add one more line of the following content:
You can do more, but OTRS recommends just such a volume. Now a little nuance: while the old log files are there, MySQL will not be able to create new files and increase their volume accordingly, so go to the / var / lib / mysql folder and delete or move wherever you are (better to move, always have time to delete) two files with names like ib_logfile0 and ib_logfile1 .
Now restart MySQL:
We check that in place of the old log files, new ones of increased volume have been created, then everything is OK. After that, open the browser on the next machine and go to the helpdesk address, the Apache2 start page should open. Opened? So everything is OK — Apache is installed.
We will explain to Apache what to do with PHP and PERL scripts. To do this, we will uncomment the 220th AddHandler line in the /etc/apache2/mods-enabled/mime.conf file and bring it to the form:
And just add another one of this type:
Now turn on the php5, perl and cgi modules, and then restart Apache:
Now check if everything works. To do this, create two directories in / var / www / html :
And create a test file in each:
We fill the first file (index.php) as follows:
In the second we write the following:
Set rights:
And another nuance: it is necessary to explain to the Apache that in the / var / www / html / perl / directory there are scripts and he can execute them. To do this, add to the /etc/apache2/sites-available/000-default.conf file after the line DocumentRoot, here is the following block:
And restart apachephp5:
Now we try to open the helpdesk / perl / index.cg i and helpdesk / php / index.php addresses in the browser. Should open, pay attention in the php script there is a small block, placed at the very top of the page, the current date, and several environment variables, this block is still useful to us when we debug Kerberos - authentication.
Also, by the short name the page may not open and you will have to enter the full computer name, that is, helpdesk.domain.ru/php/index.php and helpdesk.domain.ru/perl/index.cgi . I will not consider how to fix this, especially since this topic is not very relevant, I can only say that you need to dig in the direction of the DNS and Apache settings.
With this item, everything should be even easier. We put the module:
Turn it on:
Restart Apache:
php- ( , php- , ). /etc/apache2/sites-available/000-default.conf perl php:
Kerberos:
Apache:
helpdesk/php/index.php , . . Remote_user, Auth_type Auth_user, . Kerberos .
, , , .
/etc/apache2/sites-available/000-default.conf :
on
:
IE helpdesk helpdesk.domain.ru :

Windows.
IE : , .
Mozilla Firefox, . «about:config», — «network.neg». , .
helpdesk/php/index.php , , . .
! ATTENTION! !
Part One: System Preparation
Part Two: Installing and Configuring OTRS
Part three: fix the shoals fasten buns
Instead of introducing
Any sufficiently large organization sooner or later faces the need to introduce a ticket or helpdesk system. And our organization is no exception, in connection with which the management has been tasked to select and implement a system.
')
Frankly speaking, there were no doubts about the choice, for personal reasons the choice fell on OTRS. Powerful and flexible with a huge number of reports that management loves so much. But as it turned out, to introduce it is a completely non-trivial task. The torture lasted for two weeks, tons of information were shoveled, a bunch of different manuals were tried, and I had the impression that I was either a complete idiot or one of two, because in all the manuals and in a bunch of reviews they all said in one voice that everything worked and was well placed and is configured, but I do not like.
In fact, the problem with all these manuals is that everything seems to be the same as yours, but somewhere a little bit the wrong version of the package, a little bit less structured AD, etc. That's because of all these little almost does not fold the stone flower. In a word, by trial and error, reading the documentation and analyzing manuals, I developed my own, quite working method, which I would like to explain.
Baseline and Requirements
- In an organization, AD is raised on two Win2008r2 controllers, and since this is so, then integration with AD is needed, since in my opinion, the integration of everything and everything, especially with LDAP "is the true way"
- Many services (such as mail and Jabber) are raised on Linux, and Ubuntu Server 14.04 is chosen as the OS, and since OTRS is OpenSource, then in my opinion, it will be installed on the proprietary OS, so I will install it on Ubuntu. By the way, if it will be interesting in the following articles, I’ll try to tell you about my experience in raising these services and integrating them with AD and OTRS. (The integration of OTRS and Jabber is generally a very cool and useful thing)
- The ability to quickly pick up on the machine file scanner for scanning a little bit, etc.
- And finally, since we have AD, and when the computer is turned on, the user still enters his password and the system already at this stage knows who works in the system, then it would be necessary to save him of unnecessary passwords and logins and implement pass-through authorization.
Here is the standard set of requirements, as I already said, corporate mail and Jabber work in the network, and an additional requirement was to integrate OTRS and with them too. But since the article turned out so great about integrating OTRS with them, I’ll tell you when I will write about them.
In fact, it is not difficult to put OTRS and even integrates with AD at times, the whole snag was in pass-through authorization or (SSO). A bunch of manuals were found on the network in this regard, but none came up to me for various reasons, in one OTRS was installed on Windows, in the other too old version of OTRS, in the third one used an adapter module written by who and when.
In general, I will say that there are 4 ways to implement pass-through authorization.
- The first is SSPI, but it does not fit, because it is a module for OTRS under Windows
- The second is the self-written ADSSO module, in fact just a doped LDAP authorization module, which in my opinion is a crutch.
- The third is again a self-written NTLM authorization module for OTRS, which is also a crutch.
- And the last is the regular OTRS HTTPBasicAuth module in a company with Kerberos authentication.
Here is the last in my opinion (and I think many will agree with me) is the most correct and safe. So, the source data:
- Network 192.168.0.0/16
- Domain DOMAIN.RU
- Domain controllers on them and DNS and NTP
- PDC - ad1.domain.ru (192.168.10.1)
- SDC - ad2.domain.ru (192.168.10.2)
- GATE 192.168.10.10
- All domain users are in the organization unit ORGANIZATION within which are scattered in groups.
- A group of OTRSagents has been created, which includes service workers, that is, those who receive applications (in the terminology of OTRS "Agents").
- Clients, that is, those who send applications (in the terminology of OTRS “Kustomer”) will be all domain users without exception.
Another configuration is also possible from the OTRS config. You will understand how to configure it for other locations of users and agents.
The OTRS server will read the information from LDAP on behalf of the user otrs.admin, for the period of the configuration we will give it domain administrator rights, after the configuration we will select them and even the right to log in on the machines, it just needs to be able to read the information from LDAP.
1. Preparation of the system
1.1 Install Ubuntu Server with these settings (these are my settings, you may have other)
- IP: 192.168.10.14
- MASK: 255.255.0.0
- GATE: 192.168.10.10
- DNS: 192.168.10.1 192.168.10.2 8.8.8.8
- NAME: HELPDESK
- USER: helpdesk
- PASS: strongpass
At the final stage, the installation will ask if we want to preinstall any software, choose the installation of the OpenSSH server.
1.2. We cling on SSH to the new server
ssh 192.168.10.14 -l helpdesk We agree to accept the key and enter the password for helpdesk
Raise rights to root
sudo su ! ATTENTION! All further actions are performed from su, and after system reboots, we do not forget to again raise the rights to root.
We check the relevance of the information in the / etc / hostname and / etc / hosts files: in the first one there should be the name of our machine in large letters, in the second there should be an entry like: 127.0.0.1 helpdesk.domain.ru helpdesk
If something is wrong - fix it. Now we try to ping all domain controllers by IP, full and abbreviated name. Must ping for everyone. If not, we understand the network settings.
1.3. Update and install mc
apt-get update && apt-get -y upgrade && apt-get install -y mc for the inexperienced, you can execute commands in turn
apt-get update apt-get -y upgrade apt-get install -y mc 2. Enter the machine in the domain and set up domain authorization. Configuring Samba, Kerberos and Winbind.
An excellent article on this subject is on the Ubuntu tech support site: help.ubuntu.ru/wiki/%D0%B2%D0%B2%D0%BE%D0%B4_%D0%B2_%D0%B4%D0%BE%D0% BC% D0% B5% D0% BD_windows
2.1. Install and configure Kerberos
Put the necessary packages:
apt-get install krb5-user samba winbind libpam-krb5 libpam-winbind libnss-winbind ntp smbclient rlwrap It is very important for Kerberos to work so that the clock on the computers goes synchronously and the time difference does not exceed 5 minutes. Configure time synchronization with the domain controller in the /etc/ntp.conf file
As the name implies, the file is responsible for setting the ntp daemon, which periodically adjusts the system clock. The time server is set by the server directive, so we need to comment out all the lines indicating the time servers that are there and enter our own.
mcedit /etc/ntp.conf We comment on all the deadlines starting with server:
#server 0.ubuntu.pool.ntp.org #server 1.ubuntu.pool.ntp.org #server 2.ubuntu.pool.ntp.org #server 3.ubuntu.pool.ntp.org # Use Ubuntu's ntp server as a fallback. #server ntp.ubuntu.com And we write our own:
server 192.168.10.1 server 192.168.10.2 I have two domain controllers and an exact time service is raised on each one. After that, save the file and restart the daemon with the new settings:
service ntp restart The output should be:
root@HELPDESK:/home/helpdesk# service ntp restart * Stopping NTP server ntpd [ OK ] * Starting NTP server ntpd [ OK ] The daemon is launched with new settings and synchronizes the clock. Kerberos is configured by editing the krb5.conf file:
mcedit /etc/krb5.conf First of all, let's turn on the logs, for this we will add a section to the very beginning of the file:
[logging] default = FILE:/var/log/krb5libs.log kdc = FILE:/var/log/krb5kdc.log admin_server = FILE:/var/log/kadmind.log And then we need to explain kerberos in which domain (in Kerberos terminology - in which realm) it works and who rules this realm. To do this, rule the sections:
[libdefaults] default_realm = DOMAIN.RU #( ) [realms] # DOMAIN.RU = { #. . kdc = ad1.domain.ru # kdc = ad2.domain.ru #. , admin_server = ad1.domain.ru admin_server = ad2.domain.ru default_domain = domain.ru } [domain_realm] # .domain.ru = DOMAIN.RU # () domain.ru = DOMAIN.RU Now we need to check the performance of our config, for this we will try to get a kerberos ticket in the domain for some user:
kinit username@DOMAIN.COM # username — , ! ! After that, she will request a password and try to get a ticket. If everything went well, the command will remain silent, that is, the output will be empty. Something like this:
root@HELPDESK:/home/helpdesk# kinit otrs.admin@DOMAIN.RU Password for otrs.admin@DOMAIN.RU: root@HELPDESK:/home/helpdesk# Check if we got the ticket, enter:
klist And we see something like this:
root@HELPDESK:/home/helpdesk# klist Ticket cache: FILE:/tmp/krb5cc_0 Default principal: test@DOMAIN.RU Valid starting Expires Service principal 10.08.2015 15:46:01 11.08.2015 01:46:01 krbtgt/DOMAIN.RU@DOMAIN.RU renew until 11.08.2015 15:45:57 As you can see, we received the ticket successfully and everything is OK. So the config works. Now we crash the ticket until we need it.
Kdestroy The output is also empty, and that means the ticket has been destroyed (note that the command destroys ALL tickets in the cache).
2.2 It's time to configure SAMBA and join the domain.
To do this, edit the file /etc/samba/smb.conf :
mcedit /etc/samba/smb.conf Here we rule the [global] section:
[global] # , workgroup # , realm - workgroup = RUS realm = DOMAIN.RU # AD security = ADS encrypt passwords = true # dns proxy = no socket options = TCP_NODELAY # , , # , domain master = no local master = no preferred master = no os level = 0 domain logons = no # load printers = no show add printer wizard = no printcap name = /dev/null disable spoolss = yes Check the configuration correctness with the command:
testparm The output will be something like this:
Load smb config files from /etc/samba/smb.conf rlimit_max: increasing rlimit_max (1024) to minimum Windows limit (16384) Processing section "[printers]" Processing section "[print$]" Loaded services file OK. Server role: ROLE_DOMAIN_MEMBER Press enter to see a dump of your service definitions By pressing Enter, we will see the compiled smb.conf (that is, no comments):
The message “rlimit_max: increasing rlimit_max (1024) to minimum Windows limit (16384)” occurs due to the difference in the pool of limits between Windows and Ubuntu, we will get rid of it a little later, when we correct the limits.
Now we try to directly enter the domain. To do this, execute the command:
net ads join -U username -D DOMAIN #username - She first asks for the user's password and if everything is OK, then the output will be like this:
Using short domain name -- RUS Joined 'HELPDESK' to dns domain 'domain.ru' You can check the correctness of connection to the domain with the command:
net ads testjoin Her output should be:
Join is OK You can check the settings at this stage by trying to index the shared resources of any machine in the domain. We get a ticket:
kinit username@DOMAIN.COM And we try to look at the resources of any machine, for example a file server:
smbclient -k -L //File-server The -k key says that you need to use kerberos, File-server is the name of the machine in the domain that has shared resources. In the output of the command, you should see a list of common resources of the specified machine, if yes, everything is ok, so far everything has been done correctly. Then we destroy the tickets with the command:
kdestroy 2.3 Configuring Winbind
To do this, we rule the same /etc/samba/smb.conf and add the following lines to the [global] section:
# Winbind. # . idmap config * : range = 10000-20000 idmap config * : backend = tdb # . winbind enum groups = yes winbind enum users = yes # . # , .. username - DOMAIN\username. # , . winbind use default domain = yes # #, , shell' #/bin/false template shell = /bin/bash # Kerberos pam_winbind.so winbind refresh tickets = yes # kerberos # ( # ), «passdb backend = tdbsam» : kerberos method = system keytab dedicated keytab file = /etc/krb5.keytab We check the correctness of our configuration:
testparm And if everything is ok, we restart the daemons (in exactly the following sequence):
service winbind stop service smbd restart service winbind start If the services are restarted, the normal output will be approximately as follows:
root@HELPDESK:/home/helpdesk# service winbind stop winbind stop/waiting root@HELPDESK:/home/helpdesk# service smbd restart smbd stop/waiting smbd start/running, process 4859 root@HELPDESK:/home/helpdesk# service winbind start winbind start/running, process 4871 Do you have the same? Then we go further. It's time to fix the limits on which the samba swears. They are governed in the /etc/security/limits.conf file. It is necessary to add two lines to the end of the file:
* - nofile 16384 root - nofile 16384 After this operation, you must restart the machine:
shutdown -r now or
reboot Who like?
After the reboot, check if our machine has established a trust relationship with the domain:
wbinfo -t The output should be like this:
checking the trust secret for domain DCN via RPC calls succeeded Let me remind you that all commands are executed by root. At first, I had a gag at this stage, because after the reboot I forgot to raise the rights to su. All secrets (tickets, etc.) are stored in samba databases /var/lib/samba/private/*.tdb which only root can access. So do not forget after the reboots to increase the rights and all commands are executed from the superuser. We also check that winbind sees users and groups in the domain:
wbinfo -u and
wbinfo -g 2.4. Well, another bonus
Since we’ve entered the machine into the domain, we’ll add the ability to log in to the machine under the domain accounts. To do this, add the winbind data source in the /etc/nsswitch.conf file. It will also give us the opportunity to work with domain users as local, and therefore assign them as owners of objects and give access rights. That will give the opportunity to raise the balls on the Linux machine. Here are the lines:
passwd: compat group: compat to mind
passwd: compat winbind group: compat winbind It is also recommended to add a line to the end of the file:
files: dns mdns4_minimal[NotFound=return] mdns4 This stage is checked by querying the list of users and groups:
getent passwd and
getent group In the output, we are looking for domain users and groups, and if we find them, then everything is ok. And the last thing: let's give the opportunity to open sessions to domain users, in previous versions of Ubunt, non-trivial dances with a percussion instrument were needed for this, but now PAM.D does a great job with our task, we add the line to the /etc/pam.d/common-session file :
session optional pam_mkhomedir.so skel=/etc/skel/ umask=0077 Now reboot and try to log in under the domain register, if it works, then all the previous steps are done correctly.
3. Create a Kerberos key and add HTTP principality to the domain.
I spent the next 3 stages for 2 weeks, until I figured out what was happening. As is often the case, everything turned out to be quite simple and started up the first time; it was just necessary to analyze a ton of information and put it into a single sequence
At this three stages , this article helped me a lot.
So, the Kerberos protocol, is a network authentication protocol based on the principle of trust to a third party, the directory says so to us. What does it mean? This means that in the authentication process there is a third party that the interaction participants trust by default, such a party is called the Key Distribution Center, if the client sends a message to the KDC before the server goes to the server, and the KDC sends the session copy to each participant in the session key, valid for a short period of time. The purpose of these keys is to authenticate the client and server.
For people familiar with cryptography, I’ll say that the entire Kerberos mechanism slightly more than completely copies the PKI mechanism. In fact, he is only sharpened for other tasks. Only instead of the certificate authority in this case is the Key Distribution Center (KDC). Usually located on a domain controller.
The new word “principled”, in the terminology of Kerberos, is the name of the participants in the network interaction, that is, those who apply to the KDC for keys.
You can perform this step in two ways, complicated and simpler. For some reason, all the manuals on the network describe a more complicated method, namely, creating a Kerberos key on a domain controller using the ktpass utility (a terrible beast with an incredible number of keys) and then copying it to a Linux machine. I do not deny the canonical correctness of this path, but if you please, the command is obtained in several lines and I did not comprehend Zen when using it.
As it turned out, there is a simpler way - creating a key directly on a Linux machine. In the network, I found only one mention of it, maybe I looked badly, but it works.
Also, in order to control the accuracy at this stage, we will need to do something on the domain controller.
First we go to the controller and open the “AD-users and computers” snap-in, open the container with computers and look for our Linux-machine, it should appear there after we included it into the domain. Found - approx. Go ahead.
Now we need an ADSI editor, open the command line, type:
adsiedit.msc And click inter. We see the console tree copying the AD console in its structure. Here we find our car, open its properties and look for the servicePrincipalName attribute in the list. Now there should be two entries of the type HOST / hepldesk.domain.ru and HOST / helpdesk .
Both start on HOST in one full in another abbreviated name of our machine, this means that now our machine is HOST, that is, an ordinary machine in the domain.
Now we go to the Linux machine and execute the command:
net ads keytab create The output of the command is empty, but after execution the file /etc/krb5.keytab should be created, or any other one, depending on what you specified in the smb.conf file in the dedicated keytab file directive . But after all, OTRS, this is a web application and our Linux machine will provide http services, which means we need to add HTTP as well. No sooner said than done:
net ads keytab add HTTP If you now look at the list of principals, in the properties of the machine on the domain, you will notice that there are two more added - " HTTP / helpdesk.domain.ru " and " HTTP / helpdesk " (a small nuance: the information in the ADSI Edit window is not updated automatically, so close the properties of the machine, press F5 and open them again).
In principle, this already means that the addition was successful. However, let's see what is now in the keytab:
klist -ek /etc/krb5.keytab # keytab Keytab name: FILE:/etc/krb5.keytab KVNO Principal ---- -------------------------------------------------------------------------- 2 host/helpdesk.domain.ru@DOMAIN.RU (DES cbc mode with CRC-32) 2 host/helpdesk.domain.ru@DOMAIN.RU (DES cbc mode with RSA-MD5) 2 host/helpdesk.domain.ru@DOMAIN.RU (ArcFour with HMAC/md5) 2 host/helpdesk@DOMAIN.RU (DES cbc mode with CRC-32) 2 host/helpdesk@DOMAIN.RU (DES cbc mode with RSA-MD5) 2 host/helpdesk@DOMAIN.RU (ArcFour with HMAC/md5) 2 HELPDESK$@DOMAIN.RU (DES cbc mode with CRC-32) 2 HELPDESK$@DOMAIN.RU (DES cbc mode with RSA-MD5) 2 HELPDESK$@DOMAIN.RU (ArcFour with HMAC/md5) 2 HTTP/helpdesk.domain.ru@DOMAIN.RU (DES cbc mode with CRC-32) 2 HTTP/helpdesk.domain.ru@DOMAIN.RU (DES cbc mode with RSA-MD5) 2 HTTP/helpdesk.domain.ru@DOMAIN.RU (ArcFour with HMAC/md5) 2 HTTP/helpdesk@DOMAIN.RU (DES cbc mode with CRC-32) 2 HTTP/helpdesk@DOMAIN.RU (DES cbc mode with RSA-MD5) 2 HTTP/helpdesk@DOMAIN.RU (ArcFour with HMAC/md5) For complete confidence, you can get a Kerberos ticket from the KDC for the newly established principals:
kvno HTTP/web.domain.ru@DOMAIN.RU HTTP/web@DOMAIN.RU HTTP/web.domain.ru@DOMAIN.RU: kvno = 2 HTTP/web@DOMAIN.RU: kvno = 2 We look tickets team:
klist -e The output will be a complete list of tickets currently available, and among them should be HTTP tickets, if there is, then everything is OK, and if you are not a perfectionist, you can proceed to the next step.
And for the rest I will say, I am just a perfectionist and I consider it somewhat incorrect to store all the keys in one file, let's select everything related to HTTP into a separate key file. You can do this with the help of ktutil . It does not support advanced editing functions, so it can be launched via rlwrap .
rlwrap ktutil Load the containment of the keytab file:
ktutil: read_kt /etc/krb5.keytab Let's see what we have now in it:
ktutil: list We are interested in everything that starts with HTTP, we delete everything that is superfluous:
ktutil: delent 1 # 1 It should be something like this:
ktutil: list slot KVNO Principal ---- ---- --------------------------------------------------------------------- 1 2 HTTP/helpdesk.domain.ru@DOMAIN.RU 2 2 HTTP/helpdesk.domain.ru@DOMAIN.RU 3 2 HTTP/helpdesk.domain.ru@DOMAIN.RU 4 2 HTTP/helpdesk.domain.ru@DOMAIN.RU 5 2 HTTP/helpdesk.domain.ru@DOMAIN.RU 6 2 HTTP/HELPDESK@DOMAIN.RU 7 2 HTTP/HELPDESK@DOMAIN.RU 8 2 HTTP/HELPDESK@DOMAIN.RU 9 2 HTTP/HELPDESK@DOMAIN.RU 10 2 HTTP/HELPDESK@DOMAIN.RU Now save all that remains in a separate file:
ktutil: write_kt /etc/httpd.keytab And exit the utility:
quit 4. We put Apache2 and modules. (LAMP) + Perl
Excellent manual for setting up services in Ubuntu 14 here
.
I don’t know how for you, but for me if the web server is LAMP , so we put the whole stack at once, especially since we already need MySQL and Apache, and php has a convenient function phpinfo (); with which we will monitor environment variables.
So let's go. We put Apache
apt-get install mysql-server apache2 php5 libapache2-mod-php5 libapache2-mod-auth-mysql php5-mysql php5-cgi libapache2-mod-php5 php5-common php-pear During the installation of the mysql-server, it will ask you to set a password for the mysql superuser ( root @ localhost ), ask not to be confused with the system superuser, even though they are both root , they are different users. Although no one forbids to specify the same passwords for them. So we indicate this password and remember it, we will still need it.
After all the packages have been delivered, we will need to configure MySQL a little at once, to do this, open the /etc/mysql/my.cnf file:
mcedit /etc/mysql/my.cnf We find two lines in the file indicating the maximum size of received packets. Lines begin with max_allowed_packet . By default, this item is set to 16 megabytes, change to 20 MB in both lines:
max_allowed_packet = 20M And you also need to change the size of the log file innodb , as I understand it is an analogue of the transaction log in MS SQL. To do this, find the following string:
# * InnoDB And after it add one more line of the following content:
innodb_log_file_size = 512M You can do more, but OTRS recommends just such a volume. Now a little nuance: while the old log files are there, MySQL will not be able to create new files and increase their volume accordingly, so go to the / var / lib / mysql folder and delete or move wherever you are (better to move, always have time to delete) two files with names like ib_logfile0 and ib_logfile1 .
Now restart MySQL:
service mysql restart We check that in place of the old log files, new ones of increased volume have been created, then everything is OK. After that, open the browser on the next machine and go to the helpdesk address, the Apache2 start page should open. Opened? So everything is OK — Apache is installed.
Now Perl.
apt-get install perl libapache2-mod-perl2 libdbd-mysql-perl libnet-dns-perl libnet-ldap-perl libio-socket-ssl-perl libpdf-api2-perl libsoap-lite-perl libgd-text-perl libgd-graph-perl libapache-dbi-perl libyaml-libyaml-perl
We will explain to Apache what to do with PHP and PERL scripts. To do this, we will uncomment the 220th AddHandler line in the /etc/apache2/mods-enabled/mime.conf file and bring it to the form:
AddHandler cgi-script .cgi .pl And just add another one of this type:
AddHandler php5-script .php Now turn on the php5, perl and cgi modules, and then restart Apache:
a2enmod php5 a2enmod perl a2enmod cgi service apache2 restart Now check if everything works. To do this, create two directories in / var / www / html :
mkdir /var/www/html/php mkdir /var/www/html/perl And create a test file in each:
touch /var/www/html/php/index.php touch /var/www/html/perl/index.cgi We fill the first file (index.php) as follows:
cat /var/www/html/php/index.php <html> <body> <div style="width: 100%; font-size: 40px; font-weight: bold; text-align:center;"> <?php print Date("Y/m/d"); echo "<br>Path :".$_SERVER['PHP_SELF']; echo "<br>Remote User :".$_SERVER['REMOTE_USER']; echo "<br>Auth type :".$_SERVER['AUTH_TYPE']; echo "<br>Auth User :".$_SERVER['PHP_AUTH_USER']; ?> </div> <?php phpinfo(); ?> </body> </html> In the second we write the following:
cat /var/www/html/perl/index.cgi #!/usr/bin/perl print "Content-type: text/html\n\n"; print "<html>\n<body>\n"; print "<div style=\"width: 100%; font-size: 40px; font-weight: bold; text-align: center;\">\n"; print "CGI Test Page"; print "\n</div>\n"; print "</body>\n</html>\n"; Set rights:
chmod 755 /var/www/html/php/index.php chmod 755 /var/www/html/perl/index.cgi And another nuance: it is necessary to explain to the Apache that in the / var / www / html / perl / directory there are scripts and he can execute them. To do this, add to the /etc/apache2/sites-available/000-default.conf file after the line DocumentRoot, here is the following block:
<Directory "/var/www/html/perl">
AllowOverride All
Options +ExecCGI
Require all granted
And restart apachephp5:
service apache2 restart Now we try to open the helpdesk / perl / index.cg i and helpdesk / php / index.php addresses in the browser. Should open, pay attention in the php script there is a small block, placed at the very top of the page, the current date, and several environment variables, this block is still useful to us when we debug Kerberos - authentication.
Also, by the short name the page may not open and you will have to enter the full computer name, that is, helpdesk.domain.ru/php/index.php and helpdesk.domain.ru/perl/index.cgi . I will not consider how to fix this, especially since this topic is not very relevant, I can only say that you need to dig in the direction of the DNS and Apache settings.
5. Configure Kerberos authentication in Apache2. We check the performance of authentication. Configure transparent authentication.
With this item, everything should be even easier. We put the module:
apt-get install libapache2-mod-auth-kerb Turn it on:
a2enmod auth_kerb Restart Apache:
service apache2 restart php- ( , php- , ). /etc/apache2/sites-available/000-default.conf perl php:
<Directory /var/www/html/php>
AuthType Kerberos
AuthName "Kerberos Authntication"
KrbAuthRealms DOMAIN.RU
Krb5Keytab /etc/httpd.keytab
KrbMethodNegotiate Off
KrbSaveCredentials Off
KrbVerifyKDC Off
Require valid-user
Kerberos:
chmod 644 /etc/httpd.keytab Apache:
service apache2 restart helpdesk/php/index.php , . . Remote_user, Auth_type Auth_user, . Kerberos .
, , , .
/etc/apache2/sites-available/000-default.conf :
KrbMethodNegotiate Off
on
KrbMethodNegotiate On
:
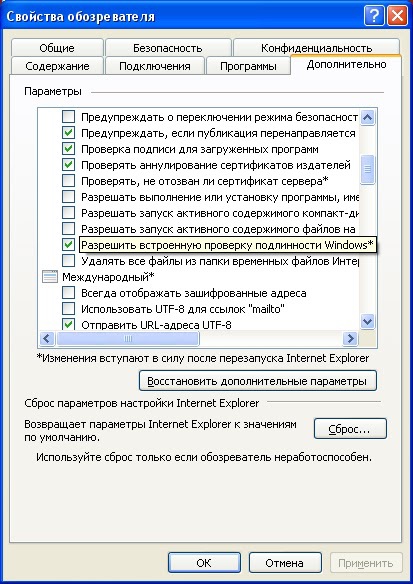
IE
IE helpdesk helpdesk.domain.ru :
Windows.
IE : , .
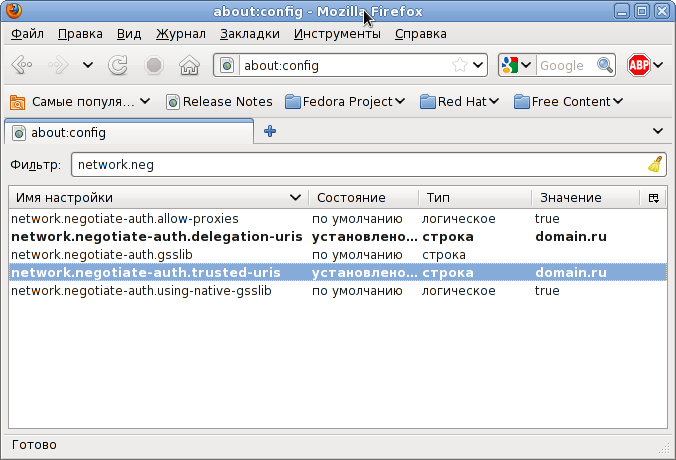
FireFox
Mozilla Firefox, . «about:config», — «network.neg». , .
helpdesk/php/index.php , , . .
! ATTENTION! !
Source: https://habr.com/ru/post/264617/
All Articles