Tutorial: Interactive SVG Cartogram Component for InstantCMS 2
Difficulty: medium.
Time required: 30 min.
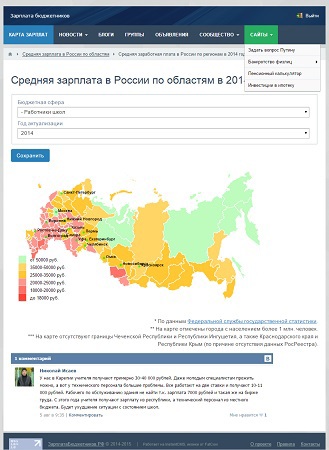
The article provides instructions on how to create your own component for the InstantCMS2 engine. At the end of the article there is a link to the archive with the source code and the contents of all files from this instruction. An example of the appearance of a component that can be created using this tutorial is shown in the illustration (the image is clickable).
To begin with, a few words about the social network / community / blog social social network engine InstantCMS2. This free CMS can be a great compromise, perhaps the best of the existing ones.
The basic version already has a richer functionality than LiveStreet CMS.
I don’t provide a screenshot of the comparison of the functional, because the link provides information not on the latest version of the InstantCMS engine.
')
Of the minuses - the number of modules, additions, those for this engine is quite limited. The quality of technical support is a bit weak. There is no lively active community around this engine, and registration on the forum is by invitation only. But all these disadvantages are more than covered by the fact that the InstantCMS 2 engine is free.
Of the benefits - out of the box is provided immediately: a forum, user profiles with the ability to add to friends, articles, blogs, news, groups, photo albums, static pages of the site. As well as comments, RSS feeds, RSS fields, the ability to customize the main menu, normal moderation and quite convenient admin panel.
Download the InstantCMS 2 engine with the auto-install feature from the official project site.
The installation process is well documented and intuitive.
Let us proceed directly to the question of writing a separate component.
To create a new component, create a folder in which your component will be (let's call it newcomponent) in the \ SiteDirectory \ system \ controllers \ directory, that is, the full address to the created directory will be \ SiteDirectory \ system \ controllers \ newcomponent \ - all letters in component names should be lowercase, this is important!
Further in this folder we create the file frontend.php - this is the main file, without which the component will not work.
In this file we create a class with the same name. The class name matches the folder name. And this class is inherited from the system class cmsFrontend.
In this class, we have the ability to add methods that describe the actions of the component.
What are component actions? Let's take a look at the following image:
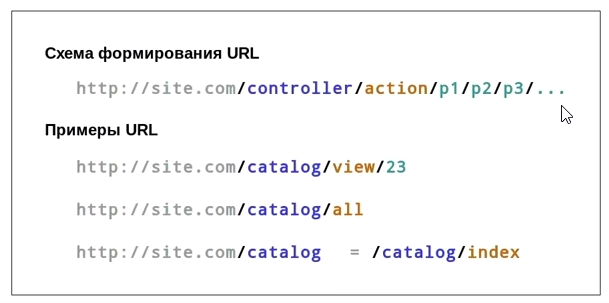
Each page address consists of several segments:
How is the action of the component determined? A public method is defined in the component's class, which is called action Name of the Action with the BigBuk. For the main page of the siteaddress.ru/newcomponent/ component, you must define the actionIndex () method. For the internal page of the siteaddress.ru/newcomponent/act/ component, you need to define the actionAct () method.
The attentive reader has noticed the use of the $ this-> model-> getChoropleth () method.
To use the model's methods in the \ SiteDirectory \ system \ controllers \ newcomponent \ directory, create the model.php file
However, we will read the data from the files, so put a stub here. The description of the model file is for training purposes.
Line $ template-> render ('index'); determines the output of this template, which should be created in the \ SiteDirectory \ templates \ default \ controllers \ newcomponent \ directory. Where \ default is the name of the used theme on the site (you can find and download a new theme from the instantcms community site and change the theme used through the admin area), the folder \ newcomponent will need to be created independently, this is the folder for the new component templates.
The index.tpl.php file should be created in this folder for the main page of the component, and act.tpl.php for the internal one.
The internal component page will contain a form for selecting parameters.
First, create a folder \ forms \ in the folder of our component \ SiteDirectory \ system \ controllers \ newcomponent \.
In the \ SiteDirectory \ system \ controllers \ newcomponent \ forms \ directory create the file form_newForm.php
The form will be very simple, it prompts the user to select two parameters from the drop-down lists.
After that, let's move on to creating a template for the inner page of the / act component — create the file act act.tpl.php and place it in the \ SiteDirectory \ templates \ default \ controllers \ newcomponent \ directory.
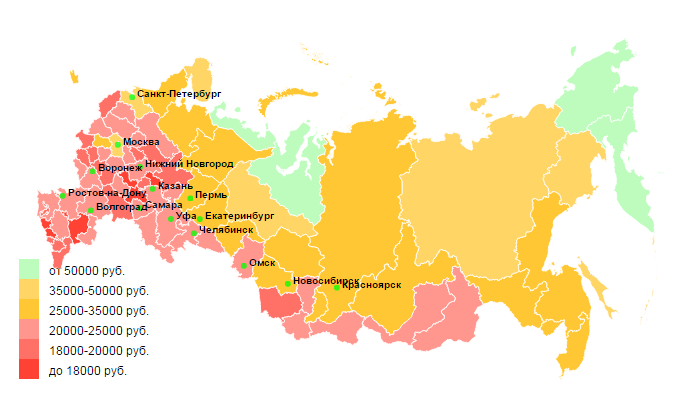
To create a unique service, we will use the development of the KoGor user (taking this opportunity, I want to convey a huge gratitude for the work done by KoGor 'and a well-designed and intuitive article ) - an infogramma of the map of the Russian Federation with regional distribution.
As a result, we should get something like this nice map of Russia:
In order for the card to work, the last step remains. We place the files cities.tsv, russia.json, zarplata-1-1.csv, zarplata-1-2.csv, zarplata-2-1.csv, zarplata-2-2.csv (given in the archive, the link to which is at the end of the article) in the \ SiteDirectory \ upload \ directory.
We go to the address siteaddress.ru/newcomponent/act/ - here all the regions on the map of Russia are tinted with a dark gray color and when you hover, the name of the region appears - NaN. To display any real data, replace the values in the last column of the .csv files with numerical data.
Finally, a small hint. In the default default template in InstantCMS 2, the sidebar along with the action menu disappears as the width of the browser window decreases. But on mobile devices, the disappearance of the sidebar and the action menu is not very convenient, because Users have lost quite a lot of possible actions. To change this situation, you can do the following. Locate the theme-layout.css file in the \ templates \ default \ css \ directory and replace a piece of code in it
on
Those. in fact, only 2 lines need to be corrected. #body aside {display: none; } on #body aside {width: 100%! important; } - after that, the sidebar will move down to the main column after the content in it (before the footer) when the width of the browser decreases.
All the described scripts and files can be downloaded in the archive , which you just need to download and unpack to the root directory of your website running on InstantCMS2.
PS For any typos, errors or inaccuracies, please write to private messages.
Time required: 30 min.
The article provides instructions on how to create your own component for the InstantCMS2 engine. At the end of the article there is a link to the archive with the source code and the contents of all files from this instruction. An example of the appearance of a component that can be created using this tutorial is shown in the illustration (the image is clickable).
To begin with, a few words about the social network / community / blog social social network engine InstantCMS2. This free CMS can be a great compromise, perhaps the best of the existing ones.
The basic version already has a richer functionality than LiveStreet CMS.
I don’t provide a screenshot of the comparison of the functional, because the link provides information not on the latest version of the InstantCMS engine.
')
Pros and Cons of InstantCMS2
Of the minuses - the number of modules, additions, those for this engine is quite limited. The quality of technical support is a bit weak. There is no lively active community around this engine, and registration on the forum is by invitation only. But all these disadvantages are more than covered by the fact that the InstantCMS 2 engine is free.
Of the benefits - out of the box is provided immediately: a forum, user profiles with the ability to add to friends, articles, blogs, news, groups, photo albums, static pages of the site. As well as comments, RSS feeds, RSS fields, the ability to customize the main menu, normal moderation and quite convenient admin panel.
Download the InstantCMS 2 engine with the auto-install feature from the official project site.
The installation process is well documented and intuitive.
Own component for InstantCMS2
Let us proceed directly to the question of writing a separate component.
To create a new component, create a folder in which your component will be (let's call it newcomponent) in the \ SiteDirectory \ system \ controllers \ directory, that is, the full address to the created directory will be \ SiteDirectory \ system \ controllers \ newcomponent \ - all letters in component names should be lowercase, this is important!
Further in this folder we create the file frontend.php - this is the main file, without which the component will not work.
In this file we create a class with the same name. The class name matches the folder name. And this class is inherited from the system class cmsFrontend.
In this class, we have the ability to add methods that describe the actions of the component.
What are component actions? Let's take a look at the following image:
Each page address consists of several segments:
- / controller - The name of the component.
- / action - The name of the action. Each component can have several actions within itself.
- / p1 / p2 / p3 / ... - Any number of parameters required for this action.
How is the action of the component determined? A public method is defined in the component's class, which is called action Name of the Action with the BigBuk. For the main page of the siteaddress.ru/newcomponent/ component, you must define the actionIndex () method. For the internal page of the siteaddress.ru/newcomponent/act/ component, you need to define the actionAct () method.
Frontend.php file
<?php class newcomponent extends cmsFrontend { public function actionIndex() { $template = cmsTemplate::getInstance(); $template->render('index'); } public function actionAct() { $errors = false; $form = $this->getForm('newForm'); $is_submitted = $this->request->has('submit'); $newForm = $form->parse($this->request, $is_submitted); if ($is_submitted){ $errors = $form->validate($this, $newForm); if (!errors) { $choropleth = $this->model->getChoropleth($newForm); } if (!errors) { cmsUser::addSessionMessage(LANG_FORM_ERRORS, 'error'); } } $template = cmsTemplate::getInstance(); $template->render('act', array( 'form' => $form, 'errors' => $errors, 'newForm' => $newForm )); } } ?> The attentive reader has noticed the use of the $ this-> model-> getChoropleth () method.
To use the model's methods in the \ SiteDirectory \ system \ controllers \ newcomponent \ directory, create the model.php file
However, we will read the data from the files, so put a stub here. The description of the model file is for training purposes.
File model.php
<?php class modelNewComponent extends cmsModel { public function getChoropleth($average_zarplata) { $choropleth = array(); return $choropleth; } } ?> Line $ template-> render ('index'); determines the output of this template, which should be created in the \ SiteDirectory \ templates \ default \ controllers \ newcomponent \ directory. Where \ default is the name of the used theme on the site (you can find and download a new theme from the instantcms community site and change the theme used through the admin area), the folder \ newcomponent will need to be created independently, this is the folder for the new component templates.
The index.tpl.php file should be created in this folder for the main page of the component, and act.tpl.php for the internal one.
File index.tpl.php
<?php $this->setPageTitle(' '); $this->addBreadcrumb(' '); $this->addToolButton(array( 'class' => 'item', 'title' => ' ', 'href' => $this->href_to('act') )); ?> <h1> </h1> <p> </p> The internal component page will contain a form for selecting parameters.
First, create a folder \ forms \ in the folder of our component \ SiteDirectory \ system \ controllers \ newcomponent \.
In the \ SiteDirectory \ system \ controllers \ newcomponent \ forms \ directory create the file form_newForm.php
The form will be very simple, it prompts the user to select two parameters from the drop-down lists.
File form_newForm.php
<?php class formNewcomponentnewform extends cmsForm { public function init() { return array( array( 'type' => 'fieldset', 'childs' => array ( new fieldList('par1', array( 'title' => '1', 'items' => array ( "1" => "1", "2" => "2" ) )), new fieldList('par2', array( 'title' => '2', 'items' => array ( 1 => "1", 2 => "2" ) )) ) ) ); } } ?> Interactive SVG Cartogram
After that, let's move on to creating a template for the inner page of the / act component — create the file act act.tpl.php and place it in the \ SiteDirectory \ templates \ default \ controllers \ newcomponent \ directory.
To create a unique service, we will use the development of the KoGor user (taking this opportunity, I want to convey a huge gratitude for the work done by KoGor 'and a well-designed and intuitive article ) - an infogramma of the map of the Russian Federation with regional distribution.
As a result, we should get something like this nice map of Russia:
File act.tpl.php
<?php $this->setPageTitle(' '); $this->addBreadcrumb(' ', $this->href_to('')); $this->addBreadcrumb(' '); $arr_par1_id = array('1' => 1 , '2' => 2 ); $filename='/upload/zarplata-'.$arr_par1_id[$_GET['par1']].'-'.$_GET['par2'].'.csv'; if (!isset ($_GET['par1']) || !isset ($_GET['par2'])) $filename='/upload/zarplata-1-1.csv'; $this->renderForm($form, $newForm, array( 'action' => '', 'method' => 'get', 'toolbar' => false ), $errors); ?> <script type="text/javascript" src="http://d3js.org/d3.v3.min.js"></script> <script type="text/javascript" src="http://d3js.org/queue.v1.min.js"></script> <script type="text/javascript" src="http://d3js.org/topojson.v0.min.js"></script> <!-- <script type="text/javascript" src="http://d3js.org/topojson.v1.min.js"></script> --> <style> path { stroke:white; stroke-width: 1px; } body { font-family: Arial, sans-serif; } .city { font: 10px sans-serif; font-weight: bold; } .legend { font-size: 12px; } div.tooltip { position: absolute; text-align: center; width: 150px; height: 25px; padding: 2px; font-size: 10px; background: #FFFFE0; border: 1px; border-radius: 8px; pointer-events: none; } </style> <script type="text/javascript"> var width = 720, height = 375; // Setting color domains(intervals of values) for our map var color_domain = [10000, 15000, 20000, 30000, 50000] var ext_color_domain = [0, 10000, 15000, 20000, 30000, 50000] var legend_labels = [" 10000 .", "10000-15000 .", "15000-20000 .", "20000-30000 .", "30000-50000 .", " 50000 ."] var color = d3.scale.threshold() .domain(color_domain) .range(["#ff1300", "#ff4e40", "#ff7d73", "#ffba00", "#ffcb40", "#adfcad"]); var div = d3.select("form").append("div") .attr("class", "tooltip") .style("opacity", 0); var svg = d3.select("form").append("svg") .attr("width", width) .attr("height", height) .style("margin", "10px auto"); var projection = d3.geo.albers() .rotate([-105, 0]) .center([-10, 65]) .parallels([52, 64]) .scale(500) .translate([width / 2, height / 2]); var path = d3.geo.path().projection(projection); //Reading map file and data queue() .defer(d3.json, "/upload/russia.json") .defer(d3.csv, "<?php echo $filename; ?>") .await(ready); //Start of Choropleth drawing function ready(error, map, data) { var rateById = {}; var nameById = {}; data.forEach(function(d) { rateById[d.RegionCode] = +d.AverageZarplata; nameById[d.RegionCode] = d.RegionName; }); //Drawing Choropleth svg.append("g") .attr("class", "region") .selectAll("path") .data(topojson.object(map, map.objects.russia).geometries) //.data(topojson.feature(map, map.objects.russia).features) <-- in case topojson.v1.js .enter().append("path") .attr("d", path) .style("fill", function(d) { return color(rateById[d.properties.region]); }) .style("opacity", 0.8) //Adding mouseevents .on("mouseover", function(d) { d3.select(this).transition().duration(300).style("opacity", 1); div.transition().duration(300) .style("opacity", 1) div.text(nameById[d.properties.region] + " : " + rateById[d.properties.region]) .style("left", (d3.event.pageX) + "px") .style("top", (d3.event.pageY -30) + "px"); }) .on("mouseout", function() { d3.select(this) .transition().duration(300) .style("opacity", 0.8); div.transition().duration(300) .style("opacity", 0); }) // Adding cities on the map d3.tsv("/upload/cities.tsv", function(error, data) { var city = svg.selectAll("g.city") .data(data) .enter() .append("g") .attr("class", "city") .attr("transform", function(d) { return "translate(" + projection([d.lon, d.lat]) + ")"; }); city.append("circle") .attr("r", 3) .style("fill", "lime") .style("opacity", 0.75); city.append("text") .attr("x", 5) .text(function(d) { return d.City; }); }); }; // <-- End of Choropleth drawing //Adding legend for our Choropleth var legend = svg.selectAll("g.legend") .data(ext_color_domain) .enter().append("g") .attr("class", "legend"); var ls_w = 20, ls_h = 20; legend.append("rect") .attr("x", 20) .attr("y", function(d, i){ return height - (i*ls_h) - 2*ls_h;}) .attr("width", ls_w) .attr("height", ls_h) .style("fill", function(d, i) { return color(d); }) .style("opacity", 0.8); legend.append("text") .attr("x", 50) .attr("y", function(d, i){ return height - (i*ls_h) - ls_h - 4;}) .text(function(d, i){ return legend_labels[i]; }); </script> Baseline data for cartogram
In order for the card to work, the last step remains. We place the files cities.tsv, russia.json, zarplata-1-1.csv, zarplata-1-2.csv, zarplata-2-1.csv, zarplata-2-2.csv (given in the archive, the link to which is at the end of the article) in the \ SiteDirectory \ upload \ directory.
We go to the address siteaddress.ru/newcomponent/act/ - here all the regions on the map of Russia are tinted with a dark gray color and when you hover, the name of the region appears - NaN. To display any real data, replace the values in the last column of the .csv files with numerical data.
Demo component
This module was developed by me for the site SalaryByudzhetnikov.RF in the section Salary Card. Demo module can be viewed at the link .
Bonus
Finally, a small hint. In the default default template in InstantCMS 2, the sidebar along with the action menu disappears as the width of the browser window decreases. But on mobile devices, the disappearance of the sidebar and the action menu is not very convenient, because Users have lost quite a lot of possible actions. To change this situation, you can do the following. Locate the theme-layout.css file in the \ templates \ default \ css \ directory and replace a piece of code in it
/* Media Queries ============================================================ */ @media screen and (max-width: 980px) { #body section { width:100% !important; } #body aside { display:none; } } @media screen and (max-width: 800px) { #body section { width:100% !important; } #body aside { display:none; } on
/* Media Queries ============================================================ */ @media screen and (max-width: 980px) { #body section { width:100% !important; } #body aside { width:100% !important; } } @media screen and (max-width: 800px) { #body section { width:100% !important; } #body aside { width:100% !important; } Those. in fact, only 2 lines need to be corrected. #body aside {display: none; } on #body aside {width: 100%! important; } - after that, the sidebar will move down to the main column after the content in it (before the footer) when the width of the browser decreases.
Source
All the described scripts and files can be downloaded in the archive , which you just need to download and unpack to the root directory of your website running on InstantCMS2.
PS For any typos, errors or inaccuracies, please write to private messages.
Source: https://habr.com/ru/post/264519/
All Articles