Updating Linux on a device based on the Altera SoC FPGA chip and gaining access to shared Windows server resources
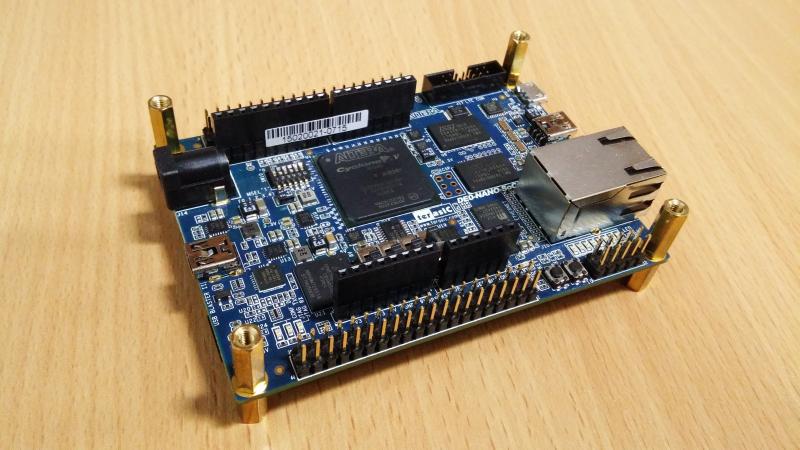
Recently, Terasic began selling a very interesting DE0-Nano-SoC Kit . It is interesting because a very powerful and feature-rich development kit based on the Altera Cyclone V SoC FPGA chip with an integrated ARM Cortex-A9 dual-core processor is offered for a very modest price. In addition, the manufacturer bundled with the board provides Linux OS deployed on a MicroSD memory card.
But having received this fee at my disposal, I rather quickly came across several problems, due to the fact that Linux was compiled from the source code of the Yocto Project . Basically, all the problems were related to the lack of publicly accessible repositories from which the missing components could be added to the system. For example, in order to gain access to the shared resources of the Windows server from this device via the network, the kernel lacked the Cifs file system support module.
')
Therefore, first of all, it was decided to upgrade the kernel, replace Yocto with the more familiar Debian Wheezy and install everything necessary for access to shared Windows server resources.
The assembly process was studied by me and carried out following the recommendations from this article , for which its author Des333 many thanks!
I didn’t enter into a complete redesign of my plans, so it was decided to leave the bootloaders on the card native - from the Linux 3.13 image that came with the board. So it was decided not to touch the section with type A2 at all.
Tasks
- Upgrade linux kernel
- Replace RootFS with Debian 7
- Sharpen the image so that it can be updated from the Internet
- Mount the directory shared on the Windows server
Kernel build
Since my main working environment in my life is Windows, all the Linux builds were performed from under Linux Mint 17.2 Cinnamon installed on the virtual machine.
1. Run the terminalka and enter the root-mode - in order not to type sudo command every time:
sudo -i At the same time / root will be our home directory - we will do everything in it.
2. We will compile the kernel using the cross-compiler included in the Altera SoC Embedded Design Suite (EDS) package. Therefore, download and install the latest package Altera SoC EDS. At the moment, Altera SoC EDS is version 15.0. Download this package directly from the site of Altera .
Altera SoC EDS is installed in the /root/altera/15.0 directory.
3. Install build-essential:
apt-get install build-essential 4. Install libncurses:
apt-get install libncurses5-dev 5. Download the linux-socfpga sources from the Altera repositories and unpack them into your home directory:
- Go to the linux-socfpga releases in the Altera repositories.
- Find the right release. I chose version 4.1 - since it was the latest stable version at the moment
- Download the source archive
- Unpack the sources in your home directory
As a result, the /root/linux-socfpga-4.1 directory appears with source code for the Linux kernel version 4.1.
Amendment (02/11/2016):
It is necessary to take not master and not tags but the brakes of socfpga- * .Therefore, for the source you need to go here . Many thanks to Des333 for the tip!
For example, socfpga-4.3
It is there that patches are applied with the necessary functionality for SoC.
6. Run the alter script, which will launch the new BASH and tweak some environment variables in it (for example, PATH). All compilation actions will be carried out without leaving this BASH:
cd /root/altera/15.0/embedded ./embedded_command_shell.sh 7. Create several environment variables:
export ARCH=arm export CROSS_COMPILE=arm-linux-gnueabihf- export LOADADDR=0x8000 8. Create a default configuration for socfpga:
cd /root/linux-socfpga-4.1 make socfpga_defconfig This will create a configuration file .config, sharpened for compilation under ARM.
9. Add the missing components to the kernel configuration (or delete the extra ones):
make menuconfig This will open a pseudographic window with menus.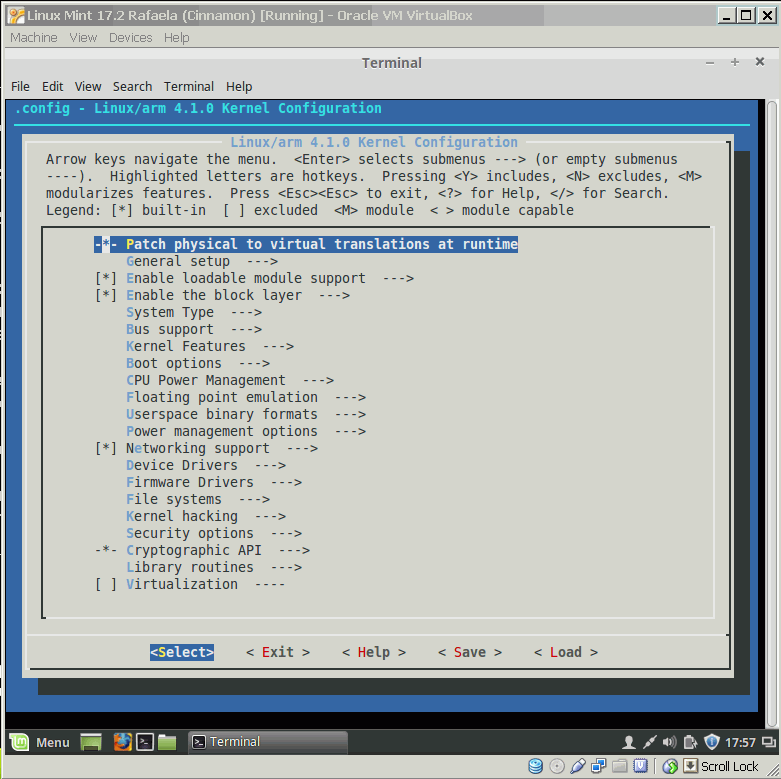
We need to add a CIFS file system driver - to be able to access shared network resources. There are two ways to add drivers to the system — add them directly to the kernel or add them as external plug-ins.
So, we go along the path File Systems -> Network File Systems , get on CIFS Support and press the space key - next to the CIFS Suport line the letter M should appear - it means the plug-in external module will be used. You will need to compile it later and put it in the external modules directory. If you press the space bar again, the letter M will change to an asterisk symbol - then the driver will be built right into the kernel.
Note : later on, when checking the system’s performance, it turned out that the external module cifs crashes when trying to copy a file from a shared Windows server disk. The cifs driver built into the kernel worked perfectly fine. Although using external modules with other versions of the kernel (for example, 3.19), there were no such problems. The reason for what is happening and I could not find out.
You also need to enable HighMem support - otherwise the system will not be able to use the top 256 megabytes of RAM. To do this, follow the path Kernel Features -> High Memory Support and also press the spacebar.
Exit the menu - press EXIT until we exit. To the question - whether it is necessary to save the configuration - we answer Yes .
10. Compile the kernel:
make uImage In my case, only one core was given to the virtual machine. The compilation process took about 20 minutes. If compilation is performed in a machine with several cores, then for speed you can parallelize the compilation process into several cores. To do this, you must explicitly specify the number of cores through the option -j . For example, for compilation by the forces of three cores:
make -j 3 uImage 11. Compile the dtb file corresponding to our device. If you use the old dtb-file, then either the device will hang when loading or there will be terrible glitches when working:
- We are looking for all files that have cyclone5 in their name and end in dts:
find ~/linux-socfpga-4.1 -name "*cyclone5*dts" - Choose the most suitable of the found files. I just looked through their contents and in one of them I saw the word terasic . I thought that this is the most suitable file for this device - and that was what I used. The file was called socfpga_cyclone5_sockit.dts .
- Run the compilation of socfpga_cyclone5_sockit.dtb:
make socfpga_cyclone5_sockit.dtb
As a result of the compilation, two files were created:
/root/linux-socfpga-4.1/arch/arm/boot/zImage /root/linux-socfpga-4.1/arch/arm/boot/dts/socfpga_cyclone5_sockit.dtb 12. If at the configuration stage the option of using external modules was chosen, it is necessary to compile them.
Compile the CIFS module:
make M=fs/cifs and compile cryptography modules - they will be needed when mounting shared Windows resources:
make M=crypto 13. Copy the kernel and dtb files to the card. Initially, the card was sliced so that the core and the DTB file lay on a separate FAT32 partishen. Here we write these files to it. The only note is that the DTB file needs to be renamed - so that it is also named like the one that already lies on the FAT32 section of the card:
- We connect the card to the virtual machine. I had to use an external card reader connected directly to the USB2 port of the computer. For some reason, it was not possible to do the same thing through the card reader built into the computer. Also, it was not possible to connect an external card reader to the virtual machine, if you connect it via the USB3 port.
- There will be an auto-mounting of the card partitions - you cannot unmount the partitions via the GUI, because in this case the card reader is completely disconnected from the virtual machine.
- We look at the names of the mounted sections:
mount
See something like this:/dev/sdb1 on /media/user/F725-1429 type vfat (rw,nosuid,nodev,uid=1000,gid=1000,shortname=mixed,dmask=0077,utf8=1,showexec,flush,uhelper=udisks2) /dev/sdb2 on /media/user/41cad05c-898e-49a3-9d00-02b92fa817ba type ext3 (rw,nosuid,nodev,uhelper=udisks2)
A section of the vfat type (first line) is what we are interested in at the moment. - We look that lies on the vfat section:
ll /media/user/F725-1429
We see something like this:-rw-r--r-- 1 user user 1164128 Apr 20 20:23 de0_nano_soc.rbf -rw-r--r-- 1 user user 15274 Jul 26 17:08 socfpga.dtb -rw-r--r-- 1 user user 176 Apr 20 19:59 u-boot.scr -rw-r--r-- 1 user user 3371472 Jul 29 16:50 zImage
So the dtb file is called socfpga.dtb. - We copy our files to the card:
cp /root/linux-socfpga-4.1/arch/arm/boot/zImage /media/user/F725-1429/ cp /root/linux-socfpga-4.1/arch/arm/boot/dts/socfpga_cyclone5_sockit.dtb /media/user/F725-1429/socfpga.dtb
File system build
This subsection in many respects repeats what is written in this article , but nevertheless I cite it completely, in order to make it easier to use this guide later.
We will collect Debian 7 Wheezy:
1. Install the packages you need to build the file system:
apt-get install debootstrap qemu-user-static binfmt-support 2. Create a directory and load all the necessary files into it:
cd /root mkdir debian7 debootstrap --arch armel --foreign wheezy debian7 http://ftp.debian.org/debian 3. To run applications compiled under the ARM architecture, we will use qemu static . To do this, copy the file to our debian7 directory:
cp /usr/bin/qemu-arm-static debian7/usr/bin/ 4. Go to our new file system:
chroot debian7 /bin/bash 5. If the interpreter's invitation has changed to “I have no name! @Hostname: / #”, then everything went well.
Finish the build process:
/debootstrap/debootstrap --second-stage 6. In / etc / inittab we leave the following lines:
/etc/inittab id:5:initdefault: si::sysinit:/etc/init.d/rcS ~~:S:wait:/sbin/sulogin l0:0:wait:/etc/init.d/rc 0 l1:1:wait:/etc/init.d/rc 1 l2:2:wait:/etc/init.d/rc 2 l3:3:wait:/etc/init.d/rc 3 l4:4:wait:/etc/init.d/rc 4 l5:5:wait:/etc/init.d/rc 5 l6:6:wait:/etc/init.d/rc 6 z6:6:respawn:/sbin/sulogin S:2345:respawn:/sbin/getty 115200 console 7. Set a password for the root account:
passwd 8. We are packing the new file system into the archive:
tar -cpzf debian7.tar.gz --exclude=debian7.tar.gz / 9. Exit chroot:
exit 10. Unmount and then format the ext3 partition on the card (see the section names in section 13 of the kernel build):
umount /dev/sdb2 mkfs.ext3 /dev/sdb2 11. Mount the ext3 partition:
mount /dev/sdb2 /mnt/ 12. Unpack the archive with the file system on the card in the ext3 partition:
tar -xzf /root/debian7/debian7.tar.gz -C /mnt/ 13. If the option of using external modules was chosen when building the kernel, it is necessary to write external modules compiled in step 12 of the kernel build process to the card:
cd /mnt/lib mkdir modules mkdir modules/4.1.0 mkdir modules/4.1.0/extra mkdir modules/4.1.0/kernel mkdir modules/4.1.0/kernel/crypto cp /root/linux-socfpga-4.1/fs/cifs/cifs.ko ./modules/4.1.0/extra/ cp /root/linux-socfpga-4.1/crypto/*.ko ./modules/4.1.0/kernel/crypto/ 14. Unmount the partitions:
umount /dev/sdb1 umount /dev/sdb2 That's all - the card is ready, you can install it in the device and boot.
Final refinement
After loading the device, we finish the image on the spot:
1. Login to Debian on the device by connecting to it via the built-in serial port.
2. If the option of using external modules was chosen when building the kernel, then it is necessary to generate files with information about the external modules of the kernel:
depmod -a 3. Add the Debian 7 repository to the list of repositories (I added a German server):
echo "deb http://ftp.de.debian.org/debian wheezy main" > /etc/apt/sources.list 4. We connect the device to the Ethernet-network. We get the address by DHCP:
dhclient -4 eth0 5. We are raising the NTP, since with the wrong time it will not be possible to mount shared resources:
apt-get update apt-get install ntp 6. Set our time zone:
dpkg-reconfigure tzdata 7. To check that everything is fine, we mount the server ball. For example, in my case I did it like this:
mount //192.168.48.4/distrib /mnt -o username=jok40 8. Install the SSH server. It is inconvenient to use the serial port, as when working through it, the typed commands occur at the beginning of the line after reaching column 80:
apt-get install openssh 9. We assign a static address to the interface eth0 - so that in the future it will be easier to connect to the device via SSH. To do this, edit the interfaces file:
nano /etc/network/interfaces In my case, he began to look like this:
# interfaces(5) file used by ifup(8) and ifdown(8) auto lo iface lo inet loopback # The primary network interface allow-hotplug eth0 iface eth0 inet static address 192.168.48.27 netmask 255.255.255.0 gateway 192.168.48.1 network 192.168.48.0 broadcast 192.168.48.255 auto eth0 10. We edit the resolv.conf file - so that the DNS client works normally:
nano /etc/resolv.conf Add lines to it:
nameserver 192.168.48.1 nameserver 8.8.8.8 11. Reboot the device.
12. To check that everything is done correctly.
Connect to the device via SSH via Ethernet: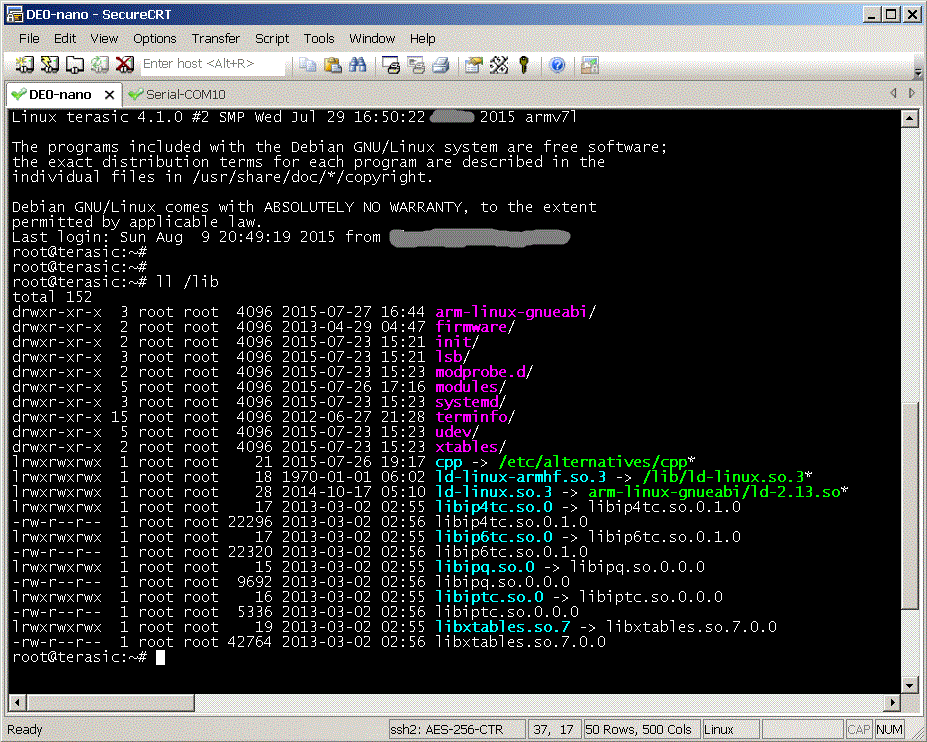
Thank you all for your attention!
Source: https://habr.com/ru/post/264515/
All Articles