We assemble our OpenWRT on a Tp-Link TL-WR741ND v.4.25 router with vlan, openvpn, provider rotation and blackjack
In this article, I would like to share the experience of building your own openwrt firmware, with choosing the right packages, as well as setting up fault-tolerant Internet access with instant channel rotation and simultaneous operation, folding the speed of providers and as a result, setting all your favorite vlans.
The choice fell on the Tp-Link TL-WR741ND v.4.25 router (price 1150 rubles), which I chose from the following characteristics:
1) Low price
2) Sufficient memory for stated requirements
3) The possibility of zapilivaniya USB (for true connoisseurs pick a piece of iron)
4) OpenWrt Barrier breaker support
5) vlan support
6) Amazing survivability (the router can not be killed with incorrect firmware, the function of restoring the firmware on tftpd works like a clock, and more than once rescued during unsuccessful experiments). I will write about recovery methods at the end of the article.
')
The standard firmware for this router from OpenWrt did not suit. The reason for this was the extra packets that occupied the place in the precious memory of this baby.
It was decided to cut: ppp, ipv6 support, opkg (we will not install anything else).
Add: openvpn-polarssl (occupies less space), luci-mwan3 (I really liked the visual settings and the display of channel performance)
So, let's begin:
To begin with, we will update our device to the latest version of the standard tp-link firmware. I don’t see any sense to describe this action in detail, everything is quite clear and simple.
We will need a multi-core processor to comfortably create our own firmware (I compiled on i7). But Core2Duo will come down, except it will be longer to assemble. OS fit Ubuntu 15 x86_64.
All further build commands are made from a regular user, not from the root!
Go to the "store" for the source. I chose OpenWrt Bariier Breaker for ease of setup and excellent stability on the previous router (TP-LINK Archer C7).
In our home folder we will have a wrt folder, where we will assemble.
Download the source code for additional packages (such as Luci):
Perform platform configuration
A pseudo-graphic menu will appear, where we are interested in the Target System, Subtarget and Target Profile items:
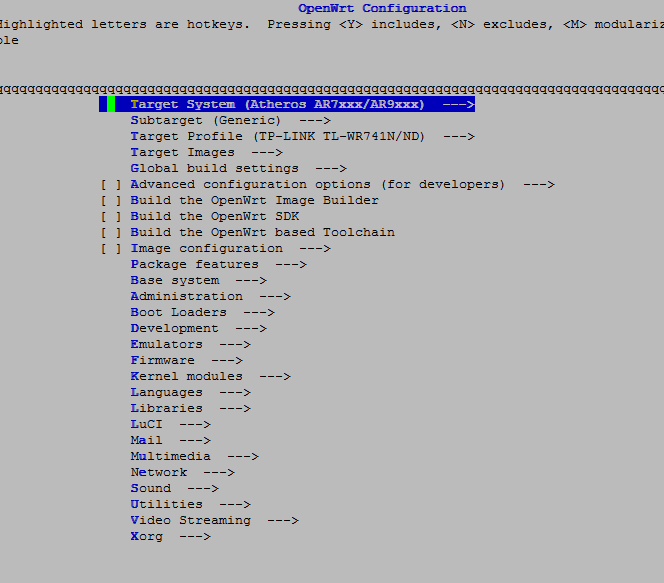
All navigation will be free to select the desired item (arrows) and pressing enter, component selection - also enter, exit from the menu - right-left arrows - Exit. Do not forget to save the config.
We apply the standard parameters for the profile:
Modify the package set:
Removed:
opkg from (base system)
removed the build option with ipv6 support (Global build settings)
ppp (network).
Added by:
Luci
luci-app-mwan3 (Luci-Applications)
openvpn-polarssl (Network-vpn).
Do not forget to save the configuration!
Getting started:
The -j5 parameter indicates the number of cores +1 stream for fast assembly, and V = s indicates the output of details (if there are errors).
The process will take a long time, 10-15 minutes on the i7 processor, after which our firmware for different versions of the router will appear in the / home / user / wrt / bin / ar71xx directory. If you didn’t appear - we’re looking at the build logs - for sure, you have exceeded the size of the firmware and you will see the line: “firmware is too big”. You have to do make clean, make distclean and start all over again. (from step ./scripts/feeds update -a)
We are interested in:
openwrt-ar71xx-generic-tl-wr741nd-v4-squashfs-factory.bin - "factory" firmware.
We transfer it to a computer with a router connected via ethernet (for example, via ftp or winscp).
Go to the address: 192.168.0.1 and flash the new firmware, wait for the reboot, then go to the address: 192.168.1.1
root without a password (assign it when you first log in - at the top will hang a yellow banner with a warning and a link to change the password).
Well, finally, the most difficult thing is over, now we have modern firmware and OUR set of programs.
Occurs in the router menu: network - switch
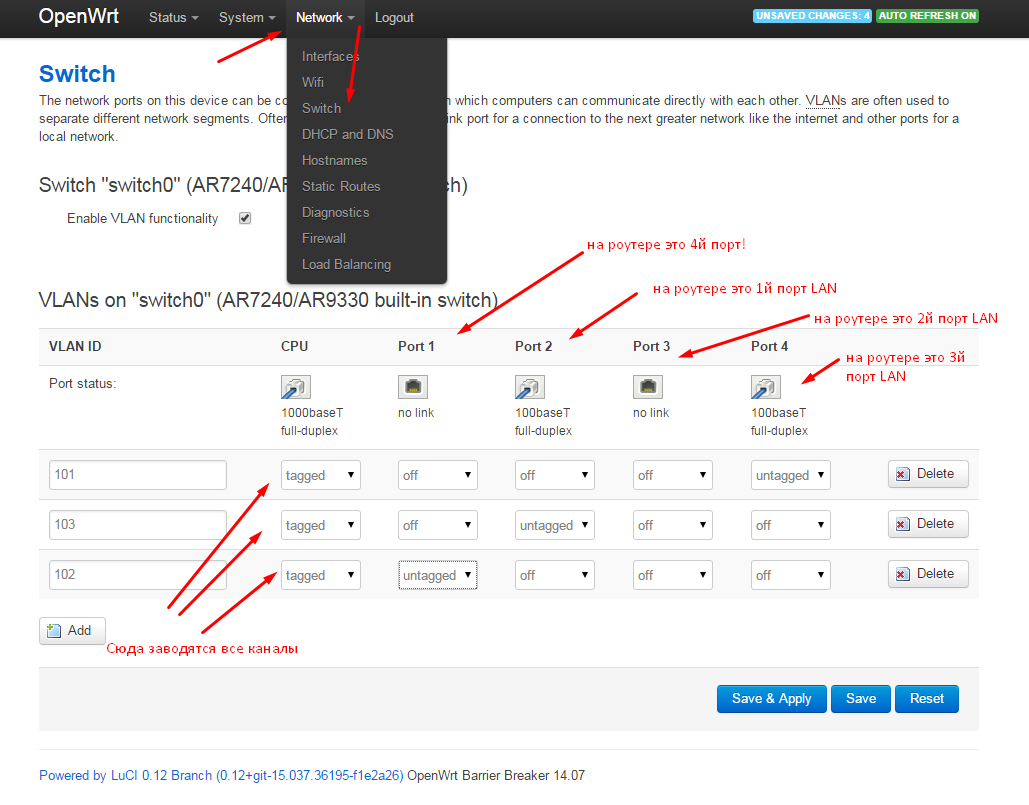
It was not without misunderstanding - the port numbering in the router and in the vlan configuration does not match. In the screenshot, I tried to explain how they are changed. The WAN port in the router does not participate in the vlan-functional.
Tagged - tagged traffic, packets from each vlan (101, 102, 103) are sent here, which are then distributed over the interfaces wan (main provider), wan2 (backup provider), eth0.103 (local network vlan).
Untagged — untagged port mode (the entry point of the ethernet cable from the required provider). It is important not to get lost in the wires: what goes where. I signed the right names behind the router so that there would be no confusion in the future (provider # 1 101, provider # 2 102, local network 103).
Simply put, we let in through 3 ports 3 different networks, which are then distributed inside the device in shelves.
After the changes, click Save, but not Apply! We do not want to be left without a network during setup?
Now, you need to create the necessary interfaces in the Network - Interfaces :
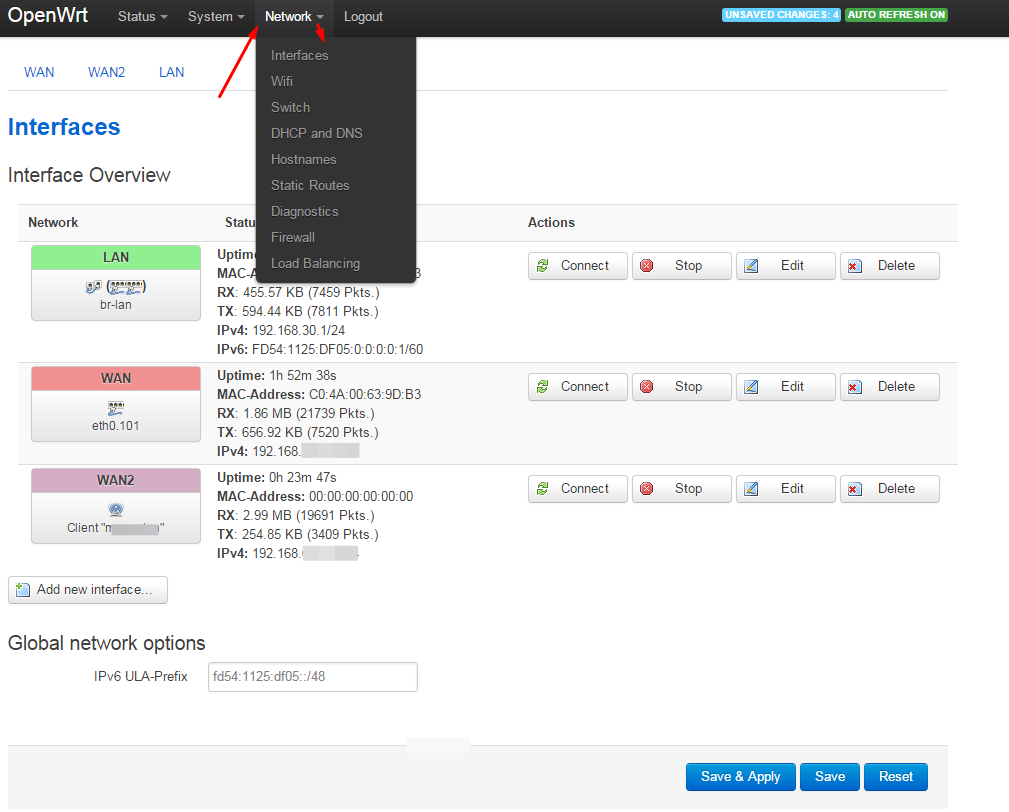
Remove the wan6 interface (we do not use ipv6 in this case).
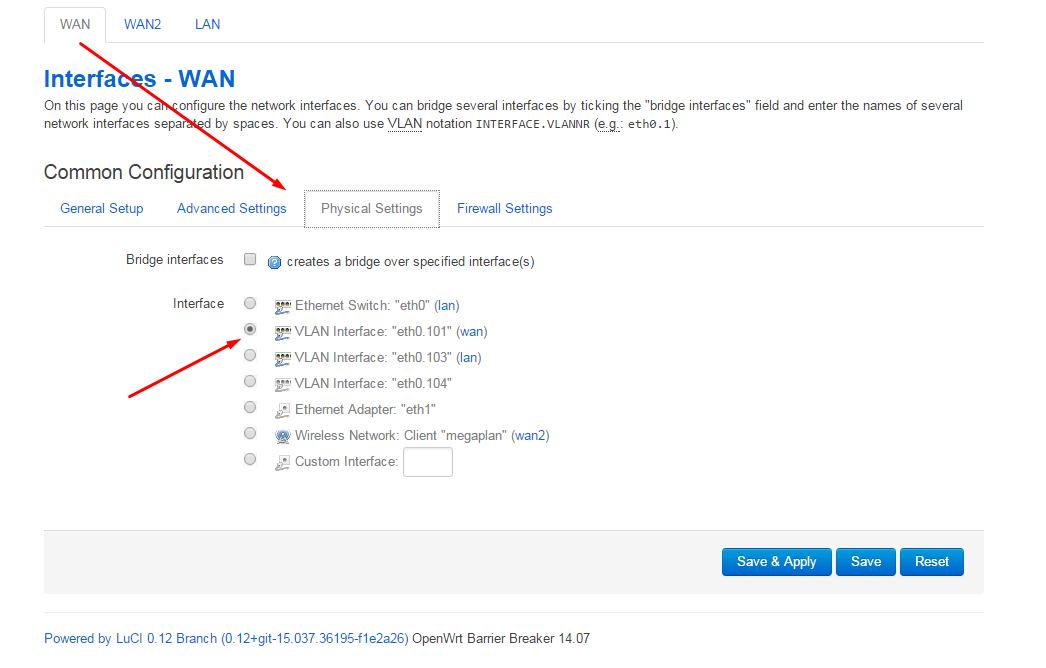
Let's change the wan interface for the first provider, specify the necessary data for the connection (for example, the provider gives an Internet via dhcp), and specify which vlan to use for this interface. This is where the vlan: wire: interface is mapped.
For the second provider wan2, specify eth0.102.
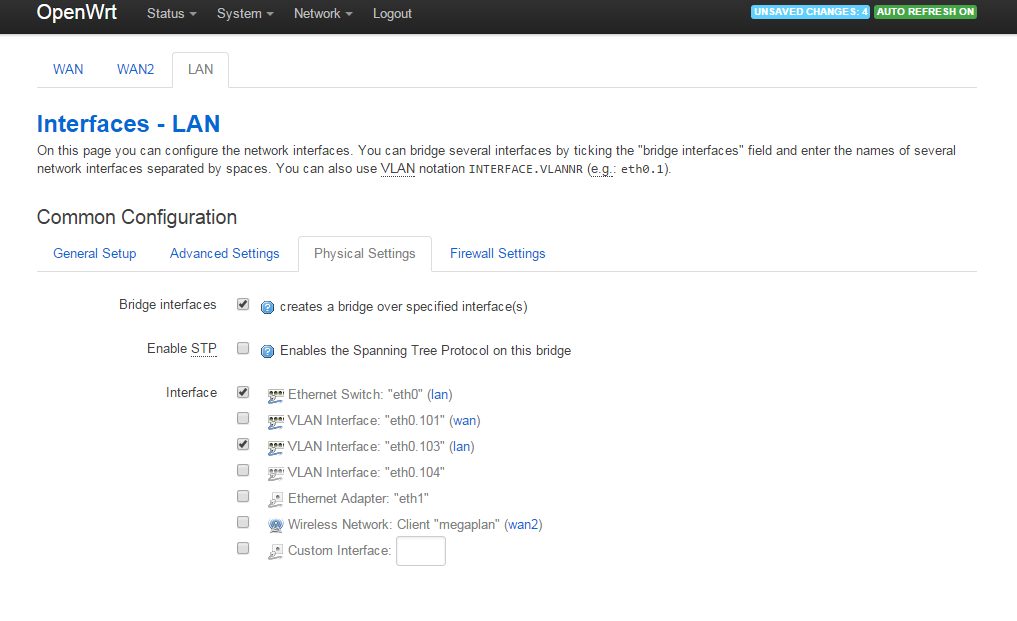
For Lan, we specify the interfaces in bridge eth0 and eth0.103:
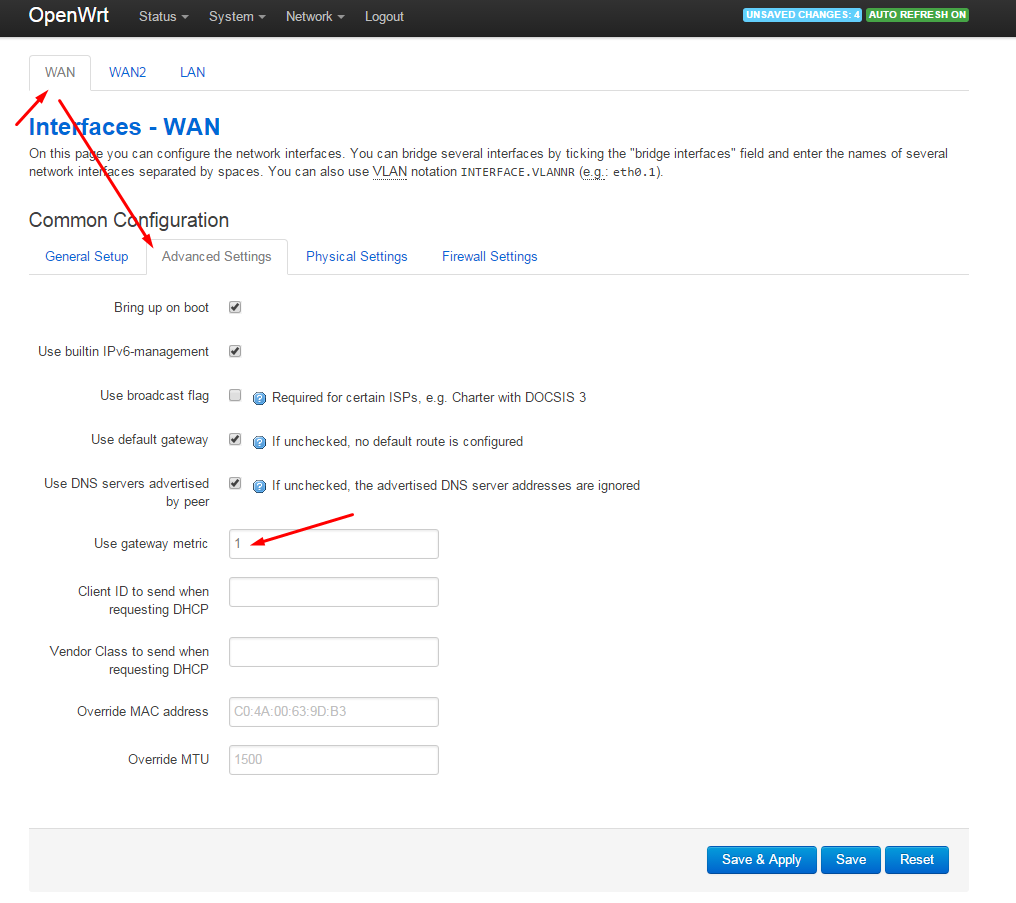
In the settings of the wan and wan2 interfaces, specify the device metric (required for mwan3 to work):
Now you can safely click on Save & Apply and check the entered settings.
It's hard to underestimate this package, because users will be able to receive the sum of the speed of two Internet channels, the Internet will always be in the office, because it is unlikely that both channels will fall.
For the admin, there will be a headache for the temporary disconnection of any of the channels, and there is no need to fence up the crutch scripts to switch. I forgot about the problems in the office with the Internet and do not worry when one of them falls (I receive sms on these events).
I know for sure that OpenVPN will switch to the backup channel in 30 seconds (glory to the multihome parameter), communication with the main office in Moscow will be restored and some users and supervisors will not notice this incident.
Let's start:
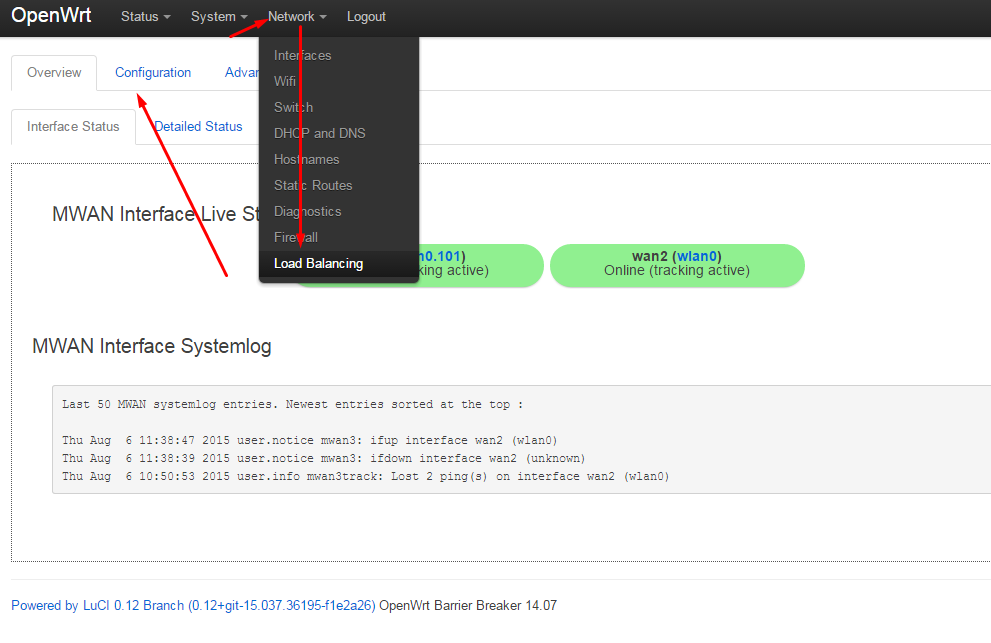
Go to network - load balancing - configuration:
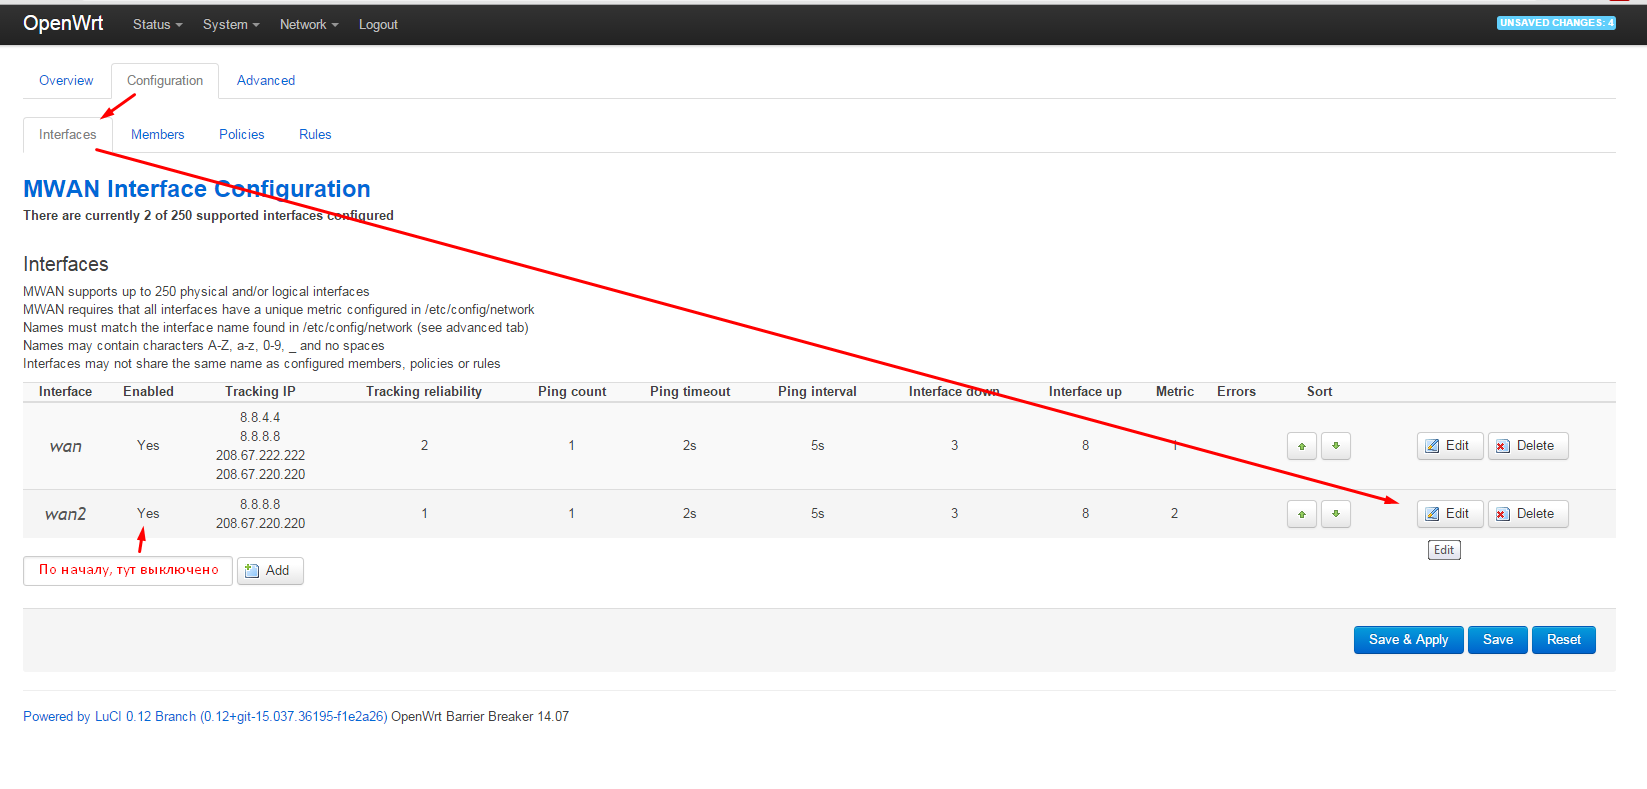
And we will include wan2 in work:
Next, set up the rules for the channels:
1) Balanced - The channels are added, the speed increases, there is fault tolerance (switching). Recommend.
2) wan_only - only provider # 1
3) wan2_only - only provider # 2
configuration - rules
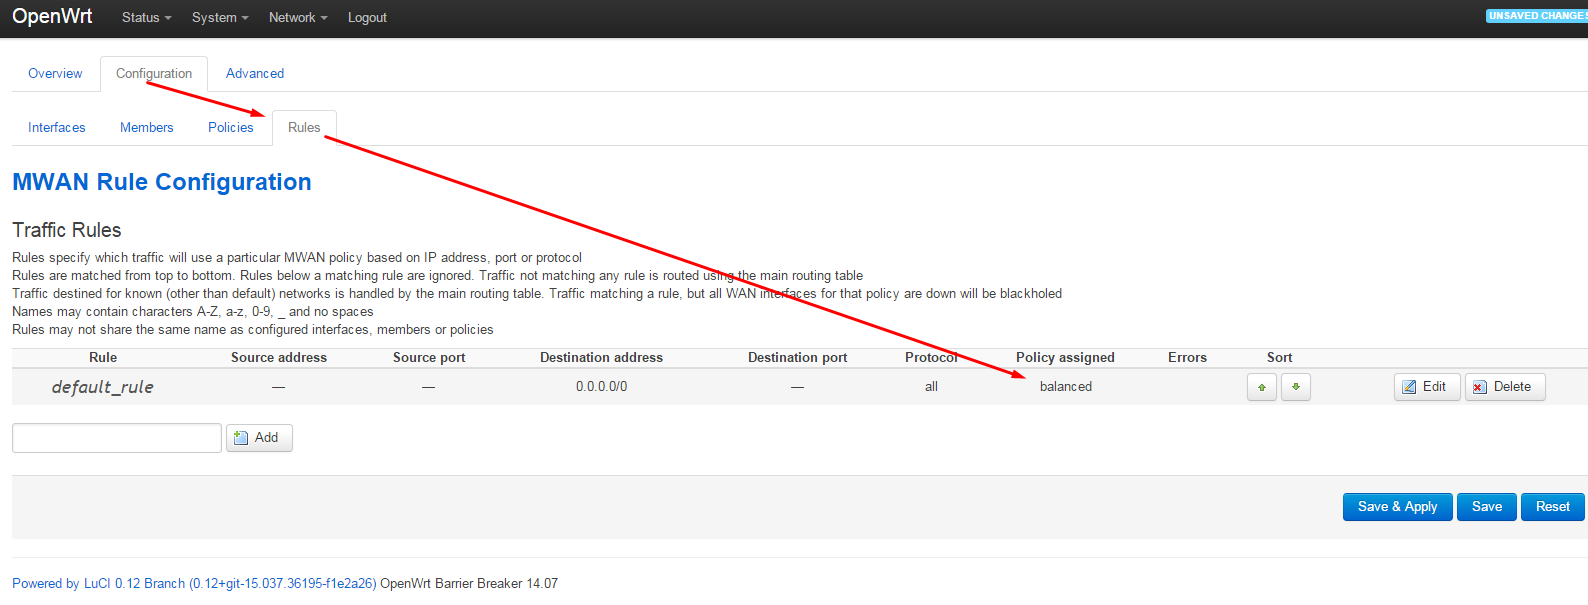
The rest of the rules can be deleted or leave another rule.
I will not dwell on mwan3 in detail - I will only say that there is an opportunity to start up traffic to a certain resource through one of the channels, if there is a binding on this resource over IP.
Great, the Internet has been set up, now you need to connect 2 offices together.
Will go on a static key. Key generation can be performed on the client side:
The key must be placed in / etc / openvpn / keys / (server, client).
OpenVPN on the router is already installed and we will start to edit the config. To do this, go to TP-Link via ssh.
In the config header we change:
We save, we leave. Here we have included the custom config in /etc/openvpn/openvpn.conf - for me personally this is somehow more familiar.
Further, the config itself:
On the router we have the server side of openvpn. Here is the config to the form:
Save, then:
Now the client:
Approximate config looks like this:
Save the config, use:
Watch ifconfig, logs and enjoy a reliable channel.
Of course, you will not once kill your router with unsuccessful firmware, pozarivshis to remove the necessary components of the base system.
But do not worry!
The easiest way to reanimate a router is to fail safe in openwrt:
1) Assign IP address 192.168.1.2 to the network adapter on the computer
2) Mask 255.255.255.0
3) Ethernet cable - to LAN1 port
4) Turn off the router
5) Turn on and wait for the gear icon to light up.
6) Hold down the QSS router button for 1-2 seconds - the gear will blink very quickly
7) Start the telnet client and connect to 192.168.1.1
8) Fill in the tmp of the router default proshfku for your model, for example, through the mini-web server tinyweb
9) Run:
The router eats the firmware and reboots.
Chef, it's all gone!
Yes, that's exactly what I thought when I killed the router even harder. The gear did not burn, and the router cyclically rebelled without stopping.
We will use a great feature in the tp-link firmware - download firmware via tftp:
1) Assign IP address 192.168.0.66 to the network adapter on the computer
2) Mask 255.255.255.0
3) Ethernet cable - to LAN1 port
4) Run the tftp server with the default firmware in a folder called “wr741ndv4_tp_recovery.bin” (you need to rename the firmware file)
4) Turn off the router
5) Take a sharp and thin object (pen)
6) Take the router in your hands, turn it to the face of the ports, hold the handle in your free hand
7) Turn on the router and immediately hold the QSS with a finger of one hand + reset with a pen in the other hand. Practice and it will work out.
8) Hold down these 2 buttons for 4-8 seconds until the firmware download to the router in the tftp client. And she goes, do not worry.
As soon as the firmware is loaded (2-3 seconds), release the buttons. Exhale, the router is saved.
Articles used:
wiki.openwrt.org/ru/doc/howto/build
openvpn.net/index.php/open-source/documentation/miscellaneous/78-static-key-mini-howto.html
denisyuriev.ru/linux/openwrt-linux/openwrt-sborka-iz-isxodnikov
habrahabr.ru/post/186760
wiki.gentoo.org/wiki/OpenVPN
wiki.openwrt.org/doc/howto/mwan3
wiki.openwrt.org/ru/doc/howto/generic.uninstall
The choice fell on the Tp-Link TL-WR741ND v.4.25 router (price 1150 rubles), which I chose from the following characteristics:
1) Low price
2) Sufficient memory for stated requirements
3) The possibility of zapilivaniya USB (for true connoisseurs pick a piece of iron)
4) OpenWrt Barrier breaker support
5) vlan support
6) Amazing survivability (the router can not be killed with incorrect firmware, the function of restoring the firmware on tftpd works like a clock, and more than once rescued during unsuccessful experiments). I will write about recovery methods at the end of the article.
')
The standard firmware for this router from OpenWrt did not suit. The reason for this was the extra packets that occupied the place in the precious memory of this baby.
It was decided to cut: ppp, ipv6 support, opkg (we will not install anything else).
Add: openvpn-polarssl (occupies less space), luci-mwan3 (I really liked the visual settings and the display of channel performance)
So, let's begin:
1) Device preparation
To begin with, we will update our device to the latest version of the standard tp-link firmware. I don’t see any sense to describe this action in detail, everything is quite clear and simple.
2) Collect firmware
We will need a multi-core processor to comfortably create our own firmware (I compiled on i7). But Core2Duo will come down, except it will be longer to assemble. OS fit Ubuntu 15 x86_64.
Install the necessary packages:
sudo apt-get update && sudo apt-get upgrade -y sudo apt-get install subversion git g++ libncurses5-dev zlib1g-dev gawk -y All further build commands are made from a regular user, not from the root!
Go to the "store" for the source. I chose OpenWrt Bariier Breaker for ease of setup and excellent stability on the previous router (TP-LINK Archer C7).
svn co svn://svn.openwrt.org/openwrt/branches/barrier_breaker wrt cd ~/wrt svn update In our home folder we will have a wrt folder, where we will assemble.
Download the source code for additional packages (such as Luci):
./scripts/feeds update -a ./scripts/feeds install -a Perform platform configuration
make menuconfig A pseudo-graphic menu will appear, where we are interested in the Target System, Subtarget and Target Profile items:
All navigation will be free to select the desired item (arrows) and pressing enter, component selection - also enter, exit from the menu - right-left arrows - Exit. Do not forget to save the config.
We apply the standard parameters for the profile:
make defconfig Modify the package set:
make menuconfig Removed:
opkg from (base system)
removed the build option with ipv6 support (Global build settings)
ppp (network).
Added by:
Luci
luci-app-mwan3 (Luci-Applications)
openvpn-polarssl (Network-vpn).
Do not forget to save the configuration!
Getting started:
make -j5 V=s The -j5 parameter indicates the number of cores +1 stream for fast assembly, and V = s indicates the output of details (if there are errors).
The process will take a long time, 10-15 minutes on the i7 processor, after which our firmware for different versions of the router will appear in the / home / user / wrt / bin / ar71xx directory. If you didn’t appear - we’re looking at the build logs - for sure, you have exceeded the size of the firmware and you will see the line: “firmware is too big”. You have to do make clean, make distclean and start all over again. (from step ./scripts/feeds update -a)
We are interested in:
openwrt-ar71xx-generic-tl-wr741nd-v4-squashfs-factory.bin - "factory" firmware.
We transfer it to a computer with a router connected via ethernet (for example, via ftp or winscp).
Go to the address: 192.168.0.1 and flash the new firmware, wait for the reboot, then go to the address: 192.168.1.1
root without a password (assign it when you first log in - at the top will hang a yellow banner with a warning and a link to change the password).
Well, finally, the most difficult thing is over, now we have modern firmware and OUR set of programs.
3) Configure vlan:
Occurs in the router menu: network - switch
It was not without misunderstanding - the port numbering in the router and in the vlan configuration does not match. In the screenshot, I tried to explain how they are changed. The WAN port in the router does not participate in the vlan-functional.
Tagged - tagged traffic, packets from each vlan (101, 102, 103) are sent here, which are then distributed over the interfaces wan (main provider), wan2 (backup provider), eth0.103 (local network vlan).
Untagged — untagged port mode (the entry point of the ethernet cable from the required provider). It is important not to get lost in the wires: what goes where. I signed the right names behind the router so that there would be no confusion in the future (provider # 1 101, provider # 2 102, local network 103).
Simply put, we let in through 3 ports 3 different networks, which are then distributed inside the device in shelves.
After the changes, click Save, but not Apply! We do not want to be left without a network during setup?
Now, you need to create the necessary interfaces in the Network - Interfaces :
Remove the wan6 interface (we do not use ipv6 in this case).
Let's change the wan interface for the first provider, specify the necessary data for the connection (for example, the provider gives an Internet via dhcp), and specify which vlan to use for this interface. This is where the vlan: wire: interface is mapped.
For the second provider wan2, specify eth0.102.
For Lan, we specify the interfaces in bridge eth0 and eth0.103:
In the settings of the wan and wan2 interfaces, specify the device metric (required for mwan3 to work):
Now you can safely click on Save & Apply and check the entered settings.
4) mwan3 or cool admin wrap
It's hard to underestimate this package, because users will be able to receive the sum of the speed of two Internet channels, the Internet will always be in the office, because it is unlikely that both channels will fall.
For the admin, there will be a headache for the temporary disconnection of any of the channels, and there is no need to fence up the crutch scripts to switch. I forgot about the problems in the office with the Internet and do not worry when one of them falls (I receive sms on these events).
I know for sure that OpenVPN will switch to the backup channel in 30 seconds (glory to the multihome parameter), communication with the main office in Moscow will be restored and some users and supervisors will not notice this incident.
Let's start:
Go to network - load balancing - configuration:
And we will include wan2 in work:
Next, set up the rules for the channels:
1) Balanced - The channels are added, the speed increases, there is fault tolerance (switching). Recommend.
2) wan_only - only provider # 1
3) wan2_only - only provider # 2
configuration - rules
The rest of the rules can be deleted or leave another rule.
I will not dwell on mwan3 in detail - I will only say that there is an opportunity to start up traffic to a certain resource through one of the channels, if there is a binding on this resource over IP.
5) Office friendship or openvpn
Great, the Internet has been set up, now you need to connect 2 offices together.
Will go on a static key. Key generation can be performed on the client side:
sudo openvpn --genkey --secret office2.key The key must be placed in / etc / openvpn / keys / (server, client).
OpenVPN on the router is already installed and we will start to edit the config. To do this, go to TP-Link via ssh.
vi /etc/config/openvpn In the config header we change:
package openvpn ################################################# # Sample to include a custom config file. # ################################################# config openvpn custom_config # Set to 1 to enable this instance: option enabled 1 # Include OpenVPN configuration option config /etc/openvpn/openvpn.conf We save, we leave. Here we have included the custom config in /etc/openvpn/openvpn.conf - for me personally this is somehow more familiar.
Further, the config itself:
mkdir /etc/openvpn mkdir /etc/openvpn/keys vi /etc/openvpn/openvpn.conf On the router we have the server side of openvpn. Here is the config to the form:
port 1194 # proto udp dev tun-office2 # multihome # wan wan2 ifconfig 10.0.0.2 10.0.0.3 #IP- secret /etc/openvpn/keys/office2.key # keepalive 5 30 # 30 . user nobody group nogroup persist-tun persist-key status /tmp/office2.status log /tmp/office2.log # verb 3 Save, then:
/etc/init.d/openvpn restart Now the client:
Approximate config looks like this:
remote wan.office2.ru # remote wan2.office2.ru # ( ) port 1194 proto udp dev tun-office1 ifconfig 10.0.0.3 10.0.0.2 # route 192.168.30.0 255.255.255.0 # secret /etc/openvpn/keys/office2.key # keepalive 5 30 # user nobody group nogroup persist-tun persist-key status /var/log/openvpn/office.status log /var/log/openvpn/office.log verb 3 Save the config, use:
/etc/init.d/openvpn restart Watch ifconfig, logs and enjoy a reliable channel.
Conclusion:
Of course, you will not once kill your router with unsuccessful firmware, pozarivshis to remove the necessary components of the base system.
But do not worry!
The easiest way to reanimate a router is to fail safe in openwrt:
1) Assign IP address 192.168.1.2 to the network adapter on the computer
2) Mask 255.255.255.0
3) Ethernet cable - to LAN1 port
4) Turn off the router
5) Turn on and wait for the gear icon to light up.
6) Hold down the QSS router button for 1-2 seconds - the gear will blink very quickly
7) Start the telnet client and connect to 192.168.1.1
8) Fill in the tmp of the router default proshfku for your model, for example, through the mini-web server tinyweb
9) Run:
mtd -r write /tmp/.bin firmware The router eats the firmware and reboots.
Chef, it's all gone!
Yes, that's exactly what I thought when I killed the router even harder. The gear did not burn, and the router cyclically rebelled without stopping.
We will use a great feature in the tp-link firmware - download firmware via tftp:
1) Assign IP address 192.168.0.66 to the network adapter on the computer
2) Mask 255.255.255.0
3) Ethernet cable - to LAN1 port
4) Run the tftp server with the default firmware in a folder called “wr741ndv4_tp_recovery.bin” (you need to rename the firmware file)
4) Turn off the router
5) Take a sharp and thin object (pen)
6) Take the router in your hands, turn it to the face of the ports, hold the handle in your free hand
7) Turn on the router and immediately hold the QSS with a finger of one hand + reset with a pen in the other hand. Practice and it will work out.
8) Hold down these 2 buttons for 4-8 seconds until the firmware download to the router in the tftp client. And she goes, do not worry.
As soon as the firmware is loaded (2-3 seconds), release the buttons. Exhale, the router is saved.
Articles used:
wiki.openwrt.org/ru/doc/howto/build
openvpn.net/index.php/open-source/documentation/miscellaneous/78-static-key-mini-howto.html
denisyuriev.ru/linux/openwrt-linux/openwrt-sborka-iz-isxodnikov
habrahabr.ru/post/186760
wiki.gentoo.org/wiki/OpenVPN
wiki.openwrt.org/doc/howto/mwan3
wiki.openwrt.org/ru/doc/howto/generic.uninstall
Source: https://habr.com/ru/post/264299/
All Articles