Creating The Blacksmith: animation, camera effects, audio / video
As part of our official collaboration with Unity, we continue to publish translations of articles on creating projects on Unity 5. This time we will look at the stages of working on animation, as well as the approach to creating post effects, audio and video for The Blacksmith short film.

You can also check out the previous article in the Making Of series on concept and decoration . All articles about the creation of The Blacksmith can be found on a special page of the project .
Phased animation work
')
Step One: Pre-Visualization
As soon as we decided on the direction of development of The Blacksmith’s concept and decoration, we wanted to see the video on the screen as soon as possible, so we immediately started creating an initial version that could be repelled.
We created the initial versions of the proxy meshes of the characters, made temporary rigs for them with a rough skinning and divided the 3D objects into blocks so that, without losing time, we started to work on the revision.
Thanks to this approach, we were able to calculate the time frame, iterate scenes and angles, and also make some edits. Thus, we got an idea about the dynamics of the film at an early stage. In addition, we were able to assign tasks to third-party contractors and manage the production process much more effectively.
Cameras and rough animation previsa served as a good starting point for further work.
Motion capture
To play the roles of the characters of the video, we hired a Swedish studio stuntmen and mocap-specialists Stuntgruppen , who not only perfectly coped with their task, but also gave us a lot of useful advice on certain scenes. Before going directly to motion capture, we had several joint rehearsals.
Shooting at the site of Imagination Studios in Uppsala went smoothly. Previz proved its worth by serving as a good guide for all participants. And the ability to see the result on the screen in real time even more simplified our task.
Stages of work on the animation
The work on the animation consisted of the following stages:
• Preparation of rigs and joints for additional control in the Maya HIK system;
• Export rigs in fbx format to Motionbuilder;
• Motion capture and transfer of footage to the rigs in Maya;
• Creation of facial animation;
• Simulation of hair and clothing on additional chains of joints;
• Animation of additional objects, their adjustment and export in fbx format to Unity;
• All rigs were imported with Generic installed; on the name map of joints, we added an animation to them in the Unity timeline / sequencer tool;
• Animation of cameras was performed primarily in Motionbuilder; imported duplicates were added to the render camera in Unity by transferring the sequencer to the timeline.
Setup in Unity
Having begun work in Unity, we had to configure rigi first of all. For the two main rigs, we used the Generic Rig setting and performed an automatic matching of the joints attached to them for organizing and optimizing the scenes.
Then we started processing shots in the Scene Manager, but each shot always referred to one of the two main rigs. For this reason, the names of the joints should have correlated 1/1 for more efficient redirection. So, we collected shots from a large number of fbx-files and put them on a timeline so that they point to the main characters in the scene. As a result, the timeline consisted of the following playable elements: Character Track, Camera Track, Prop Track, Event Track, Switcher / Shot Manager Track.
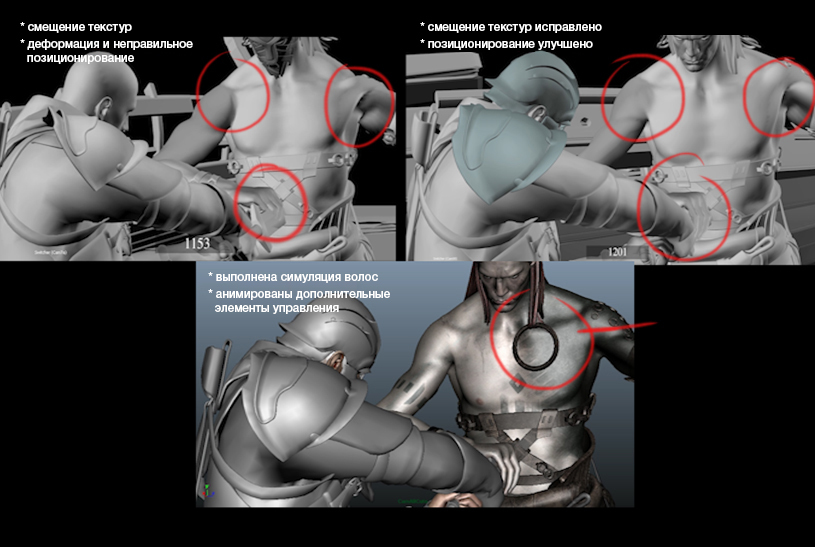
Simulation of clothes, hair and extra joints
We also wanted to focus on the realistic behavior of the hair and clothes of the characters. To do this, we added more joints to the blacksmith's hair and the floors of the clothes of both heroes. The additional setting allowed baking the simulation in joints, and we got a realistic behavior of clothes with a large number of baked bones. We set a high enough bar - we had 256 bones and 4 bones per vertex for each character - and this approach was justified.

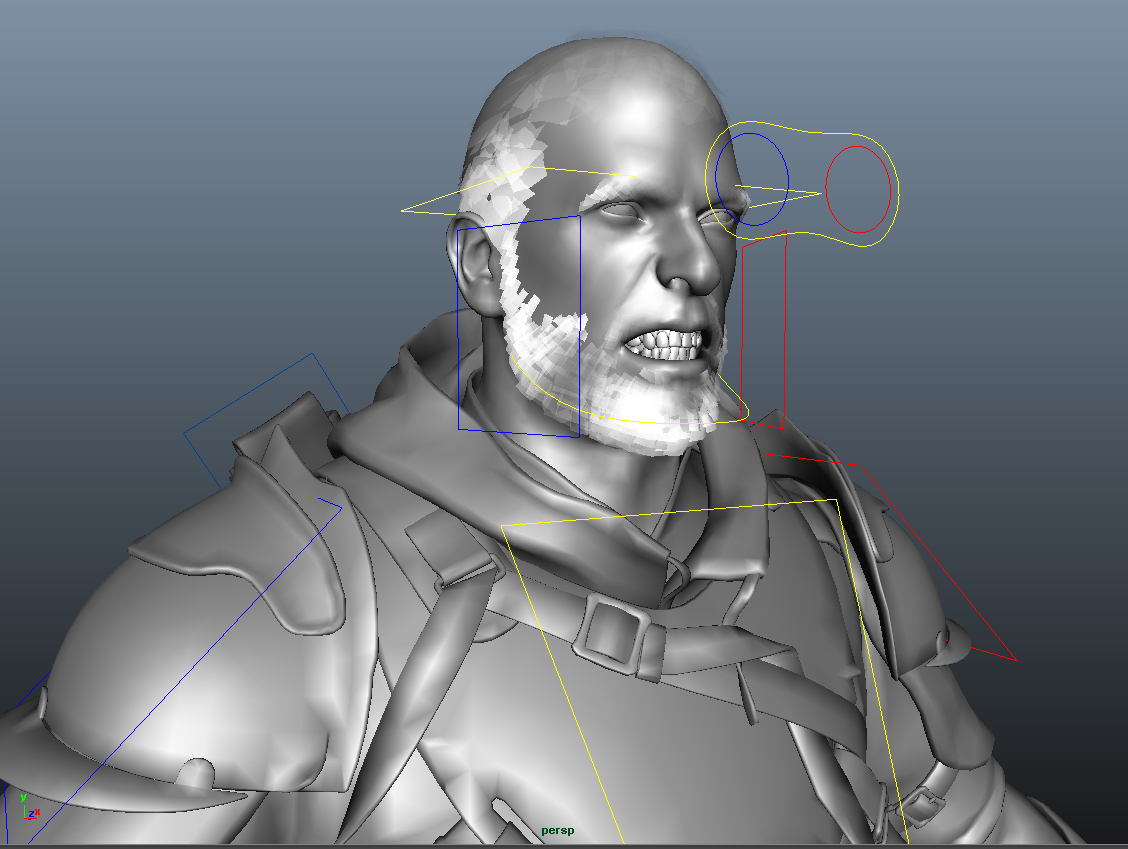
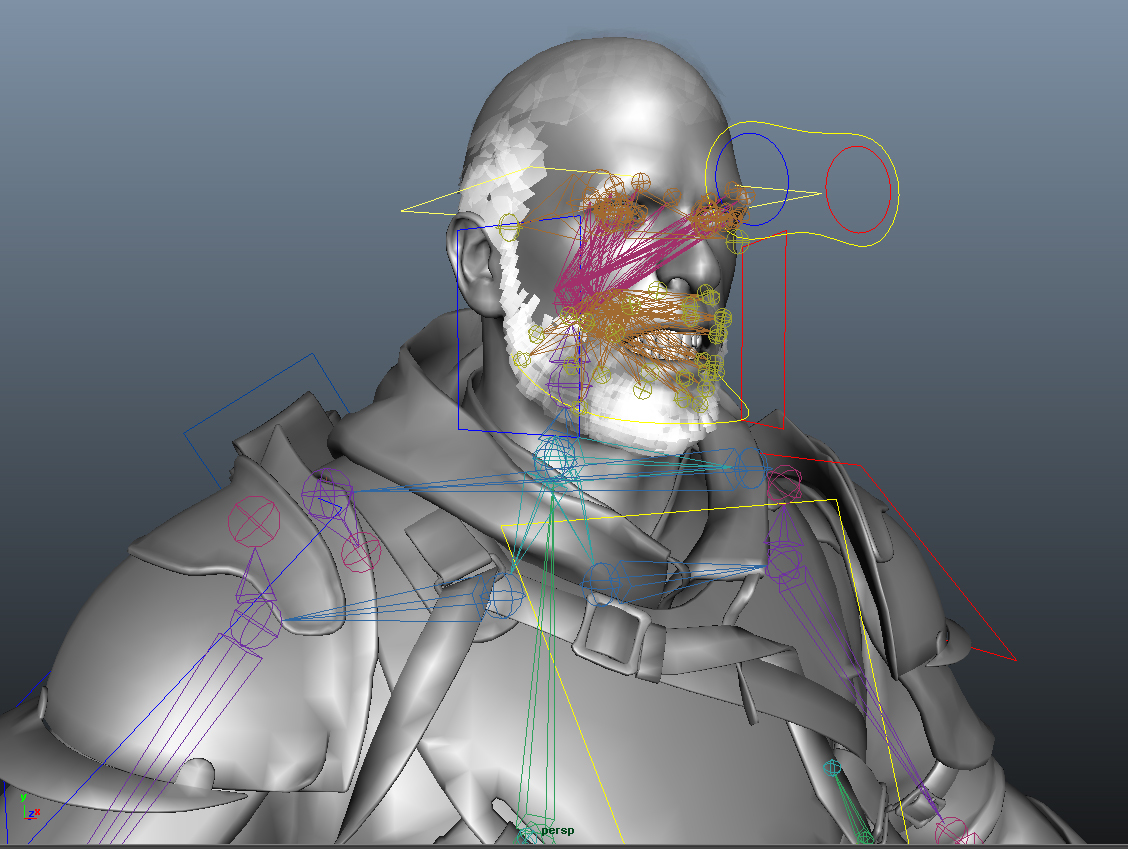
Face joints connect the eyes with the look at control; the rest of the joints around the jaw were used to connect the beard to the facial vertices using this method of rivetting in Maya.
For the correct operation of our hair shader, the beard and hair had to remain separate elements. Animation of the face was done using blendshape. They formed the basis of a unique technology of wrinkle texture management. Thus, when exporting, we again used rivetting to bake joints after the blend shakes.
Assembling footage mocap in the studio
After filming, we recreated the footage in Story mode in Motionbuilder.
At this stage, the animator continued working with content, setting up cameras in the pre-final version of the video. As the person best acquainted with the concept of each scene, the animator was also tasked with consistent editing in the main files. In addition, at this stage it was possible to introduce any ideas that might arise during the filming.
The whole film was divided into several main scenes (separate fbx-files), namely: “Forge Horizon”, “Horizon – Opponent”, “Battle of Heroes” and “Well”. Such an organization of scenes greatly simplified the work with files. At this stage, all fbx files already contained all the necessary content for the final configuration and subsequent export to Unity. Then we divided the duplicate / frame ranges in the Unity import tool.
The next step was to replace all the content from the pre-footage with the mocap material, which made it possible to import pre-final animation into Unity. This had to be done as quickly as possible in order to proceed to the final adjustment of art, lighting and special effects.
Finally, we made several technical edits, but this did not particularly affect the scenes and camera angles. Having finished the work on the figures, the animator transferred all the content back to Maya to finalize the animation of the faces, simulate clothes and hair, as well as add objects and controls.
Final export to Unity
At this stage of development, it is time to replace all temporary files with the final versions of the animation resources. The sequential structure and scenes in Unity remained almost unchanged, since we only overwritten the fbx files and made minor edits to the sequencer.
You can watch the video below to compare different stages of development, from the storyboard to the final version of the film.
Camera effects
As part of this project, we wanted to give the movie a cinematic image, so in each shot we used typical post effects for the movie, in particular some of the standard Unity effects: Depth of Field, Noise and Grain, Vignette and Bloom.
We developed our own motion blur to experiment with how camera settings, such as frame rate and shutter speed, will affect the final image. We also wanted to make sure that we could accurately fix the speed of the animated meshes - for this we needed to track the change in the movement of each bone of the skeleton, surrounding objects and cameras.
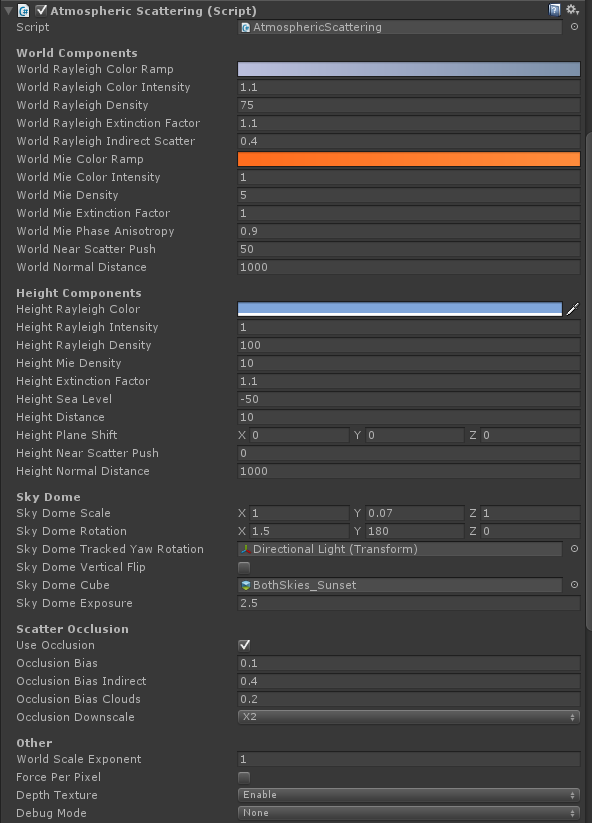
In order to convey the depth and scale of large stage shots, we were looking for a solution that would provide a realistic aerial perspective. Therefore, we specifically developed a component for atmospheric dispersion to replace the fog modes built into Unity. Having a little experimented on the basis of various theoretical works, we decided to sacrifice exact modeling of atmospheric dispersion in favor of complex control over artistic effects.
Here are the camera settings in one of the shots:

To enhance the cinematic effect, we decided to simulate the classic process of transferring a film to a film copy. To do this, we imported screenshots from Unity to DaVinci Resolve - an external professional video production application - and performed color correction and tonal compression in it. In the same place, we created a lookup table, which we then imported into Unity and converted it into a custom image effect. At run time, this effect converted the linear data into a logarithmic distribution, which was then run through the lookup table. Thus, we combined color correction and tonal compression in one process.
Audio
The soundtrack is an audio track imported into Unity and synchronized across the timeline of the sequencer. When writing and synchronizing the track, the composer was guided by an offline render - a special preview for the video. To create the right atmosphere, he focused on the song Ilmarinen's Lament , which we licensed from the US-Swedish indie musician Theo Hakola, and also added elements of his own composition to it.
Video
We wanted this short film to be entirely created in Unity - without any post-processing or editing. To do this, we have developed a separate tool for frame-by-frame rendering at a set time interval. Then each frame was loaded into the memory of the H.264 encoder, mapped to an audio stream and recorded in mp4 format to disk. Finally, the final version of the video was uploaded directly to YouTube.
That's all. Stay tuned for updates on our blog, and in the meantime, be sure to check out the special The Blacksmith page.
You can also check out the previous article in the Making Of series on concept and decoration . All articles about the creation of The Blacksmith can be found on a special page of the project .
Phased animation work
')
Step One: Pre-Visualization
As soon as we decided on the direction of development of The Blacksmith’s concept and decoration, we wanted to see the video on the screen as soon as possible, so we immediately started creating an initial version that could be repelled.
We created the initial versions of the proxy meshes of the characters, made temporary rigs for them with a rough skinning and divided the 3D objects into blocks so that, without losing time, we started to work on the revision.
Thanks to this approach, we were able to calculate the time frame, iterate scenes and angles, and also make some edits. Thus, we got an idea about the dynamics of the film at an early stage. In addition, we were able to assign tasks to third-party contractors and manage the production process much more effectively.
Cameras and rough animation previsa served as a good starting point for further work.
Motion capture
To play the roles of the characters of the video, we hired a Swedish studio stuntmen and mocap-specialists Stuntgruppen , who not only perfectly coped with their task, but also gave us a lot of useful advice on certain scenes. Before going directly to motion capture, we had several joint rehearsals.
Shooting at the site of Imagination Studios in Uppsala went smoothly. Previz proved its worth by serving as a good guide for all participants. And the ability to see the result on the screen in real time even more simplified our task.
Stages of work on the animation
The work on the animation consisted of the following stages:
• Preparation of rigs and joints for additional control in the Maya HIK system;
• Export rigs in fbx format to Motionbuilder;
• Motion capture and transfer of footage to the rigs in Maya;
• Creation of facial animation;
• Simulation of hair and clothing on additional chains of joints;
• Animation of additional objects, their adjustment and export in fbx format to Unity;
• All rigs were imported with Generic installed; on the name map of joints, we added an animation to them in the Unity timeline / sequencer tool;
• Animation of cameras was performed primarily in Motionbuilder; imported duplicates were added to the render camera in Unity by transferring the sequencer to the timeline.
Setup in Unity
Having begun work in Unity, we had to configure rigi first of all. For the two main rigs, we used the Generic Rig setting and performed an automatic matching of the joints attached to them for organizing and optimizing the scenes.
Then we started processing shots in the Scene Manager, but each shot always referred to one of the two main rigs. For this reason, the names of the joints should have correlated 1/1 for more efficient redirection. So, we collected shots from a large number of fbx-files and put them on a timeline so that they point to the main characters in the scene. As a result, the timeline consisted of the following playable elements: Character Track, Camera Track, Prop Track, Event Track, Switcher / Shot Manager Track.
Simulation of clothes, hair and extra joints
We also wanted to focus on the realistic behavior of the hair and clothes of the characters. To do this, we added more joints to the blacksmith's hair and the floors of the clothes of both heroes. The additional setting allowed baking the simulation in joints, and we got a realistic behavior of clothes with a large number of baked bones. We set a high enough bar - we had 256 bones and 4 bones per vertex for each character - and this approach was justified.
Face joints connect the eyes with the look at control; the rest of the joints around the jaw were used to connect the beard to the facial vertices using this method of rivetting in Maya.
For the correct operation of our hair shader, the beard and hair had to remain separate elements. Animation of the face was done using blendshape. They formed the basis of a unique technology of wrinkle texture management. Thus, when exporting, we again used rivetting to bake joints after the blend shakes.
Assembling footage mocap in the studio
After filming, we recreated the footage in Story mode in Motionbuilder.
At this stage, the animator continued working with content, setting up cameras in the pre-final version of the video. As the person best acquainted with the concept of each scene, the animator was also tasked with consistent editing in the main files. In addition, at this stage it was possible to introduce any ideas that might arise during the filming.
The whole film was divided into several main scenes (separate fbx-files), namely: “Forge Horizon”, “Horizon – Opponent”, “Battle of Heroes” and “Well”. Such an organization of scenes greatly simplified the work with files. At this stage, all fbx files already contained all the necessary content for the final configuration and subsequent export to Unity. Then we divided the duplicate / frame ranges in the Unity import tool.
The next step was to replace all the content from the pre-footage with the mocap material, which made it possible to import pre-final animation into Unity. This had to be done as quickly as possible in order to proceed to the final adjustment of art, lighting and special effects.
Finally, we made several technical edits, but this did not particularly affect the scenes and camera angles. Having finished the work on the figures, the animator transferred all the content back to Maya to finalize the animation of the faces, simulate clothes and hair, as well as add objects and controls.
Final export to Unity
At this stage of development, it is time to replace all temporary files with the final versions of the animation resources. The sequential structure and scenes in Unity remained almost unchanged, since we only overwritten the fbx files and made minor edits to the sequencer.
You can watch the video below to compare different stages of development, from the storyboard to the final version of the film.
Camera effects
As part of this project, we wanted to give the movie a cinematic image, so in each shot we used typical post effects for the movie, in particular some of the standard Unity effects: Depth of Field, Noise and Grain, Vignette and Bloom.
We developed our own motion blur to experiment with how camera settings, such as frame rate and shutter speed, will affect the final image. We also wanted to make sure that we could accurately fix the speed of the animated meshes - for this we needed to track the change in the movement of each bone of the skeleton, surrounding objects and cameras.
In order to convey the depth and scale of large stage shots, we were looking for a solution that would provide a realistic aerial perspective. Therefore, we specifically developed a component for atmospheric dispersion to replace the fog modes built into Unity. Having a little experimented on the basis of various theoretical works, we decided to sacrifice exact modeling of atmospheric dispersion in favor of complex control over artistic effects.
Here are the camera settings in one of the shots:
To enhance the cinematic effect, we decided to simulate the classic process of transferring a film to a film copy. To do this, we imported screenshots from Unity to DaVinci Resolve - an external professional video production application - and performed color correction and tonal compression in it. In the same place, we created a lookup table, which we then imported into Unity and converted it into a custom image effect. At run time, this effect converted the linear data into a logarithmic distribution, which was then run through the lookup table. Thus, we combined color correction and tonal compression in one process.
Audio
The soundtrack is an audio track imported into Unity and synchronized across the timeline of the sequencer. When writing and synchronizing the track, the composer was guided by an offline render - a special preview for the video. To create the right atmosphere, he focused on the song Ilmarinen's Lament , which we licensed from the US-Swedish indie musician Theo Hakola, and also added elements of his own composition to it.
Video
We wanted this short film to be entirely created in Unity - without any post-processing or editing. To do this, we have developed a separate tool for frame-by-frame rendering at a set time interval. Then each frame was loaded into the memory of the H.264 encoder, mapped to an audio stream and recorded in mp4 format to disk. Finally, the final version of the video was uploaded directly to YouTube.
That's all. Stay tuned for updates on our blog, and in the meantime, be sure to check out the special The Blacksmith page.
Source: https://habr.com/ru/post/264291/
All Articles