GNS3 in the cloud

Hello! Today I will tell you how to set up a GNS3 server in cloud services. And at the end there will be a small FAQ on GNS3. Google Compute Engine (GCE) was chosen as an example (due to the free two-month trial and lower prices for virtuals in Europe compared to AWS).
Why is it worth bothering?
')
Having tried it once, I no longer run GNS3 locally. It makes no sense to clog the RAM of your laptop laby. In addition, I can run my CCIE labs from any computer (in my case, work and home laptops) - no matter how much RAM / what CPU. At the same time, I save the local lab files to Dropbox, which allows me to continue working on the same lab with different devices.
Under the cat you will find detailed instructions for installing GNS3 in GCE.
VM preparation
1. Registration
You can register here .
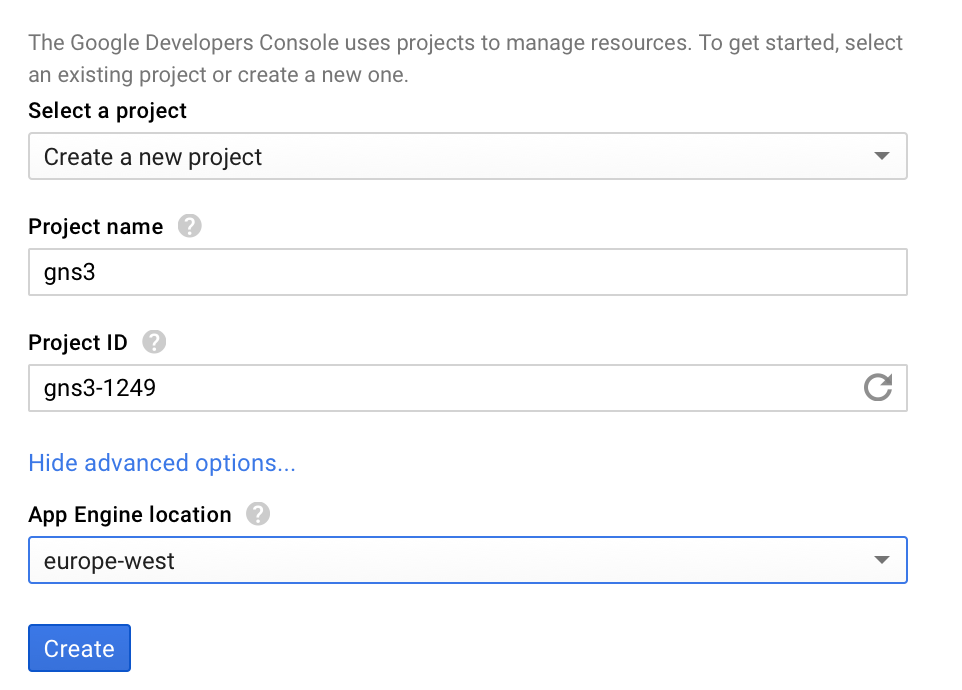
2. Creating a project
After registration, we need to create a project using the Create Project button.
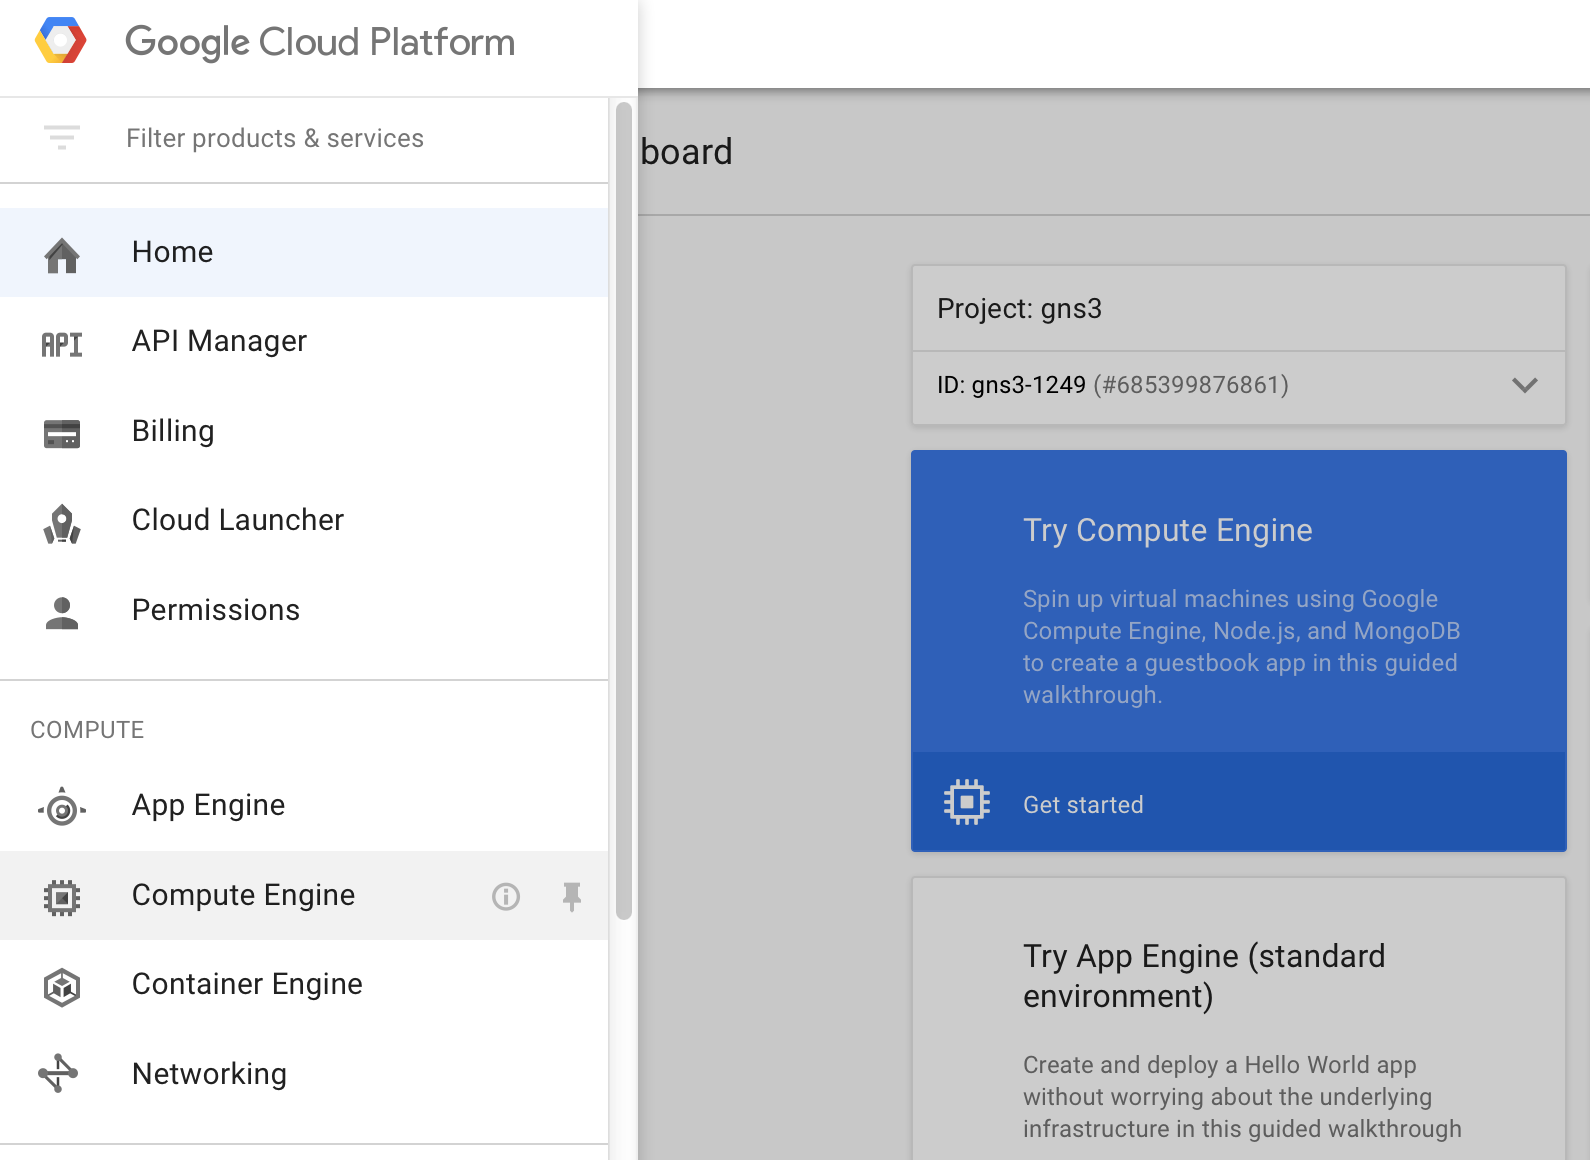
3. Creating a virtual machine (instance)
After creating the project, we get to the Google Cloud Platform menu.
To create a virtual, click in the upper left corner of Menu -> Compute Engine :
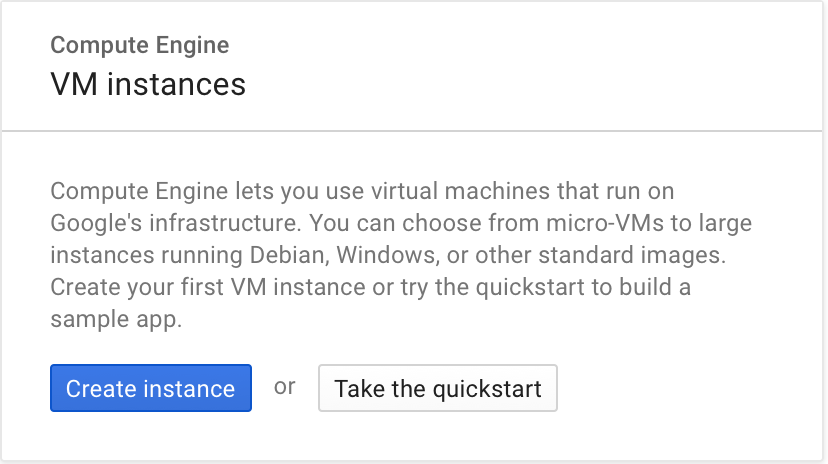
Click on Create instance :
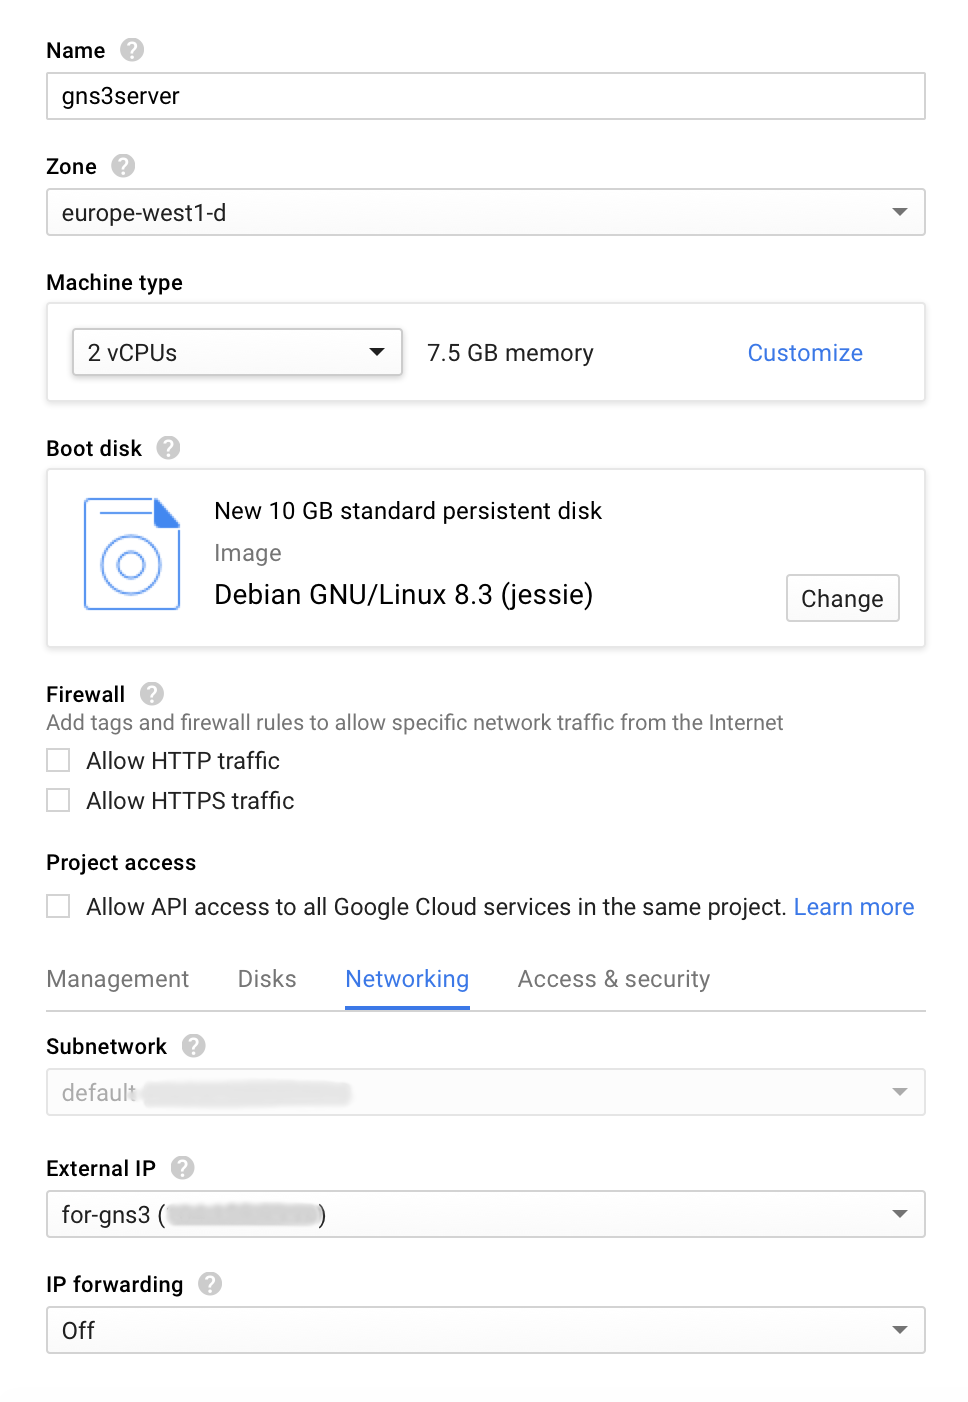
Options:
Name: gns3server
Zone: any in Europe
Machine type: n1-standard-2 (2 vCPU 7.5 GB RAM) or better
Boot disk: 10-15 GB standard persistent disk , image Debian 8.3 jessie (or Ubuntu)
At the bottom, click Networking -> External IP: New Static IP . Enter any name.
Clicking on Create will create a virtual machine.
4. Username verification
After the virtual machine is created, go to it using a browser-based SSH client: SSH -> Open in browser window .
We check the username with whoami . If the username is not gns3 , then you need to change it:
Settings -> Change Linux Username -> enter gns3 -> ok
5. Setting up SSH server access
Now we will configure access for the favorite SSH client, in my case it is SecureCRT.
We need to create a private key (if you do not already have). This can be done using ssh-keygen or PuTTYgen (Windows), or directly to SecureCRT using Tools -> Create Public Key .
The key must be in the OpenSSH format with the gns3 comment. Do not forget to put a password for a private key (encrypt).
Now you need to add the created public key in GCE using the menu: Compute Engine -> Metadata -> SSH keys -> Edit
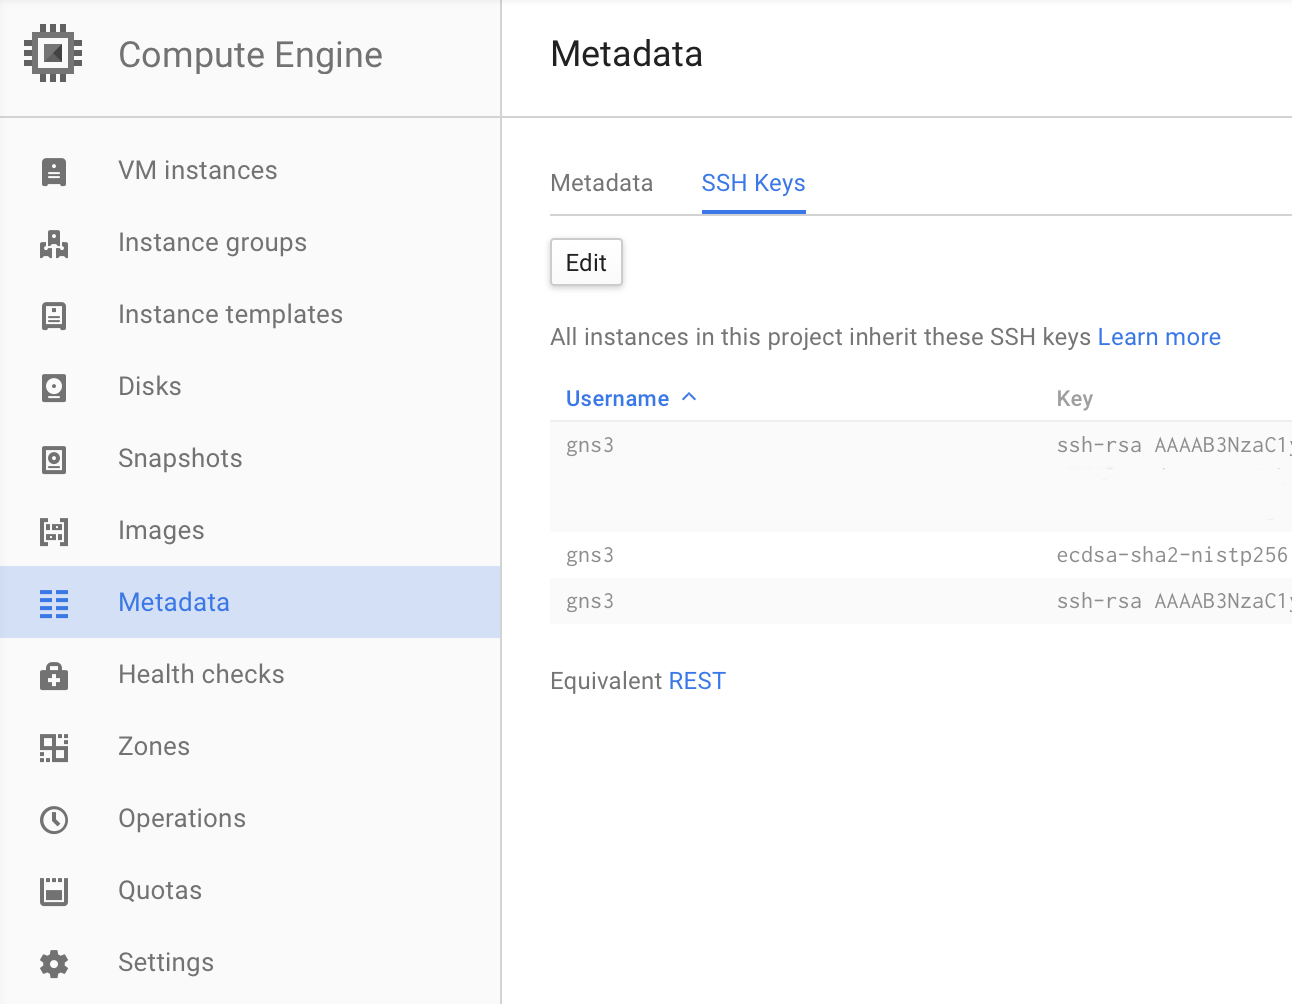
Click Add item , add the contents of the file id_rsa.pub and click Save .
After that, you need to check that we can log into the server using the selected SSH client.
6. Configure Network Access / Firewall
Go to Menu -> Networking , then in Firewall Rules :
We remove 0.0.0.0/0 everywhere, except ICMP.
In the rule of default-allow-ssh, we add our IP to the IP ranges. Do not forget to add later other IPs from which you will be using the GNS3 server.
You can also add Google IP ( 74.125.0.0/16 ) to this rule so that you can log in via SSH through a browser.
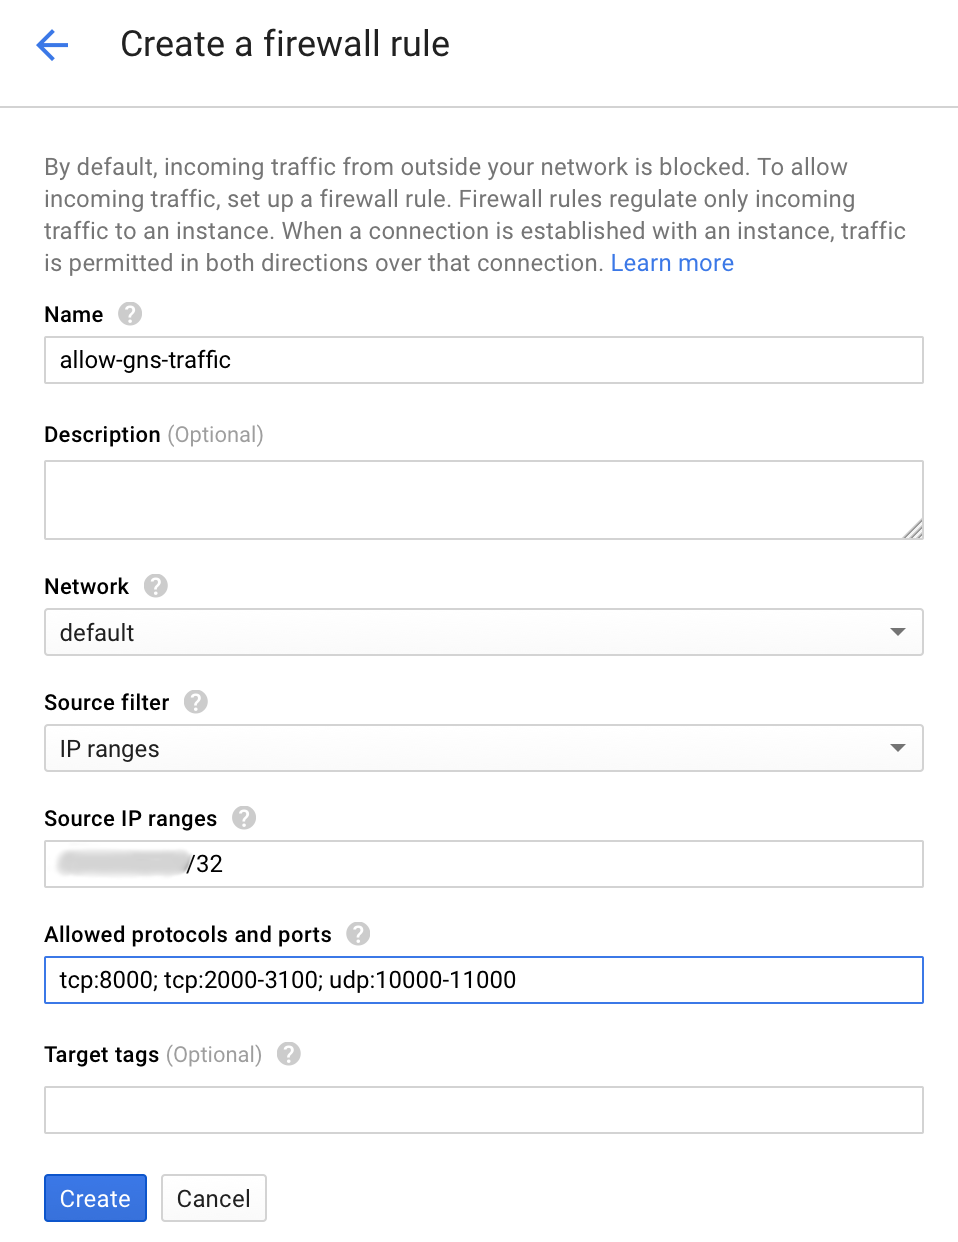
We need to create another rule using the Create Firewall Rule button:
Name - allow-gns-traffic .
Source IP ranges - your IP addresses.
Allowed protocols and ports - tcp: 8000 ; tcp: 2000-3100 ; udp: 10,000-11000
Optional: disable password-less sudo (root without password)
On GCE, password-less sudo is enabled by default, which personally bothers me. In order to disable this, you must run the following commands:
Change the string
sudo passwd gns3 # gns3 # sudo su visudo Change the string
gns3 ALL=NOPASSWD: ALL on gns3 ALL=(ALL) ALL Optionally: manage virtuals locally using Python
We will need a locally installed Python 3 and the Google API client library, which can be installed using pip:
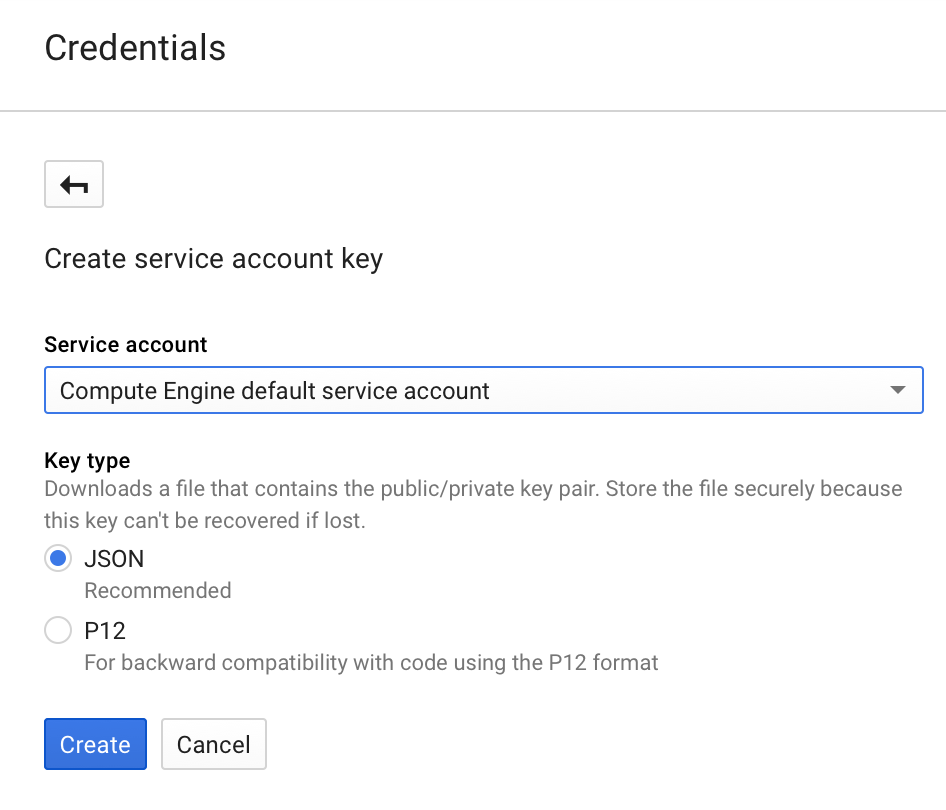
Let's create a key for authorization, for this we go to the Google Cloud Platform Menu -> API Manager -> Credentials . Then click on Create Credentials -> Service account key -> JSON :
Save the JSON file locally to the computer and add the local environment variable:
Now create the following scripts:
Now you can start, stop and check the current state of the virtual machine using the appropriate start.py , stop.py , check.py scripts
sudo pip3 install --upgrade google-api-python-client Let's create a key for authorization, for this we go to the Google Cloud Platform Menu -> API Manager -> Credentials . Then click on Create Credentials -> Service account key -> JSON :
Save the JSON file locally to the computer and add the local environment variable:
GOOGLE_APPLICATION_CREDENTIALS="--json" Now create the following scripts:
tools.py
from oauth2client.client import GoogleCredentials from googleapiclient.discovery import build # , # gns3-#### PROJECT = 'gns3-0000' ZONE = 'europe-west1-d' INSTANCE = 'gns3server' credentials = GoogleCredentials.get_application_default() compute = build('compute', 'v1', credentials=credentials) def start_instance(compute): return compute.instances().start( project=PROJECT, zone=ZONE, instance=INSTANCE).execute() def stop_instance(compute): return compute.instances().stop( project=PROJECT, zone=ZONE, instance=INSTANCE).execute() def check_status(compute): return compute.instances().get( project=PROJECT, zone=ZONE, instance=INSTANCE).execute()['status'] start.py
#!/usr/bin/env python3 # -*- coding: utf-8 -*- from tools import compute, start_instance def main(): print(start_instance(compute)) if __name__ == '__main__': main() stop.py
#!/usr/bin/env python3 # -*- coding: utf-8 -*- from tools import compute, stop_instance def main(): print(stop_instance(compute)) if __name__ == '__main__': main() check.py
#!/usr/bin/env python3 # -*- coding: utf-8 -*- from tools import compute, check_status def main(): print(check_status(compute)) if __name__ == '__main__': main() Now you can start, stop and check the current state of the virtual machine using the appropriate start.py , stop.py , check.py scripts
Installing GNS3 server directly on virtualku
7. Adding a repository (PPA) with GNS3 packages
You need to make changes to the following file:
sudo nano /etc/apt/sources.list Add to the end of the file the following:
deb http://ppa.launchpad.net/gns3/ppa/ubuntu trusty main deb-src http://ppa.launchpad.net/gns3/ppa/ubuntu trusty main Add a key for PPA:
sudo apt-key adv --keyserver hkp://keyserver.ubuntu.com:80 --recv-keys A2E3EF7B 8. Install the necessary packages
First, update the installed packages:
sudo dpkg --add-architecture i386 && sudo apt-get update && sudo apt-get upgrade Install everything you need for a GNS3 server:
sudo apt-get install git python3 python3-pip gns3-server gns3-iou 9. Changing the maximum queue length for datagrams
This is necessary to get rid of EXCESSCOLL errors while working with the lab. Make changes to the following file:
sudo nano /etc/sysctl.conf Add at the end:
# Prevent EXCESSCOLL error net.unix.max_dgram_qlen=1000000 Note : if you are going to use IOL, then you must also put the license file in your home directory ( ~ / .iourc ). Let me remind you that legally you can get it only if you are a Cisco employee.
10. Automatic start of the GNS3 server when starting virtuals.
Remember that the latest version of Debian uses systemd as the init system / service manager.
Training:
Create a log file and transfer the rights to it to the gns3 user.
sudo touch /var/log/gns3.log sudo chown gns3 /var/log/gns3.log It is also necessary to create several directories at the time of launch. To do this, make changes to the following file:
sudo nano /etc/tmpfiles.d/gns3.conf Add:
d /var/run/gns3 0755 gns3 gns3 d /var/cache/gns3 0755 gns3 gns3 Create the gns3server daemon configuration file:
sudo nano /etc/systemd/system/gns3.service Add:
[Unit] Description=GNS3 server [Service] Type=forking Environment=statedir=/var/cache/gns3 PIDFile=/var/run/gns3/gns3.pid ExecStart=/usr/bin/gns3server --log /var/log/gns3.log \ --pid /var/run/gns3/gns3.pid --daemon Restart=on-abort User=gns3 [Install] WantedBy=multi-user.target We start the daemon and reboot the virtual machine to create the directories:
sudo systemctl enable gns3.service sudo reboot now 11. Verification
Check that gns3server works and find out its version:
➜ ~ systemctl check gns3 active ➜ ~ ps -aux | grep gns3server gns3 574 0.0 0.3 172704 30396 ? Sl 16:02 0:00 /usr/share/gns3/gns3-server/bin/python /usr/bin/gns3server --log /var/log/gns3.log --pid /var/run/gns3/gns3.pid --daemon ➜ ~ gns3server --version 1.4.4 12. Domain Records
We also need to create domain records for the server. If you have your own domain, I advise you to create a subdomain for GCE static IP.
If you do not have a domain, add the following entry to your local hosts file:
<GCE static IP> gns3server On the GNS3 server, you also need to change / etc / hosts :
sudo nano /etc/hosts Add:
127.0.0.1 < gns3server> This completes the configuration of the server part.
Configuring the local GNS3 client
13. Client download
Download the client here .
You must install the GNS3 client of the same version as the gns3server (see step # 11).
14. Starting and configuring the client
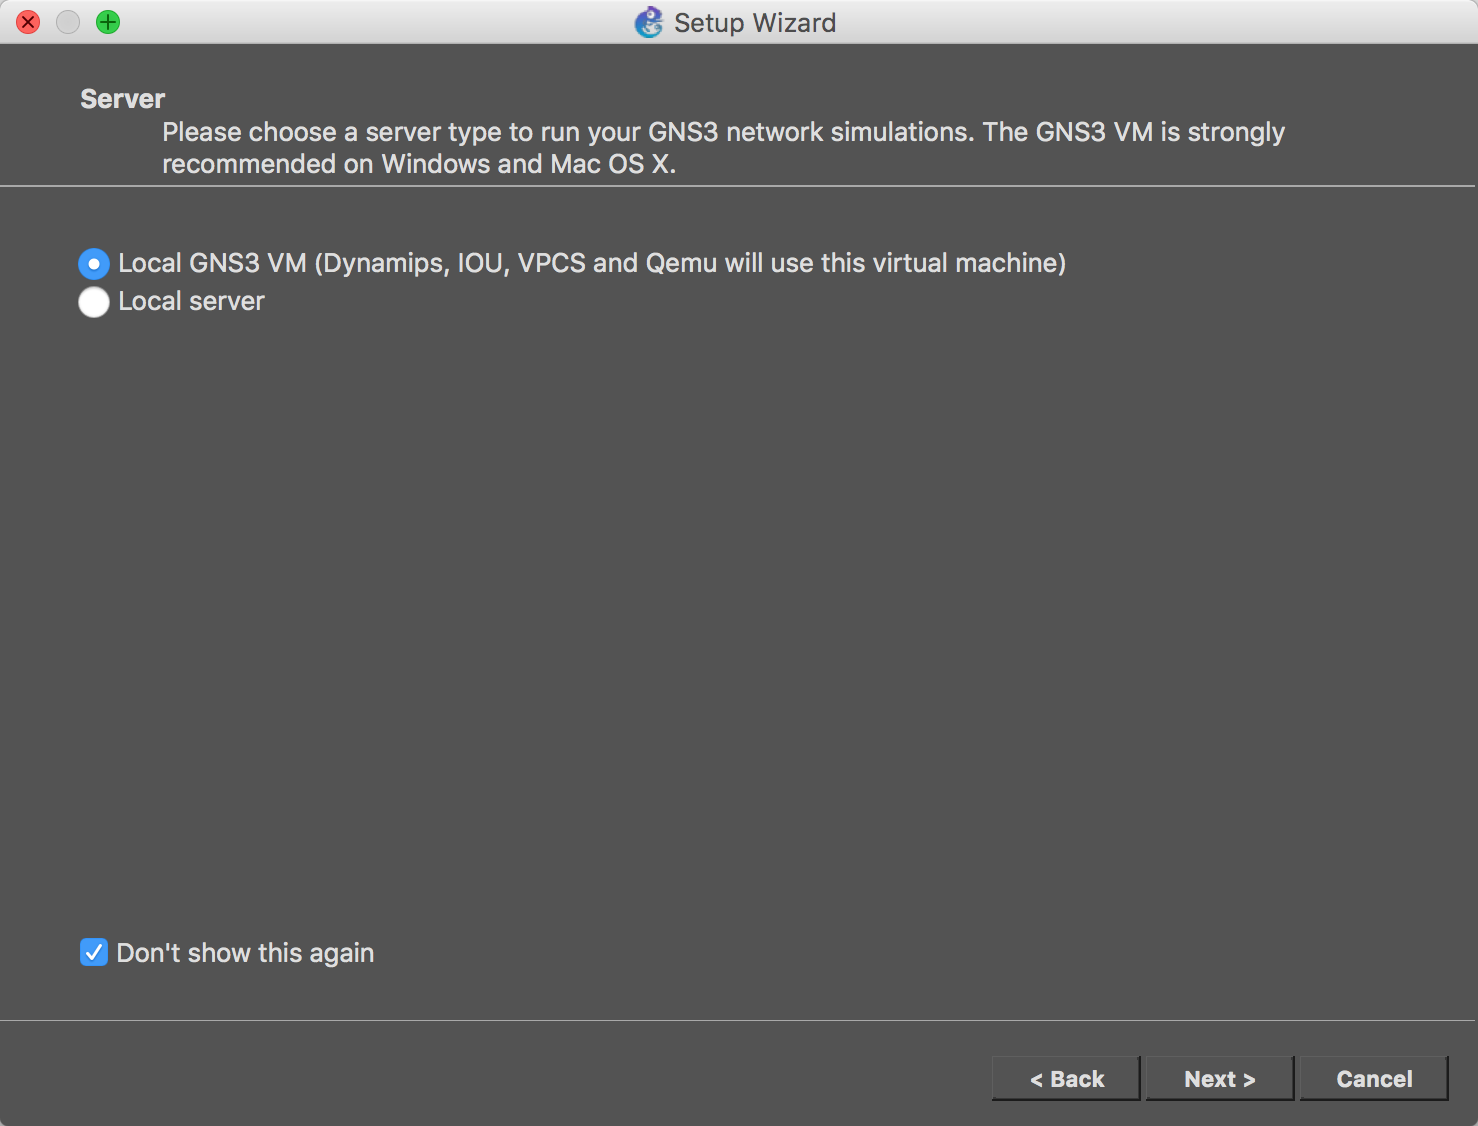
When the client starts, the Setup Wizard appears .
Click Don't show this again , then Cancel
Then, on the project selection window, click Cancel again.
Go to the Preferences menu.
Click on the Server section, uncheck Enable local server .
Click the Remote Servers tab, add the domain name of your GNS3 server or gns3server , click Add :
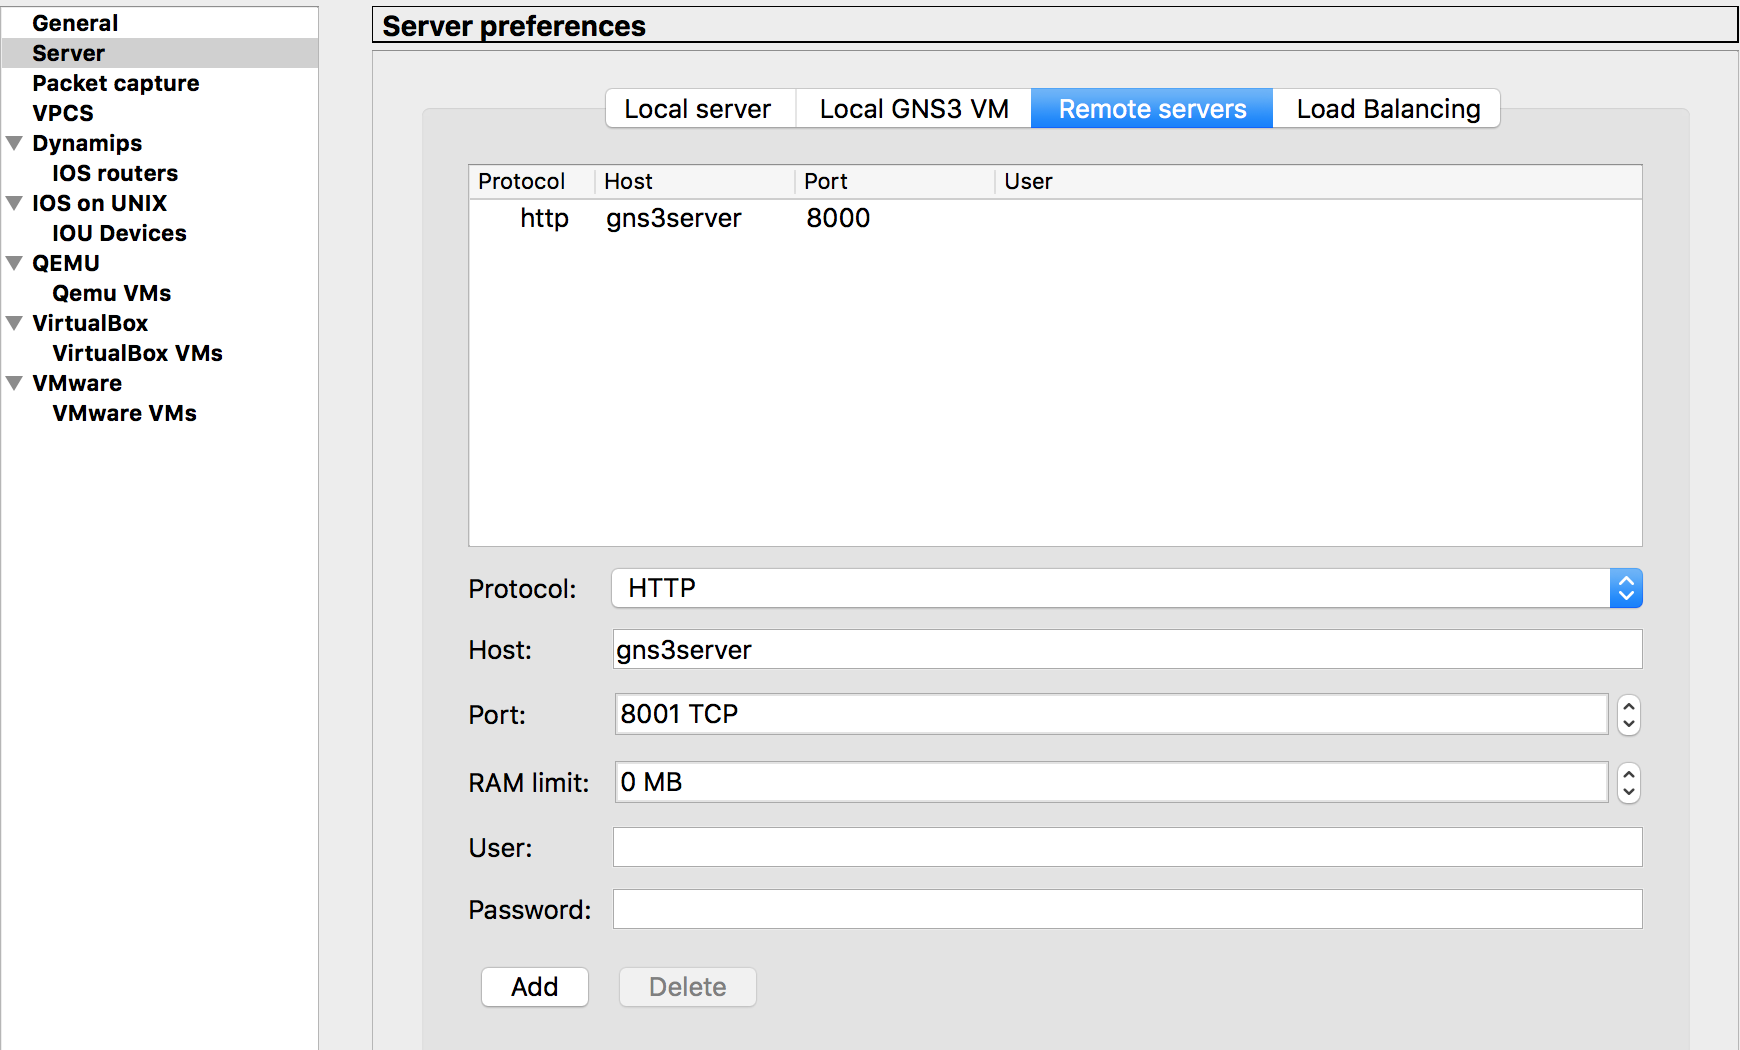
Click on the VPCS section, uncheck Enable local server .
Click on the Dynamips section, uncheck Enable local server .
Click on Apply at the bottom of the window.
Click on the section Dynamips -> IOS routers . Click on New . A window like this should appear:
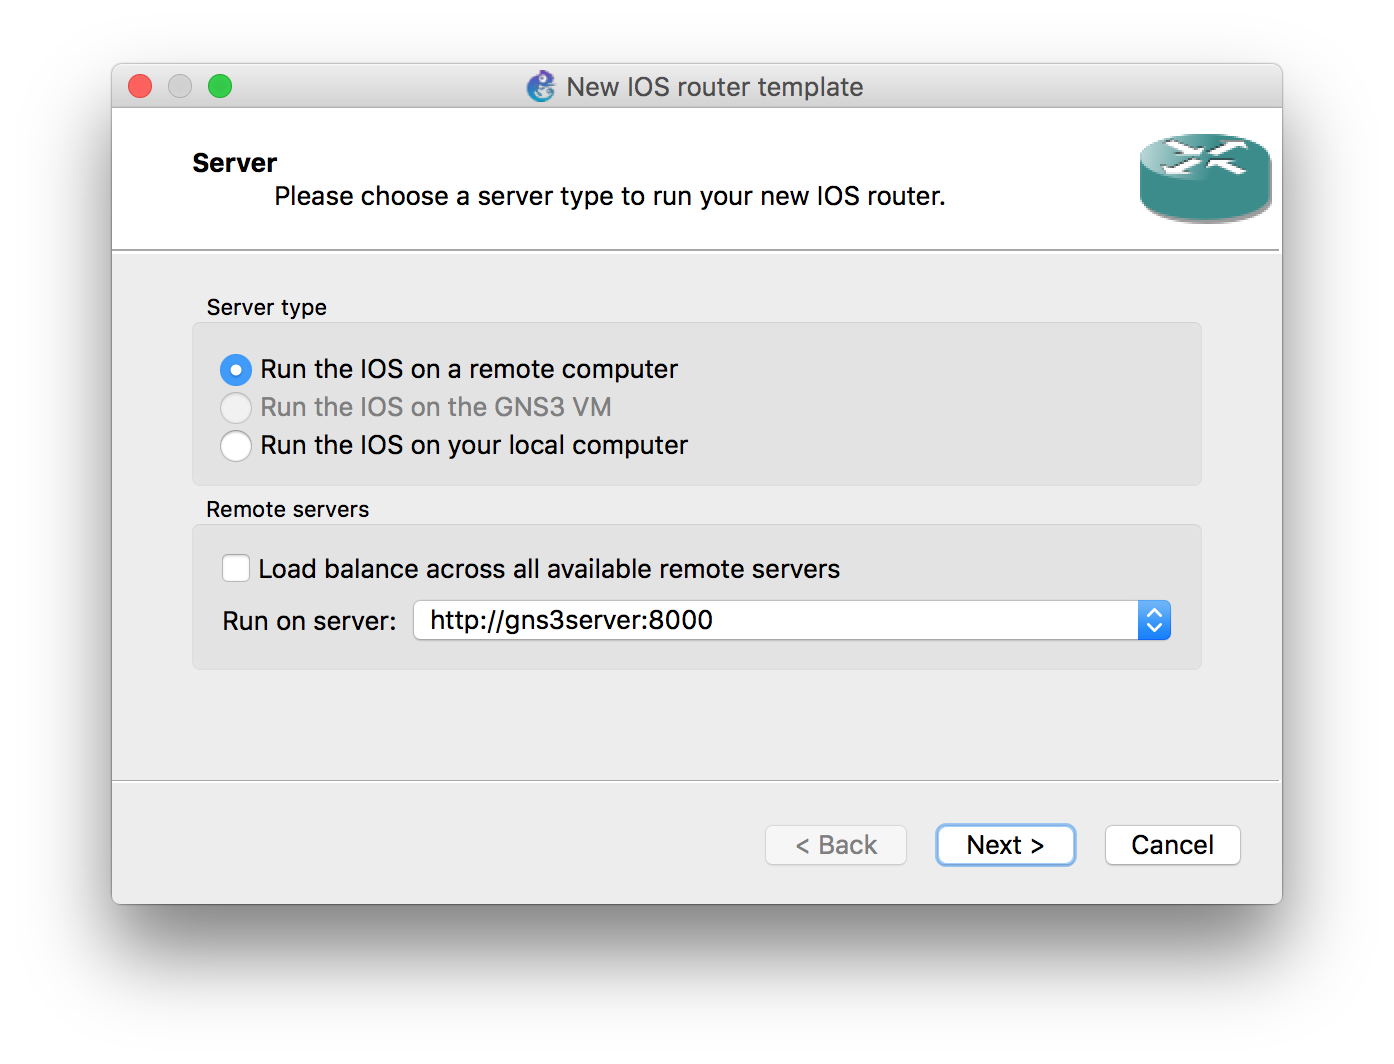
Remove the Load Balance checkbox and select the desired server.
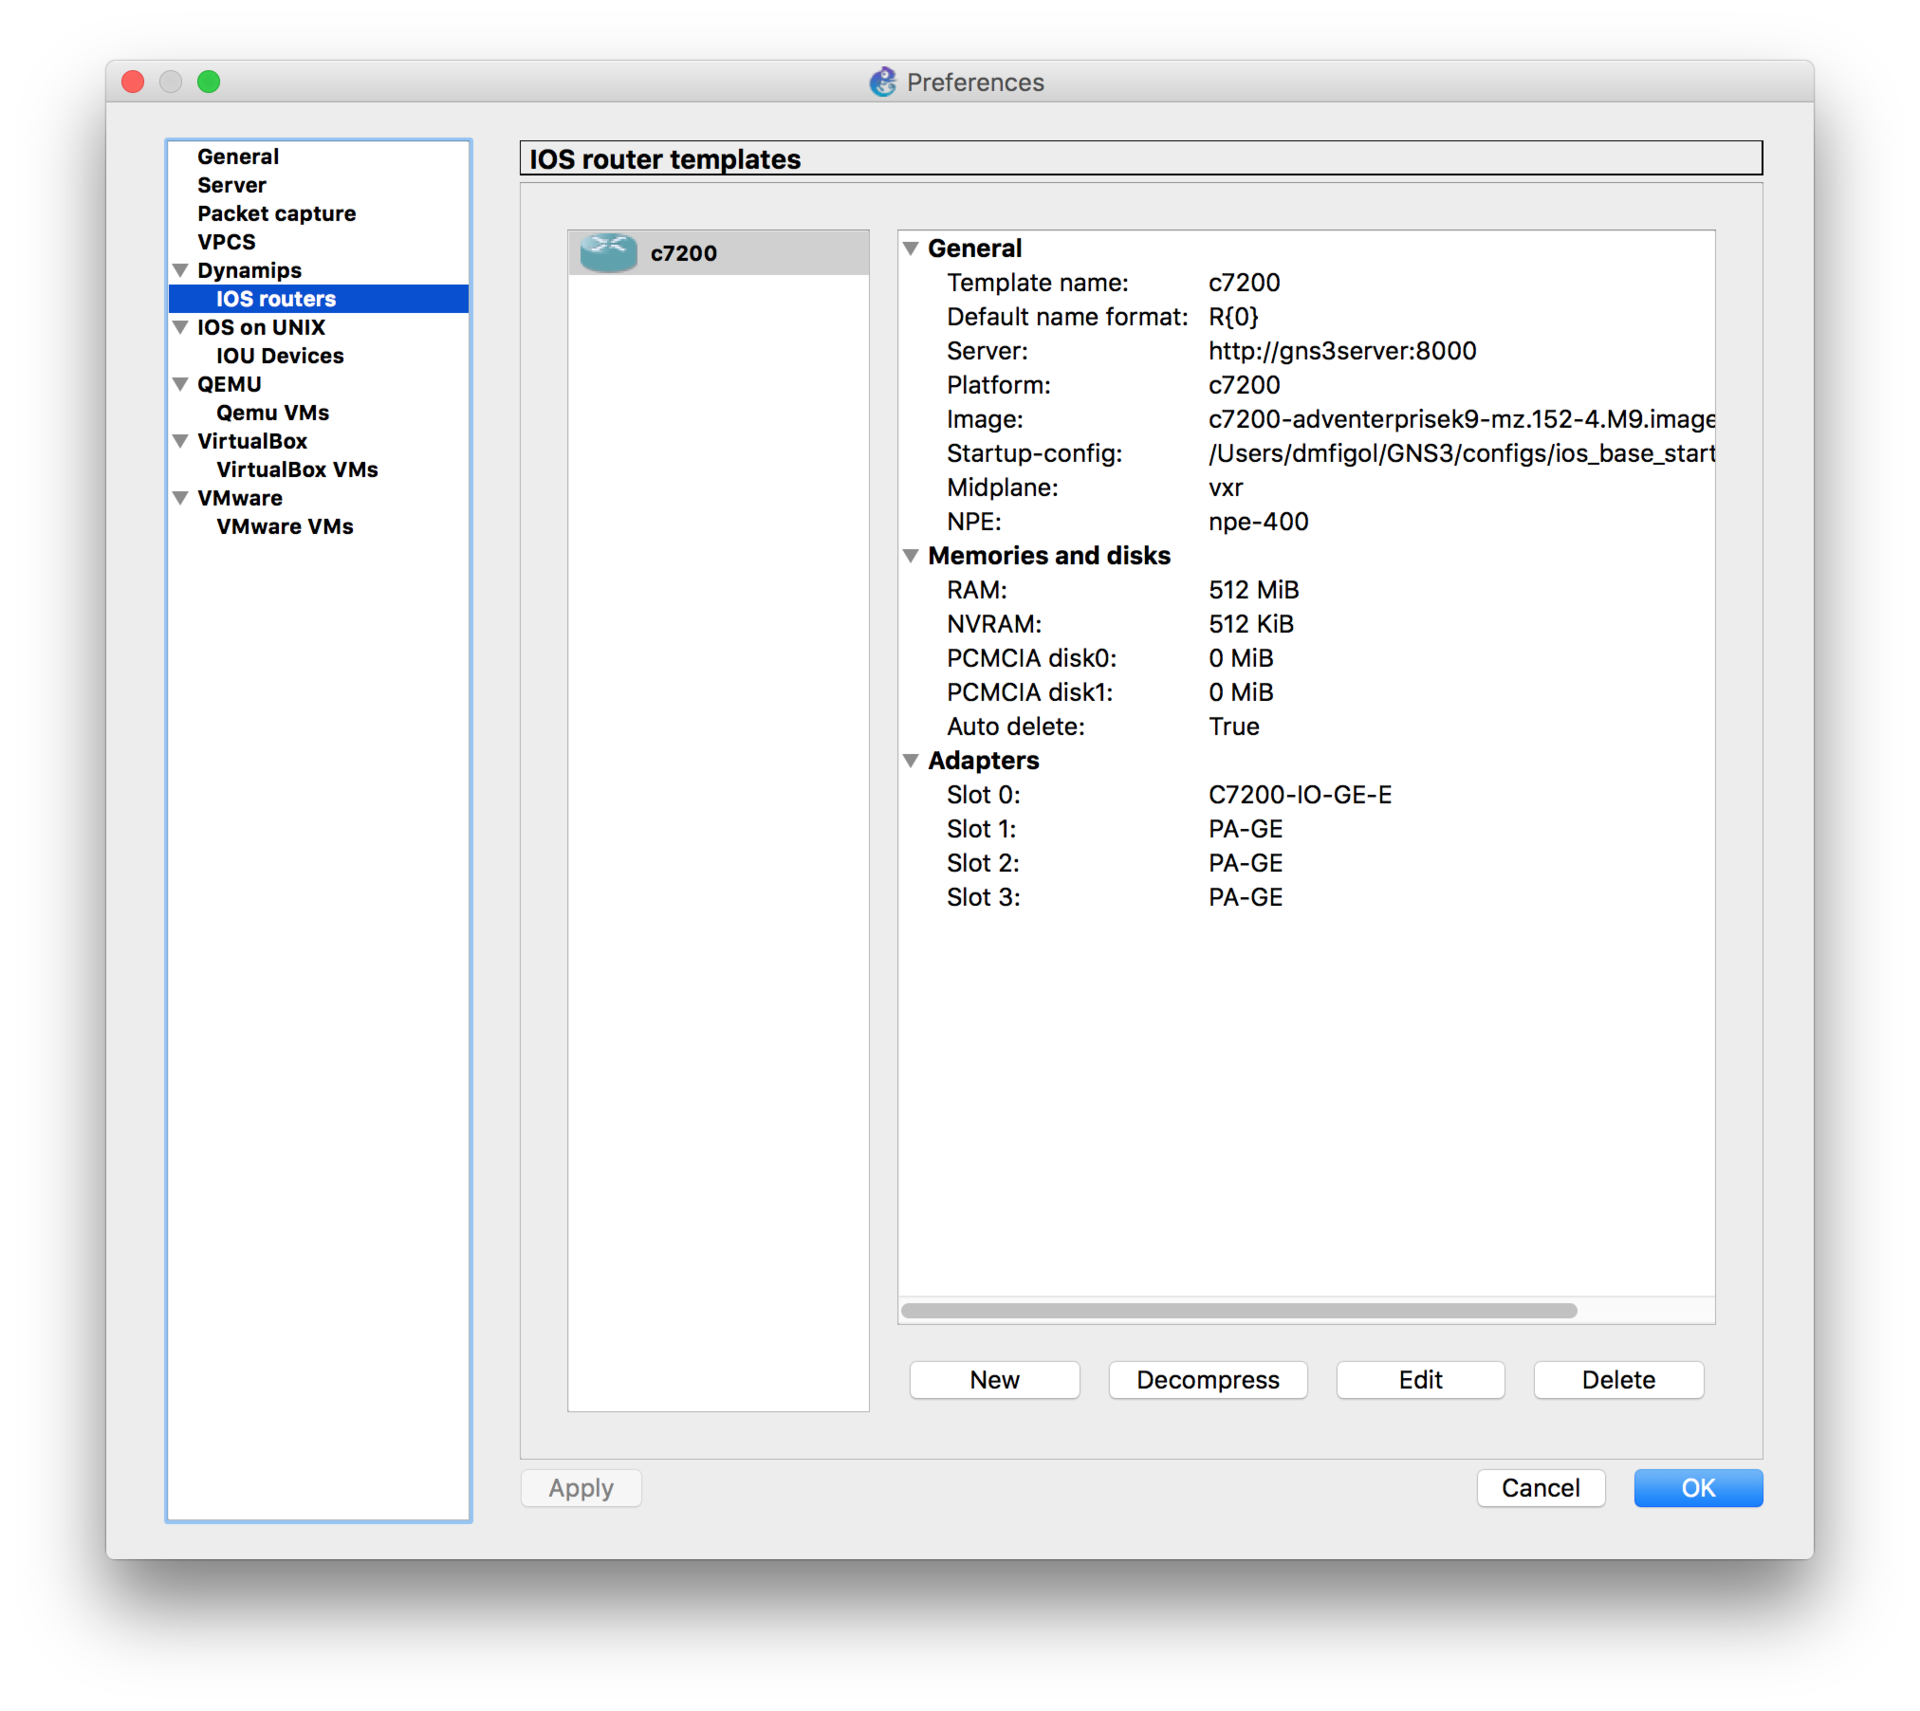
Next, select the local image that you want to use - it will be downloaded automatically to the server. Next, follow the dialog box. As a result, the selected Dynamips IOS image should appear in the list:
IOL images are added in the same way using the IOS on UNIX -> IOU Devices section .
After adding all the images click OK .
15. Verification
Let us build a small topology for the test, consisting of a switch and three routers:
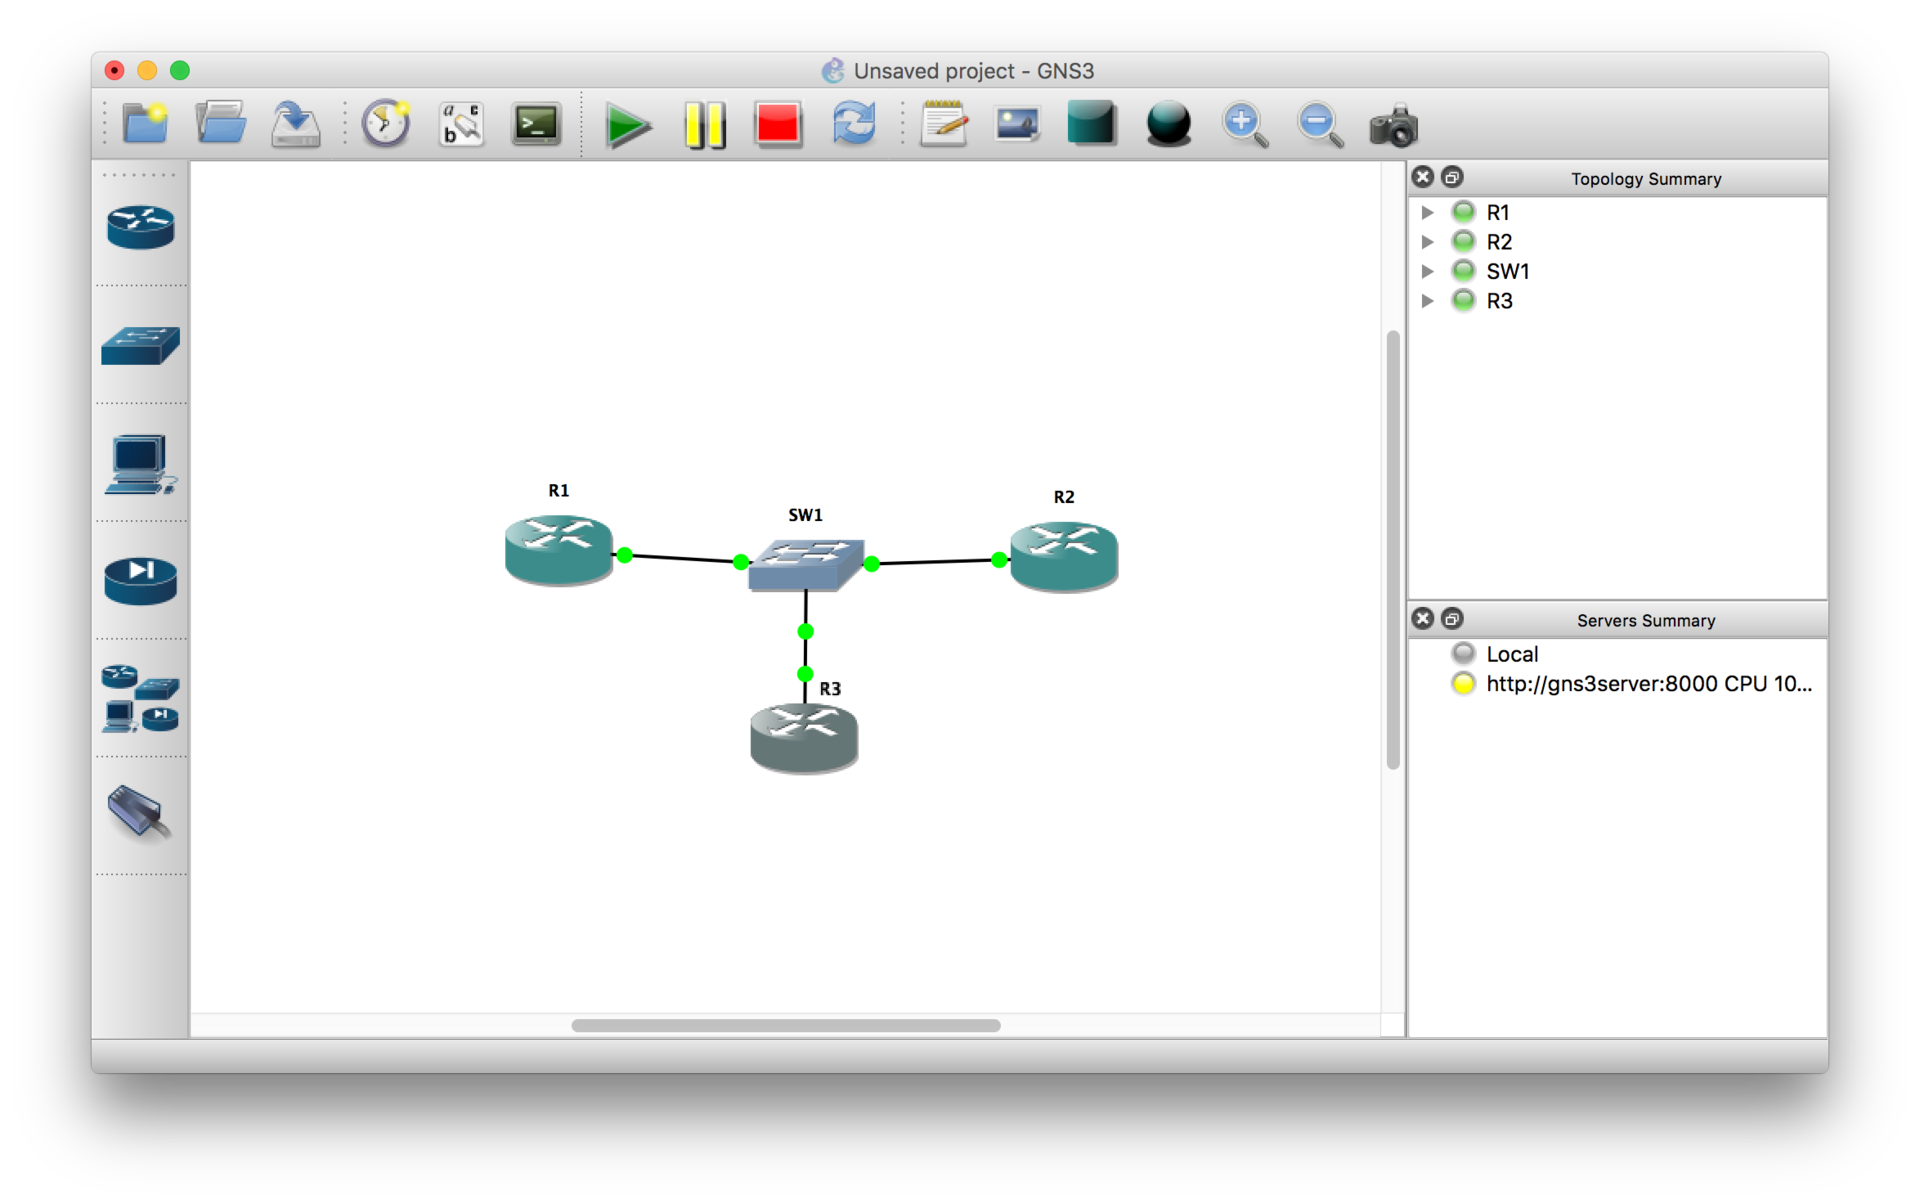
To launch the topology, use the Start / Resume all devices button on the panel.
After launching all devices, you can connect to console ports by clicking on Console connect to all devices .
Congratulations, your labs can now be running in the cloud!
FAQ
I don't use GNS3 yet, but I want to start. Which version should I use?
- Last stable. At the time of writing this article is 1.4.4.
How to change the default application for console access?
- Preferences -> General -> Console Applications -> Edit
How to set up Wireshark Live Capture?
- Install Wireshark version 2.x, in GNS3 Preferences -> Packet Capture make sure that the correct path to Wireshark is used.
When I launch the GUI, I get the following message: => Client version X differs with server version Y.
Do I have to use the same version of the client and server?
-It is better to use the same, but in most cases, if the client and the server are from the same branch (for example, 1.4), even despite the warning, everything will work fine.
Is there a legal way to use IOL in GNS3 for non-Cisco engineers?
- Not. In this case, the only legal way to use IOL for your topologies is Cisco's CCIE Lab Builder.
Can I use Qemu (KVM) images in the cloud?
- Theoretically, it is possible if your cloud service supports Nested Virtualization / KVM hardware acceleration. Unfortunately, neither in AWS nor in GCE can this be enabled.
Is adding QEMU images as difficult as before?
- No, 1.4 added Appliances - these are special files with preconfiguration available for download. You are only required to provide the desired image.
Can I export / import different configs for the same labs if I use IOL?
- Yes, using the File option -> Import / Export configs . Do not forget to stop all the devices (before import / export), and before export you also need to save the project.
When the IOL device starts up, the initial configuration dialog is shown to me, can this be avoided?
- Yes. To do this, you need to specify all physical interfaces in the startup-config.cfg file, according to the number of ethernet and serial adapters, given that one adapter contains 4 interfaces. The minimum config for 1 ethernet and 1 serial adapters:
interface Ethernet0/0 ! interface Ethernet0/1 ! interface Ethernet0/2 ! interface Ethernet0/3 ! interface Serial1/0 ! interface Serial1/1 ! interface Serial1/2 ! interface Serial1/3 ! I have a physical server or servers where I want to run GNS3. Do I also need to perform as many steps for GNS3 to work?
- Not. Just download the GNS3 VM where everything is preinstalled, and add a Remote Server, as shown in the last part of the article.
Is multi-user mode supported?
- More likely no than yes. There is still a lot to do to be able to add it to the list of supported features. However, in the current version of GNS3, ports for console connections are automatically selected if the selected port is busy, which allows several users to do labs at the same time.
Where is GNS3 heading?
- Docker support is expected in 1.5.x. Also planned Web GUI (you can choose a separate application or Web GUI) and multiplayer mode. Unfortunately, if I'm not mistaken, both of these features are not planned in 1.5.x
I have suggestions for improving GNS3. Where should i write?
- GNS3 - open source project, the code is laid out on Github. If you are a developer, you can send them your pull request. If you do not have the opportunity to help the code, you can write about the bugs found and your wishes on the GNS3 forum or directly on the GUI github-> issues or Server github-> issues . You can also chat with developers in the IRC channel on irc.freenode.net # gns3: noplay, grossmj.
Source: https://habr.com/ru/post/263761/
All Articles