Quick start with PHPixie 3

After two years of development, the third version of the PHPixie framework has been completed . Why so long? In fact, during this time, at least three ORMs and template engines were written, which were deleted and copied again, because “aah, you can do better”. Especially a lot of time was spent on tests, without which a huge amount of improvements simply would not have been noticed. Many times I just wanted to leave this business, stop at the second version and add modules to it. But now, when all these iterations have been completed, I can confidently say that this is the best implementation that I know (and which I was capable of). This is what will make you happy with PHPixie 3:
- Compliance with PSR-2 and PSR-4 standards
- PSR-7 query support and library for convenient work with them
- Templates using simple PHP, but with support for inheritance and blocks like Twig. Allows you to easily add your extensions and other formats, such as HAML, etc.
- ORM which is easy to use as ActiveRecord, but at the same time breaking the logic of requests, entities and repositories separately. Supports links to MongoDB collections and optimizes queries on many entities at the same time (for example, you can link several articles with several tags in one query)
- The approach with processors instead of the usual controllers allows you to create an arbitrary architecture.
- The configuration component allows you to split the settings by depth into folders (for example, the languages.en.plural.mouse key can refer to the plural.mouse key in the languages / en.php file )
- The bundle system allows you to easily use one code in several projects and shares it with other users. Bundles are installed through the composer like any other library.
And now a short tutorial that will show you everything you need to know to start developing with PHPixie 3:
')
Installation
First we create the project skeleton using Composer:
php composer.phar create-project phpixie/project your_project_folder 3.*-dev Set up your HTTP server in the / web directory. In the case of Nginx, you also need to add this to the config:
location / { try_files $uri $uri/ /index.php; } If you are using Windows, you will need to create a shortcut / web / bundles / app pointing to / bundles / app / web.
On Linux and MacOS, the shortcut will work out of the box. It is needed in order to open access to the web files of the default bundle (I will explain everything now).
Now going to localhost's link should see a short greeting.
Bandla
PHPixie 3 supports the bundle system, such as Symfony2. If you have not worked with them yet, imagine that the site can now be divided into logical parts, which can then be easily transferred to other projects and shared through Composer. For example, user authentication can be created as a separate bundle with its own templates, styles and images and then used on several projects. Bands are “mounted” in a project, as for example in Linux, disks are mounted in a file system.
At first, a project is created with a single 'app' bundle in '/ bundles / app'. And although the structure of the project in the third version seems more complicated than in the second, but as long as you have only one bundle, you will rarely do something outside this directory.
Processors
The familiar concept of MVC Controllers is greatly expanded in PHPixie, it now supports infinite nesting and arbitrary architecture. The idea is that there is only one “controller” in terms of the framework. But he can, for example, delegate his functions to “subcontrollers” and generally do what he wants. The processor interface (as they are now called) consists of only one process ($ request) method. This allowed us to create several base classes of processors that process requests in different ways. Of course, one of the options is completely similar to the usual controllers, so you can do everything in the old way, which is what the standard Greet processor does, which showed us the greeting after installation.
Now we will create a new Quickstart processor, on which we will try everything:
// bundles/app/src/Project/App/HTTPProcessors/Quickstart.php namespace Project\App\HTTPProcessors; use PHPixie\HTTP\Request; // class Quickstart extends \PHPixie\DefaultBundle\Processor\HTTP\Actions { /** * Builder * * @var Project\App\Builder */ protected $builder; public function __construct($builder) { $this->builder = $builder; } // public function defaultAction(Request $request) { return "Quickstart tutorial"; } // } Now you need to register it in the main processor of the bundle. By default, it is configured to send a request to the processor specified in the routing parameters. In the second version, there was no need to register controllers anywhere, since they were determined automatically by namespace and class name. This approach is inconvenient because it makes us fit into some frameworks with class naming and folder structure. Now for each controller, a builder method is simply added, which allows you to call the classes as you like and pass different parameters through the constructor.
// bundles/app/src/Project/App/HTTPProcessors.php //... protected function buildQuickstartProcessor() { return new HTTPProcessors\Quickstart( $this->builder ); } //... Going to localhost / quickstart now we will see the message "Quickstart tutorial".
Now you can try other parts of the framework.
Routing
Often you have to create links like / quickstart / view / 4 including the id or the name of the page or product. To do this, first create a simple action in our processor:
// bundles/app/src/Project/App/HTTPProcessors/Quickstart.php //... public function viewAction($request) { // 'id' return $request->attributes()->get('id'); } //... } Now you also need to add a rule with this parameter to those that are already registered in the config. But first, let's look at how it looks:
// bundles/app/assets/config/routeResolver return array( // // // - 'type' => 'group', 'resolvers' => array( //... // 'default' => array( 'type' => 'pattern', // 'path' => '(<processor>(/<action>))', // // /greet // 'action' 'default' 'defaults' => array( 'processor' => 'greet', 'action' => 'default' ) ) ) ); The part we want to add looks like this:
'view' => array( 'type' => 'pattern', // id // 'path' => 'quickstart/view/<id>', 'defaults' => array( 'processor' => 'quickstart', 'action' => 'view' ) ) Since the routes are selected in order, it is important that the more specific rules in the config are higher than the general ones.
Now going to localhost / quickstart / view / 5 you will see '5' in response.
As a quick example of what can be achieved in the settings, try setting a common prefix for several routes with their own parameters. It's okay if it seems difficult, at the moment it does not matter to us:
array( // 'type' => 'prefix', // // 'path' => 'user/<userId>/', 'resolver' => array( 'type' => 'group', 'resolvers' => array( // /user/5/friends to Friends::userFriends() 'friends' => array( 'path' => 'friends', 'defaults' => array( 'processor' => 'friends', 'action' => 'usersFriends' ) ), // /user/5/profile to Profile::userProfile() 'profile' => array( 'path' => 'profile', 'defaults' => array( 'processor' => 'profile', 'action' => 'userProfile' ) ) ) ) ); This approach allows not only to get more flexible settings (after all, it’s enough to change the prefix in one place and it will change in all nested routes), but also to win in performance, because if the prefix did not fit, then all routes written in it are skipped.
Input and Output
As you have already noticed, each action receives a request as a parameter and returns some kind of response. Here is how we can get different information from the request:
//$_GET['name'] $request->query()->get('name'); //$_POST['name'] $request->data()->get('name'); // $request->attributes()->get('name'); And now a little more interesting:
$data = $request->data(); // $data->get('name', 'Trixie'); // // 'name' $data->getRequired('name'); // // $_POST['users']['pixie']['name'] $data->get('users.pixie.name'); // '' // $pixie = $data->slice('users.pixie'); $pixie->get('name'); // $data->get(); // $data->keys(); // // foreach($data as $key => $value) { } // // phpixie/slice // JSON requests are also automatically parsed in $ request-> data (), which already facilitates working with AJAX requests
The conclusion is even simpler:
// return 'hello'; // JSON // return array('success' => true); // // HTTP $http = $this->builder->components()->http(); $httpResponses = $http->responses(); // return $httpResponses->redirect('http://phpixie.com/'); // return $httpResponses->stringResponse('Not found', $headers = array(), 404); // return $httpResponses->downloadFile('pixie.jpg', 'image/png', $filePath); // // CSV return $httpResponses->download('report.csv', 'text/csv', $contents); Templates
PHPixie template engine supports template inheritance, blocks and the ability to easily add your own extensions and even formats.
By default, the standard bundle loads templates from the bundles / app / assets / templates folder.
It already contains two files that were used by the standard Greet processor.
Let's start by creating a simple template:
<!-- bundles/app/assets/templates/quickstart/message.php --> <!-- $_() HTML, '<', '>' .. , XSS . --> <p><?=$_($message)?></p> Now add another action to the processor:
// bundles/app/src/Project/App/HTTPProcessors/Quickstart.php //... public function renderAction($request) { $template = $this->builder->components()->template(); return $template->render( 'app:quickstart/message', array( 'message' => 'hello' ) ); } //... } And we see the result of the link localhost / quickstart / render
If you like to pass parameters to the template dynamically, rather than an array, then this approach is also available:
$template = $this->components()->template(); $container = $template->get('app:quickstart/message'); $container->message = 'hello'; return $container->render(); // // return $container; Pattern Inheritance
Add a basic parent template.
<!-- bundles/app/assets/templates/quickstart/layout.php --> <h1>Quickstart</h1> <div> <!-- --> <?=$this->childContent();?> </div> and use it in our message.php
<!-- bundles/app/assets/templates/quickstart/message.php --> <?php $this->layout('app:quickstart/layout');?> <p><?=$_($message)?></p> Now, at localhost / quickstart / render, our template will already be wrapped in the parent. By the way, the parent template, in turn, can also have its parents.
Even more flexibility can be achieved by using blocks that allow you to replace and add content to different places of the parent template.
<!-- bundles/app/assets/templates/quickstart/layout.php --> <!-- 'header' --> <?php $this->startBlock('header'); ?> <h1>Quickstart</h1> <?php $this->endBlock(); ?> <!-- --> <?=$this->block('header') ?> <div> <!-- --> <?=$this->childContent();?> </div> Now add content to this block from our message.php:
<!-- bundles/app/assets/templates/quickstart/message.php --> <?php $this->layout('app:quickstart/layout');?> <?php $this->startBlock('header'); ?> <h2>Message</h2> <?php $this->endBlock(); ?> <p><?=$_($message)?></p> By default, the content in the block is in the order of addition. This allows you to conveniently organize for example connecting styles and scripts depending on the page. But we can also tell the parent template to add its content to the block only if the child has not added it himself.
<!-- bundles/app/assets/templates/quickstart/layout.php --> <?php if($this->startBlock('header', true)): ?> <h1>Quickstart</h1> <?php $this->endBlock(); endif;?> <!-- ... --> Or, for example, add content to the beginning of the block and not to the end:
$this->startBlock('header', false, true); Sub-patterns
The sublabel activation is also possible:
<?php include $this->resolve('some:template');?> Link generation
To generate links in the template, there are two methods httpPath and httpUri :
<?php $url=$this->httpPath( 'app.default', array( 'processor' => 'hello', 'action' => 'greet' ) ); ?> <a href="<?=$_($url)?>">Hello</a> Databases and ORM
Database connections are described in global configuration, outside bundles. For example, a connection to MySQL might look like this:
// assets/config/database.php return array( 'default' => array( 'driver' => 'pdo', 'connection' => 'mysql:host=localhost;dbname=quickstart', 'user' => 'pixie', 'password' => 'pixie' ) ); PHPixie supports not only relational databases, but also ** MongoDB **.
You can even describe the relationships (one-to-one, one-to-many, many-to-many) between relational tables and MongoDB collections and work with them using the same syntax. At the moment, no other PHP ORM supports this level of integration.
Fill the database with data. For example, let's say we want to create a tracker for projects that consist of tasks. The scheme could look like this:
CREATE TABLE `projects`( `id` INT NOT NULL AUTO_INCREMENT PRIMARY KEY, `name` VARCHAR(255), `tasksTotal` INT DEFAULT 0, `tasksDone` INT DEFAULT 0 ); CREATE TABLE `tasks`( `id` INT NOT NULL AUTO_INCREMENT PRIMARY KEY, `projectId` INT NOT NULL, `name` VARCHAR(255), `isDone` BOOLEAN DEFAULT 0 ); INSERT INTO `projects` VALUES (1, 'Quickstart', 4, 3), (2, 'Build a website', 3, 0); INSERT INTO `tasks` VALUES (1, 1, 'Installing', 1), (2, 1, 'Routing', 1), (3, 1, 'Templating', 1), (4, 1, 'Database', 0), (5, 2, 'Design', 0), (6, 2, 'Develop', 0), (7, 2, 'Deploy', 0); And we can already use ORM to access this data. Add the orm action to the processor:
// bundles/app/src/Project/App/HTTPProcessors/Quickstart.php //... public function ormAction(Request $request) { $orm = $this->builder->components->orm(); $projects = $orm->query('project')->find(); // // . // , // , // JSON return $projects->asArray(true); } //... Now going to localhost / quickstart / orm you will see a JSON response with the project data.
Before we take a deeper look at the possibilities of the new ORM, set up a one-to-many relationship
between projects and their tasks.
// bundles/app/assets/config/orm.php <?php return array( 'relationships' => array( array( 'type' => 'oneToMany', 'owner' => 'project', 'items' => 'task', // // 'itemsOptions' => array( 'onOwnerDelete' => 'delete' ) ) ) ); Entities
Creating, modifying, and deleting entities is quite intuitive:
$orm = $this->builder->components->orm(); // $projectRepository = $orm->repository('project'); $project = $projectRepository->create(); // $project = $orm->createEntity('project'); // $project->name = 'Buy Groceries'; $project->save(); $task = $orm->createEntity('task'); $task->name = 'Milk'; $task->save(); // $project->tasks->add($task); // $project->delete(); // $projects = $orm->query('project')->find(); foreach($projects as $project) { foreach($project->tasks() as $task) { //... } } Requests
Here are just a part of what is now possible with ORM requests:
$orm = $this->builder->components->orm(); // $orm->query('project')->where('name', 'Quickstart')->findOne(); // id $orm->query('project')->in($id)->findOne(); // id $orm->query('project')->in($ids)->findOne(); // $orm->query('project') ->where('tasksTotal', '>', 2) ->or('tasksDone', '<', 5) ->find(); // //WHERE name = 'Quickstart' OR ( ... ) $orm->query('project') ->where('name', 'Quickstart') ->or(function($query) { $querty ->where('tasksTotal', '>', 2) ->or('tasksDone', '<', 5); }) ->find(); // $orm->query('project') ->where('name', 'Quickstart') ->startWhereConditionGroup('or') ->where('tasksTotal', '>', 2) ->or('tasksDone', '<', 5) ->endGroup() ->find(); // , '*' // tasksTotal = tasksDone $orm->query('project') ->where('tasksTotal', '=*', 'tasksDone') ->find(); // $orm->query('project') ->relatedTo('task') ->find(); // $orm->query('project') ->where('tasks.name', 'Routing') ->findOne(); // $orm->query('project') ->orRelatedTo('task', function($query) { $query->where('name', 'Routing'); }) ->findOne(); // // (eager loading) $orm->query('project')->find(array('task')); // $orm->query('project')->update(array( 'tasksDone' => 0 )); // // . // $query = $orm->query('project') ->where('tasksTotal', '=*', 'tasksDone'); $count = $query->count(); $query ->limit(5) ->offset(0) ->find(); PHPixie ORM includes many optimizations to reduce the number of database requests.
For example, you can link several tasks to the project in one request:
$orm = $this->builder->components->orm(); // $projectQuery = $orm->query('project') ->where('name', 'Quickstart'); // 5 $tasksQuery = $orm->query('task')->limit(5); // // $projectQuery->tasks->add($tasksQuery); Using queries instead of working with entities dramatically reduces the number of queries. This is especially noticeable in the many-to-many relationship. As with MongoDB support, no other ORM allows this.
Entity extension
Most likely you will want to expand the classes of models to add functionality. In other implementations, this leads to a close connection of logic with the ORM itself and the database. PHPixie, on the other hand, allows you to describe completely independent wrappers that decorate entities, and thus are completely independent of ORM. This means that it is much easier to write tests and no fixation or test data is needed.
Here is a simple wrapper:
// bundles/app/src/Project/App/ORMWrappers/Project.php; namespace Project\App\ORMWrappers; class Project extends \PHPixie\ORM\Wrappers\Type\Database\Entity { // // public function isDone() { return $this->tasksDone === $this->tasksTotal; } } Now register it in the bundle:
// bundles/app/src/Project/App/ORMWrappers.php; namespace Project\App; class ORMWrappers extends \PHPixie\ORM\Wrappers\Implementation { // protected $databaseEntities = array( 'project' ); // public function projectEntity($entity) { return new ORMWrappers\Project($entity); } } Everything, now we can try:
//Find the first project $project = $orm->query('project')->findOne(); //Check if it is done $project->isDone(); You can also declare wrappers for Requests and Repositories to add or change functionality. For example, you can add to the request a method that adds several conditions at once.
Eat more!
The code for this guide is available on github . You can also get acquainted with the finished demo project , which is just a task tracker.
Everything was fine with me!
If the system of bundles, the approach to processors and other changes seem superfluous to you, and I would like to work as in the second version, then do not worry, you can continue to use the same approach:
- Forget everything outside the / bundles / app / folder
- Since you will not use the bundles, do not create a shortcut in the / web folder, but simply boldly throw your web files into it as you did in the second version. If you later change your mind and want to work with bundles, simply transfer the files from / web to / bundles / app / web. Until that time, do not bother.
- Having slightly expanded the standard classes, you can easily achieve the behavior of the second version:
We make it so that the processors are built automatically, according to the namespace, without the need to register each in the HTTPProcessor:
// /bundles/app/src/Project/App/HTTPProcessor.php namespace Project\App; class HTTPProcessor extends \PHPixie\DefaultBundle\Processor\HTTP\Builder { protected $builder; protected $attribute = 'processor'; public function __construct($builder) { $this->builder = $builder; } public function processor($name) { if(!array_key_exists($name, $this->processors)) { $class = '\Project\App\HTTPProcessors\\'.ucfirst($name); if(!class_exists($class)) { return null; } $this->processors[$name] = new $class($this->builder); } return $this->processors[$name]; } } Add the before () and after () methods, as was the case in the controllers. As an added bonus, if before () returns some result, then no longer call the action itself:
// /bundles/app/src/Project/App/HTTPProcessors\Controller.php namespace Project\App\HTTPProcessors; asbtarct class Controller extends \PHPixie\DefaultBundle\Processor\HTTP\Actions { protected $builder; protected $attribute = 'processor'; public function __construct($builder) { $this->builder = $builder; } public function process($request) { $result = $this->before($request); if($result !== null) { return $result; } $result = parent::process($request); return $this->after($request, $result); } public function before($request) { } public function after($request, $result) { return $result; } } the end
Now you should have everything to start working with PHPixie 3, but there is still a lot of unread documentation, both on the site and here in Habré. Most components already have their own documentation on the updated website or even the Russian version here. All components can be used without a framework, are covered with tests for 100% , and almost all have the maximum quality metric on CodeClimate .
By the way, the framework site has also been updated, with a more serious design, so now it will be easier to convince the team to write on it. And if you have more questions, you can actually find me constantly in our chat .
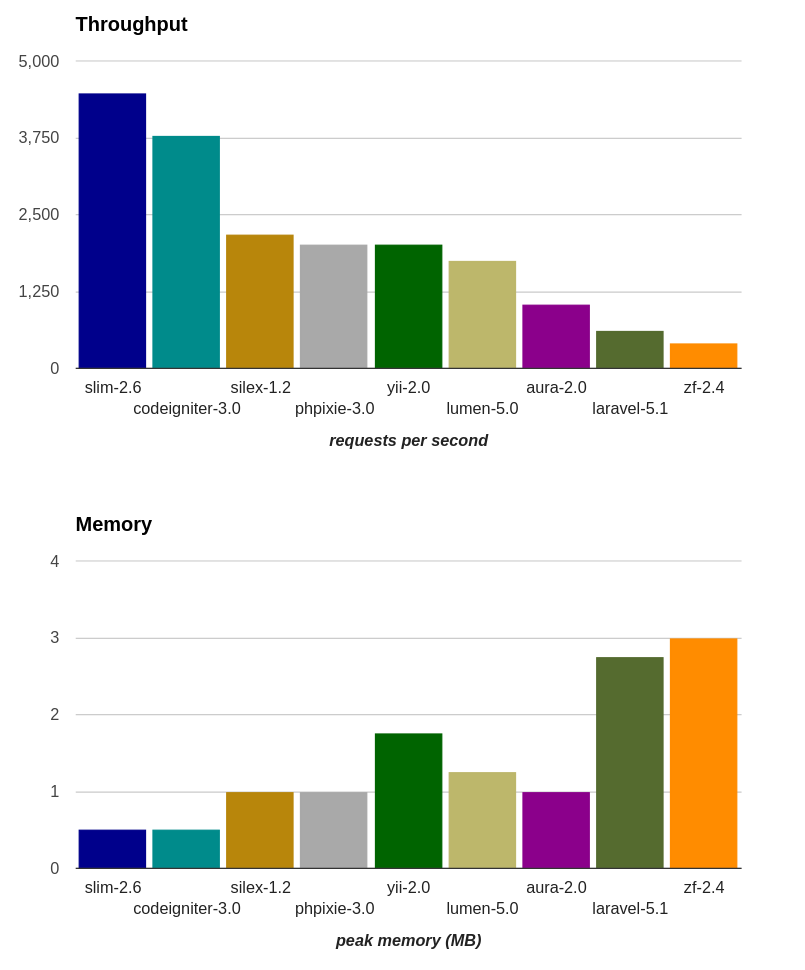
Benchmarks
Source: https://habr.com/ru/post/263551/
All Articles