Cryptocurrency - how to create it?
I'm sure everyone knows what a cryptocurrency is, and maybe you even know what it is eaten with, and used it yourself. In 2009, thanks to Satoshi Nakamoto , the well-known Bitcoin was created, thanks to which its author earned a decent fortune.

Of course, immediately after the emergence of a successful innovation, other similar products appear on the market. And so it happened, as soon as new cryptocurrencies began to appear, some simply copied the idea of Bitcoin and were a useless alternative (from a technical point of view), some introduced something of their own. But oddly enough, the excitement of cryptocurrency is not a verse. Until now, there are more and more new resources on the Internet that offer to buy / use their currency.
')
And there is a logical question: if the first cryptocurrency appeared in 2008, then resources on the Internet should have resources with guides, lessons and examples of creating such things.
Indeed, there is such a thing, but, unfortunately, all the lessons are reduced to: “Think up, buy on the site, introduce” or “Think up, download, use with friends” and so on. And never considered a detailed process of creation. In general, with this article I would like to correct the real state of things and still bring such information into the Russian-speaking community and tell people how it is possible to create their own currency.
The reasons for creating a cryptocurrency can be the sea:
1. For example, you have your own game server, and you want to create a real game currency in this way;
2. Do you really want to make money on it;
3. You are stirred up by interest and you just want to know the inside of the digital currency;
These are the first reasons that came to my mind, if you have other reasons - write them in the comments.
I admit honestly, nevertheless, I found one page with a guide on creating virtual currency on the Internet. And, roughly speaking, this article can be called a very free translation, only with additions and the like, as in the original article there are many shortcomings and gaps.
In the course of writing this article, I will also create cryptocurrency for greater clarity, and in order not to get lost myself. Link to the repository .
“First things first,” as written in the original article, we must prepare the environment for the development. If you find any cryptocurrency on github-e , then you can see how much code is stored there. Of course, we will not write everything from scratch, we don’t need to reinvent the wheel, much less we will not, until we at least try to make a steering wheel for it.
And we can easily find an example of cryptocurrency in the vast github. Of course, I found this code and copied it into my repository, and you need to clone it to yourself. Who knows how, they skip this section, and who do not know how, they read the spoiler:
Next, after you have downloaded all the basic code, from which we will build on, you need to make sure that you have all the necessary libraries on your computer for it to work correctly:
Now that the preparation is complete, let's get to the most important thing - to edit the code.
Now you have to think about how you would like your cryptocurrency to be called. Invented? Fine.
The base code you downloaded is ready-made but not yet compiled cryptocurrency, and this cryptocurrency is called FooCoin. All you have to do is replace it everywhere in the base code of the name FooCoin, Foo, etc. in the name of your cryptocurrency. Of course, doing it manually in 10,000 lines of code is a long and pointless business.
It’s good that kind people have made it easier for us a long time ago and made programs that allow you to massively replace lines in files with others.
My cryptocurrency is called PuffCoin. Here is a list of the words that I will replace with my own:
I advise you to make a similar list.
For replacement there are many programs, I will now list some.
For Linux, there is a Regexxer (free). For Mac OS - TextWrangler (it is offered by the author of the original article, for free). For Windows, I found a lot, for example: Search and Replace , Actual Search & Replace , HandyFile Find and Replace , NHRPLC . I hope there will be no problems with their use.
It is also worth renaming the foocoin-qt.pro file to *** coin-qt.pro , writing the name in lower case.
Great, now let's move on to the most important and interesting - the technical side of the code. I hope that now you have a folder with the base code open.
Since any operations with digital currency somehow occur through any network, then for our application you need to specify network ports through which all operations will occur.
You need to select 4 ports: two for P2P and RPC, and two for test P2P and RPC (testnet) connections. Of course, the ports need to be chosen such that they are not exactly used by any other application. To do this, click on the link and see which ports are free. Personally, I will do the same as the author of the original article, and for RPC I will choose port 55883, for P2P I will choose port 55884, and for testnet: RPC - 45883, P2P - 45884.
To indicate that you need to use these ports, you need to replace a few lines in some files, following the example below:
File src / bitcoinrpc.cpp : ( RPC port )
File src / init.cpp : ( P2P port + testnet P2P + RPC port )
Src / protocol.h file: ( testnet P2P + P2P port )
In the next line, you can specify any original address where you can check additional addresses. To be honest, I did not understand what it was for, but everything worked without it, so this is not a required parameter. If anyone can explain, post in the comments. Thank you in advance!
Src / net.cpp file :
Line 1000:
Now let's move on to the settings for generating your currency itself. Each currency is generated in blocks, and in each block there is some amount of currency.
In the next line, you can change the amount of currency that is issued for generating one block. To do this, you just need to change:
Src / main.cpp file:
Next, you need to specify at what intervals blocks will be generated. Time is measured in seconds
Src / main.cpp file:
Next, you need to specify the period through which the “adjustment of difficulties” will take place. Again, I did not understand what it was, and left it as it was.
Src / main.cpp file:
Next, change the amount of currency that may even be.
Src / main.h file :
And the number of blocks maximally generated in one day
Src / main.h file :
Since our currency is “crypto”, it means that all transactions are closed and only with the use of keys. Every currency user has public and private keys. In the code we have the opportunity to determine for ourselves what we will have the first byte of the public key. This can be a character or a number. You can select a number or symbol from the table . To the left of the characters “Character” are their numerical values “Value”. Select a character and remember its numeric value. Since my cryptocurrency is called PuffCoin, I chose P for myself, and its value is 22.
Now you need to replace your value with the following line:
Src / base58.h file :
At the output we will have a ready-made GUI application for the user and a console application used for both the server and the client.
For the GUI, there are also resources that are located in the src / qt / res folder. There are stored icons for the application. You can replace some icons with your own, the main thing is the same name and resolution.
Also, the author of the original article proposes to use a special utility for converting icons.
This is the first part of the guide. I hope that the second one will appear soon. I will try to do it quickly.
Of course, immediately after the emergence of a successful innovation, other similar products appear on the market. And so it happened, as soon as new cryptocurrencies began to appear, some simply copied the idea of Bitcoin and were a useless alternative (from a technical point of view), some introduced something of their own. But oddly enough, the excitement of cryptocurrency is not a verse. Until now, there are more and more new resources on the Internet that offer to buy / use their currency.
')
And there is a logical question: if the first cryptocurrency appeared in 2008, then resources on the Internet should have resources with guides, lessons and examples of creating such things.
Indeed, there is such a thing, but, unfortunately, all the lessons are reduced to: “Think up, buy on the site, introduce” or “Think up, download, use with friends” and so on. And never considered a detailed process of creation. In general, with this article I would like to correct the real state of things and still bring such information into the Russian-speaking community and tell people how it is possible to create their own currency.
The reasons for creating a cryptocurrency can be the sea:
1. For example, you have your own game server, and you want to create a real game currency in this way;
2. Do you really want to make money on it;
3. You are stirred up by interest and you just want to know the inside of the digital currency;
These are the first reasons that came to my mind, if you have other reasons - write them in the comments.
I admit honestly, nevertheless, I found one page with a guide on creating virtual currency on the Internet. And, roughly speaking, this article can be called a very free translation, only with additions and the like, as in the original article there are many shortcomings and gaps.
In the course of writing this article, I will also create cryptocurrency for greater clarity, and in order not to get lost myself. Link to the repository .
So, let's begin:
Download base code
“First things first,” as written in the original article, we must prepare the environment for the development. If you find any cryptocurrency on github-e , then you can see how much code is stored there. Of course, we will not write everything from scratch, we don’t need to reinvent the wheel, much less we will not, until we at least try to make a steering wheel for it.
And we can easily find an example of cryptocurrency in the vast github. Of course, I found this code and copied it into my repository, and you need to clone it to yourself. Who knows how, they skip this section, and who do not know how, they read the spoiler:
Download code from github
There are many ways to get the source code from github, but I’ll tell you about the most clear and simple:
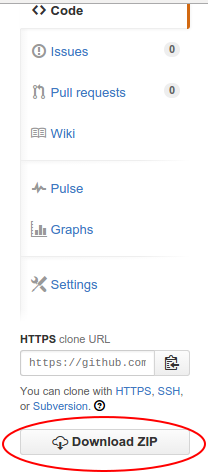
Follow the link and find the “Download ZIP” button. You have downloaded the ZIP-archive, inside which is the entire source code.
If you still want to learn how to use all the features of github and git, then this book will help you, but I warn you that this is time consuming.
Follow the link and find the “Download ZIP” button. You have downloaded the ZIP-archive, inside which is the entire source code.
If you still want to learn how to use all the features of github and git, then this book will help you, but I warn you that this is time consuming.
Installing Libraries and Dependencies
Next, after you have downloaded all the basic code, from which we will build on, you need to make sure that you have all the necessary libraries on your computer for it to work correctly:
If you have Linux (Ubuntu)
This is the easiest thing for me to say, since I myself work on Ubuntu. Establishing dependencies is not difficult:
1. Open the terminal by pressing Ctrl + Alt + T;
2. Enter the following:
3. Click Enter;
4. In the course of installing the packages, you allow the installation and so on.
1. Open the terminal by pressing Ctrl + Alt + T;
2. Enter the following:
sudo apt-get install build-essential libboost-all-dev libcurl4-openssl-dev libdb5.1-dev libdb5.1++-dev git qt-sdk libminiupnpc-dev 3. Click Enter;
4. In the course of installing the packages, you allow the installation and so on.
If you have a Mac OS
Honestly, there was no possibility to work on Mac OS, so I will give you exactly what was written in the original article:
To install the libraries on which the base code depends, you need to use MacPorts or Homebrew. The author himself prefers MacPorts, explaining that he is easier, immediately installs into / opt and because he installs universal assemblies by default. If you choose Homebrew, then the author advises to set the flag by sporting 32-bit. But an example of the installation is still given through MacPorts.
Here is a list of what you need:
After installation, the author recommends running the following command in the console:
To install the libraries on which the base code depends, you need to use MacPorts or Homebrew. The author himself prefers MacPorts, explaining that he is easier, immediately installs into / opt and because he installs universal assemblies by default. If you choose Homebrew, then the author advises to set the flag by sporting 32-bit. But an example of the installation is still given through MacPorts.
Here is a list of what you need:
- boost (C ++ libraries)
- db48 (Berkeley DB 4.8)
- qt4-mac (Open Source QT 4.8.4, includes qmake)
- openssl (ssl dev libraries)
- git (to move the back to the repository)
- miniupnpc (UPNP dev libraries, optional – honestly I say skip this crap)
After installation, the author recommends running the following command in the console:
sudo port install boost db48 qt4-mac openssl miniupnpc git If you have windows
Oh no!
This section will be a little later. In general, all libraries and dependencies will be useful to us later - when assembling a finished product, so I’ll wait a little for this, so as not to confuse you and myself.
This section will be a little later. In general, all libraries and dependencies will be useful to us later - when assembling a finished product, so I’ll wait a little for this, so as not to confuse you and myself.
Now that the preparation is complete, let's get to the most important thing - to edit the code.
Name replacement
Now you have to think about how you would like your cryptocurrency to be called. Invented? Fine.
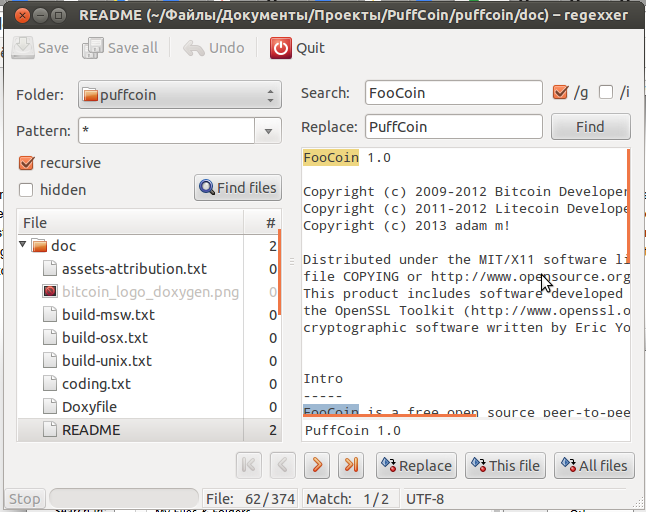
The base code you downloaded is ready-made but not yet compiled cryptocurrency, and this cryptocurrency is called FooCoin. All you have to do is replace it everywhere in the base code of the name FooCoin, Foo, etc. in the name of your cryptocurrency. Of course, doing it manually in 10,000 lines of code is a long and pointless business.
It’s good that kind people have made it easier for us a long time ago and made programs that allow you to massively replace lines in files with others.
My cryptocurrency is called PuffCoin. Here is a list of the words that I will replace with my own:
List of words to replace
FooCoin - PuffCoin
FOOCOIN - PUFFCOIN
foocoin - puffcoin
foo - puff
FOO - PUFF
FOOCOIN - PUFFCOIN
foocoin - puffcoin
foo - puff
FOO - PUFF
I advise you to make a similar list.
For replacement there are many programs, I will now list some.
For Linux, there is a Regexxer (free). For Mac OS - TextWrangler (it is offered by the author of the original article, for free). For Windows, I found a lot, for example: Search and Replace , Actual Search & Replace , HandyFile Find and Replace , NHRPLC . I hope there will be no problems with their use.
It is also worth renaming the foocoin-qt.pro file to *** coin-qt.pro , writing the name in lower case.
Selection and configuration of network ports
Great, now let's move on to the most important and interesting - the technical side of the code. I hope that now you have a folder with the base code open.
Since any operations with digital currency somehow occur through any network, then for our application you need to specify network ports through which all operations will occur.
You need to select 4 ports: two for P2P and RPC, and two for test P2P and RPC (testnet) connections. Of course, the ports need to be chosen such that they are not exactly used by any other application. To do this, click on the link and see which ports are free. Personally, I will do the same as the author of the original article, and for RPC I will choose port 55883, for P2P I will choose port 55884, and for testnet: RPC - 45883, P2P - 45884.
To indicate that you need to use these ports, you need to replace a few lines in some files, following the example below:
File src / bitcoinrpc.cpp : ( RPC port )
Line 2893:ip::tcp::endpoint endpoint(bindAddress, GetArg("-rpcport", 55883));
Line 3169:if (!d.connect(GetArg("-rpcconnect", "127.0.0.1"), GetArg("-rpcport", "55883")))
File src / init.cpp : ( P2P port + testnet P2P + RPC port )
Line 235:" -port= " + _("Listen for connections on (default: 55884 or testnet: 45884)") + "\n" +
Line 271:" -rpcport= " + _("Listen for JSON-RPC connections on (default: 55883)") + "\n" +
Src / protocol.h file: ( testnet P2P + P2P port )
Line 22:return testnet ? 45884 : 55884;
In the next line, you can specify any original address where you can check additional addresses. To be honest, I did not understand what it was for, but everything worked without it, so this is not a required parameter. If anyone can explain, post in the comments. Thank you in advance!
Src / net.cpp file :
Line 1000:
{"some website name", "somewebsite.org or ip xxxx"}, Setting currency generation
Now let's move on to the settings for generating your currency itself. Each currency is generated in blocks, and in each block there is some amount of currency.
In the next line, you can change the amount of currency that is issued for generating one block. To do this, you just need to change:
Src / main.cpp file:
Line 831:int64 nSubsidy = 1 * COIN;
Next, you need to specify at what intervals blocks will be generated. Time is measured in seconds
Src / main.cpp file:
Line 837:static const int64 nTargetSpacing = 120; // PuffCoin:
Next, you need to specify the period through which the “adjustment of difficulties” will take place. Again, I did not understand what it was, and left it as it was.
Src / main.cpp file:
Line 836:static const int64 nTargetTimespan = 1 * 24 * 60 * 60; // PuffCoin: 1
Next, change the amount of currency that may even be.
Src / main.h file :
Line 43:static const int64 MAX_MONEY = 10000 * COIN; //
And the number of blocks maximally generated in one day
Src / main.h file :
Line 550:return dPriority > COIN * 720 / 250; // 720 .
Since our currency is “crypto”, it means that all transactions are closed and only with the use of keys. Every currency user has public and private keys. In the code we have the opportunity to determine for ourselves what we will have the first byte of the public key. This can be a character or a number. You can select a number or symbol from the table . To the left of the characters “Character” are their numerical values “Value”. Select a character and remember its numeric value. Since my cryptocurrency is called PuffCoin, I chose P for myself, and its value is 22.
Now you need to replace your value with the following line:
Src / base58.h file :
Line 280:PUBKEY_ADDRESS = 22, //
Replacing icons and images
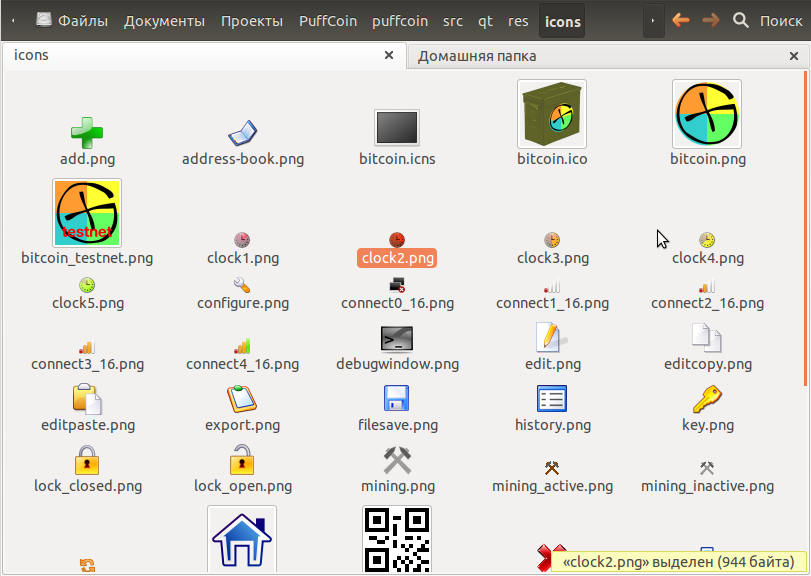
At the output we will have a ready-made GUI application for the user and a console application used for both the server and the client.
For the GUI, there are also resources that are located in the src / qt / res folder. There are stored icons for the application. You can replace some icons with your own, the main thing is the same name and resolution.
Also, the author of the original article proposes to use a special utility for converting icons.
This is the first part of the guide. I hope that the second one will appear soon. I will try to do it quickly.
Source: https://habr.com/ru/post/263367/
All Articles