Getting root access to ONT Sercomm RV6688 using contact closure
Once, the author wanted something new to replace the good, and he decided to connect to GPON from one well-known operator. And the magic box was put to the author in the apartment, through which it was possible to make phone calls, go online and watch TV, and a real optical cable was brought into it. And this box is called Sercomm RV6688 optical network terminal (ONT), it was made by order of this operator and painted with the corresponding logo.
Works box. But the author does not sit, and again he wanted something more, and he decided to sort out (how) all this magic inside the box is obtained and whether it can be finely controlled. But what could be the magic without surprises.
What was found on the topic on the Internet. In addition to the well-known admin / admin user account with “lower plinth” rights, technical forums managed to unearth a “secret” (I don’t list it here) account with extended support rights, which gives more degrees of freedom, but does not allow you to look deep into ONT operating system. The “holes” in the web-interface were also mentioned, through which it was possible to enhance the rights of users, but which were promptly eliminated in new firmware and therefore lost their relevance.
Experience with such equipment suggested that ONT somewhere there must be a port for service. Usually, this is an RS-232 serial port, which (rarely) is brought out in a D-sub connector with voltage levels of 12V or is present on the board as a pin block with TTL levels of + 5V or + 3.3V, i.e. pure UART without an additional microcircuit of conversion of voltage levels. Often, this port, which in Linux is called the tty * device, is the Linux console (does anyone doubt that it is inside ONT Linux? :)) and the bootloader console Redboot, U-boot, Barebox, and others. Access to this console was provided by would be a wide field of action. But I did not find the external connector.
In general, I adhered to these assumptions when I began to unscrew the ONT. For aesthetes, a few words about the security seal sticker. The plastic case of the RV6688 can be “cleverly” opened slightly, without breaking the seal. If you slightly “straighten” the bezel of the sealed screw with a bend, you can even remove the board, which was done.
ONT fee:
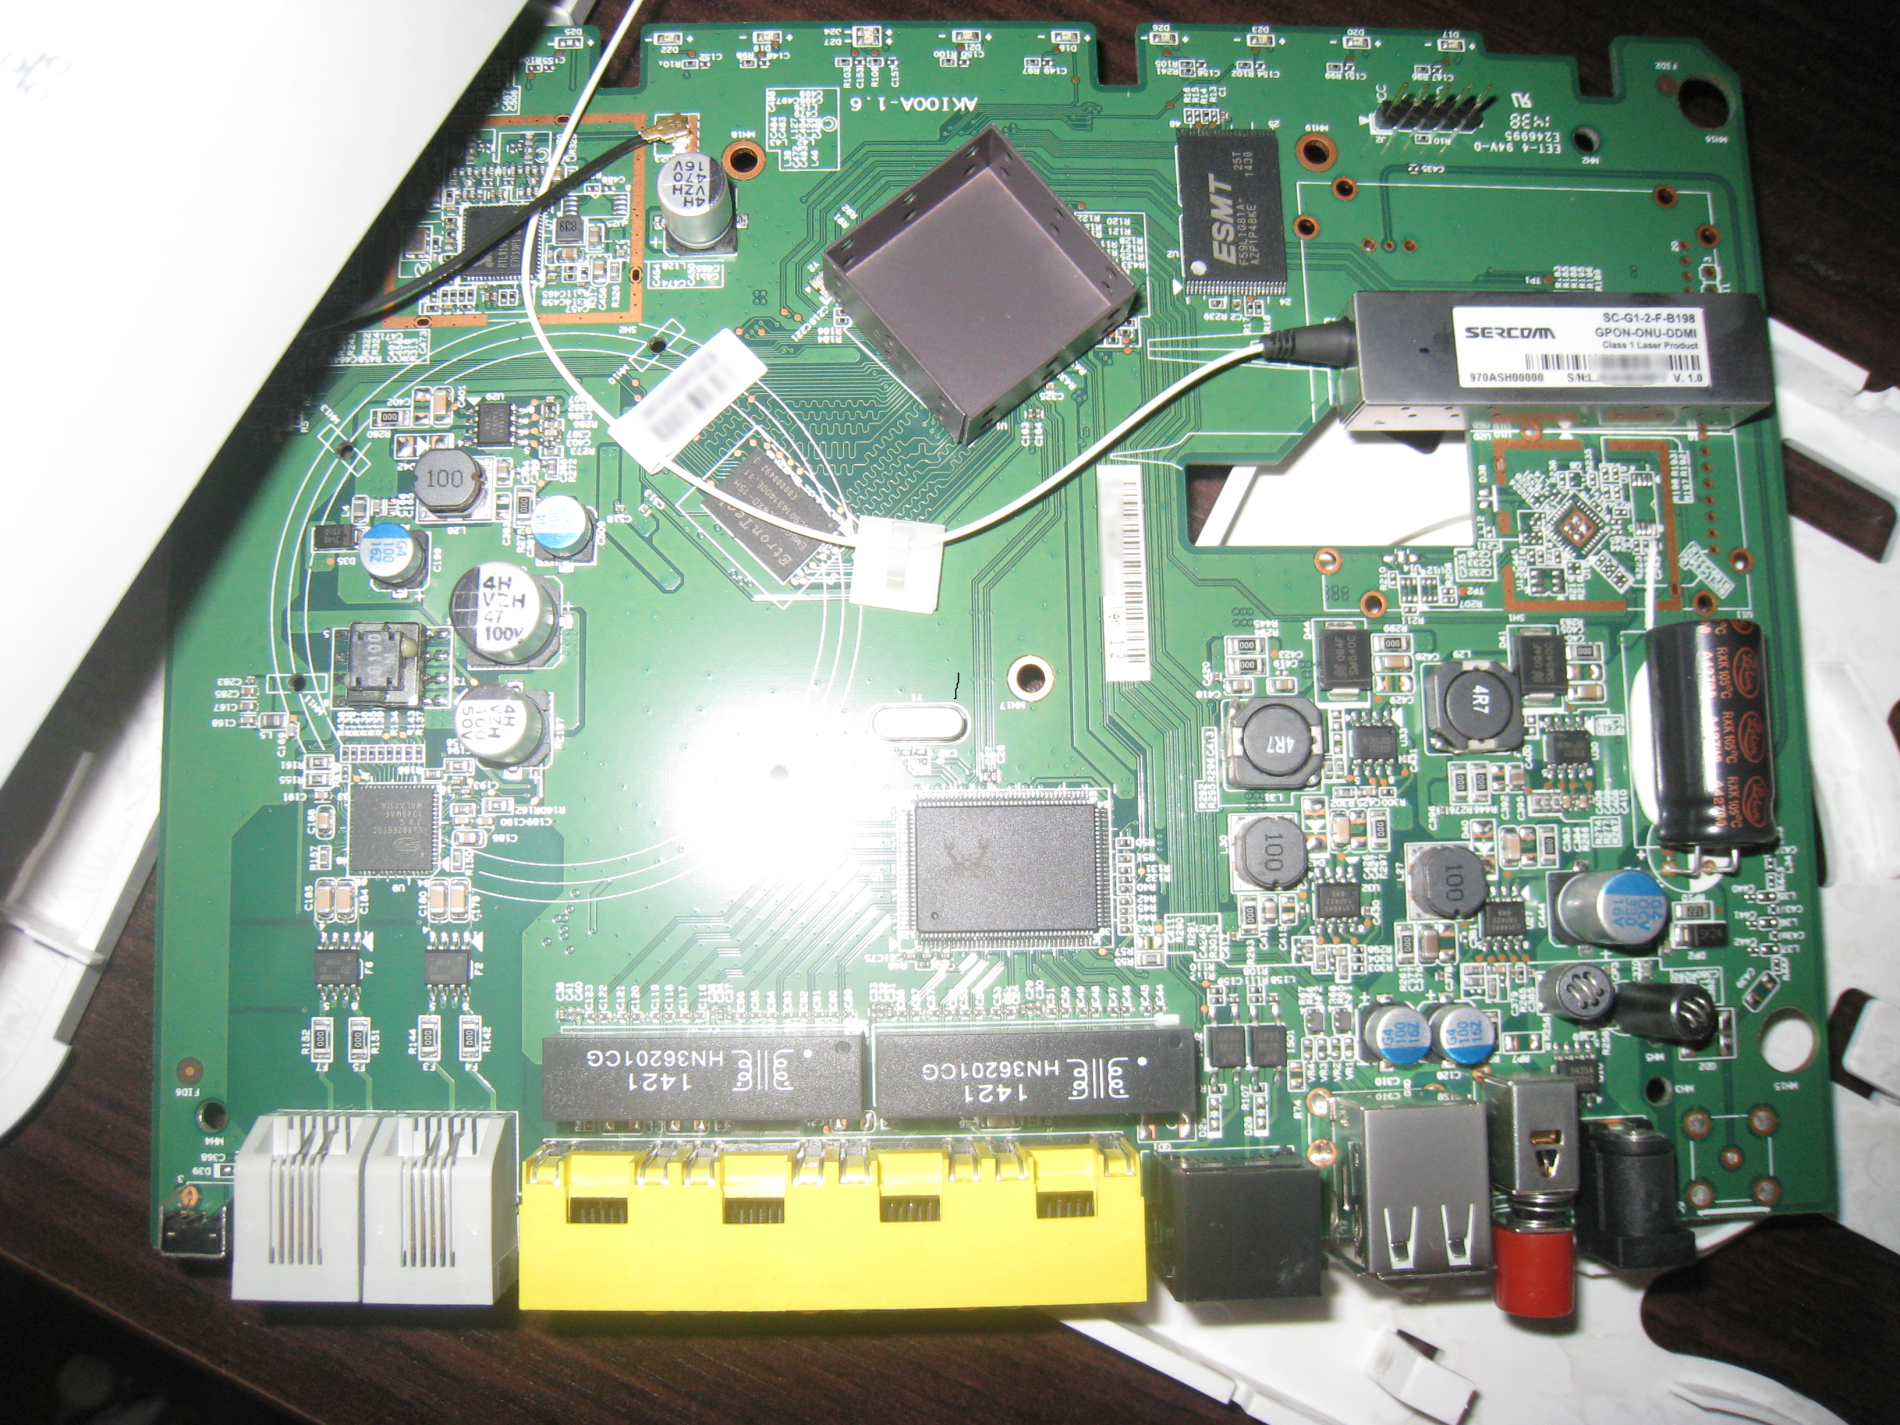
A quick inspection of the board, after a look that was delayed for a few seconds on the optical module, revealed a likely candidate for that same service port. A signature RX, TX, GND only strengthened this view. A multimeter test showed that this is a UART with 3.5V levels.
')
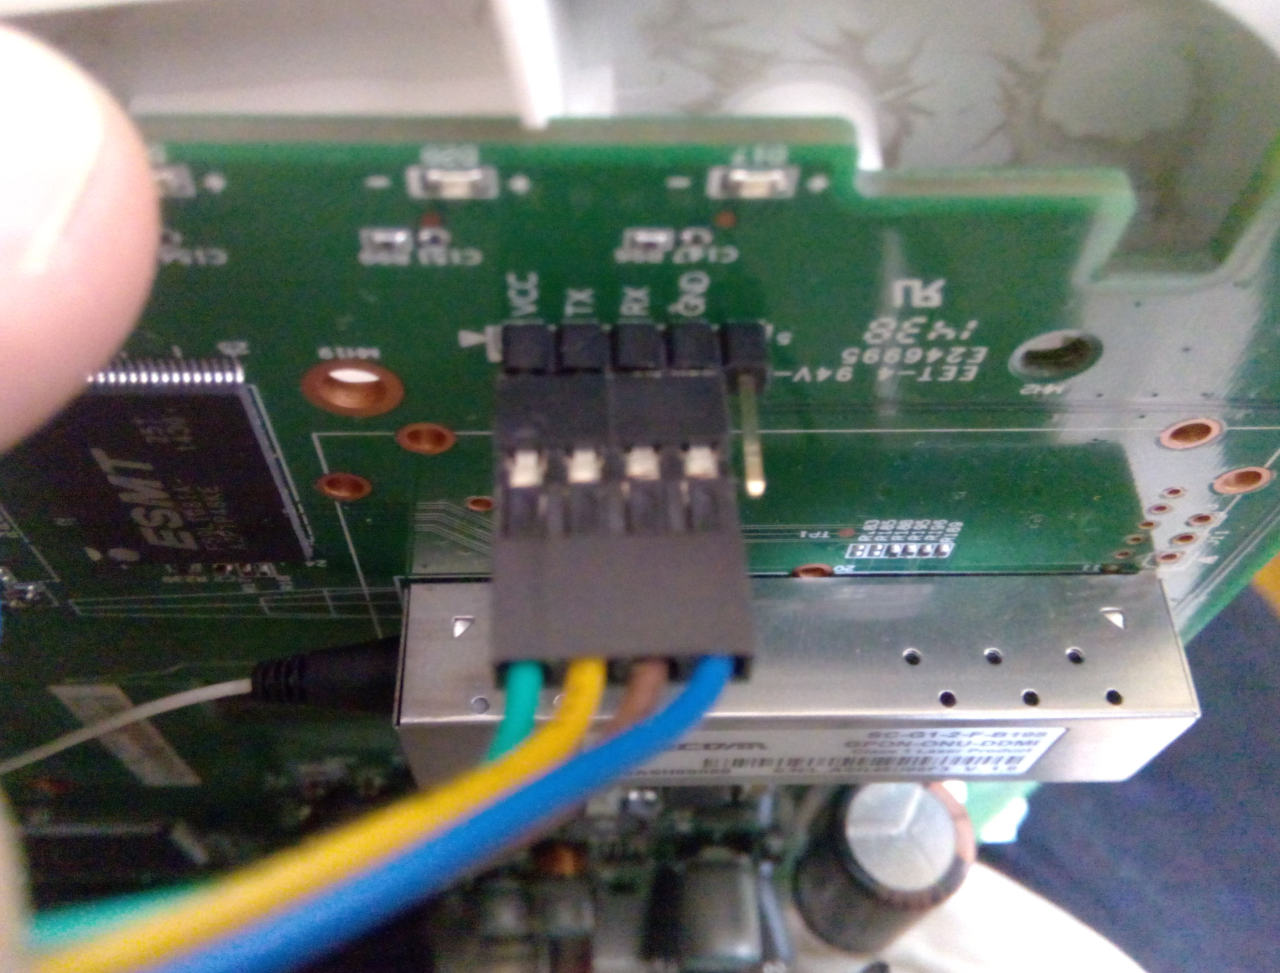
Service port:
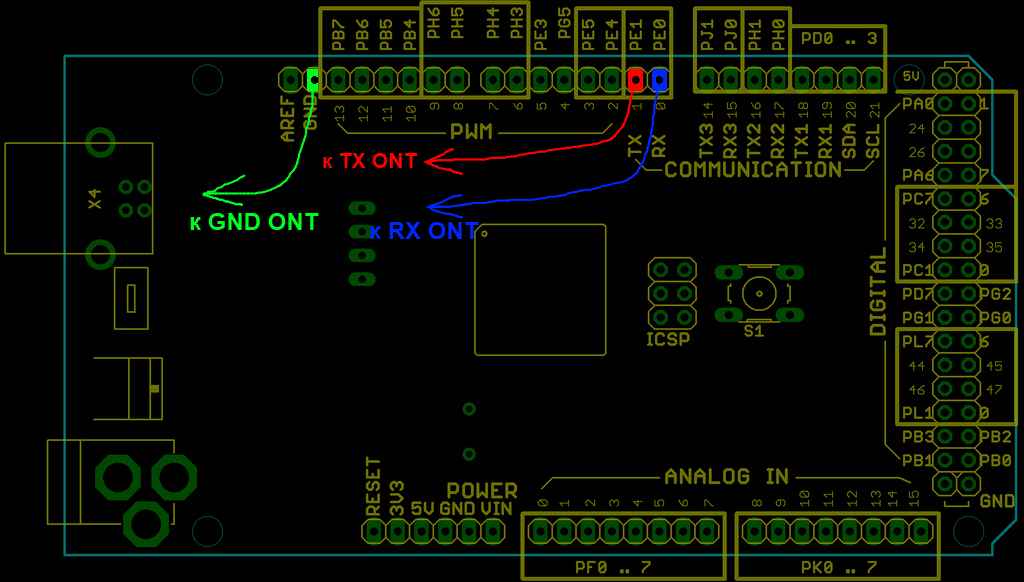
I didn’t have a USB <-> UART (TTL) adapter at that moment, but there was an Arduino Mega 2560 board that acted as a signal converter. Just in case, I filled it with an empty sketch that does not use the UART mega (which translates the inputs into a high-impedance state).
Arduino Mega 2560 as USB <-> UART converter:
Next, build a simple cable, connect to a PC, launch your favorite Tera Term terminal program. And finally, the satisfaction of displaying the expected lines of the boot log with an invitation to interrupt the boot process for 1 second and enter the U-Boot bootloader environment. At the end of the download, the Linux login prompt appears. But none of the well-known ONT username / password pairs came up, so the next step in the research was to enter the U-Boot bootloader environment, which would enable you to manage the Linux boot process, including possibly allowing you to bypass the login invitation!
Start Download Output:
And here I’d have to relax and, drinking coffee, slowly browse through the U-Boot environment variables, but the ONT developers presented an interesting surprise.
It turned out that the Ctrl + C combination does not work, and it is not possible to enter the U-Boot environment at this stage! I tried many other and even random key combinations, changed the settings of the terminal program, connection speed. To no avail. I suspected that the sending of data from the PC (RX to ONT) was not working, but at the end of the boot procedure, when the Linux login prompt appeared, the keyboard input was already working. In general, the work behind the keyboard could not give anything. (I think there is a shortcut, but ...)
He drank cold coffee and pissed off the situation. Eureka was not long in coming. At boot time, the processor diligently reads the flash-memory in accordance with the stages of this very boot. Loads the bootloader and its parameters into memory before prompting to interrupt the boot and then reads the system kernel, etc. after one second of waiting. The idea was simple: at the moment when the countdown ticked on the screen, block the ability to read data from flash. The interruption of the boot procedure will be triggered (read error), and a transition will be made to the U-boot console to correct the boot parameters (at least I thought so :)). Of the possible implementation options, the following was chosen as the least time consuming and, in my opinion, moderately safe. I decided to short out the legs of 43, 44 flash chips after starting the bootloader and thus block the correct reading of data at the time after a one-second delay. This was done with a thin screwdriver. It turned out at the third attempt, when I began to “poke” a screwdriver more confidently.
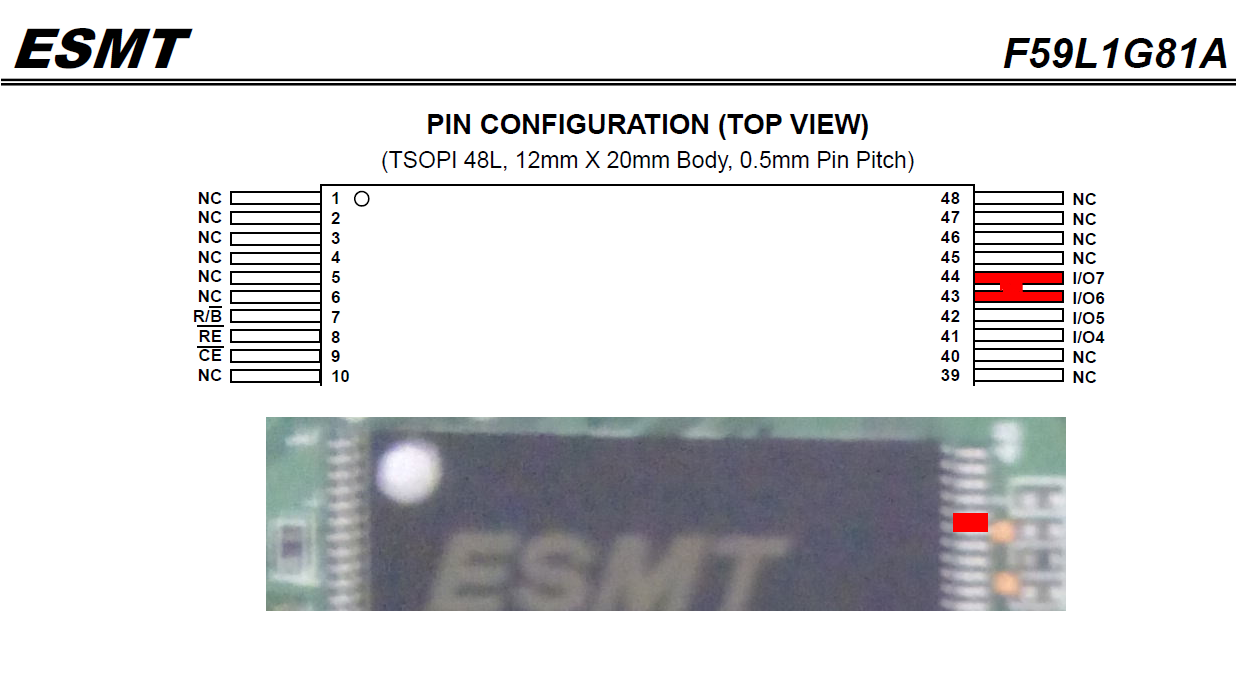
Legs flush:
This is what an attempt to download with interleaved flash data lines from the moment of the reverse report looks like this:
As you can see, at the end there was a command line prompt U-boot. Let's see what's inside (printenv):
Now you can correct variables. Increase the wait pause to 3 seconds and replace the Init process with the shell / bin / sh (Why do we need a login? No, we don’t need a login). Those. let's make a simplified single user download.
We will write the changes (saveenv) and run run bootcmd or simply distort the ONT power supply.
Now we will wait for the ONT to be fully loaded without any manipulations with a screwdriver.
Last lines of the boot log:
Hooray, we are in rootfs.
In conclusion, a recommendation on how to increase the rights for users connected via SSH.
Those who worked with this ONT on SSH, saw that not quite traditional Linux shell was launched there, on ONT it is called CLI. I found the configuration file / var / cli_pw, which contains information about CLI users (primarily SSH users) and has a syntax similar to / etc / passwd
It does not make sense to add a user record directly to this file, since each reboot / var / cli_pw is rewritten from a configuration stored in a different location. Therefore, I used the autorun script / etc / rcS to add my user to / var / cli_pw. With each reboot, this command is executed. Add something to / etc / rcS:
Editor vi to help.
Accordingly, the user alex will have full administrator rights when connecting via SSH to the ONT.
Now you can return the U-Boot variables to their original values and enjoy root access.
Works box. But the author does not sit, and again he wanted something more, and he decided to sort out (how) all this magic inside the box is obtained and whether it can be finely controlled. But what could be the magic without surprises.
A starting point
What was found on the topic on the Internet. In addition to the well-known admin / admin user account with “lower plinth” rights, technical forums managed to unearth a “secret” (I don’t list it here) account with extended support rights, which gives more degrees of freedom, but does not allow you to look deep into ONT operating system. The “holes” in the web-interface were also mentioned, through which it was possible to enhance the rights of users, but which were promptly eliminated in new firmware and therefore lost their relevance.
Own way
Experience with such equipment suggested that ONT somewhere there must be a port for service. Usually, this is an RS-232 serial port, which (rarely) is brought out in a D-sub connector with voltage levels of 12V or is present on the board as a pin block with TTL levels of + 5V or + 3.3V, i.e. pure UART without an additional microcircuit of conversion of voltage levels. Often, this port, which in Linux is called the tty * device, is the Linux console (does anyone doubt that it is inside ONT Linux? :)) and the bootloader console Redboot, U-boot, Barebox, and others. Access to this console was provided by would be a wide field of action. But I did not find the external connector.
In general, I adhered to these assumptions when I began to unscrew the ONT. For aesthetes, a few words about the security seal sticker. The plastic case of the RV6688 can be “cleverly” opened slightly, without breaking the seal. If you slightly “straighten” the bezel of the sealed screw with a bend, you can even remove the board, which was done.
ONT fee:
A quick inspection of the board, after a look that was delayed for a few seconds on the optical module, revealed a likely candidate for that same service port. A signature RX, TX, GND only strengthened this view. A multimeter test showed that this is a UART with 3.5V levels.
')
Service port:
I didn’t have a USB <-> UART (TTL) adapter at that moment, but there was an Arduino Mega 2560 board that acted as a signal converter. Just in case, I filled it with an empty sketch that does not use the UART mega (which translates the inputs into a high-impedance state).
Arduino Mega 2560 as USB <-> UART converter:
Next, build a simple cable, connect to a PC, launch your favorite Tera Term terminal program. And finally, the satisfaction of displaying the expected lines of the boot log with an invitation to interrupt the boot process for 1 second and enter the U-Boot bootloader environment. At the end of the download, the Linux login prompt appears. But none of the well-known ONT username / password pairs came up, so the next step in the research was to enter the U-Boot bootloader environment, which would enable you to manage the Linux boot process, including possibly allowing you to bypass the login invitation!
Start Download Output:
BL LILAC STARTER VER-2.1.06.0-BL (Aug 26 2013 - 17:00:31) SOC ID: BL_23570 Init DDR3.... 128MB Attempt to boot from NAND... Try to load bootloader from boot bank 0 Bootloader Loaded to DRAM Cache enabled, start bootloader... .... Enter 'Ctrl+C' to stop autoboot: 0 .... And here I’d have to relax and, drinking coffee, slowly browse through the U-Boot environment variables, but the ONT developers presented an interesting surprise.
It turned out that the Ctrl + C combination does not work, and it is not possible to enter the U-Boot environment at this stage! I tried many other and even random key combinations, changed the settings of the terminal program, connection speed. To no avail. I suspected that the sending of data from the PC (RX to ONT) was not working, but at the end of the boot procedure, when the Linux login prompt appeared, the keyboard input was already working. In general, the work behind the keyboard could not give anything. (I think there is a shortcut, but ...)
He drank cold coffee and pissed off the situation. Eureka was not long in coming. At boot time, the processor diligently reads the flash-memory in accordance with the stages of this very boot. Loads the bootloader and its parameters into memory before prompting to interrupt the boot and then reads the system kernel, etc. after one second of waiting. The idea was simple: at the moment when the countdown ticked on the screen, block the ability to read data from flash. The interruption of the boot procedure will be triggered (read error), and a transition will be made to the U-boot console to correct the boot parameters (at least I thought so :)). Of the possible implementation options, the following was chosen as the least time consuming and, in my opinion, moderately safe. I decided to short out the legs of 43, 44 flash chips after starting the bootloader and thus block the correct reading of data at the time after a one-second delay. This was done with a thin screwdriver. It turned out at the third attempt, when I began to “poke” a screwdriver more confidently.
Legs flush:
This is what an attempt to download with interleaved flash data lines from the moment of the reverse report looks like this:
Enter 'Ctrl+C' to stop autoboot: 0 UBI: mtd1 is detached from ubi0 Creating 1 MTD partitions on "nand0": 0x000000100000-0x000000200000 : "mtd=1" UBI: attaching mtd1 to ubi0 UBI: empty MTD device detected UBI: create volume table (copy #1) UBI error: ubi_scan_get_free_peb: no eraseblocks found UBI error: ubi_init: cannot attach mtd1 UBI error: ubi_init: UBI error: cannot initialize UBI, error -28 UBI init error -28 ERROR: failed to select 'cfg' partition Creating 1 MTD partitions on "nand0": 0x000000100000-0x000000200000 : "mtd=1" UBI: attaching mtd1 to ubi0 UBI: empty MTD device detected UBI: create volume table (copy #1) UBI error: ubi_scan_get_free_peb: no eraseblocks found UBI error: ubi_init: cannot attach mtd1 UBI error: ubi_init: UBI error: cannot initialize UBI, error -28 UBI init error -28 ERROR: failed to select 'cfg' partition Creating 1 MTD partitions on "nand0": 0x000000100000-0x000000200000 : "mtd=1" UBI: attaching mtd1 to ubi0 UBI: empty MTD device detected UBI: create volume table (copy #1) UBI error: ubi_scan_get_free_peb: no eraseblocks found UBI error: ubi_init: cannot attach mtd1 UBI error: ubi_init: UBI error: cannot initialize UBI, error -28 UBI init error -28 ERROR: failed to select 'cfg' partition => As you can see, at the end there was a command line prompt U-boot. Let's see what's inside (printenv):
=> printenv bootcmd=blboot baudrate=115200 consoledev=ttyS0 modetty0=115200n8 mtdids=nand0=nand mtdparts=mtdparts=nand:0x100000(starter),0x100000(cfg),0x200000(uboot0),0x200000(uboot1),0x100000(cal),0x400000(linux0),0x400000(linux1),0x2800000(rootfs0),0x2800000(rootfs1),0x800000(sc_config),0x100000(bbt) mem_reserve_low=tm=0x1400000 mc=0x400000 dsp=0x200000 EMACS_GRP_MODE=QSGMII EMAC=EMAC0 E4_MODE=NONE ethact=ETHMAC0 bootdelay=1 update_uboot=tftp a9d00000 u-boot.bin;blnp uboot;saveenv update_kernel=tftp a9d00000 uImage;blnp linux;saveenv update_rootfs=tftp a9d00000 rootfs.img;blnp rootfs;saveenv bootargs=ubi.mtd=0 ubi.mtd=11 root=ubi0_0 rw rootfstype=ubifs console=ttyS0,115200 xx=dd filesize=CEB800 fileaddr=A9D00000 gatewayip=192.168.1.254 netmask=255.255.255.0 ipaddr=172.21.17.188 serverip=172.21.17.155 boot_ver=1110 ethaddr=d4:21:22:xx:xx:xx memsize=128M stdin=serial stdout=serial stderr=serial partition=nand0,0 mtddevnum=0 mtddevname=starter Environment size: 946/262140 bytes => Now you can correct variables. Increase the wait pause to 3 seconds and replace the Init process with the shell / bin / sh (Why do we need a login? No, we don’t need a login). Those. let's make a simplified single user download.
Environment size: 946/262140 bytes => setenv bootdelay 3 => setenv bootargs ubi.mtd=0 ubi.mtd=11 root=ubi0_0 rw rootfstype=ubifs console=ttyS0,115200 single init=/bin/sh => saveenv => printenv ... bootargs=ubi.mtd=0 ubi.mtd=11 root=ubi0_0 rw rootfstype=ubifs console=ttyS0,115200 single init=/bin/sh ... Environment size: 966/262140 bytes => We will write the changes (saveenv) and run run bootcmd or simply distort the ONT power supply.
Now we will wait for the ONT to be fully loaded without any manipulations with a screwdriver.
Last lines of the boot log:
UBIFS: file system size: 14450688 bytes (14112 KiB, 13 MiB, 112 LEBs) UBIFS: journal size: 2967552 bytes (2898 KiB, 2 MiB, 23 LEBs) UBIFS: media format: w4/r0 (latest is w4/r0) UBIFS: default compressor: zlib UBIFS: reserved for root: 0 bytes (0 KiB) Freeing unused kernel memory: 196k freed BusyBox v1.15.3 () built-in shell (ash) Enter 'help' for a list of built-in commands. /bin/sh: can't access tty; job control turned off / # # whoami SuperUser Hooray, we are in rootfs.
In conclusion, a recommendation on how to increase the rights for users connected via SSH.
Those who worked with this ONT on SSH, saw that not quite traditional Linux shell was launched there, on ONT it is called CLI. I found the configuration file / var / cli_pw, which contains information about CLI users (primarily SSH users) and has a syntax similar to / etc / passwd
It does not make sense to add a user record directly to this file, since each reboot / var / cli_pw is rewritten from a configuration stored in a different location. Therefore, I used the autorun script / etc / rcS to add my user to / var / cli_pw. With each reboot, this command is executed. Add something to / etc / rcS:
echo 'alex:$1$SERCOMM$/Yr1kjT7kcnd11coqAlgN1:0:0:root:/:/bin/sh' >> /var/cli_pw Editor vi to help.
Accordingly, the user alex will have full administrator rights when connecting via SSH to the ONT.
Now you can return the U-Boot variables to their original values and enjoy root access.
Source: https://habr.com/ru/post/263277/
All Articles