UINavigationController and what it eats with: basic principles, subclassing, protection against double transitions and much more
I do not pretend to be the ultimate truth, but I still understand the development of something. Therefore, I decided to share with you some of the results of the work done, to share a certain compilation of knowledge about navigation controllers, so to speak. Maybe this will help any of the haunted shells that can be further referred to as my readers, to create a more sophisticated software product.
The subject of the study will be the navigation controller, namely the UINavigationController class from the standard UIKit framework for working with the interface that Apple kindly provides us.
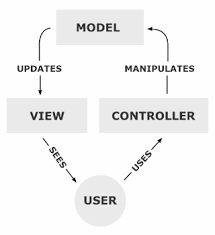
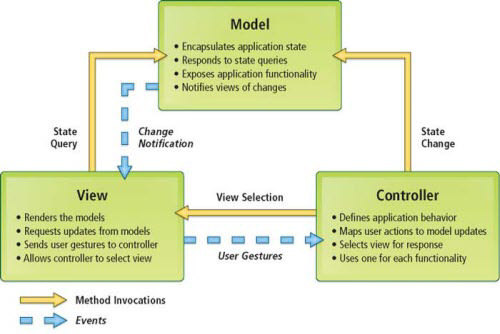
“Controller” in this case is a certain class that encapsulates logic, according to the concept (also called a pattern) of MVC .
')
The navigation controller ( UINavigationController ) is a high-level class of abstraction, contains a hierarchy of other view controllers, between representations (UIView views) which are able to navigate (which is, in fact, its main task is!), Transferring at the right moment control to the corresponding the controller. In addition - the composition contains a navigation bar (UINavigationBar), which displays on the screen, and accordingly changes the contents of this panel: depending on the active controller.
At any time from the active controller, you can get both the current navigation Item and the navigation Bar:
The hierarchical structure is always tree-like:


My acquaintance with this control was initially superficial, but after one incident I had to go deeper. The fact is that in one of my applications, in different places, due to the large amount of asynchrony, not weak connectivity - a lot of lewdness occurred during transitions from one screen to another, and double transitions constantly occurred, with quick touches (tachas). Before that, I was able to successfully cope with various workarounds, but where could we go without striving for the perfect ...
At one point, I needed to stop the double transition (after 2 levels of hierarchy, after the button is pressed back, and the button is quickly activated). Actually it was required to put a lock at the time of the transition. After some research, it turned out that there are 2 ways to do this:
1) Create a button programmatically, hang up on a navigation bar, attach a corresponding selector (handler method) to it, in which you explicitly block and call one of the methods, like popViewControllerAnimated:;
2) Use the protocol that implements the delegate for the UINavigationBarDelegate navigation bar.
Unfortunately, the first approach had a clear drawback: by creating the button programmatically and hanging it on the navigation bar, I could not easily achieve the standard arrow and back button (I simply did not have this icon, it is taken from standard assets (sets )).
After some sampling, it turned out that UINavigationBarDelegate allows only UINavigationController as delegate, and I decided to try to subclass for this beast.
Delegation is one of the fundamental design patterns, the essence of which is that we delegate (reassign) the response for any actions to the delegate class. Specifically for objective-c:
Class delegating behavior -> delegate class
- we assign the appropriate protocol to the delegate class, for example, we define all methods with the @required specifier
and some methods marked with the @optional keyword
- assign to the class that delegates the behavior, this delegate through the delegate property (the delegating class must have a property, something like @property (assign, nonatomic) id delegate;)
- after that, if we write the first class, then in the right places we pull methods, not forgetting to do checks by type
In general, how is it that one object hires another object so that this object explains to him what to do and how to act in certain situations. So that…

Creating a new subclass on objective-c like to call "subclassing", so I will not deviate much from these canons.
What is the advantage of creating a subclass? At first, I thought of handling only one situation in navigation, but later I came to the conclusion that it is much better to handle all similar situations centrally, to implement certain pieces of code directly in the navigation, in order to get rid of some root problems and for all other situations. Another advantage is that you can centrally (in one place of the code) write configuration code that will be common to each controller (for example, in my case, disable multi-touch)
Almost all navigation methods in this case begin with push / pop prefixes, something like pushing / pushing (not like push / pull antonyms in Git-e), but this was not the convention of naming target methods that I adopted. A few words about UINavigationBar. It contains a similar hierarchy, but NavigationItem. These Items are UINavigationBar-a elements (there is no direct access to the subwoofers of this bar. And in the documentation it is clearly not recommended to get / change them in any way
Only from the name it should already be very clear that these are will / did methods. The first is called before the corresponding action, the second - after. Only in this case, the first method of the type of should, also provides an answer to the question: “Do this action?” Thus, the method should be launched before the animation of the replacement item-a navigationBar-a, and the method did — after. Proceeding from the task, my first idea was to block user interaction in the should method, and return it in the did method. The push methods mean a movement down the hierarchy (toward a more particular one), and the pop methods towards the root.
One of the key concepts of defensive programming in asynchrony is “we process accordingly, or we block intermediate states”. Intermediate states (intermediate states) are always one of the main sources of bugs in programs. Since the animation is inherently an asynchronous action (that is, the exact point in time is unknown when a piece of code is called that marks the end of the action, so it cannot be synchronized with other pieces of code. Asynchronous code is always executed in a separate thread), it should be escaped!
In terms of defensive programming, the theoretical part is quite well described in the well-known “Perfect Code”

In addition, the transition animation (segue) from one root view to another also takes a certain amount of time, as it turned out, it is different from the animation time of the navigation bar. The duration of the animation UINavigationBar-a is static and determined by the constant
And the duration of the transition animation can be different. The main reason for this is the viewDidLoad / viewWillAppear: / methods of building layout (layout-a) according to the construction rules (constraints / constraint). Accordingly, the transition animation also needs to be screened.
UINavigationController-a has a delegate protocol UINavigationControllerDelegate. It defines 6 methods, 4 associated with transitions that allow processing the current animation directly (but Available ios 7.0 +, respectively, says that they are not yet relevant), but the other 2 are just a storehouse).
Accordingly, the handlers for the start and end of the animation of the appearance of the view controller.
I would like a few words about the transitions (segue), recently they have become a convenient and fashionable technology, as they allow to work wonders on the sideboard. Previously, to execute the transition, it was necessary to instantiate the controller instance, transfer the necessary data to the object, and run the pushViewController: animated: method, now it’s enough to create a “sego” on the storyboard, on the action, if you need to hang up the identifier, configure. In our case, the segue navigation controller is always run as a push (not as modal or something else).
After that, you can work with any transition in the code; there are 3 UIViewController methods:
The first method allows you to perform any actions with the destination controller before its appearance, to process various transitions (transition
The second method allows, among other things, to allow or interrupt the execution of the transition.
The third method allows you to programmatically call the transition in the code, in fact, it contains the transition code with
The most important thing here is that push transitions using segue call the same methods from the navigationController (if any):

What else might be interesting here? There are so-called reverse transitions (unwind segue), which perform transitions back through the controllers (they also contain pop methods). And each of the UIStoryboardSegue has a perform method in which you can override the transition animation using the UIStoryboardSegue subclassing.
Using transitions (segue) is the most up-to-date practice of moving from one view controller to another.


And in order to correctly perform the task - a few words about the user interaction with the interface. When the user touches the screen, a touch event is generated and thrown in, unfortunately the UIEvent does not have an open constructor, so we are not able to easily create our touch events on the device screen, thus emulating this situation. Controls throughout the application react to the corresponding events (events) intended for them, with the result that the interface becomes interactive and responsive to user actions.
Some actions to events are already predetermined (for example, when we touch the button - the button goes into the highlighted state, and changes its appearance). We can intercept events, and process them as we like, assigning handlers through selectors. The selector stores a hash value that allows you to quickly select a method associated with it from the hash table of class selectors. All events are assigned and sent (if I'm not mistaken) in the depths of the UIApplication class, which has 2 important methods.
In general, this is the implementation of the target-action pattern:

There are 2 ways to block user interaction: the first is to block the receipt of events by a specific control (control); the second is to block sending events directly from the application instance object.
1st way (each View has a userInteractionEnabled property):
2nd way (the application object is singleton):
Since there is a need to block any interaction (it is not known when clicking specifically on which button the dangerous code will be executed (with the following transition)), the second method suits us.
As you may know, the best practice is to define the appearance using the UIAppearance, but thanks to such a subclass, it is possible to abandon it if you use this subclass everywhere. By the same to encapsulate this logic (to hide) inside the navigation controller is a very smart decision. The
If someone is interested in multitouch (so that it is not possible to press 2 buttons in a row):
Ps. if you want to use this miracle, use at your own peril and risk, I haven't tried everything out of what was available, so for some situations you may have to write it yourself. The Utility / GAIClient classes are not supplied (from the first one, the method for disabling multitouch is taken, with the help of the second - non-crash report is sent to GoogleAnalytics).
It was implemented:
c) respectively, by blocking user interaction, if at least one corresponding animation has begun, and unlocking, if all have been completed;
wired protection from the processing of actions at once 2 buttons (by disabling the multitouch);
the release mechanism, in case something went wrong;
creating a report if something went wrong.
The 1st problem was related to the fact that using the explicit and implicit transitions (in the second case via the navigation bar “Back”) in the second case, the
The 2nd problem is navigation-bar behavior on iOS 7.0. On this firmware for the standard controller navigation, a delegate is automatically assigned (and if we try to do it again manually, it will generate an exception).
The third problem is that on the 7th firmware there is a right-hand svayp interactivePopGestureRecognizer, which allows you to go backwards (it only called the navigation controller delegate will, which is why the user interaction was tightly blocked).
4th problem - in extremely rare situations, there could be a danger that the opposite method was not always launched (the system should have been self-restoring if anything happened). A semblance of a timer was implemented, with a deblocking handler.
Git Repo on github-e
The subject of the study will be the navigation controller, namely the UINavigationController class from the standard UIKit framework for working with the interface that Apple kindly provides us.
Briefly about ...
“Controller” in this case is a certain class that encapsulates logic, according to the concept (also called a pattern) of MVC .
')
The navigation controller ( UINavigationController ) is a high-level class of abstraction, contains a hierarchy of other view controllers, between representations (UIView views) which are able to navigate (which is, in fact, its main task is!), Transferring at the right moment control to the corresponding the controller. In addition - the composition contains a navigation bar (UINavigationBar), which displays on the screen, and accordingly changes the contents of this panel: depending on the active controller.
At any time from the active controller, you can get both the current navigation Item and the navigation Bar:
self.navigationItemself.navigationController.navigationBarThe hierarchical structure is always tree-like:
Prehistory
My acquaintance with this control was initially superficial, but after one incident I had to go deeper. The fact is that in one of my applications, in different places, due to the large amount of asynchrony, not weak connectivity - a lot of lewdness occurred during transitions from one screen to another, and double transitions constantly occurred, with quick touches (tachas). Before that, I was able to successfully cope with various workarounds, but where could we go without striving for the perfect ...
At one point, I needed to stop the double transition (after 2 levels of hierarchy, after the button is pressed back, and the button is quickly activated). Actually it was required to put a lock at the time of the transition. After some research, it turned out that there are 2 ways to do this:
1) Create a button programmatically, hang up on a navigation bar, attach a corresponding selector (handler method) to it, in which you explicitly block and call one of the methods, like popViewControllerAnimated:;
2) Use the protocol that implements the delegate for the UINavigationBarDelegate navigation bar.
Unfortunately, the first approach had a clear drawback: by creating the button programmatically and hanging it on the navigation bar, I could not easily achieve the standard arrow and back button (I simply did not have this icon, it is taken from standard assets (sets )).
After some sampling, it turned out that UINavigationBarDelegate allows only UINavigationController as delegate, and I decided to try to subclass for this beast.
About Delegation, Navigation, and Security Programming, UINavigationControllerDelegate / UInavigationBarDelegate
Delegation is one of the fundamental design patterns, the essence of which is that we delegate (reassign) the response for any actions to the delegate class. Specifically for objective-c:
Class delegating behavior -> delegate class
- we assign the appropriate protocol to the delegate class, for example, we define all methods with the @required specifier
and some methods marked with the @optional keyword
- assign to the class that delegates the behavior, this delegate through the delegate property (the delegating class must have a property, something like @property (assign, nonatomic) id delegate;)
- after that, if we write the first class, then in the right places we pull methods, not forgetting to do checks by type
if(self.delegate && [self.delegate conformsToProtocol:@protocol(MyProtocol)] && [self.delegate respondsToSelector: @selector(aMethod)]){ [delegate aMethod]; } In general, how is it that one object hires another object so that this object explains to him what to do and how to act in certain situations. So that…
Creating a new subclass on objective-c like to call "subclassing", so I will not deviate much from these canons.
What is the advantage of creating a subclass? At first, I thought of handling only one situation in navigation, but later I came to the conclusion that it is much better to handle all similar situations centrally, to implement certain pieces of code directly in the navigation, in order to get rid of some root problems and for all other situations. Another advantage is that you can centrally (in one place of the code) write configuration code that will be common to each controller (for example, in my case, disable multi-touch)
Almost all navigation methods in this case begin with push / pop prefixes, something like pushing / pushing (not like push / pull antonyms in Git-e), but this was not the convention of naming target methods that I adopted. A few words about UINavigationBar. It contains a similar hierarchy, but NavigationItem. These Items are UINavigationBar-a elements (there is no direct access to the subwoofers of this bar. And in the documentation it is clearly not recommended to get / change them in any way
frame/bounds/alpha
frame/bounds/alpha
UINavigationBar-a (it is still inherited from UIView)). That is, the navigation bar should still be configured directly by the created and initialized navigationItem, and everything else must be from the crafty one. Why all this? And to the fact that UINavigationBarDelegate provides access to 4 methods: - (BOOL)navigationBar:(UINavigationBar *)navigationBar shouldPushItem:(UINavigationItem *)item; - (void)navigationBar:(UINavigationBar *)navigationBar didPushItem:(UINavigationItem *)item; - (BOOL)navigationBar:(UINavigationBar *)navigationBar shouldPopItem:(UINavigationItem *)item; - (void)navigationBar:(UINavigationBar *)navigationBar didPopItem:(UINavigationItem *)item; Only from the name it should already be very clear that these are will / did methods. The first is called before the corresponding action, the second - after. Only in this case, the first method of the type of should, also provides an answer to the question: “Do this action?” Thus, the method should be launched before the animation of the replacement item-a navigationBar-a, and the method did — after. Proceeding from the task, my first idea was to block user interaction in the should method, and return it in the did method. The push methods mean a movement down the hierarchy (toward a more particular one), and the pop methods towards the root.
One of the key concepts of defensive programming in asynchrony is “we process accordingly, or we block intermediate states”. Intermediate states (intermediate states) are always one of the main sources of bugs in programs. Since the animation is inherently an asynchronous action (that is, the exact point in time is unknown when a piece of code is called that marks the end of the action, so it cannot be synchronized with other pieces of code. Asynchronous code is always executed in a separate thread), it should be escaped!
In terms of defensive programming, the theoretical part is quite well described in the well-known “Perfect Code”
In addition, the transition animation (segue) from one root view to another also takes a certain amount of time, as it turned out, it is different from the animation time of the navigation bar. The duration of the animation UINavigationBar-a is static and determined by the constant
extern const CGFloat UINavigationControllerHideShowBarDuration;And the duration of the transition animation can be different. The main reason for this is the viewDidLoad / viewWillAppear: / methods of building layout (layout-a) according to the construction rules (constraints / constraint). Accordingly, the transition animation also needs to be screened.
UINavigationController-a has a delegate protocol UINavigationControllerDelegate. It defines 6 methods, 4 associated with transitions that allow processing the current animation directly (but Available ios 7.0 +, respectively, says that they are not yet relevant), but the other 2 are just a storehouse).
- (void)navigationController:(UINavigationController *)navigationController willShowViewController:(UIViewController *)viewController animated:(BOOL)animated; - (void)navigationController:(UINavigationController *)navigationController didShowViewController:(UIViewController *)viewController animated:(BOOL)animated; Accordingly, the handlers for the start and end of the animation of the appearance of the view controller.
About transitions (Segues)
I would like a few words about the transitions (segue), recently they have become a convenient and fashionable technology, as they allow to work wonders on the sideboard. Previously, to execute the transition, it was necessary to instantiate the controller instance, transfer the necessary data to the object, and run the pushViewController: animated: method, now it’s enough to create a “sego” on the storyboard, on the action, if you need to hang up the identifier, configure. In our case, the segue navigation controller is always run as a push (not as modal or something else).
After that, you can work with any transition in the code; there are 3 UIViewController methods:
- (void)prepareForSegue:(UIStoryboardSegue *)segue sender:(id)sender; - (BOOL)shouldPerformSegueWithIdentifier:(NSString *)identifier sender:(id)sender; - (void)performSegueWithIdentifier:(NSString *)identifier sender:(id)sender; The first method allows you to perform any actions with the destination controller before its appearance, to process various transitions (transition
identifier and destinationViewController ).The second method allows, among other things, to allow or interrupt the execution of the transition.
The third method allows you to programmatically call the transition in the code, in fact, it contains the transition code with
pushViewController:animated:The most important thing here is that push transitions using segue call the same methods from the navigationController (if any):
What else might be interesting here? There are so-called reverse transitions (unwind segue), which perform transitions back through the controllers (they also contain pop methods). And each of the UIStoryboardSegue has a perform method in which you can override the transition animation using the UIStoryboardSegue subclassing.
Using transitions (segue) is the most up-to-date practice of moving from one view controller to another.
About the target-action model, the user interaction (User Interaction)
And in order to correctly perform the task - a few words about the user interaction with the interface. When the user touches the screen, a touch event is generated and thrown in, unfortunately the UIEvent does not have an open constructor, so we are not able to easily create our touch events on the device screen, thus emulating this situation. Controls throughout the application react to the corresponding events (events) intended for them, with the result that the interface becomes interactive and responsive to user actions.
Some actions to events are already predetermined (for example, when we touch the button - the button goes into the highlighted state, and changes its appearance). We can intercept events, and process them as we like, assigning handlers through selectors. The selector stores a hash value that allows you to quickly select a method associated with it from the hash table of class selectors. All events are assigned and sent (if I'm not mistaken) in the depths of the UIApplication class, which has 2 important methods.
- (void)sendEvent:(UIEvent *)event; - (BOOL)sendAction:(SEL)action to:(id)target from:(id)sender forEvent:(UIEvent *)event; In general, this is the implementation of the target-action pattern:
There are 2 ways to block user interaction: the first is to block the receipt of events by a specific control (control); the second is to block sending events directly from the application instance object.
1st way (each View has a userInteractionEnabled property):
self.navigationController.navigationBar.userInteractionEnabled = NO; self.someButton.userInteractionEnabled = YES; 2nd way (the application object is singleton):
[[UIApplication sharedApplication] beginIgnoringInteractionEvents]; [[UIApplication sharedApplication] endIgnoringInteractionEvents]; Since there is a need to block any interaction (it is not known when clicking specifically on which button the dangerous code will be executed (with the following transition)), the second method suits us.
Appearance navigation-bar-a
As you may know, the best practice is to define the appearance using the UIAppearance, but thanks to such a subclass, it is possible to abandon it if you use this subclass everywhere. By the same to encapsulate this logic (to hide) inside the navigation controller is a very smart decision. The
awakeFromNib method is suitable for awakeFromNib . I personally did not try to do this, but I spied on others. This was a small tip.Multitouch
If someone is interested in multitouch (so that it is not possible to press 2 buttons in a row):
- (void) makeExclusiveTouchToSubviews:(UIView*)view { for (UIView * currentSubtView in [view subviews]) { currentSubView.multipleTouchEnabled = NO; currentSubView.exclusiveTouch = YES; [self makeExclusiveTouchToSubviews:currentSubView]; } } Ps. if you want to use this miracle, use at your own peril and risk, I haven't tried everything out of what was available, so for some situations you may have to write it yourself. The Utility / GAIClient classes are not supplied (from the first one, the method for disabling multitouch is taken, with the help of the second - non-crash report is sent to GoogleAnalytics).
Implemented functionality
It was implemented:
- A way to block transitions quickly manually (if necessary);
- 3 levels of protection against transitions:
a) at the level of the should navigationBarDelegate methods;
c) respectively, by blocking user interaction, if at least one corresponding animation has begun, and unlocking, if all have been completed;
wired protection from the processing of actions at once 2 buttons (by disabling the multitouch);
the release mechanism, in case something went wrong;
creating a report if something went wrong.
Nuances and problems encountered
The 1st problem was related to the fact that using the explicit and implicit transitions (in the second case via the navigation bar “Back”) in the second case, the
popToViewController:animated: method did not start, it was necessary to explicitly check whether the transition from one controller to another;The 2nd problem is navigation-bar behavior on iOS 7.0. On this firmware for the standard controller navigation, a delegate is automatically assigned (and if we try to do it again manually, it will generate an exception).
The third problem is that on the 7th firmware there is a right-hand svayp interactivePopGestureRecognizer, which allows you to go backwards (it only called the navigation controller delegate will, which is why the user interaction was tightly blocked).
4th problem - in extremely rare situations, there could be a danger that the opposite method was not always launched (the system should have been self-restoring if anything happened). A semblance of a timer was implemented, with a deblocking handler.
Download / View
Git Repo on github-e
Source: https://habr.com/ru/post/263069/
All Articles