Another camera for FreeTrack
I know that this invention has already been well established on the Internet. And writing this article, more precisely, a short post, I do not open America. Rather, it is a manual for disassembling the camera.
The simple fact is that I was going to make a similar device with the child and found that the recommended cameras are now simply not found and all the links are already outdated as a rule. Having run all the shops, I did not find anything suitable, but for some reason my eyes fell on the camera Ritmix RVC-007M I was especially surprised by the price - 120 rubles. Looking ahead, I will tell you what my surprise was when it all worked, and even no worse than the purchase TrackIR-e. Which I took the day before from a friend to compare them.
And so I just give the procedure for disassembling this camera.
Turn off the screw at the bottom of the tripod mount and remove it

Then unscrew the small screw holding the camera body in a tripod.
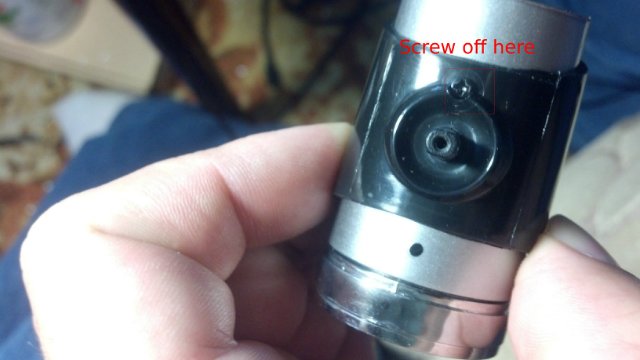
Then we take out the camera body and it splits into two palavins.

There unfortunately did not take a photo. On the back side of the board, the lens is attached with two small screws, turn them away. Carefully, with a regular needle, remove the IR filter.

Then, as a filter of visible light, we cut a small square from the old floppy disk about 10x10 mm. And put it there. We collect everything back.
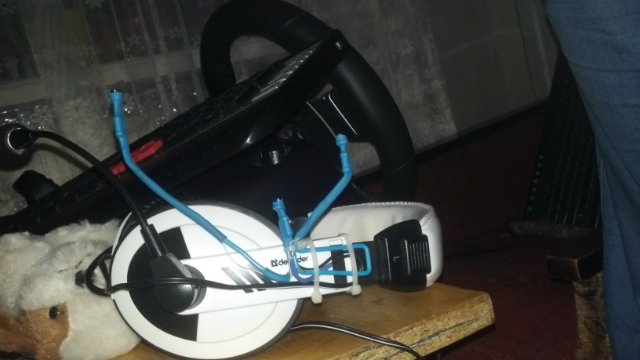
Well, finally, the photo of my frame with IR diodes, can someone come in handy.


This device was tested with two games War Thunder and City Car Drive. Where showed excellent results.
')
PS The most difficult thing was to find a floppy disk. Frame dimensions can be found in the program itself. Please do not scold for comments in English, since, like I should have at first, I posted a similar post on the Fritraker forum.
The simple fact is that I was going to make a similar device with the child and found that the recommended cameras are now simply not found and all the links are already outdated as a rule. Having run all the shops, I did not find anything suitable, but for some reason my eyes fell on the camera Ritmix RVC-007M
I was especially surprised by the price - 120 rubles. Looking ahead, I will tell you what my surprise was when it all worked, and even no worse than the purchase TrackIR-e. Which I took the day before from a friend to compare them.And so I just give the procedure for disassembling this camera.
Turn off the screw at the bottom of the tripod mount and remove it
Then unscrew the small screw holding the camera body in a tripod.
Then we take out the camera body and it splits into two palavins.
There unfortunately did not take a photo. On the back side of the board, the lens is attached with two small screws, turn them away. Carefully, with a regular needle, remove the IR filter.
Then, as a filter of visible light, we cut a small square from the old floppy disk about 10x10 mm. And put it there. We collect everything back.
Well, finally, the photo of my frame with IR diodes, can someone come in handy.
This device was tested with two games War Thunder and City Car Drive. Where showed excellent results.
')
PS The most difficult thing was to find a floppy disk. Frame dimensions can be found in the program itself. Please do not scold for comments in English, since, like I should have at first, I posted a similar post on the Fritraker forum.
Source: https://habr.com/ru/post/262519/
All Articles