Let Docker roam around the cluster on the Raspberry Pi
From the translator : The link to this article was published in the latest Docker official newsletter. I think I'm not the only one interested in both Raspberry Pi and Docker (Swarm) at the same time, so I offer you a translation,
In this post we will tell you how easy it is to install Swarm on your Raspberry Pi and set up a Swarm cluster on them using the Docker Machine.
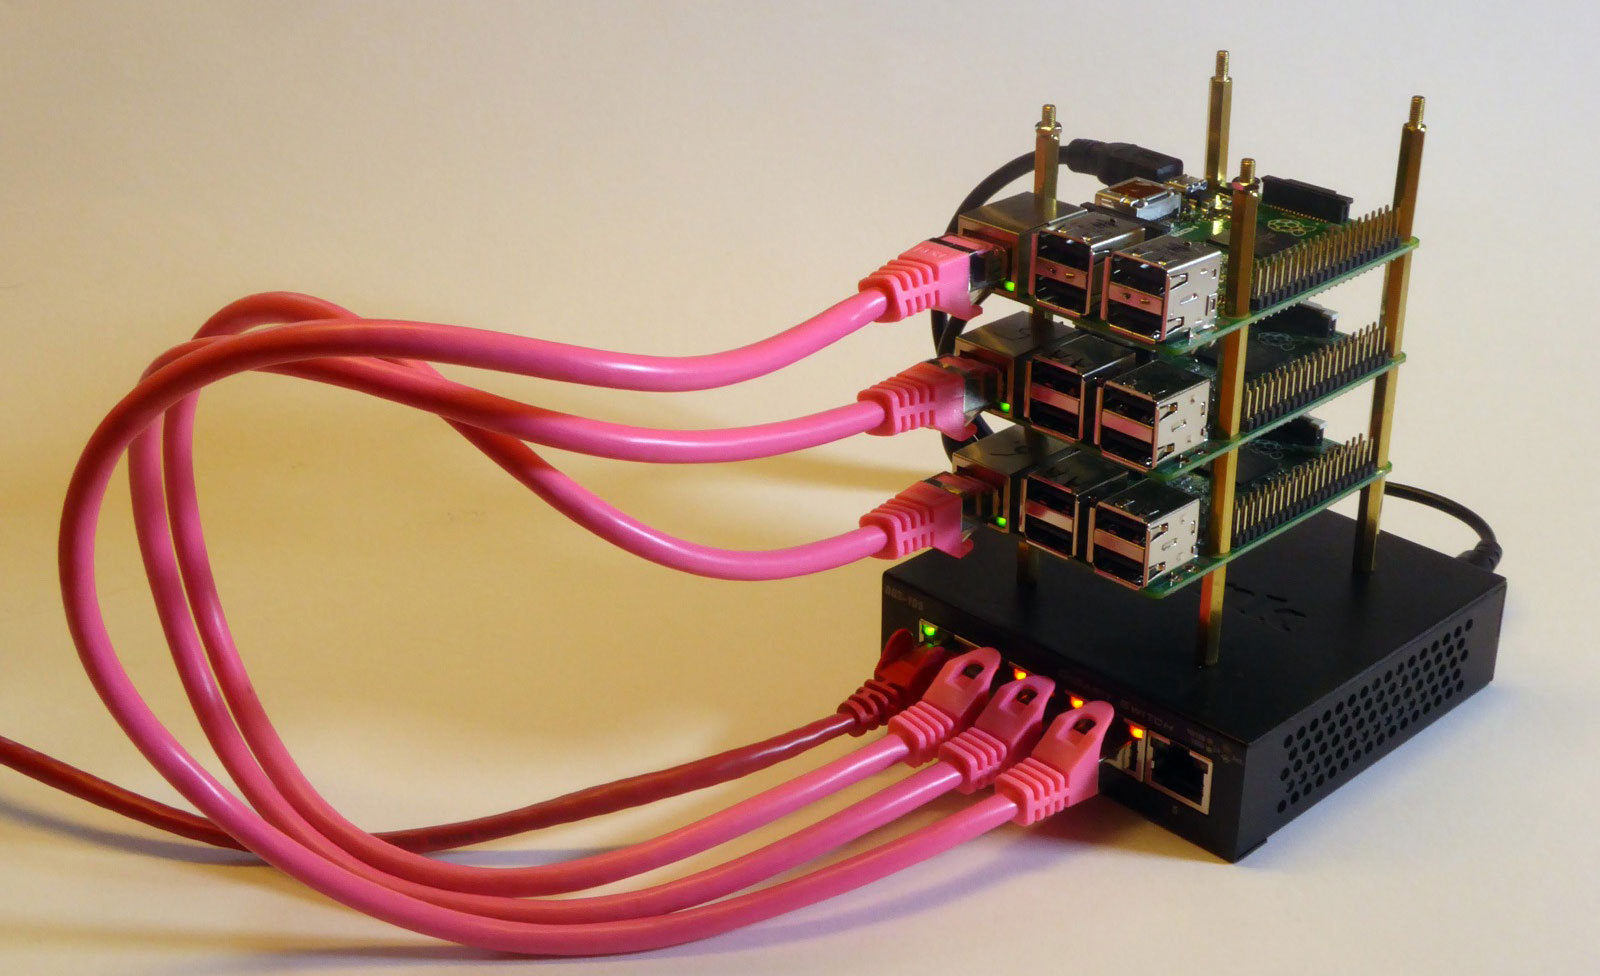
We built a small Pi tower from three Raspberry Pi 2 Model B and put them together in a Docker Swarm cluster.
')
As you can see in the photo, we put three Raspberri Pi on the D-Link five-port switch. All four devices are powered by 4 USB-port charger. This allows the tower to be very stable, but at the same time portable - from the external wires there is only one power wire and one network cable.
For your convenience, we have collected the used components in one shopping list on Amazon. (Translator’s note: there are only two items left from the entire list, the rest are very quickly shared with Amazon.)
Necessary materials
In this tutorial, we will perform all three steps on the Mac. For this we need three utilities:
Flash utility for recording images of SD cards for all Raspberry Pi.
A docker client that is one brew installation distance.
Binary Docker Machine with driver hypriot.
Write down the cards
First we need to install maps with Docker pre-installed. On a computer with a Mac or Linux, you can use our small flash command line utility to prepare all three cards using simple commands:
$ flash --hostname pi1 http://downloads.hypriot.com/hypriot-rpi-20150416-201537.img.zip $ flash --hostname pi2 http://downloads.hypriot.com/hypriot-rpi-20150416-201537.img.zip $ flash --hostname pi3 http://downloads.hypriot.com/hypriot-rpi-20150416-201537.img.zip Then insert the cards into all Raspberry Pi devices and boot from them. After a while, they will appear with different host names.
Get IP Addresses
Our SD images also run avahi-deamon to announce the hostname via mDNS. Therefore, each of the raspberries is available through
pi1.local , pi2.local and pi3.local . The Docker Machine cannot resolve these hostnames at the moment, so we need to get the IP addresses for Malin manually. $ ping -c 1 pi1.local $ ping -c 1 pi2.local $ ping -c 1 pi3.local For this example, let's imagine that our three addresses are
92.168.1.101, 102 and 103 .Enter SSH public key
Docker Machine connects to each Raspberry Pi via SSH. You will need to enter the SSH public key in order not to enter the password for the
root . There is a special utility for entering a public SSH key for a remote machine called ssh-copy-id . You may need to install it first. $ ssh-copy-id root@192.168.1.101 $ ssh-copy-id root@192.168.1.102 $ ssh-copy-id root@192.168.1.103 For each of the above commands, you will need to enter the
hypriot password for the root user.Create Docker machines
For the next step, we will use the Docker Machine driver to connect to the Raspberry Pi Hypriot devices. Our hypriot driver is not yet integrated into the official Docker Machine binary. Therefore, you will need to download the
docker-machine binary with the hypriot driver. $ curl -o docker-machine http://downloads.hypriot.com/docker-machine_0.4.0-dev_darwin-amd64 $ chmod +x ./docker-machine Download the file to the current directory and make it executable. You may need to transfer it to another directory in
PATH order to use it from other directories.Create a Swarm Token
The Docker Swarm Cluster uses a unique cluster identifier that allows individual agents to find each other. We need this ID to create a Docker Swarm.
This can be done from the shell:
$ export TOKEN=$(for i in $(seq 1 32); do echo -n $(echo "obase=16; $(($RANDOM % 16))" | bc); done; echo) $ echo $TOKEN In this example, we use
$ export TOKEN=babb1eb00bdecadedec0debabb1eb00b If you already have a container running with Docker Swarm, you can also create a new cluster identifier with the
docker run --rm hypriot/rpi-swarm create . We used the command above not to go into the problem of chicken and eggs.Create a swarm master
Now create the Docker Swarm Master on the first Raspberry Pi with our generated cluster ID
$ ./docker-machine create -d hypriot --swarm --swarm-master --swarm-discovery token://$TOKEN --hypriot-ip-address 192.168.1.101 pi1 This command connects to the pi1 raspberry, takes control of the docker through the TLS daemon and downloads the Docker
hypriot/rpi-swarm:latest image from Docker Hub. It will launch both the Swarm Master and the Swarm agent in the container.To check whether everything works as it should, we can connect to the newly created Swarm Master using the following command. It gets all the environment variables the client Docker needs to communicate with Swarm.
$ eval $(./docker-machine env --swarm pi1) $ docker info Containers: 2 Strategy: spread Filters: affinity, health, constraint, port, dependency Nodes: 1 pi1: 192.168.1.202:2376 └ Containers: 2 └ Reserved CPUs: 0 / 4 └ Reserved Memory: 0 B / 971.3 MiB We have successfully set up a lonely Swarm manager. So that he was not lonely, let's launch another malik.
Create Swarm Agents
For the remaining Raspberry Pi, we also need to create Docker Machine connections with the same cluster ID. This time we will launch docker-machine without the
--swarm-master option to simply launch the Swarm agent container on each of the raspberries. $ ./docker-machine create -d hypriot --swarm --swarm-discovery token://$TOKEN --hypriot-ip-address 192.168.1.102 pi2 $ ./docker-machine create -d hypriot --swarm --swarm-discovery token://$TOKEN --hypriot-ip-address 192.168.1.103 pi3 Let's take a look at what our Swarm now looks like.
$ docker info Containers: 4 Strategy: spread Filters: affinity, health, constraint, port, dependency Nodes: 3 pi1: 192.168.1.101:2376 └ Containers: 2 └ Reserved CPUs: 0 / 4 └ Reserved Memory: 0 B / 971.3 MiB pi2: 192.168.1.102:2376 └ Containers: 1 └ Reserved CPUs: 0 / 4 └ Reserved Memory: 0 B / 971.3 MiB pi3: 192.168.1.103:2376 └ Containers: 1 └ Reserved CPUs: 0 / 4 └ Reserved Memory: 0 B / 971.3 MiB We can withdraw all containers in the entire swarm with the usual command.
$ docker ps CONTAINER ID IMAGE COMMAND CREATED STATUS PORTS NAMES 5effaa7de4a3 hypriot/rpi-swarm:latest "/swarm join --addr 2 minutes ago Up About a minute 2375/tcp pi3/swarm-agent 6b73003b7246 hypriot/rpi-swarm:latest "/swarm join --addr 4 minutes ago Up 3 minutes 2375/tcp pi2/swarm-agent 5e00fbf7b9f6 hypriot/rpi-swarm:latest "/swarm join --addr 7 minutes ago Up 7 minutes 2375/tcp pi1/swarm-agent 02c905ec25a0 hypriot/rpi-swarm:latest "/swarm manage --tls 7 minutes ago Up 7 minutes 2375/tcp, 192.168.1.101:3376->3376/tcp pi1/swarm-agent-master After setting up Docker Swarm, you can now use the usual Docker commands on port 3376. For more information, see the official Docker Swarm documentation .
For proper communication with Swarm Master, before using the Docker client, do not forget to set up the environment
$ eval $(docker-machine env --swarm pi1) Now you can remotely control the feed on your Raspberry Pi from your poppy. See, it was not at all difficult!
[...]
Source: https://habr.com/ru/post/262509/
All Articles