Quick backup setup for Linux and not only (UrBackup)
About a year ago, I had an "urgent" need to transfer the backup data system in the corporate network to free rails. Prior to that, a paid product from Symantec was used, and of course, there were many complaints about it, but it worked, although it did not always cope. As usual, everything had to be done “yesterday”, and I began to search for options.
To begin, I began to look for a solution for backing up files; the obvious solution was to simply set up scripts on Linux using cron, but this is not a very convenient and reliable solution if there are more than one server (I have about 50) and the structure is quite dynamic. Especially if the infrastructure is mixed, Linux + Windows. I wanted something simple in the future maintenance and extraction of the copies themselves, for example, to transfer the recovery of user files to the support group. Rummaging through a couple of hours on the Internet, I came across an interesting UrBackup project, it met all my conditions.
As an operating system, I chose the CentOS 6 in the minimal configuration, you can take it here . Details on the installation and initial setup will not stop, because Manul on this procedure is already enough on Habré. Let's proceed to install the culprit of the UrBackup topic.
Previous versions of UrBackup had to be compiled from source, but thanks to the developers, repositories for most popular systems appeared for the latest versions. Although it was not a problem to compile from source, the repository greatly simplifies life, especially during updates.
')
So let's get started:
yum install wget nano -y cd /etc/yum.repos.d/ wget http://download.opensuse.org/repositories/home:kot1grun/CentOS_6/home:kot1grun.repo yum install urbackup-server -y Here we connect the repository and install the actual server. Next, so that we can connect to the server from the outside, we need to correct iptables:
# nano /etc/sysconfig/iptables # Firewall configuration written by system-config-firewall # Manual customization of this file is not recommended. *filter :INPUT ACCEPT [0:0] :FORWARD ACCEPT [0:0] :OUTPUT ACCEPT [0:0] -A INPUT -m state --state ESTABLISHED,RELATED -j ACCEPT -A INPUT -p icmp -j ACCEPT -A INPUT -i lo -j ACCEPT -A INPUT -m state --state NEW -m tcp -p tcp --dport 22 -j ACCEPT # urbackup -A INPUT -m state --state NEW -m tcp -p tcp --dport 55414 -j ACCEPT -A INPUT -j REJECT --reject-with icmp-host-prohibited -A FORWARD -j REJECT --reject-with icmp-host-prohibited COMMIT Reboot iptables:
service iptables restart We also disable selinux for servers inside the network:
# nano /etc/sysconfig/selinux # This file controls the state of SELinux on the system. # SELINUX= can take one of these three values: # enforcing - SELinux security policy is enforced. # permissive - SELinux prints warnings instead of enforcing. # disabled - No SELinux policy is loaded. SELINUX=disabled # SELINUXTYPE= can take one of these two values: # targeted - Targeted processes are protected, # mls - Multi Level Security protection. SELINUXTYPE=targeted Disable selinux without rebooting:
# setenforce 0 Install the service in autoload and run:
chkconfig urbackup-server on service urbackup-server restart Is done. You can connect and configure.
Go to the address
http: // my-server-ip: 55414. If desired, select the language and go to the settings:
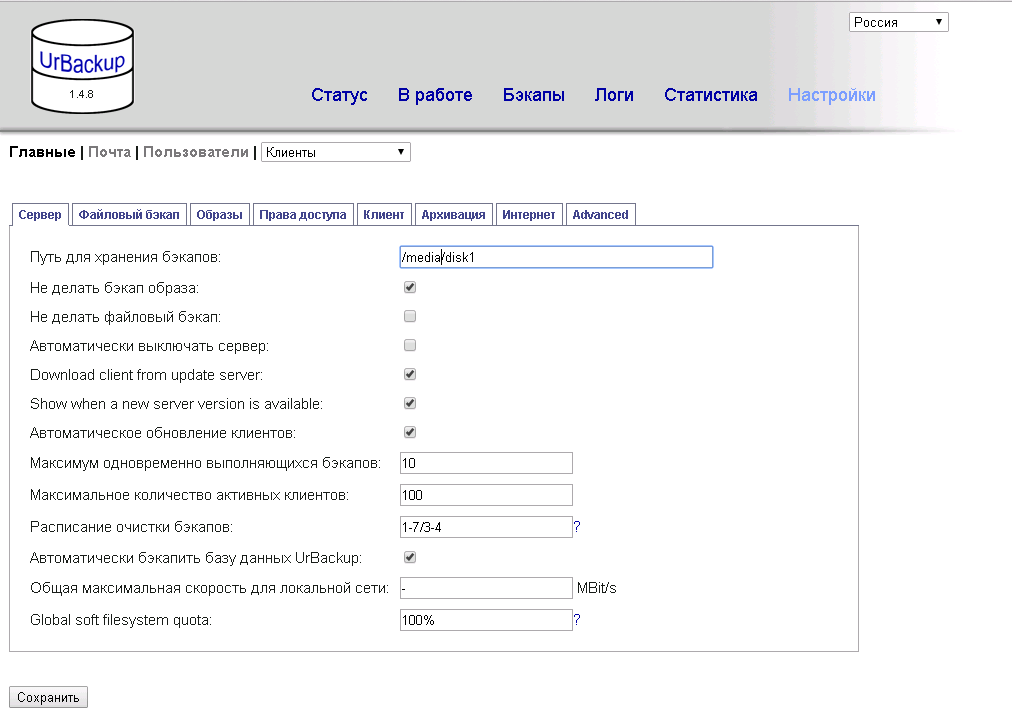
Here for the initial setup, we need to specify only the path for storing backups. Do not forget to click the "save" button and we can proceed to setting up clients.
First we need to install the client on the server that we want to copy. The client for Windows systems can be downloaded from the developers' site, but since we are currently considering linux systems, consider the installation on the same CentOS 6:
cd /etc/yum.repos.d/ wget http://download.opensuse.org/repositories/home:kot1grun/CentOS_6/home:kot1grun.repo yum install urbackup-client-nogui -y chkconfig urbackup-client on service urbackup-client start Add rules to iptables:
# nano /etc/sysconfig/iptables # Firewall configuration written by system-config-firewall # Manual customization of this file is not recommended. *filter :INPUT ACCEPT [0:0] :FORWARD ACCEPT [0:0] :OUTPUT ACCEPT [0:0] -A INPUT -m state --state ESTABLISHED,RELATED -j ACCEPT -A INPUT -p icmp -j ACCEPT -A INPUT -i lo -j ACCEPT -A INPUT -m state --state NEW -m tcp -p tcp --dport 22 -j ACCEPT # urbackup -A INPUT -m state --state NEW -m tcp -p tcp --dport 35621 -j ACCEPT -A INPUT -m state --state NEW -m udp -p udp --dport 35622 -j ACCEPT -A INPUT -m state --state NEW -m tcp -p tcp --dport 35623 -j ACCEPT -A INPUT -j REJECT --reject-with icmp-host-prohibited -A FORWARD -j REJECT --reject-with icmp-host-prohibited COMMIT Reboot iptables:
service iptables restart Do not forget to disable selinux, if, of course, it is not necessary. And you can add a client to the server. We return to the server
http: // my-server-ip: 55414. Go to the "status" section:

We type in the “Name / IP” field the IP address of the server from which we want to backup the data, and click add. We are waiting for a couple of minutes until the client appears in the list.
For a client with a GUI, this is enough, setting folders for copying can be done directly on the client, backups will start on a schedule, but we have minimal Linux and we installed the client without a GUI, it can also be configured directly from the server.
Go to settings:

We select our server from the list and set up “default directories for backup”.
We save.
Is done. The server is up and running. While working, we see something similar:

The server works surprisingly quickly and very compactly uses disk space using simlink-based de-duplication.
This is the minimum server setting, if you wish, you can configure authorization, archiving, creating system images (Windows), backup via the Internet, etc. In future articles I plan to tell you how to set up MSSQL and Exchange backups on the same server, if this is of course interesting for readers.
Source: https://habr.com/ru/post/262499/
All Articles