How to embed banners in the Android application without blocking other elements
Banners - one of the most popular types of advertising in mobile applications. They do not take up much space, such as full-screen (interstitial) ads. And allow you to combine them with elements of the user interface of the application. They can be added to different screens in the application.
After reading this article, you will learn how best to insert banners so that they do not interfere with the user and do not spoil the look of the application. In this case, you do not have to change the layout xml and make many changes to the application code. You can embed banners in your finished application by adding just a few lines of code. The approach described in the article, universal, you can use it for the API of any advertising services. The article will be interesting for both beginners and experienced developers. If you are new to the development, then in order to understand the subject of the article, you will not need any deep knowledge. Enough understanding of the basic concepts of development for Android. And experienced developers can find in it a ready-made solution that they can implement at their place. But initialization of the advertising service, working with specific advertising APIs and caching are beyond the scope of this article. To resolve such issues, please refer to the manual for your specific advertising service.
The idea of the article arose from the fact that in one of our Android applications we needed to place banners in several places, but this should be done in such a way as not to spoil the look of the application and not to overlap controls with banners. The application code was already written completely and we really didn’t want to redraw it, so we tried to make adding banners as simple as possible, correct and not affecting the work of the existing code. Another reason - we needed to create a paid version of the application without ads. And if the introduction of banners would require a change in layout xml, then it would greatly complicate the creation of a version without ads.
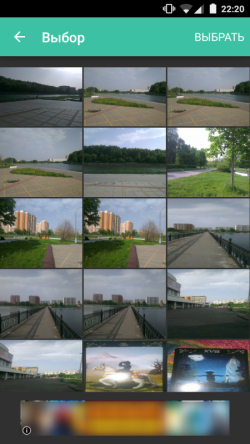
To make it more clear and understandable what I am writing about, look at the following screen:
')

User interface elements occupy the entire screen space. There are no empty places. In this case, we can place a banner at the bottom or at the top. The option of placing a banner below is preferable, since the banner will be located far away from the buttons and the user will not touch the banner, accidentally trying to click on "Select" or "Back." We need to place a banner at the bottom of the screen under the GridView with a photo. Since the banner is loaded over the network, it may not be immediately and not always unavailable. Consequently, it is not possible to show it at any moment in time, and an empty space from below can turn out. If we leave this empty place - it will turn out very ugly. It will look as if it is a gross flaw in interface design. If we place a banner on top of the GridView, it will block parts of the photo and create inconvenience to the user, which is also unacceptable.
Then we reduce the task to that we need to make so that there were no additional indents. And when the banner is loaded and can be shown - dynamically add an indent to the bottom and show the banner. On the other hand, we need to make the banner placement code as simple as possible, without complicated initializations. Those. It is not allowed to pass elements id or links to containers (ViewGroup). To insert banners into the layout xml of each screen where we need to add a banner is also unsuitable, because will require significant changes. Ideally, the banner installation code should look like this:
Only one line of code, one method call, which is passed only a link to the Activity in which the banner will be placed. Such code can be inserted into the Activity onCreate method.
In order to implement this, we need to know what is in the View and get access to it. There is no direct method for accessing the content view in the Activity. But thanks to nickes with StackOverflow, we found a solution . It is necessary to go through the Window in which the Activity is located. Window has DecorView, and ContentView is in DecorView. The first child element in it is the ViewGroup from layout xml.
So we need a Window, then we get the DecorView, then we get the ContentView, and then we get the first child ContentView. And with this child, we change the indent:
We found a solution for how to dynamically indent. Now we need to place the banner itself. Different advertising services have different APIs. Some have a View banner, which you can create and add to the ViewGroup. But some advertising APIs do not have access to the View banner, but only have a method that displays a banner. Consider both options.
Let's call the banner View class Banner. (To find out how it is actually called in your case and how to work with it, please refer to the manual of your advertising service.)
First, we need to create a Banner object:
Then he should assign an event listener. We are interested in the event of successful loading of a banner (this is again the code - an example. In order to find out how the listener is called and how to use it, please contact the management of your advertising service):
When the banner is loaded, we call setupContentViewPadding to dynamically add indentation from below.
Then we add our banner to the Window. We add it on top of existing items. In the Window class, there is an addContentView method for this:
We have no View banner and we can not create and place it explicitly. But the API has methods, like showBanner - show the banner.
I conditionally call the adapi API class - AdAPI (you should refer to the management of your advertising service to find out how the class in which there are methods for placing banners is called). In this case, the banner placement code will look something like this:
Where BANNER_HEIGHT is a constant equal to the height of the banner.
There are some difficulties. You should know exactly or set the height of the banner. We had such a problem: we launched our application on a 3.7 inch smartphone and on a 10.1 inch tablet. The size of the banner was different on different devices. On the smartphone, the banner looked great, but on the tablet it turned out to be too big and took up too much space from other elements. If your advertising service allows you to explicitly set the height of the banner - it is better to set it so that there are no such unpleasant surprises.
As you can see, the banner is shown and does not overlap other elements. Indent bottom added dynamically.
This is what we needed.
Summarizing all the above, I provide a way to integrate the code into your application.
Ads class:
Replace the code in the showBottomBanner method with your ad service API calls.
To place a banner, add a line of Ads.showBottomBanner (this) code to the Activity onCreate method.
In the article I gave a description of how to integrate banners into the application in the most correct and simple way. There are other ways to place banners. For example, you can take the first screen shown in the article and place the banner not from below, but between elements.
Hope the article was helpful to you.
Please write your comments in the comments.
Thank you for attention. Good luck to you in the development!
After reading this article, you will learn how best to insert banners so that they do not interfere with the user and do not spoil the look of the application. In this case, you do not have to change the layout xml and make many changes to the application code. You can embed banners in your finished application by adding just a few lines of code. The approach described in the article, universal, you can use it for the API of any advertising services. The article will be interesting for both beginners and experienced developers. If you are new to the development, then in order to understand the subject of the article, you will not need any deep knowledge. Enough understanding of the basic concepts of development for Android. And experienced developers can find in it a ready-made solution that they can implement at their place. But initialization of the advertising service, working with specific advertising APIs and caching are beyond the scope of this article. To resolve such issues, please refer to the manual for your specific advertising service.
The idea of the article arose from the fact that in one of our Android applications we needed to place banners in several places, but this should be done in such a way as not to spoil the look of the application and not to overlap controls with banners. The application code was already written completely and we really didn’t want to redraw it, so we tried to make adding banners as simple as possible, correct and not affecting the work of the existing code. Another reason - we needed to create a paid version of the application without ads. And if the introduction of banners would require a change in layout xml, then it would greatly complicate the creation of a version without ads.
To make it more clear and understandable what I am writing about, look at the following screen:
')
User interface elements occupy the entire screen space. There are no empty places. In this case, we can place a banner at the bottom or at the top. The option of placing a banner below is preferable, since the banner will be located far away from the buttons and the user will not touch the banner, accidentally trying to click on "Select" or "Back." We need to place a banner at the bottom of the screen under the GridView with a photo. Since the banner is loaded over the network, it may not be immediately and not always unavailable. Consequently, it is not possible to show it at any moment in time, and an empty space from below can turn out. If we leave this empty place - it will turn out very ugly. It will look as if it is a gross flaw in interface design. If we place a banner on top of the GridView, it will block parts of the photo and create inconvenience to the user, which is also unacceptable.
Then we reduce the task to that we need to make so that there were no additional indents. And when the banner is loaded and can be shown - dynamically add an indent to the bottom and show the banner. On the other hand, we need to make the banner placement code as simple as possible, without complicated initializations. Those. It is not allowed to pass elements id or links to containers (ViewGroup). To insert banners into the layout xml of each screen where we need to add a banner is also unsuitable, because will require significant changes. Ideally, the banner installation code should look like this:
Ads.showBottomBanner(activity); Only one line of code, one method call, which is passed only a link to the Activity in which the banner will be placed. Such code can be inserted into the Activity onCreate method.
Dynamic indenting
In order to implement this, we need to know what is in the View and get access to it. There is no direct method for accessing the content view in the Activity. But thanks to nickes with StackOverflow, we found a solution . It is necessary to go through the Window in which the Activity is located. Window has DecorView, and ContentView is in DecorView. The first child element in it is the ViewGroup from layout xml.
So we need a Window, then we get the DecorView, then we get the ContentView, and then we get the first child ContentView. And with this child, we change the indent:
public static void setupContentViewPadding(Activity activity, boolean top, int margin) { View view = ((ViewGroup) activity.getWindow().getDecorView().findViewById(android.R.id.content)).getChildAt(0); if (top) view.setPadding(view.getPaddingLeft(), margin, view.getPaddingRight(), view.getPaddingBottom()); else view.setPadding(view.getPaddingLeft(), view.getPaddingTop(), view.getPaddingRight(), margin); } Banner placement
We found a solution for how to dynamically indent. Now we need to place the banner itself. Different advertising services have different APIs. Some have a View banner, which you can create and add to the ViewGroup. But some advertising APIs do not have access to the View banner, but only have a method that displays a banner. Consider both options.
API in which there is a banner View
Let's call the banner View class Banner. (To find out how it is actually called in your case and how to work with it, please refer to the manual of your advertising service.)
First, we need to create a Banner object:
final Banner banner = new Banner(activity); Then he should assign an event listener. We are interested in the event of successful loading of a banner (this is again the code - an example. In order to find out how the listener is called and how to use it, please contact the management of your advertising service):
banner.setBannerListener(new BannerListener() { @Override public void onReceiveAd(View view) { // setupContentViewPadding(activity, true, BANNER_HEIGHT); } }); When the banner is loaded, we call setupContentViewPadding to dynamically add indentation from below.
Then we add our banner to the Window. We add it on top of existing items. In the Window class, there is an addContentView method for this:
FrameLayout.LayoutParams layoutParams = new FrameLayout.LayoutParams( FrameLayout.LayoutParams.MATCH_PARENT, height);// Utils.toDIP(activity, BANNER_HEIGHT)); layoutParams.gravity = Gravity.CENTER_HORIZONTAL | Gravity.BOTTOM; activity.getWindow().addContentView(banner, layoutParams); API without banner view
We have no View banner and we can not create and place it explicitly. But the API has methods, like showBanner - show the banner.
I conditionally call the adapi API class - AdAPI (you should refer to the management of your advertising service to find out how the class in which there are methods for placing banners is called). In this case, the banner placement code will look something like this:
Ad banner = AdAPI.loadBanner(); banner.addListener(new AdListener() { public void adLoaded() { // add bottom padding, when banner is loaded. setupContentViewPadding(activity, true, BANNER_HEIGHT); } }); Where BANNER_HEIGHT is a constant equal to the height of the banner.
There are some difficulties. You should know exactly or set the height of the banner. We had such a problem: we launched our application on a 3.7 inch smartphone and on a 10.1 inch tablet. The size of the banner was different on different devices. On the smartphone, the banner looked great, but on the tablet it turned out to be too big and took up too much space from other elements. If your advertising service allows you to explicitly set the height of the banner - it is better to set it so that there are no such unpleasant surprises.
Result
As you can see, the banner is shown and does not overlap other elements. Indent bottom added dynamically.
This is what we needed.
Using
Summarizing all the above, I provide a way to integrate the code into your application.
Ads class:
public class Ads { // final private static int BANNER_HEIGHT = 75; public static void showBottomBanner(Activity activity) { // final Banner banner = new Banner(activity); banner.setBannerListener(new BannerListener() { @Override public void onReceiveAd(View view) { // setupContentViewPadding(activity, true, BANNER_HEIGHT); } }); FrameLayout.LayoutParams layoutParams = new FrameLayout.LayoutParams( FrameLayout.LayoutParams.MATCH_PARENT, height);// Utils.toDIP(activity, BANNER_HEIGHT)); layoutParams.gravity = Gravity.CENTER_HORIZONTAL | Gravity.BOTTOM; activity.getWindow().addContentView(banner, layoutParams); } public static void setupContentViewPadding(Activity activity, boolean top, int margin) { View view = ((ViewGroup) activity.getWindow().getDecorView().findViewById(android.R.id.content)).getChildAt(0); if (top) view.setPadding(view.getPaddingLeft(), margin, view.getPaddingRight(), view.getPaddingBottom()); else view.setPadding(view.getPaddingLeft(), view.getPaddingTop(), view.getPaddingRight(), margin); } } Replace the code in the showBottomBanner method with your ad service API calls.
To place a banner, add a line of Ads.showBottomBanner (this) code to the Activity onCreate method.
Conclusion
In the article I gave a description of how to integrate banners into the application in the most correct and simple way. There are other ways to place banners. For example, you can take the first screen shown in the article and place the banner not from below, but between elements.
Hope the article was helpful to you.
Please write your comments in the comments.
Thank you for attention. Good luck to you in the development!
Source: https://habr.com/ru/post/262475/
All Articles