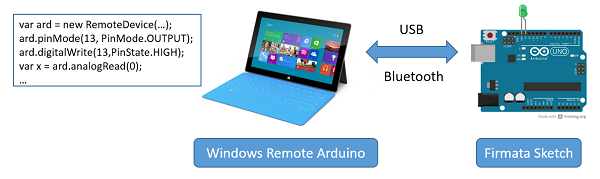
Windows Remote Arduino - control a desk lamp directly from a universal Windows application
Finishing a week of the Internet of things on Habré and in continuation of the previous post about partnership with Arduino , I will tell you about connection of devices to Windows. I already wrote about various scenarios for connecting sensors to the cloud , but there are scenarios when we just want to connect sensors or devices to our computer and remotely manage them. For example, we want to make an application that will turn the desk lamp on and off. In these cases, the simplest solution would be to use Windows Remote Arduino .
Windows Remote Arduino is a WinRT library that allows you to control the digital and analog channels of the Arduino card from a Windows / Windows Phone application using familiar commands like digitalRead / Write and analogRead / Write. At the same time, the board itself can be connected to the computer via USB or Bluetooth - it is important that the serial data transmission channel is provided. In addition to simple on / off I / O commands, in one form or another, it is possible to work with the I2C bus and (in the future) with servo drives.
')
For work, it is necessary that the Arduino board runs a special program that supports the execution of commands using the Firmata protocol. The Windows Remote Arduino library exchanges commands with the board, providing the programmer with high-level control functions.
Windows Remote Arduino is available for Windows 8.1 / Windows Phone 8.1 and for universal Windows 10 applications. To use them in your project, it is currently easiest to clone a Git-project repository and add the necessary projects to your solution (I will describe an example below).
In my example, I will develop an intelligent application that includes a desk lamp. For this purpose, I use the Arduino Uno board and a relay capable of switching 220V. The relay is connected to some digital output (for example, 7). Also, to detect the presence of a person, we will use an infrared presence sensor , which will be included in the analog input A0. For the convenience of switching, we use Troyka Shiled from Amperki . In the video above, see more about the hardware setup, as well as the entire project in action.
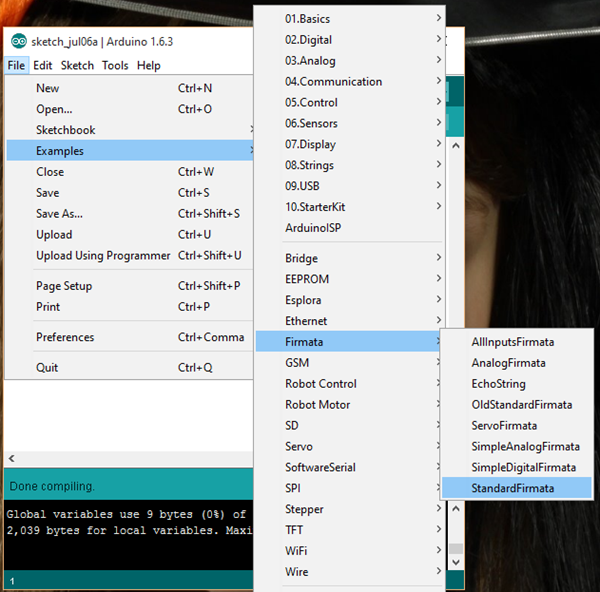
The first step is to install a standard sketch on the Arduino board to execute the Firmata commands. Such a sketch is already included in the standard delivery of the Arduino IDE - just select File -> Examples -> Firmata -> Standard Firmata from the menu. The sketch that opens will need to be loaded into the board in the usual way.
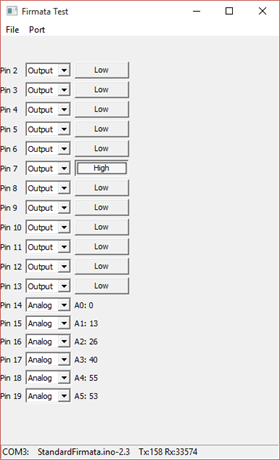
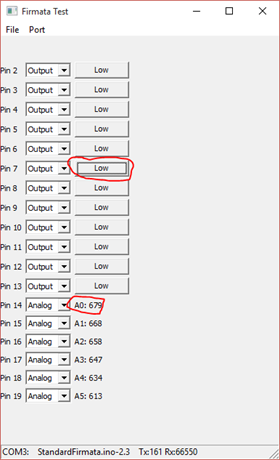
At this stage it will be useful to make sure that all the hardware is configured correctly. To do this, you can use the special program firmata_test.exe (or any of the programs described here ) - you should be able to control the light bulb by switching the state of digital output 7, as well as at input A0, you should receive a value of 0 if there is no movement around the sensor, and a large positive value (about 600 or more) otherwise
To use Windows Remote Arduino in your project, you need to connect the appropriate libraries. Currently, the technology is quite young, and libraries exist in the form of source texts. We hope that NuGet packages will appear over time, but now the process of including libraries is as follows:
Our application will have three buttons: to turn on the light, to turn it off, and for auto-mode, in which the light will be controlled by the presence sensor. To begin with, we will add these three buttons to the main page of the MainPage.xaml application, setting them to the inactive state:
This code is added inside the Grid container that the page already has by default. Also for each button we will create a handler function in C # (by double-clicking on each button, or through the Visual Studio properties window).
To begin, initialize the Remote Arduino object. To do this, in the window class in the MainPage.xaml.cs file we describe two variables:
To connect to the Arduino, we describe the connect () function, which we then call from the MainPage () constructor:
Here, we first define a list of available ports where Arduino can be connected, then create a UsbSerial serial connection with this port, and then on top of this - a RemoteDevice object, which will be a virtual Arduino. After that we call the begin function, passing the parameters of the serial connection.
IMPORTANT: The speed of the serial channel used by the Firmata protocol is specified in the StandardFirmata sketch. By default, it is 57600, so we select this particular speed in our application. If the speeds do not match, the connection will not work.
When a connection to the board is established, the Comm_ConnectionEstablished function will be called, which we describe as follows:
The main function code is wrapped in a call to the dispatcher that runs it in the UI thread - this is important. Next we set the modes of the main Arduino pins used, create a timer that will call the loop () function every half-second, and also make the buttons visible.
An interesting point - the installation of port 14 in analog mode. The fact is that the analog inputs in the Arduino are numbered after the digital ones, and input A0 corresponds to number 14. It is necessary to set the mode to ANALOG, and not INPUT, which means digital input.
Now to turn on / off the light bulb, it is enough to describe the function-event handlers of the buttons as follows:
The off_Click function is done by analogy. Please note that familiar commands like digitalRead / digitalWrite are used to work with remote Arduino pins.
The variable auto_mode is a variable of type bool that needs to be described in our class. It is needed in order to handle the automatic mode. The AUTO button will set this variable to true:
Now it remains for the small - to implement the function loop, which will switch the lamp depending on the presence of a signal from the presence sensor. This should be done only if auto_mode is set:
IMPORTANT : For more reliable work right before reading the port, it is better to set its mode to analog again. This should not be so, but in practice it improves stability. Also note that we use analogRead (0), although the line previously indicated the port number 14. The port number from 0 to 5 is transmitted in analogRead, when setting the port mode, you must add 14 to these numbers.
In our case, we wrote a universal application that can be placed on Windows Phone 10. However, this is useless, since it is impossible to connect the Arduino board via USB to a smartphone. However, if we use Bluetooth instead of a USB connection by connecting a Bluetooth card to the Arduino, then we will be able to control our design from the smartphone with the same application. In this case, the following lines should be added to the application manifest to allow Bluetooth communication:
We will not now consider using bluetooth - this is a topic for a separate article. However, we note that from the point of view of programming there is almost no difference - you need to use the BluetoothSerial object instead of UsbSerial, and all other constructs remain unchanged.
The source code of my project is traditionally available on GitHub: https://github.com/evangelism/RemoteArduinoLamp/tree/v1.0-serial . Please take it, experiment, if you find mistakes - make pull requests.
Windows Remote Arduino is a rather young and raw technology, but now it can simplify the solution of a number of tasks in which you need to directly control the inputs / outputs of the Arduino connected to the computer. Of course, all the same can be programmed by hand, writing your sketch and using a serial channel to interact with it, but why not use the ready-made developments and established standards (Firmata) in order not to reinvent the wheel.
I hope you will use Windows Remote Arduino in your projects, and if you do something interesting, I will be pleased to know about it! Write in the comments, twitter or vkontakte !
What is Windows Remote Arduino
Windows Remote Arduino is a WinRT library that allows you to control the digital and analog channels of the Arduino card from a Windows / Windows Phone application using familiar commands like digitalRead / Write and analogRead / Write. At the same time, the board itself can be connected to the computer via USB or Bluetooth - it is important that the serial data transmission channel is provided. In addition to simple on / off I / O commands, in one form or another, it is possible to work with the I2C bus and (in the future) with servo drives.
')
For work, it is necessary that the Arduino board runs a special program that supports the execution of commands using the Firmata protocol. The Windows Remote Arduino library exchanges commands with the board, providing the programmer with high-level control functions.
Windows Remote Arduino is available for Windows 8.1 / Windows Phone 8.1 and for universal Windows 10 applications. To use them in your project, it is currently easiest to clone a Git-project repository and add the necessary projects to your solution (I will describe an example below).
Example - light bulb switch
In my example, I will develop an intelligent application that includes a desk lamp. For this purpose, I use the Arduino Uno board and a relay capable of switching 220V. The relay is connected to some digital output (for example, 7). Also, to detect the presence of a person, we will use an infrared presence sensor , which will be included in the analog input A0. For the convenience of switching, we use Troyka Shiled from Amperki . In the video above, see more about the hardware setup, as well as the entire project in action.
Install the Firmata sketch on the Arduino board
The first step is to install a standard sketch on the Arduino board to execute the Firmata commands. Such a sketch is already included in the standard delivery of the Arduino IDE - just select File -> Examples -> Firmata -> Standard Firmata from the menu. The sketch that opens will need to be loaded into the board in the usual way.
At this stage it will be useful to make sure that all the hardware is configured correctly. To do this, you can use the special program firmata_test.exe (or any of the programs described here ) - you should be able to control the light bulb by switching the state of digital output 7, as well as at input A0, you should receive a value of 0 if there is no movement around the sensor, and a large positive value (about 600 or more) otherwise
Preparing a project with Windows Remote Ardunio
To use Windows Remote Arduino in your project, you need to connect the appropriate libraries. Currently, the technology is quite young, and libraries exist in the form of source texts. We hope that NuGet packages will appear over time, but now the process of including libraries is as follows:
- Create a new project - in our case it will be a universal Windows 10 application.
- Clone the GitHub repository of the Windows Remote Arduino project into a local folder:
git clone https://github.com/ms-iot/remote-wiring/
IMPORTANT : there are several versions of the library in the repository. At the time of this writing, the last master branch contained many errors when working with analog and digital inputs, so I use the most stable revert-18-develop branch. I really hope that an even more stable version will be released soon, and it will be possible to clone as shown above, without specifying a branch. - In the resulting project tree there are folders Microsoft.Maker.Win10 and Microsoft.Maker.Win8_1. We will use the option for Windows 10, but the project also supports universal Windows 8.1 applications.
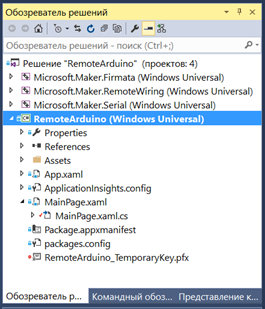
- There are three projects in the Microsoft.Maker.Win10 folder: Microsoft.Maker.Firmata, Microsoft.Maker.Serial and Microsoft.Maker.RemoteWiring. These three projects need to be added to the project we have created (Add Existing Project)
- The result is the following project tree:
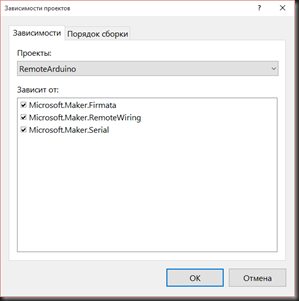
- In order for projects to be compiled in the correct order, you need to install the correct project dependencies. Right-click on our project, select “Build Dependencies -> Project Dependencies,” and check the boxes for all three added projects. The remaining dependencies should be already installed, but you can check them: the Firmata project depends on the Serial project, the RemoteWiring project - on the Firmata and Serial projects. Accordingly, on the “Assembly Order” tab, projects should be assembled in the following order: Serial, Firmata, RemoteWiring, and our application.
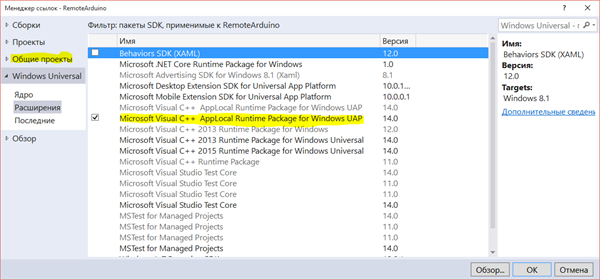
- In our main project, right-click on References and add the Microsoft Visual C ++ AppLocal Runtime Package for Windows UAP extension. There in the item “Common projects” select all three added projects Windows Remote Arduino.
- IMPORTANT: In order for our application to use the capabilities of working with a serial port, it is necessary in the application manifest (Package.appxmanifest file) in the section
<Capabilities>
add the following code:<DeviceCapability Name="serialcommunication"> <Device Id="any"> <Function Type="name:serialPort"/> </Device> </DeviceCapability> - We are ready to create our application that will use the Windows Remote Arduino libraries! To make sure everything works correctly, try building the resulting application.
Create an application with Windows Remote Arduino
Our application will have three buttons: to turn on the light, to turn it off, and for auto-mode, in which the light will be controlled by the presence sensor. To begin with, we will add these three buttons to the main page of the MainPage.xaml application, setting them to the inactive state:
<StackPanel Orientation="Horizontal" HorizontalAlignment="Center" VerticalAlignment="Center"> <Button x:Name="on" IsEnabled="False" Content="ON" FontSize="30" Width="150" Height="150" Click="on_Click"></Button> <Button x:Name="off" IsEnabled="False" Content="OFF" FontSize="30" Width="150" Height="150" Click="off_Click"></Button> <Button x:Name="auto" IsEnabled="False" Content="AUTO" FontSize="30" Width="150" Height="150" Click="auto_Click" ></Button> <TextBlock x:Name="txt"/> <ListBox x:Name="lst"/> </StackPanel> This code is added inside the Grid container that the page already has by default. Also for each button we will create a handler function in C # (by double-clicking on each button, or through the Visual Studio properties window).
To begin, initialize the Remote Arduino object. To do this, in the window class in the MainPage.xaml.cs file we describe two variables:
UsbSerial usbcomm; RemoteDevice arduino; To connect to the Arduino, we describe the connect () function, which we then call from the MainPage () constructor:
private async void connect() { var dev = await UsbSerial.listAvailableDevicesAsync(); usbcomm = new UsbSerial(dev[0]); arduino = new RemoteDevice(usbcomm); usbcomm.ConnectionEstablished += Comm_ConnectionEstablished; usbcomm.begin(57600, SerialConfig.SERIAL_8N1); } Here, we first define a list of available ports where Arduino can be connected, then create a UsbSerial serial connection with this port, and then on top of this - a RemoteDevice object, which will be a virtual Arduino. After that we call the begin function, passing the parameters of the serial connection.
IMPORTANT: The speed of the serial channel used by the Firmata protocol is specified in the StandardFirmata sketch. By default, it is 57600, so we select this particular speed in our application. If the speeds do not match, the connection will not work.
When a connection to the board is established, the Comm_ConnectionEstablished function will be called, which we describe as follows:
private void Comm_ConnectionEstablished() { Dispatcher.RunAsync(Windows.UI.Core.CoreDispatcherPriority.Normal,new Windows.UI.Core.DispatchedHandler(() => { arduino.pinMode(14, PinMode.ANALOG); arduino.pinMode(relay_pin, PinMode.OUTPUT); dt = new DispatcherTimer() { Interval = new TimeSpan(500) }; dt.Tick += loop; dt.Start(); on.IsEnabled = true; off.IsEnabled = true; auto.IsEnabled = true; })); } The main function code is wrapped in a call to the dispatcher that runs it in the UI thread - this is important. Next we set the modes of the main Arduino pins used, create a timer that will call the loop () function every half-second, and also make the buttons visible.
An interesting point - the installation of port 14 in analog mode. The fact is that the analog inputs in the Arduino are numbered after the digital ones, and input A0 corresponds to number 14. It is necessary to set the mode to ANALOG, and not INPUT, which means digital input.
Now to turn on / off the light bulb, it is enough to describe the function-event handlers of the buttons as follows:
private void on_Click(object sender, RoutedEventArgs e) { auto_mode = false; arduino.digitalWrite(relay_pin, PinState.HIGH); } The off_Click function is done by analogy. Please note that familiar commands like digitalRead / digitalWrite are used to work with remote Arduino pins.
The variable auto_mode is a variable of type bool that needs to be described in our class. It is needed in order to handle the automatic mode. The AUTO button will set this variable to true:
private void auto_Click(object sender, RoutedEventArgs e) { auto_mode = true; } Now it remains for the small - to implement the function loop, which will switch the lamp depending on the presence of a signal from the presence sensor. This should be done only if auto_mode is set:
private void loop(object sender, object e) { if (auto_mode) { arduino.pinMode(14, PinMode.ANALOG); var on = arduino.analogRead(0) > 512; arduino.digitalWrite(relay_pin, on ? PinState.HIGH : PinState.LOW); } } IMPORTANT : For more reliable work right before reading the port, it is better to set its mode to analog again. This should not be so, but in practice it improves stability. Also note that we use analogRead (0), although the line previously indicated the port number 14. The port number from 0 to 5 is transmitted in analogRead, when setting the port mode, you must add 14 to these numbers.
How to connect Arduino via Bluetooth and control from a smartphone
In our case, we wrote a universal application that can be placed on Windows Phone 10. However, this is useless, since it is impossible to connect the Arduino board via USB to a smartphone. However, if we use Bluetooth instead of a USB connection by connecting a Bluetooth card to the Arduino, then we will be able to control our design from the smartphone with the same application. In this case, the following lines should be added to the application manifest to allow Bluetooth communication:
<DeviceCapability Name="bluetooth.rfcomm"> <Device Id="any"> <Function Type="name:serialPort"/> </Device> </DeviceCapability> We will not now consider using bluetooth - this is a topic for a separate article. However, we note that from the point of view of programming there is almost no difference - you need to use the BluetoothSerial object instead of UsbSerial, and all other constructs remain unchanged.
Where to get the source code
The source code of my project is traditionally available on GitHub: https://github.com/evangelism/RemoteArduinoLamp/tree/v1.0-serial . Please take it, experiment, if you find mistakes - make pull requests.
findings
Windows Remote Arduino is a rather young and raw technology, but now it can simplify the solution of a number of tasks in which you need to directly control the inputs / outputs of the Arduino connected to the computer. Of course, all the same can be programmed by hand, writing your sketch and using a serial channel to interact with it, but why not use the ready-made developments and established standards (Firmata) in order not to reinvent the wheel.
I hope you will use Windows Remote Arduino in your projects, and if you do something interesting, I will be pleased to know about it! Write in the comments, twitter or vkontakte !
Source: https://habr.com/ru/post/262419/
All Articles