Introduction to Octopus Deploy
Continuous Integration and Continuous Delivery are de facto an integral part of modern project development. To automate CI, there are many programs from various vendors, but with the automation of application deployment, things are more modest. One of the deployment assistants is Octopus Deploy.

')
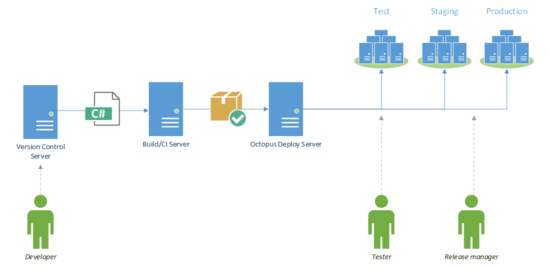
Let's look at a common approach in the development process. Developers write code, run unit-tests on the affected code, make commit. And they do it as often as possible, according to CI ideology. Next, a CI application (TeamCity, TFS, Jenkins, Bamboo, or another favorite on your team) builds the application and runs automatic tests.
There comes a time when it is time to give the application for manual testing and a member of the team ( DevOps ) deploys the application for testers.
And here is the next moment, it's time to give to the customer for testing (User Acceptance Test or Staging).
Well, after the green signal from the customer comes the main moment of importance, the publication of the application in production. And often the customer expects that if something goes wrong in production, your team will be able to roll back all changes with a click of your finger, for a maximum of half an hour.
Octopus Deploy comes to the rescue of deploying .NET applications. Octopus picks up the package with the application and deploys it to the server. Usually the Dev Environment server comes first. Then you can easily push the application to Test, UAT / Staging, and then the Production environment of the server. But first things first.
Octopus uses Octopus Server, which retrieves application packets from NuGet. You can pick them up automatically from the NuGet repository by subscribing to the NuGet Feed CI server via http / https, or from a regular folder on the server. As a rule, a NuGet package should contain a complete application, for example, your full ASP.NET Web site, or all files necessary for installing Windows Service.
Octopus reaches out to publishing servers with tentacles. Tentacle Agent is a lightweight program that runs as a Windows Service, retrieves the Nuget package from Octopus Server, and deploys the application. There is a mode of communication pull and push, i.e. Tentacle periodically polls the server for new packets, or Tentacle waits for a signal from the server and the server pushes. Octopus Server also runs as a Windows service, and communicates with its tentacles via a secure HTTPS (TLS and X.509 certificate). For greater security, when installing Octopus, you need to configure which Tentacle agents are trusted by the server and vice versa.
In the current version 2.0, the embedded database RavenDB is used to store all data, but for a number of reasons in the new version 3.0 they will be transferred to MS SQL Server. By the way, the new version will be released in the coming months, although according to the company's policy, you will have the opportunity to upgrade to the new version in the coming year after purchase, after a year you are not abandoned to complete arbitrariness and they allow you to download critical updates for free, but without new features, of course.
Let us dwell a little more on the structure that can work out.
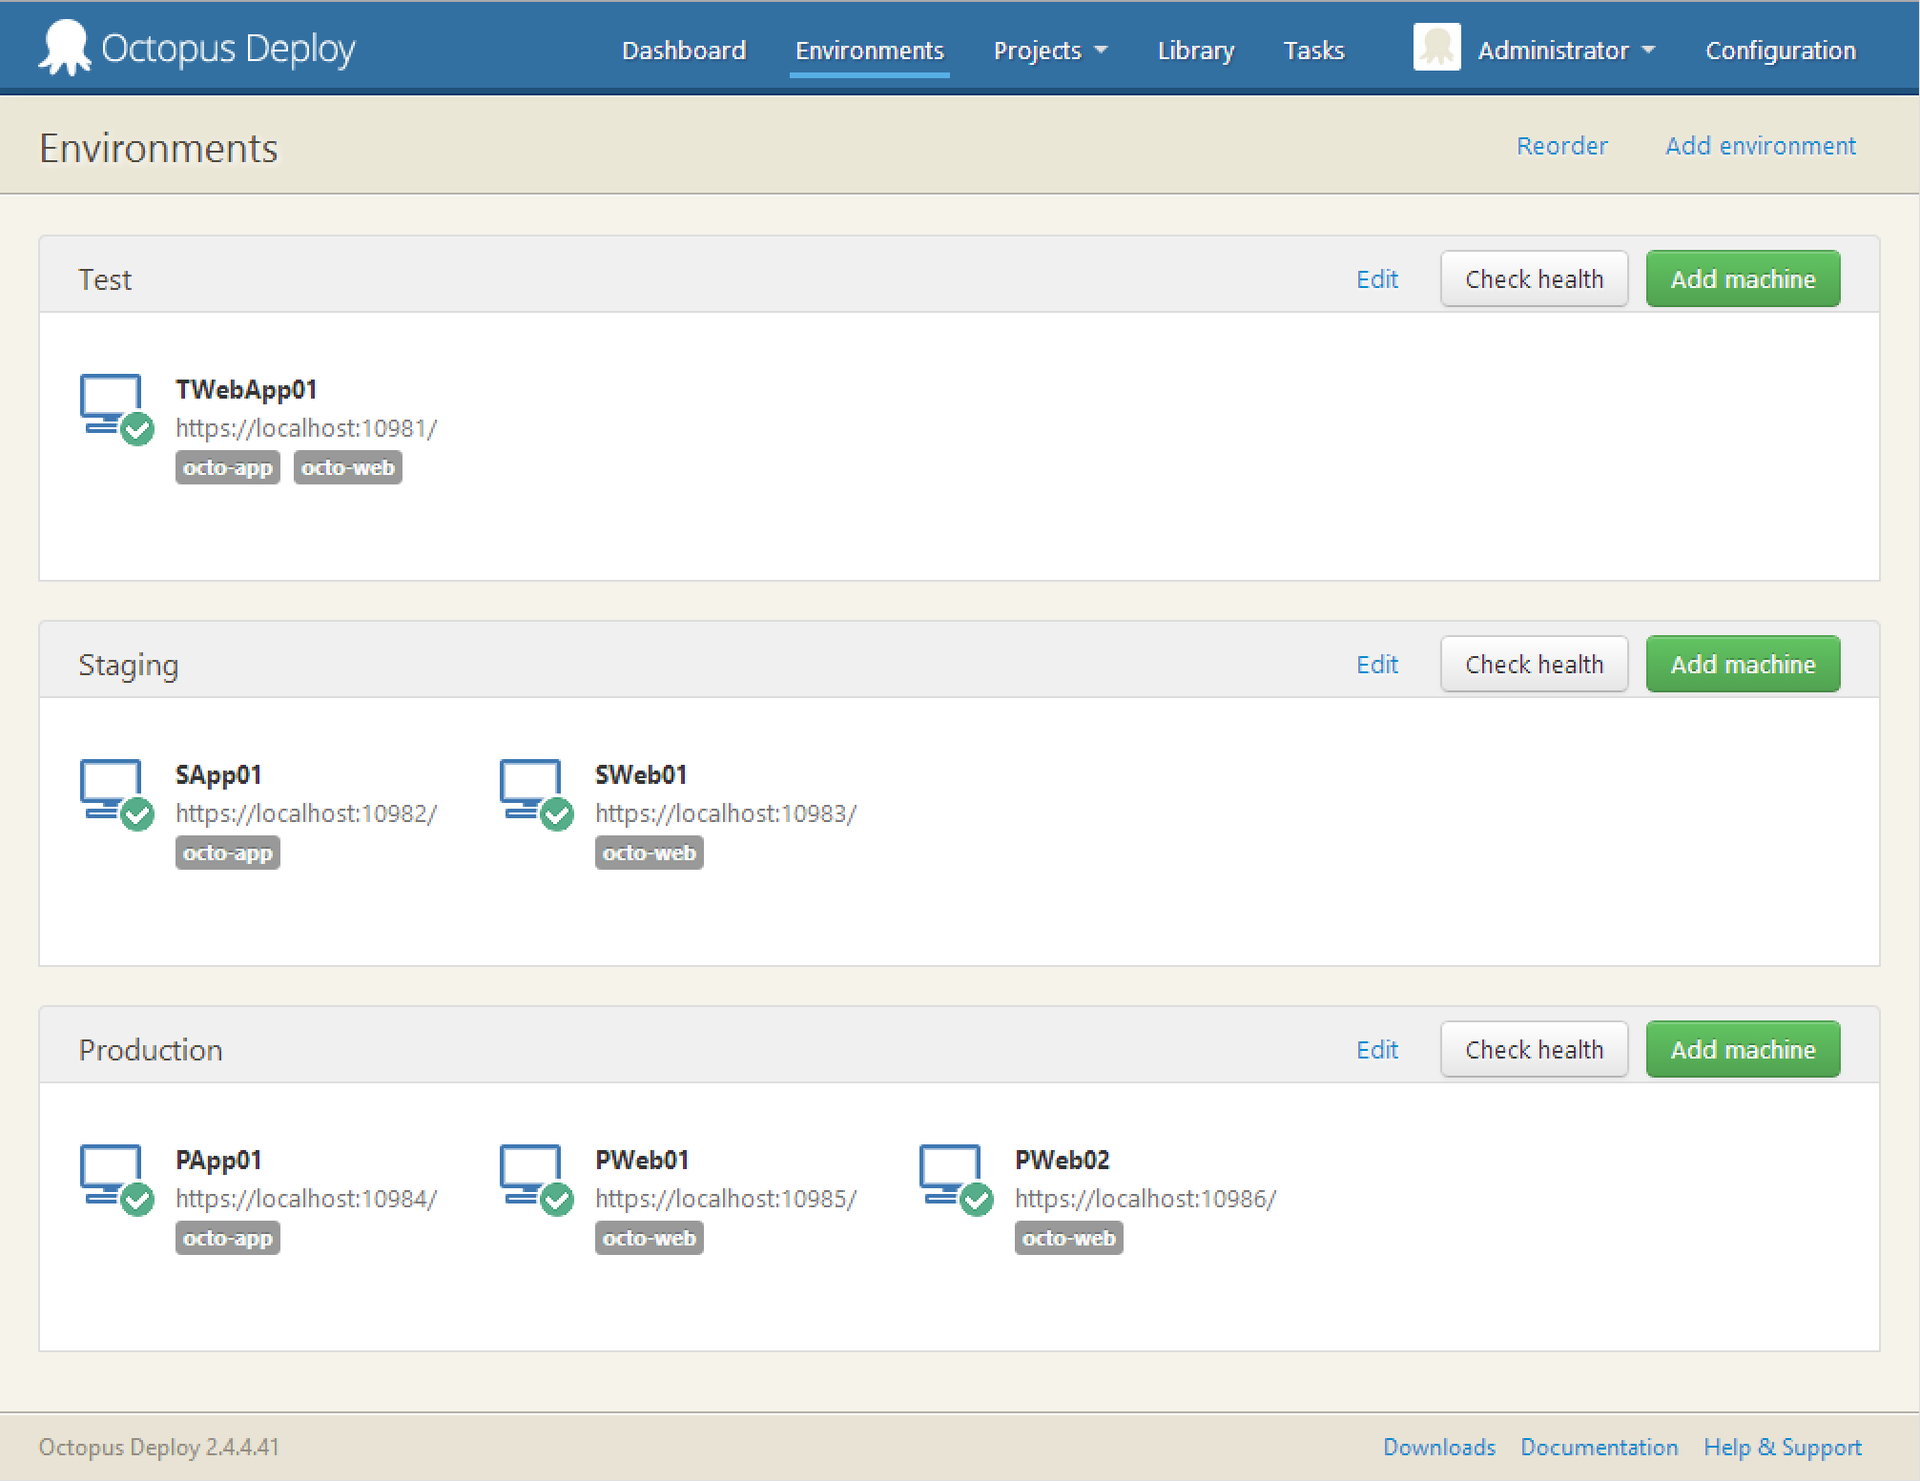
We have three environments (Test, Staging and Production). Six servers on which Tentacles are installed and where the application will be installed. And two roles: octo-web and octo-app. Creating roles is very convenient, for example, you can specify: install the site only on machines that have the octo-web role, and the application only on machines with the octo-app role. Note that there is one server for testing, where the site and the application will be located. And on production there are three servers, one for the application, and two for the site. This is a very realistic scenario with the deployment of two copies of the site (without a database) and the subsequent launch of the balancer.
The OctoFX application, with the octo-app role, will look like this:

The life cycle of the application will consist in passing the Test environment, then Staging, and then launching on Production.
The settings are very wide and you can choose the available environments for different applications.
Each deployment is done step by step. And in each step there is an opportunity:

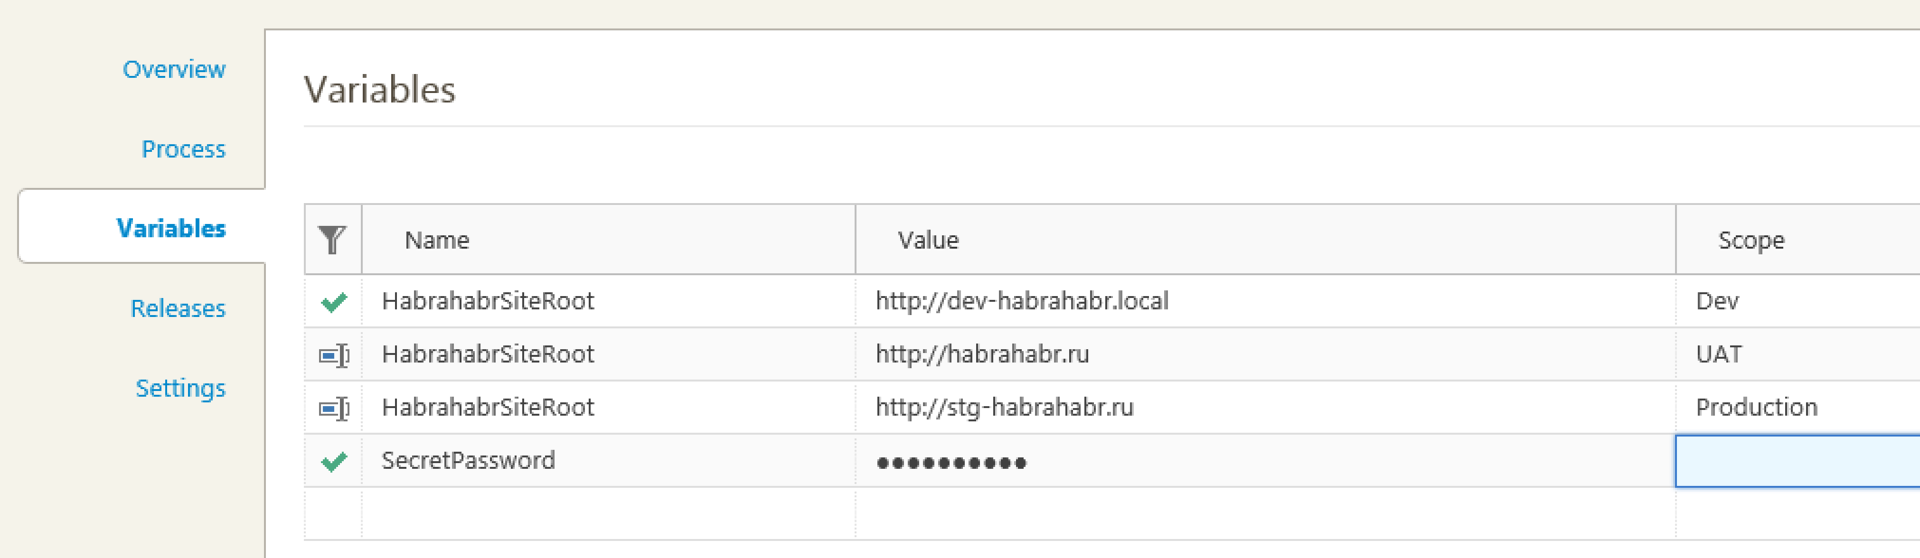
Variables are placed in a separate block and allow you to modify the value depending on the environment, role or server name.
Consider the example with Habr, if we need different values for the address of our site and we want to change the variable in the web config, then it is enough to add it to the block
Then config file
can be automatically transformed into a dev environment in
It is most convenient to store passwords in variables, since Octopus encrypts them and does not allow copying or viewing them later in the Variables panel. It is possible to create users and restrict access in environments. Thus, using a block of variables and restricting access to users, you can make it so that only the administrator or the Release Manager can deploy the application to Production and respectively see the passwords in the final version of the config file.
There are special system variables . They can be used as well as user variables, i.e. in PowerShell scripts or Config files. For example, one of our clients uses the Umbraco site. Of course, in NuGet, the package makes sense to add only the executable part of the site, and not Gigabytes of media content. When the site is updated, Octopus creates a new folder, i.e. in fact, a new site, for example, puts it in the \ Octopus \ Applications \ UmracoSite \ 1.20.0 \ folder. And we copy using the PowerShell script and the variable Octopus.Deployment.PreviousSuccessful.Id all media content from the old version of the site to the new one.
Until now, I meet manual database backup before deploying an application, manually changing config files, many variants of self-written scripts that are stored locally and differ from programmers and system administrators, and even manually copying the application folder in production and test environment.
Try to minimize the human factor and routine in the process. And successful deployment to you!
Project
Video lessons
Documentation
')
Introduction
Let's look at a common approach in the development process. Developers write code, run unit-tests on the affected code, make commit. And they do it as often as possible, according to CI ideology. Next, a CI application (TeamCity, TFS, Jenkins, Bamboo, or another favorite on your team) builds the application and runs automatic tests.
There comes a time when it is time to give the application for manual testing and a member of the team ( DevOps ) deploys the application for testers.
And here is the next moment, it's time to give to the customer for testing (User Acceptance Test or Staging).
Well, after the green signal from the customer comes the main moment of importance, the publication of the application in production. And often the customer expects that if something goes wrong in production, your team will be able to roll back all changes with a click of your finger, for a maximum of half an hour.
Octopus Deploy comes to the rescue of deploying .NET applications. Octopus picks up the package with the application and deploys it to the server. Usually the Dev Environment server comes first. Then you can easily push the application to Test, UAT / Staging, and then the Production environment of the server. But first things first.
Octopus device
Octopus uses Octopus Server, which retrieves application packets from NuGet. You can pick them up automatically from the NuGet repository by subscribing to the NuGet Feed CI server via http / https, or from a regular folder on the server. As a rule, a NuGet package should contain a complete application, for example, your full ASP.NET Web site, or all files necessary for installing Windows Service.
Octopus reaches out to publishing servers with tentacles. Tentacle Agent is a lightweight program that runs as a Windows Service, retrieves the Nuget package from Octopus Server, and deploys the application. There is a mode of communication pull and push, i.e. Tentacle periodically polls the server for new packets, or Tentacle waits for a signal from the server and the server pushes. Octopus Server also runs as a Windows service, and communicates with its tentacles via a secure HTTPS (TLS and X.509 certificate). For greater security, when installing Octopus, you need to configure which Tentacle agents are trusted by the server and vice versa.
In the current version 2.0, the embedded database RavenDB is used to store all data, but for a number of reasons in the new version 3.0 they will be transferred to MS SQL Server. By the way, the new version will be released in the coming months, although according to the company's policy, you will have the opportunity to upgrade to the new version in the coming year after purchase, after a year you are not abandoned to complete arbitrariness and they allow you to download critical updates for free, but without new features, of course.
Environment, Roles, and Applications
Let us dwell a little more on the structure that can work out.
We have three environments (Test, Staging and Production). Six servers on which Tentacles are installed and where the application will be installed. And two roles: octo-web and octo-app. Creating roles is very convenient, for example, you can specify: install the site only on machines that have the octo-web role, and the application only on machines with the octo-app role. Note that there is one server for testing, where the site and the application will be located. And on production there are three servers, one for the application, and two for the site. This is a very realistic scenario with the deployment of two copies of the site (without a database) and the subsequent launch of the balancer.
The OctoFX application, with the octo-app role, will look like this:
The life cycle of the application will consist in passing the Test environment, then Staging, and then launching on Production.
The settings are very wide and you can choose the available environments for different applications.
Steps and Variables
Steps
Each deployment is done step by step. And in each step there is an opportunity:
- Download and place the contents of the NuGet package in a folder, FTP or MS Azure server
- Run Power Shell script, pass variables to script
- Update config files with special variables
- Transform config files. Typically, the build will run config.Release, but you can add another XML transformation over, for example config.Staging
- Send email
- Stop the deployment process and prompt for user action.
- Run a special step for easy deployment of the Windows service
- Run a special step to expand the site, including updating the binding and ports
Variables
Variables are placed in a separate block and allow you to modify the value depending on the environment, role or server name.
Consider the example with Habr, if we need different values for the address of our site and we want to change the variable in the web config, then it is enough to add it to the block
Then config file
<appSettings> <add key="HabrahabrSiteRoot" value="testkey"/> </appSettings> <deepConfigSection> <anotherTagExample someAttribute ="Site #{HabrahabrSiteRoot}" /> <deepConfigSection> can be automatically transformed into a dev environment in
<appSettings> <add key="HabrahabrSiteRoot" value="http://dev-habrahabr.local"/> </appSettings> <deepConfigSection> <anotherTagExample someAttribute ="Site http://dev-habrahabr.local" /> <deepConfigSection> It is most convenient to store passwords in variables, since Octopus encrypts them and does not allow copying or viewing them later in the Variables panel. It is possible to create users and restrict access in environments. Thus, using a block of variables and restricting access to users, you can make it so that only the administrator or the Release Manager can deploy the application to Production and respectively see the passwords in the final version of the config file.
There are special system variables . They can be used as well as user variables, i.e. in PowerShell scripts or Config files. For example, one of our clients uses the Umbraco site. Of course, in NuGet, the package makes sense to add only the executable part of the site, and not Gigabytes of media content. When the site is updated, Octopus creates a new folder, i.e. in fact, a new site, for example, puts it in the \ Octopus \ Applications \ UmracoSite \ 1.20.0 \ folder. And we copy using the PowerShell script and the variable Octopus.Deployment.PreviousSuccessful.Id all media content from the old version of the site to the new one.
Conclusion
Until now, I meet manual database backup before deploying an application, manually changing config files, many variants of self-written scripts that are stored locally and differ from programmers and system administrators, and even manually copying the application folder in production and test environment.
Try to minimize the human factor and routine in the process. And successful deployment to you!
Useful links:
Project
Video lessons
Documentation
Source: https://habr.com/ru/post/262409/
All Articles