Manage ReSharper settings in the team
Today I want to talk about how you can centrally manage ReSharper settings at the level of the development team. By settings, I mean the settings for the formatter, Live Templates, and the ReSharper settings. They can be exported and packaged in the so-called Declarative Extensions .
At the moment, all the plug-ins for ReSharper are standard NuGet packages. This allows you to distribute them through the official NuGet feed from JetBrains or publish them in a private, closed NuGet server within the company.
To export the settings and Live Templates, go to the RESHARPER-> Manage Options menu.

')
In this dialog, you need to select the level (Layer) of the settings that we want to export.
Click the "Import / Export settings" button.

In the “Export To File” window, select the “Code Style” and “LiveTemplates” nodes. Then you need to specify the directory and the name of the DotSettings file in which the exported settings will be written.
Once the settings are exported, you can start creating the NuGet package. It is necessary to describe the .nuspec file. For ReSharper 8.2, it will look like this:
In the case of ReSharper 9.1, the .nuspec file will be slightly different. The Dependencies node must indicate the “Wave” version, not ReSharper:
You will also need to change the target:
Where “YourCompany.Settings” is the NuGet identifier of the package.
Now you can build the package by running the command:
If we have completed the previous steps without errors, the package “YourCompany.Settings.1.0.0.nupkg” will be created next to the nuspec file.
As mentioned above, ReSharper can use the following sources of NuGet packages:
Publishing a package on a NuGet server is almost the same as publishing on nuget.org.
In this article, for simplicity, as a NuGet feed, I will use a folder in the file system. This folder must be accessible from the computer of each programmer in the team. For example, it may be a shared exchange folder on a network drive.
After the package with the extension is published, we need to register a new source of extensions. To do this, go to RESHARPER -> Options ...-> Environment -> Extension Manager.
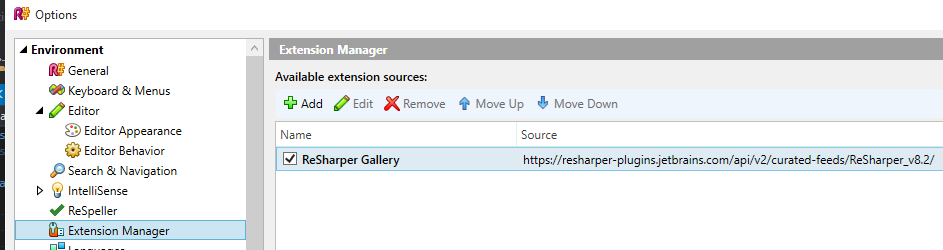
Click “Add”, specify the name in the “Name” field and the path to Artifacts, NuGet server or directory in the “Source” field.

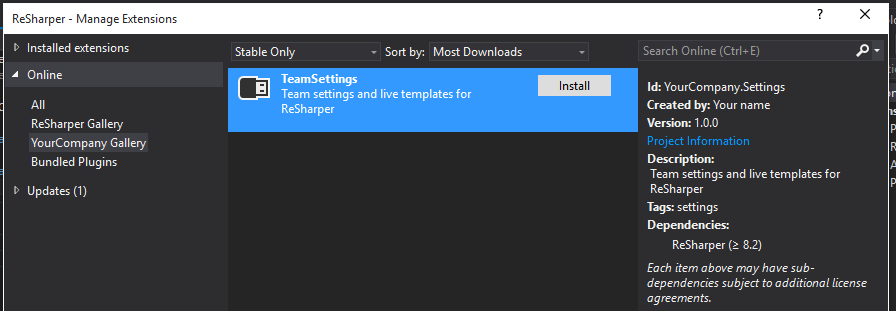
To install an extension, go to the RESHARPER -> Extension Manager menu.
In the search you need to find our package and click Install.
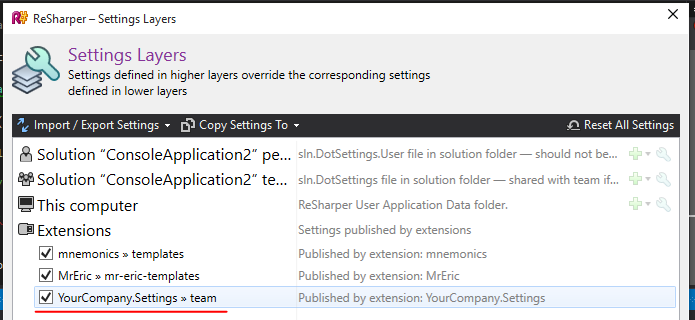
Check that ReSharper has discovered new settings. Open the Manage Options dialog and make sure that the new settings layer is displayed on the screen.
Now each team member can use the current version of settings. If you change or update the settings, all you have to do is publish the new version of the plugin, and ReSharper will automatically find the update and inform the developer.
At the moment, all the plug-ins for ReSharper are standard NuGet packages. This allows you to distribute them through the official NuGet feed from JetBrains or publish them in a private, closed NuGet server within the company.
Export Settings
To export the settings and Live Templates, go to the RESHARPER-> Manage Options menu.
')
In this dialog, you need to select the level (Layer) of the settings that we want to export.
Click the "Import / Export settings" button.
In the “Export To File” window, select the “Code Style” and “LiveTemplates” nodes. Then you need to specify the directory and the name of the DotSettings file in which the exported settings will be written.
NuGet package preparation
Once the settings are exported, you can start creating the NuGet package. It is necessary to describe the .nuspec file. For ReSharper 8.2, it will look like this:
<?xml version="1.0"?> <package> <metadata> <id>YourCompany.Settings</id> <version>1.0.0</version> <title>TeamSettings</title> <authors>Your name</authors> <owners>Your Company</owners> <projectUrl>http://your-company.com</projectUrl> <requireLicenseAcceptance>false</requireLicenseAcceptance> <description> Team settings and live templates for ReSharper </description> <copyright>Copyright Your Company</copyright> <dependencies> <dependency id="ReSharper" version="8.2" /> </dependencies> <releaseNotes> </releaseNotes> <tags>settings</tags> </metadata> <files> <file src="..\Settings\" target="ReSharper\v8.2\settings\" /> </files> </package> In the case of ReSharper 9.1, the .nuspec file will be slightly different. The Dependencies node must indicate the “Wave” version, not ReSharper:
<dependencies> <dependency id="Wave" version="[2.0]" /> </dependencies> You will also need to change the target:
<files> <file src="..\Settings\" target="DotFiles\Extensions\YourCompany.Settings\settings\" /> </files> Where “YourCompany.Settings” is the NuGet identifier of the package.
Now you can build the package by running the command:
nuget.exe pack nuspec-file-name.nuspec If we have completed the previous steps without errors, the package “YourCompany.Settings.1.0.0.nupkg” will be created next to the nuspec file.
Publishing a NuGet Package
As mentioned above, ReSharper can use the following sources of NuGet packages:
- Official feed from JetBrains
- Any third-party NuGet server (for example, ProGet)
- TeamCity artifacts
- Local or network folder
Publishing a package on a NuGet server is almost the same as publishing on nuget.org.
In this article, for simplicity, as a NuGet feed, I will use a folder in the file system. This folder must be accessible from the computer of each programmer in the team. For example, it may be a shared exchange folder on a network drive.
Using custom NuGet feed
After the package with the extension is published, we need to register a new source of extensions. To do this, go to RESHARPER -> Options ...-> Environment -> Extension Manager.
Click “Add”, specify the name in the “Name” field and the path to Artifacts, NuGet server or directory in the “Source” field.
Extension installation
To install an extension, go to the RESHARPER -> Extension Manager menu.
In the search you need to find our package and click Install.
Check that ReSharper has discovered new settings. Open the Manage Options dialog and make sure that the new settings layer is displayed on the screen.
Now each team member can use the current version of settings. If you change or update the settings, all you have to do is publish the new version of the plugin, and ReSharper will automatically find the update and inform the developer.
Source: https://habr.com/ru/post/262383/
All Articles