Create a room motion detector on the Arduino and MATLAB
In this example, a simple motion detector will be created, based on a photoresistor and an Arduino . Controlled by the Arduino Support Package for MATLAB .
Introduction
A photoresistor is a variable resistor that reacts to the intensity of the incident light, therefore, the motion detector will detect only the movement that causes changes in illumination.
A control program written in MATLAB will use commands from the Support Package to read the voltage from the Arduino pins. Voltage values will be loaded directly into MATLAB, with reference to time. This data will be plotted and analyzed in real time for motion detection.
')
The code uses a combination of algorithms for motion detection, but there are many other machine learning and data analysis algorithms that can be used in similar projects.
While the motion detector is running, the MATLAB program stores all voltage readings along with the corresponding time stamps. This allows the user to process the complete data set in MATLAB after the recording is completed. The following article presents the results of the analysis of several such records and algorithms.
What is needed?
- Arduino or equivalent
- USB cable
- 1 photoresistor
- 10 kΩ resistor
- Wires (MGTF 0.2 should be enough)
- Small breadboard
Task 1 - Connect Arduino to MATLAB
To connect Arduino to MATLAB, you need to install the MATLAB support package for Arduino. This support package is available for MATLAB, starting with the release of R2014a (current R2015a) and higher, and is installed using the installer of support packages. This installer can be opened from the MATLAB ribbon (Add-Ons -> Get Hardware Support Packages) or from the command line using the supportPackageInstaller command. After installing the support package, you can connect Arduino.
Procedure
- Connect the Arduino to your computer using a USB cable.
- In MATLAB, initialize an Arduino object:
% Inputs: Port ID (from your computer), Arduino board type myArduino = arduino('COM4','uno'); Task 2 - Check MATLAB-Arduino Connection
Most Arduino boards or clones have a built-in LED at pin 13. If your board has a LED, you can test the connection by simply flashing them.
If there is no built-in LED, you can connect one in series to a resistor between the digital output (for example, 13) and GND (see electrical diagram below).
The resistor value will be different for the LED color, but for the red and yellow LEDs, a 330 Ohm resistor should be sufficient. When the LED is connected, to check it is necessary to execute the code below (we blink the LED 5 times).


Task 3 - Build the Scheme
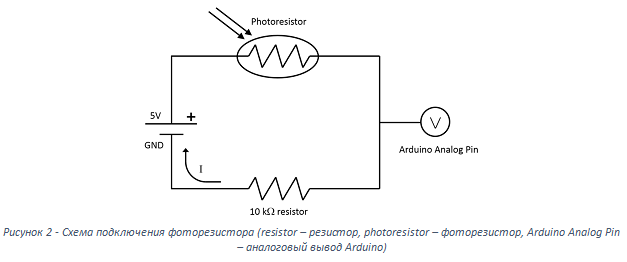
It is important that, like all resistors, the photoresistor has no orientation - no need to worry about the direction of the current flowing through it. First, you need to create a simple voltage divider using a photoresistor:
- On a breadboard, connect a photoresistor and a 10kΩ resistor in series.
- Connect the free output of a 10 kΩ resistor to the GND Arduino output.
- Connect the free output of the photoresistor to the output 5V Arduino.
To measure the voltage between the photoresistor and 10 kOhm resistor, you need to connect this point in the circuit to the analog output of the Arduino using a wire. This bundle will work as a potentiometer.
Task 4 - Checking the circuit and photoresistor
The next step is to check the circuit in order to make sure that the photoresistor responds correctly to changing illumination.
The script below shows how to set up an Arduino and get voltage readings from a photoresistor via an analog Arduino pin.
Try to cover the photoresistor or turn on / off the light in the room when the script is running to see how the photoresistor reacts to changes in light.
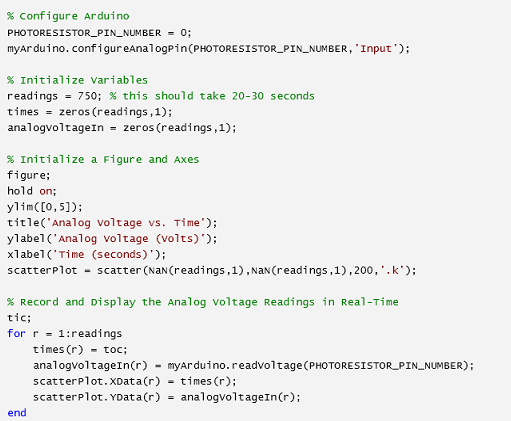
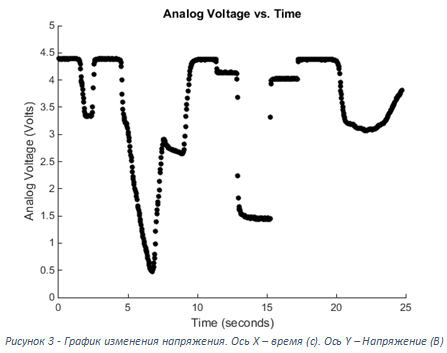
A photoresistor is a variable resistance resistor that responds to the intensity of the incident light. The brighter the light, the lower the resistance of the photoresistor. A simple voltage divider, in the form of a series connection of a photoresistor and a resistor with constant resistance, will convert the changes in the resistance of the circuit into measured voltage drops. MATLAB is used to read the voltage from the analog output of the Arduino. When the voltage value is written to MATLAB, the program can correlate each voltage value with the corresponding light level. Even simple photoresistors can be very sensitive, providing reading of the full voltage range (0-5 V) from the analog output of the Arduino. MATLAB reads these voltages with rounding to the nearest 0.0049 volts, because the analog signal is converted to a 10-bit digital signal:

Task 5 - Calibration of Motion Detection Algorithm
Since the photoresistor has a high sensitivity, motion detection algorithms will require calibration, which will depend on the ambient lighting conditions and the scenario of using the motion detector. Software light levels must also be adjusted for the desired sensitivity.
The MATLAB code for motion detection (Run_Motion_Detector.m) uses three types of calculations in real time to determine that the current voltage value corresponds to movement.
Each calculation is a simple way to quantify variability within a small data window. Each result of the calculation is compared with the corresponding threshold, to determine whether this change indicates movement. If any of the results exceeds the corresponding variable threshold value, the current voltage value is referred to as motion.
Threshold variables are directly related to the sensitivity of the motion detector and must be calibrated for each specific situation.
Total implemented 3 methods:
- The standard deviation method — calculates the standard deviation of all points within the data window using std ( voltages ) . This is the basic calculation of the difference between the voltage readings.
- Difference method - calculates the sum of absolute values of differences between successive points using sum ( abs ( diff ( voltages))) . This is the calculation of the net change between consecutive data points in the data window.
- The Slope method calculates the most suitable linear trend (slope) for the data window. Required as voltage readings, the same time counts.
For a descriptive analysis of the lighting conditions, the getLightingCondition function qualitatively describes the light intensity at each voltage reading.
This function must also be calibrated and extended accordingly to describe the level of illumination at the site of your motion detector.
Task 6 - Handling Recorded Data
Many motion sensors are only intended to detect movement in real time, as they are designed to automate a specific task. This is a very common type of motion detector used in automatic doors at airports and shops, or by motion-activated switches in office buildings.
The motion detector created using MATLAB, built in this example, can not only detect movement in real time, but also record and collect sensor readings throughout the entire recording session.
The Run_Motion_Detector function automatically saves the raw values of analog voltages and the time-cutoffs of the variables analogVoltage and sensorTime in the MATLAB basic workspace.
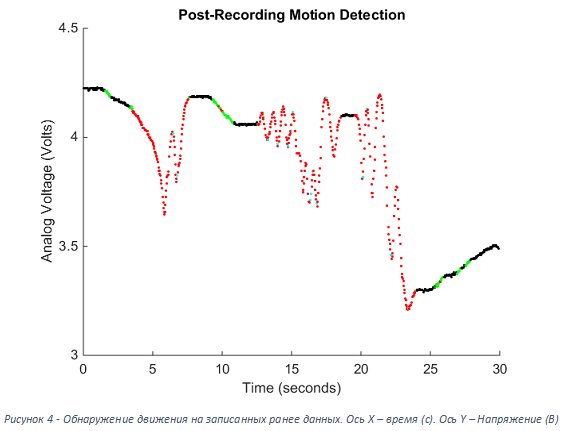
After saving to MATLAB, this data can be transferred to the Analyze_Motion_Detector_Data function to implement and compare various motion detection algorithms. The figure below shows the results of the three motion detection algorithms applied to the complete data set.
Red data markers are characterized as movement in all three ways. It is significant that some movements are detected only by the Slope method (shown by green markers), while other movement is detected only by the standard deviation method and / or the difference method (shown by blue markers).
Using a combination of these three methods to determine motion, a motion detector implemented in MATLAB can create a complete motion record.

Task 7 - Motion Classification
Using MATLAB for data processing, it is easy to select motion events and characterize each according to several calculated parameters.
Some simple parameters that can be calculated include:
- light level before the motion event occurred
- light level after movement
- Average illumination during the motion event
- Total time for motion event
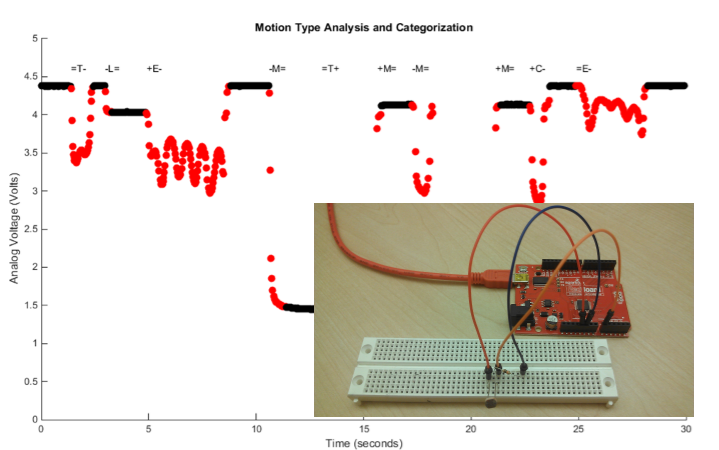
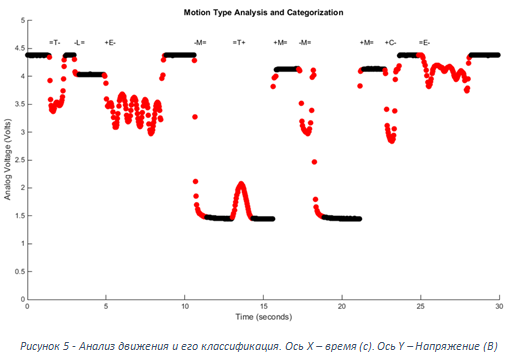
The Categorize_Motion_Events function calculates these four parameters for each motion event and uses them to qualitatively describe motion records.
Descriptions are used to create tick marks on a voltage chart. Motion marks consist of three characters and are located above the motion event.
- The first symbol - plus, minus, or the equal sign indicates an increase in illumination intensity (+), a decrease (-), or immutability (=) in the vicinity of a motion event.
- The next character is a letter denoting a certain type of movement. Movement types with the corresponding letters are listed below.
- G: Continuous movement (change of lighting occurs for more than 20 seconds)
- E: Extended motion (change of lighting occurs within a few seconds)
- M: Significant change in illumination (changes in illumination dramatically around the event)
- C: Combination (change in light during and around the event)
- L: change in light (slight change in light around event)
- T: Temporary movement (no significant changes in light around the event)
- The third sign (if specified) shows how the mean value of the light intensity during each motion event is related to the previous and next light intensities, using the same plus, minus, and equal signs as for the first character.
If you want to track specific types of motion, you can tighten the restrictions to get a more accurate classification, or use the MATLAB machine learning methods to program an automatically tuned motion detector.

Practical use: Monitoring activity in the lobby
Since the motion detector is sensitive to changes in light, it will work best when the movement you want to track corresponds to a sharp increase or a sharp decrease in light.
One of the scenarios that works well for detecting people is to locate a motion detector in a corridor on a well-lit wall or next to a light source. When people pass through the corridor, there will be a sharp drop in voltage when their shadows fall on the photoresistor.
The graph below shows the data collected by the motion detector in the lobby. Motion events are classified using the version of the Categorize_Motion_Events function, which has been specially modified to analyze data collected in the lobby.
Motion events classified as lighting changes (M or L) can be dropped as they most likely do not indicate people passing through the hall.
This leaves nine events that seem to indicate the passage of people. Further analysis can be performed to calculate a person’s speed while walking or how many people were in a group, studying the length of a motion event.


Conclusion
With Arduino, a simple motion detector was created, MATLAB was used to calibrate the detector and classify motion.
Practical application: practice on cats to hone their algorithm and then transfer to a more serious component base.
Article Materials
Source: https://habr.com/ru/post/262259/
All Articles