Writing for Apple Watch something harder Hello, world
Much time has passed since the release of Apple's new product - the Apple Watch. Watch out for the final version of the operating system for them - Watch OS 2.0. And on Habré, there is still no more or less detailed article on how to write something more complicated than “Hello, world!” For the Apple Watch. And in this article we will try to fix it and write an application from several screens with a list, data loading and interaction with the main application.
In those articles that have already written about the Apple Watch, the principle of the work has already been described in detail, charts were drawn, advantages and disadvantages were sorted out. Therefore, I suggest not to dwell on this in detail, but to get to work right away!
The only thing worth mentioning is that the application runs on the phone, and the clock simply displays the user interface. In general, all this is explained by the picture from the official documentation. I think those who are interested in developing for Apple Watch have already seen it many times :)

And now you can start, and the first thing in our application, we need to create an extension to work with Watch Watch Kit Extension. It makes it very simple: in the list of Targets, click on the plus sign, find the WatchKit App there. On the next screen, we check that our main application is there, the correct BundleID is written and click Finish.

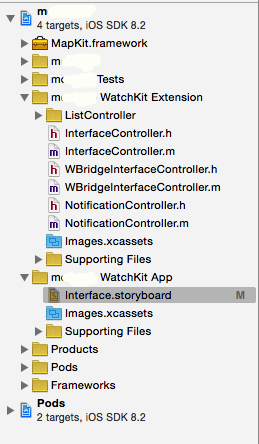
After these manipulations, two new Targets will appear in the project: an extension for our main application and an application for watches.
Also, two folders have been added in the project tree (for the extension and for the application, respectively) and in the folder for the application there is the Interface.storyboard familiar to us.
')
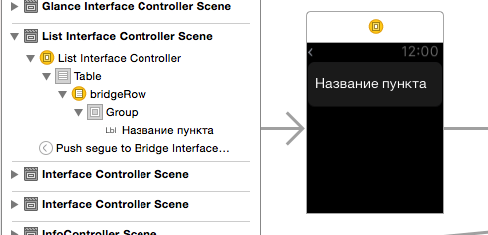
There are controllers familiar to us, which are now inheritors of the WKInterfaceController class, there are UI components (which, unfortunately, are very few) and there are transitions between the Segue screens.

The main point to which you should pay attention - if there was one entry (Initital controller) on iOS, now there are three of them at once - the initial screen, notifications and “glance” (another one of the notification options).
On our main controller, we add a button (drag it to the right-bottom from the Object Library. This is where the next feature of the clock comes in - the developers have maximally simplified the interface and components can be placed only one after another, from top to bottom. If you need to place components in a line, then for You have provided for the Group component, which is a container of other components and which has a parameter Layout (either vertical or horizontal).
In addition, the component inside the parent container can be aligned vertically and horizontally, as well as giving it an absolute and relative size.

In general, a simple concept that, if you think about it, allows you to cover most of the needs.
Add a couple of buttons to the main screen and switch from one of them to the next screen, where we will try to make a list. Transitions between screens occur in the same way as in iOS through segue. But there is one interesting feature: on the Connections Inspector tab for the controller there is the Next page property. By connecting it to another controller, you can make transitions between them by brushing it like on a Page View Controller.
On the next screen, we will create a list of data downloaded over the network. The clock has no analogue UITableViewController, because everything is inherited from the only WKInterfaceController, so we simply transfer the Table component to our screen and associate it with the controller's outlet property. By default, the component creates a prototype of the TableRow row.
Now let's take a closer look at the inside of the controller. By default, three methods are created there. Consider them in more detail.
The screen initialization method, here with the help of the context parameter, data from other screens are transferred, here it is necessary to initialize the data and load it.
Method that is called after displaying the screen. Here you can run animations, make simple data updates.
The method of unloading the screen, where you need to clean everything up, save and remove.
Now in the awakeWithContext method we will try to fill our list with data. To do this, you need to write the class of the list cell, and you must inherit it from the usual NSObject. I have it looks like this:
And in InterfaceBuilder, we specify it as a cell class and associate properties with UI components. Also, the cell in InterfaceBuilder needs to specify the Identifier by which it will be created.
After that, the code for adding data to the table will look like this:
setNumberOfRows creates in the table the number of cells we need with the necessary identifier, which we specified in IB. And then we can access each cell using the rowControllerAtIndex method, which will return our cell controller class to us.
There used to be such a bug that when you frequently called setNumberOfRows, the clock interface started to behave very strangely (slow down and glitch). But in the latest version it was corrected, at least I could not repeat it myself.
Now, the question arises - can we take the data that is already loaded into our main application, and which we do not want to load again into the Extension?
And here you can tell about another basic concept - the interaction of WatchKit applications with the parent application iOS. The point is this: we send the “request” to the parent application, it gets the data from the database, or loads it from the network, and returns it to us.
It all works with the controller's openParentApplication method. As a parameter, we transfer the dictionary with the action parameter and in the reply we indicate the block in which we process the answer.
In the parent application, in the application delegate, we override the handleWatchKitExtension method. In it we get the dictionary sent from the clock, after processing which, we can return the result to the processing unit in the same way using the dictionary.
After loading and displaying data, we will try to process the tap on the line of the list and display the next screen, for example, with detailed information about the object.
The easiest way to open the screen when tapping into a line is to open the Storyboard and in the Connection Inspector to associate the selection item on the line component with the controller to which you want to go.
Next, in the Attribute Inspector, we specify an Identifier with him so that we can refer to the transition when triggered and transfer the data.
In the controller itself, we override the contextForSegueWithIdentifier method, which is triggered by the segue and in it, checking by the identifier that this is the transition we need, returning a pointer to the data to be passed to the next screen. For example:
In the next screen controller, in the awakeWithContext method already familiar to us, we can get and use this data as we like, for example, display :)
In the process of writing the article, I noticed such a strange “feature” of Xcode - if you write a Segue identifier with capital letters, for example, “showInfo”, you cannot catch it using the contextForSegueWithIdentifier method, since such an identifier will not be saved and the transition will have the name generated by the IDE itself.
Another of the features of the development, for the first time I had to face the fact that some pods are not intended for use in extensions and begin to swear during assembly. For example, AFNetworking wrote that he doesn’t know what [UIApplication sharedApplication] is, because In extensions this class is not available.
Everything is solved very simply - add the AF_APP_EXTENSIONS = 1 parameter to the assembly macros.

Each pod of the parameter name can have its own and is usually either registered in the documentation, or it can be before the line on which the compiler swears when building.
On this, I suggest to stop and try to write your first application for Apple Watch. And in the next part I will explain in more detail how the notifications and the Glance screen work.
In those articles that have already written about the Apple Watch, the principle of the work has already been described in detail, charts were drawn, advantages and disadvantages were sorted out. Therefore, I suggest not to dwell on this in detail, but to get to work right away!
The only thing worth mentioning is that the application runs on the phone, and the clock simply displays the user interface. In general, all this is explained by the picture from the official documentation. I think those who are interested in developing for Apple Watch have already seen it many times :)
And now you can start, and the first thing in our application, we need to create an extension to work with Watch Watch Kit Extension. It makes it very simple: in the list of Targets, click on the plus sign, find the WatchKit App there. On the next screen, we check that our main application is there, the correct BundleID is written and click Finish.
After these manipulations, two new Targets will appear in the project: an extension for our main application and an application for watches.
Also, two folders have been added in the project tree (for the extension and for the application, respectively) and in the folder for the application there is the Interface.storyboard familiar to us.
')
There are controllers familiar to us, which are now inheritors of the WKInterfaceController class, there are UI components (which, unfortunately, are very few) and there are transitions between the Segue screens.
The main point to which you should pay attention - if there was one entry (Initital controller) on iOS, now there are three of them at once - the initial screen, notifications and “glance” (another one of the notification options).
On our main controller, we add a button (drag it to the right-bottom from the Object Library. This is where the next feature of the clock comes in - the developers have maximally simplified the interface and components can be placed only one after another, from top to bottom. If you need to place components in a line, then for You have provided for the Group component, which is a container of other components and which has a parameter Layout (either vertical or horizontal).
In addition, the component inside the parent container can be aligned vertically and horizontally, as well as giving it an absolute and relative size.
In general, a simple concept that, if you think about it, allows you to cover most of the needs.
Add a couple of buttons to the main screen and switch from one of them to the next screen, where we will try to make a list. Transitions between screens occur in the same way as in iOS through segue. But there is one interesting feature: on the Connections Inspector tab for the controller there is the Next page property. By connecting it to another controller, you can make transitions between them by brushing it like on a Page View Controller.
On the next screen, we will create a list of data downloaded over the network. The clock has no analogue UITableViewController, because everything is inherited from the only WKInterfaceController, so we simply transfer the Table component to our screen and associate it with the controller's outlet property. By default, the component creates a prototype of the TableRow row.
Now let's take a closer look at the inside of the controller. By default, three methods are created there. Consider them in more detail.
The screen initialization method, here with the help of the context parameter, data from other screens are transferred, here it is necessary to initialize the data and load it.
- (void)awakeWithContext:(id)context { [super awakeWithContext:context]; } Method that is called after displaying the screen. Here you can run animations, make simple data updates.
- (void)willActivate { [super willActivate]; } The method of unloading the screen, where you need to clean everything up, save and remove.
- (void)didDeactivate { [super didDeactivate]; } Now in the awakeWithContext method we will try to fill our list with data. To do this, you need to write the class of the list cell, and you must inherit it from the usual NSObject. I have it looks like this:
@interface WKRow : NSObject @property (weak, nonatomic) IBOutlet WKInterfaceLabel *rowTitle; @end And in InterfaceBuilder, we specify it as a cell class and associate properties with UI components. Also, the cell in InterfaceBuilder needs to specify the Identifier by which it will be created.
After that, the code for adding data to the table will look like this:
[self.table setNumberOfRows:items.count withRowType:@"itemRow"]; for (Item *itm in items){ WKRow *row = [self.table rowControllerAtIndex:i]; [row.rowTitle setText:itm.title]; } setNumberOfRows creates in the table the number of cells we need with the necessary identifier, which we specified in IB. And then we can access each cell using the rowControllerAtIndex method, which will return our cell controller class to us.
There used to be such a bug that when you frequently called setNumberOfRows, the clock interface started to behave very strangely (slow down and glitch). But in the latest version it was corrected, at least I could not repeat it myself.
Now, the question arises - can we take the data that is already loaded into our main application, and which we do not want to load again into the Extension?
And here you can tell about another basic concept - the interaction of WatchKit applications with the parent application iOS. The point is this: we send the “request” to the parent application, it gets the data from the database, or loads it from the network, and returns it to us.
It all works with the controller's openParentApplication method. As a parameter, we transfer the dictionary with the action parameter and in the reply we indicate the block in which we process the answer.
[WBridgeInterfaceController openParentApplication:@{ @"action":@"remind" } reply:^(NSDictionary *replyInfo, NSError *error){ NSLog(@"Result: %@", [replyInfo objectForKey:@"result"]); }]; In the parent application, in the application delegate, we override the handleWatchKitExtension method. In it we get the dictionary sent from the clock, after processing which, we can return the result to the processing unit in the same way using the dictionary.
- (void)application:(UIApplication *)application handleWatchKitExtensionRequest:(NSDictionary *)userInfo reply:(void(^)(NSDictionary *replyInfo))reply{ [BridgeReminder setRemind]; reply(@{ @"result": @"ok" }); } After loading and displaying data, we will try to process the tap on the line of the list and display the next screen, for example, with detailed information about the object.
The easiest way to open the screen when tapping into a line is to open the Storyboard and in the Connection Inspector to associate the selection item on the line component with the controller to which you want to go.
Next, in the Attribute Inspector, we specify an Identifier with him so that we can refer to the transition when triggered and transfer the data.
In the controller itself, we override the contextForSegueWithIdentifier method, which is triggered by the segue and in it, checking by the identifier that this is the transition we need, returning a pointer to the data to be passed to the next screen. For example:
- (id)contextForSegueWithIdentifier:(NSString *)segueIdentifier inTable:(WKInterfaceTable *)table rowIndex:(NSInteger)rowIndex{ if ([segueIdentifier isEqualToString:@"openCard"]){ return [items objectAtIndex:rowIndex]; } return nil; } In the next screen controller, in the awakeWithContext method already familiar to us, we can get and use this data as we like, for example, display :)
- (void)awakeWithContext:(id)context { [super awakeWithContext:context]; Item *b = context; [self.itemTitle setText: b.title]; } In the process of writing the article, I noticed such a strange “feature” of Xcode - if you write a Segue identifier with capital letters, for example, “showInfo”, you cannot catch it using the contextForSegueWithIdentifier method, since such an identifier will not be saved and the transition will have the name generated by the IDE itself.
Another of the features of the development, for the first time I had to face the fact that some pods are not intended for use in extensions and begin to swear during assembly. For example, AFNetworking wrote that he doesn’t know what [UIApplication sharedApplication] is, because In extensions this class is not available.
Everything is solved very simply - add the AF_APP_EXTENSIONS = 1 parameter to the assembly macros.
Each pod of the parameter name can have its own and is usually either registered in the documentation, or it can be before the line on which the compiler swears when building.
On this, I suggest to stop and try to write your first application for Apple Watch. And in the next part I will explain in more detail how the notifications and the Glance screen work.
Source: https://habr.com/ru/post/262075/
All Articles