UNetLab emulator - revolutionary leap
This article focuses on the new UNL Emulator, with which you can create your own virtual stands to prepare for CCNP / CCIE exams, as well as to solve your engineering problems.
UNenLab (Unified Networking Lab, UNL) is a multi-vendor and multi-user platform for creating and modeling a wide variety of laboratories and designs, which allows you to simulate a virtual network from routers, switches, security devices, etc.
')
This is a continuation of the same developer who once created a web front-end for IOU. Now the development of iou-web is completed, only UNetLab is being developed and is an indispensable tool for preparing for the CCIE, network engineering, including Troubleshooting. This is, in fact, the killer of GNS, IOU and even VIRL.
UnetLab is completely free. You can run as many instances of equipment (routers, switches, security devices, etc.) as you want and what you want. For example, in the same Cisco VIRL Personal Edition you are limited to 15 nodes and the set of devices is quite modest. For example, a full-fledged ASA is not possible to get, as well as a router with a Serial interface.
Equipment support in UNetLab is very broad. You can run Cisco IOL images, images from VIRL (vIOS-L2 and vIOS-L3), ASA Firewall images (both portable 8.4 (2), 9.1 (5), and official ASAv), Cisco IPS image, XRv images and CSR1000v, dynamips images from GNS, Cisco vWLC and vWSA images, as well as images from other vendors such as Juniper, HP, Checkpoint, etc.
In addition, since the version of UNetLab 0.9.54, multiplayer functionality has appeared. On the same VM, each authorized user can create their own stands independently of each other, and also work together with a common stand shared by several users at the same time. At the same time, users run a common stand independently of each other.
Currently the following equipment list is supported:
A more detailed list can be found on the website of developers .
The most significant advantages of UnetLAB compared with Cisco VIRL
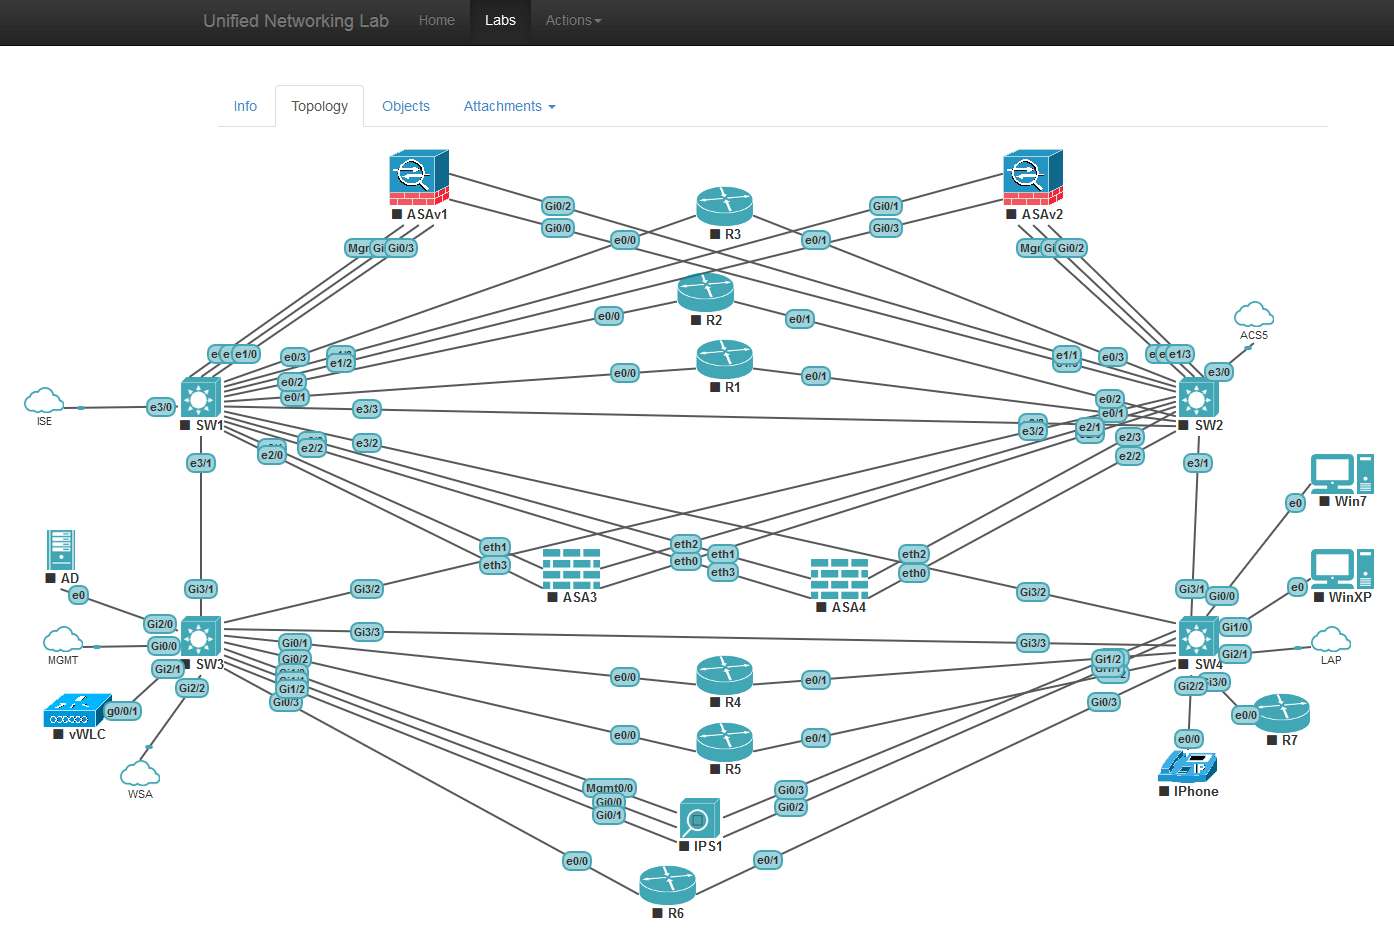
This platform is suitable both for beginners to prepare for CCNA / CCNP, and for professionals to prepare for CCIE Routing and Switching, CCIE Security, CCIE Service Provides, CCIE Data Centers, etc., as well as for other diverse engineering tasks.
Unlike the previous IOU-WEB project, UNetLAB implements a fully graphical interface of topology design, much like it is done in GNS. Now there is no need to write netmap files for each topology. The disadvantage is the complete lack of compatibility with the previous project. Topology files collected in iou-web must be rewritten for UNL. But in the latest version, developers provide a script that will help automate the process.
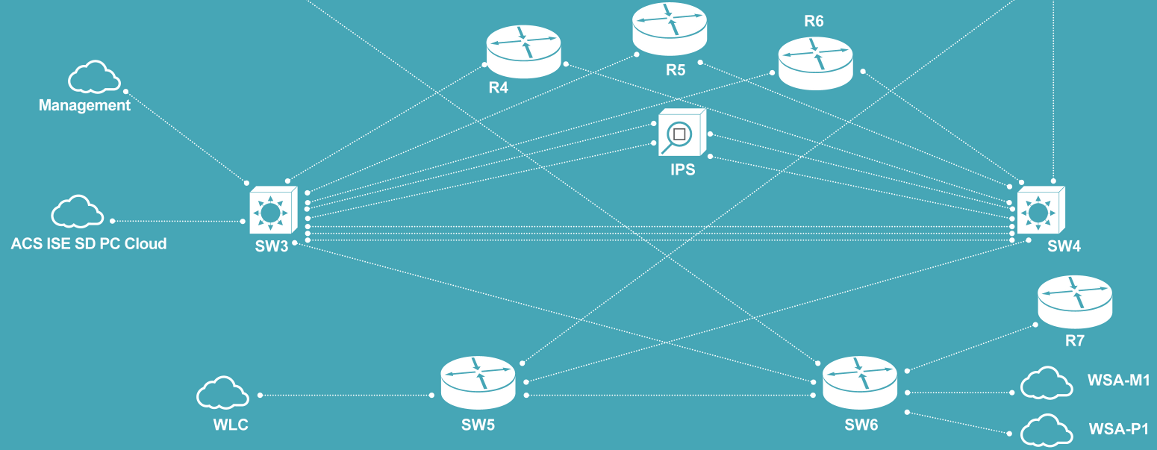
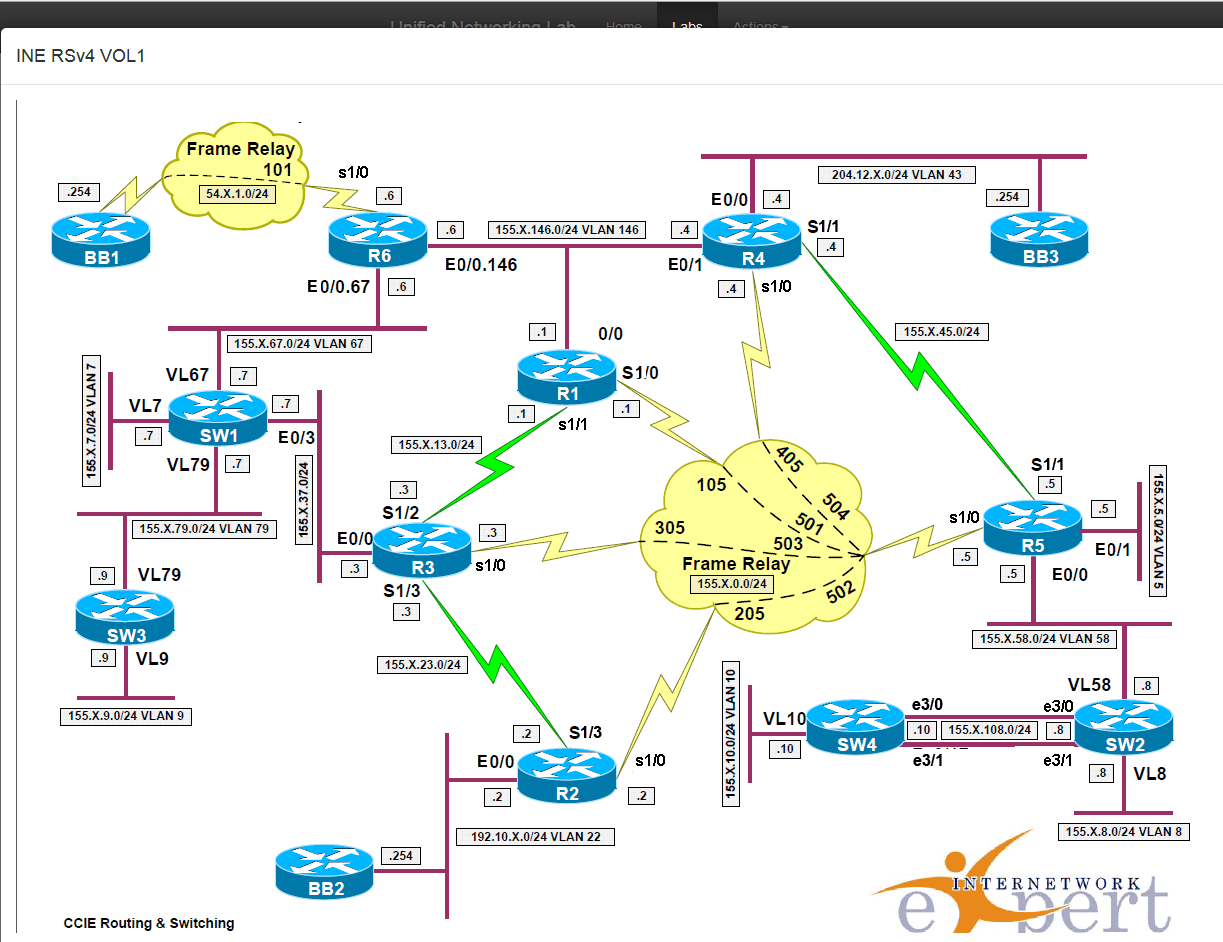
Also, UNL includes support for the so-called Custom Topology, that is, clickable beautiful picture diagrams that you can draw in MS Visio and import into your lab, as it was in iou-web.
The project is constantly evolving, adding new functionality and expanding the list of supported devices.
UnetLAB comes as a standalone Linux-based Ubuntu 14 x64 virtual machine. The kit does not include images of any equipment. For example, using IOU images is not legal if you are not a Cisco employee. Even for training. For this reason, the L2IOU and L3IOU images themselves are not provided, as well as other images (for example, images from VIRL). If you wish, you can find them on the Internet, as well as on the official websites of manufacturers, such as Cisco ASAv, Cisco XRv, Cisco CSR1000v, Juniper vSRX, etc.
The UnetLAB developer site has comprehensive instructions for installing various images into the UNL environment. Next, we look at the installation of VM UNetLAB on VmWare Workstation or VmPlayer, as well as installation under ESXi.
First we need the vmware player to install our virtual machine. You can download it from the VmWare website, Vmware Workstation or ESXi vsphere is also suitable. After installing the vmware player, you need to download a UNetLAB virtual machine of approximately 700Mb from the developer’s website and open the .ova file with the help of VmWare Player or VM Workstation
Within seconds, a VM will be created.
Next, you need to select the “Edit virtual machine settings” menu of your VM and configure the corresponding CPU and memory resources. The default for VM is 1G, 1 CPU and 1 NIC (network interface). For the simplest tasks, this is enough, but for a serious CCIE booth, these parameters need to be increased. I used 6 CPU and 12Gb on my 16G laptop. And under ESXi I allocated 8 vCPU and 24Gb. It all depends on what you want to run. If for example you are preparing for putting CCIE SP or CCIE Security, then you need to allocate more memory. For CCIE RS 4Gb and 1CPU is enough.
Finally, be sure to enable the “Virtualize Intel VT-x / EPT or AMD-V / RVI” option in the CPU settings. UNetLAB can determine in which environment it is running, and whether CPU virtualization commands are available to it. If you have Virtualization CPU Support turned off in the BIOS, or the processor does not support virtualization, UnetLAB detects this and issues an appropriate warning at boot. You can still run 32bit images, such as IOL or vIOS, but you cannot run 64bit images, such as ASAv, vSRX, etc. Therefore, you should definitely enable virtualization support for VM UNetLAB. If UNetLAB is deployed in an ESXi environment, then a similar option should be enabled in the CPU settings of the UNetLAB virtual machine.
After the VM starts, you must log into its Linux console using [b] root / unl [/ b] as the login and password. Immediately after that, an initialization script is launched that prompts you to configure such parameters as the IP address of the network interface, the host name, the time, etc. Just follow the instructions on the screen.

After initial setup, the virtual machine will reboot. After installing the Virtual Machine, log in with the root user and upgrade from the current version to the latest one. Today it is UNetLab 0.9.54 , in teams
After upgrading the VM, it is advisable to reload again, since the linux kernel will be updated.
Further, using a browser, you can access the UNetLAB web interface. Enter the address of the virtual machine, which we specified during the initial installation, for example, 10.0.200.91 , and we will see the UNetLAB interface.

Starting from version 0.9.54, multi-user support has been introduced, due to which the web interface has been slightly modified. Now you need to pass authorization. Use login: admin and password: unl .
The first step is to import the images of the equipment we want to use. In the current article, we import IOU images as the simplest ones. The first task here is that you need a license for IOU. I will not go into details on how and where to get it, but this is easy to do by tormenting Google a little.
The second feature is that IOU images must have the .bin extension, so make sure you add it to the file name.
We need to work at least two images - L2 and L3. Cisco keeps up with the times and these two levels are not clearly divided into channel and network. Currently, L3 is more or less compliant with the ISR level router, and L2 is at the 3560 level switch. The most recent version for today is IOS 15.5T for routers and IOS 15.1 for switches.
Images are added to UNetLAB from the CLI. That is, you must upload the IOU image by SCP to the / opt / unetlab / addons / iol / bin folder and configure access rights to them using the command.
Here is what the end result might look like:

We also remember that the IOU image looks in the iourc file each time it starts for a license key that uses information about the current host.
To test that the IOU images will run with us, run the following commands.
Here, L3-ADVENTERPRISEK9-M-15.4-2T.bin is the IOU image of the L3 router that we downloaded, and 100 is just the ID of the running device. Could be any number.
If you have appeared on the screen, something like:

This means that IOU images run correctly and can be used in your booth.
From the Lab-> Actions menu, select “Add a new lab” and name it, say IOL test and press the ADD button:

Next we get to the editing mode of our topology. Here you should add to your topology those devices that you will work with. Since we only imported IOU images, we will add only L2 and L3 IOU devices. From the Actions menu, select Nodes.

You will see a drop-down list with all supported hardware. But since we only imported IOU images, we need to select Cisco IOL from the list.
In the properties window that appears, we can select the IOU image that we want to run, in this case L3 routers, as well as the number of such devices (in this case, 2), the amount of memory for each device (default 256Mb), the device name, its graphic topology view number of Ethernet and Serial ports.
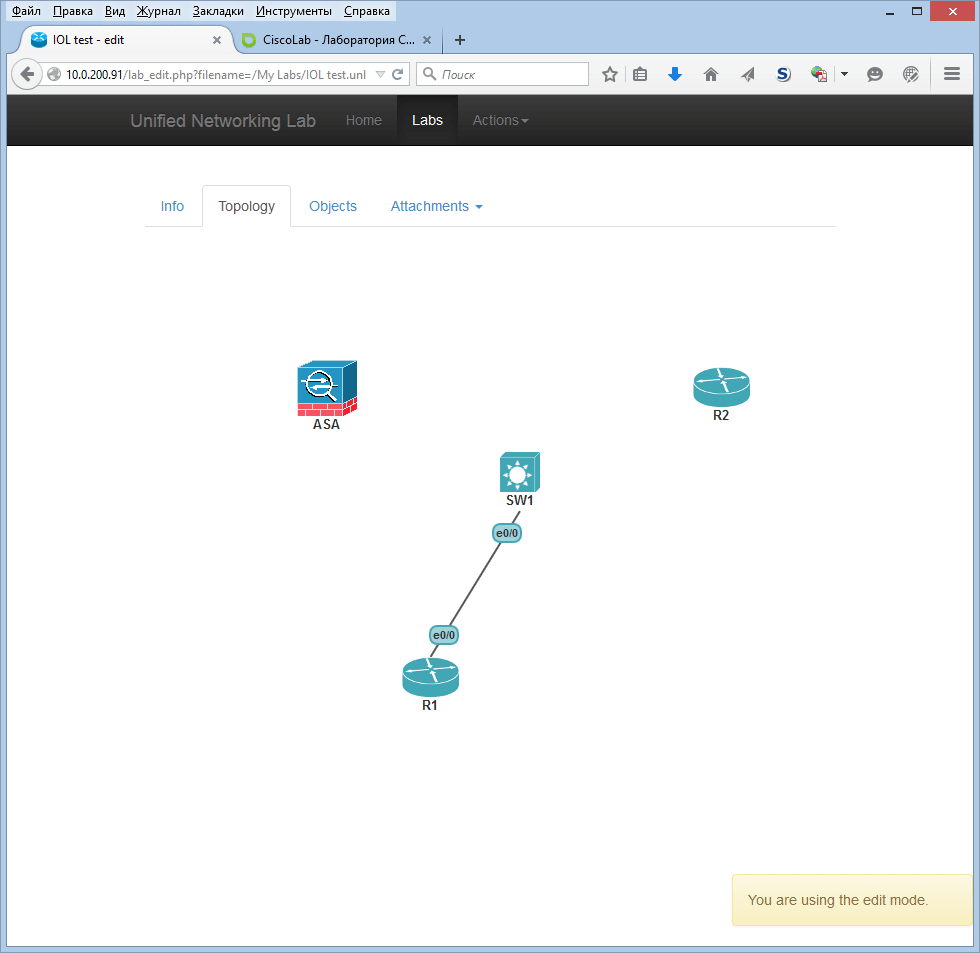
After specifying all the parameters, press ADD and two routers will appear on the screen.
Let's make a small digression and add the ASA Firewall (porting) and IOU switch. An IOU switch is added to the topology in the same way as an IOU router — by selecting the Cisco IOL menu item. But for ASA, select Cisco ASA.

Pay attention to the amount of RAM. By default there is 256Mb. With this amount, the ASA will not start, the minimum you can set 512-768Mb. By adding two more devices we get all four devices of our topology on the screen.
Now the device data must be linked to each other. For this, UNL has the concept of Networks and the corresponding menu item.
Devices in UNL do not communicate as GNS via a direct wire (Direct Link), but communicate through a network (Network). The general rule is that two devices are connected to each other through the same Network (network), as if you were connecting them with one wire. Simply announce your unique Network for wire.
For our simple stand you need three links. The ASA devices, R1 and R2 all connect to switch SW1. Therefore, in the Networks menu, select the number of networks 3 and wait for ADD.

By default, the name for the network starts with Net and our networks will be called Net1, Net2 and Net3. But names can always be changed to know exactly which network should lead to where. Network type set to default Bridge. On the types of networks will tell in one of the following articles. In the Objects tab, you can see the created networks, as well as device objects and their parameters. Networks that are not connected to device interfaces in the topology (Topology tab) are not shown.

Next we need to connect the devices to each other. Since the networks are defined, we can do this through the context menu of the Interfaces of a specific device. In the Topology tab of our topology, select the desired device, for example, the R1 router and click on it with the right mouse button.

In the context menu that appears, select Interfaces. A window opens in which all the interfaces of the device are shown and to which networks they are connected:
If the interface is not connected to any network, it is shown as Disconnected. In our case, R1 has 4 Ethernet interfaces e0 / 0 - e0 / 3 and 4 Serial interfaces s1 / 0 - s1 / 3. We need to connect e0 / 0 to the switch e0 / 0. Therefore, we select the Net1 network for the e0 / 0 interface and click Save.
The topology of the network appeared Net1 connected to the interface e0 / 0 of the router R1. Repeat the same procedure, but for the switch SW1 and connect its interface e0 / 0 to the Net1 network.
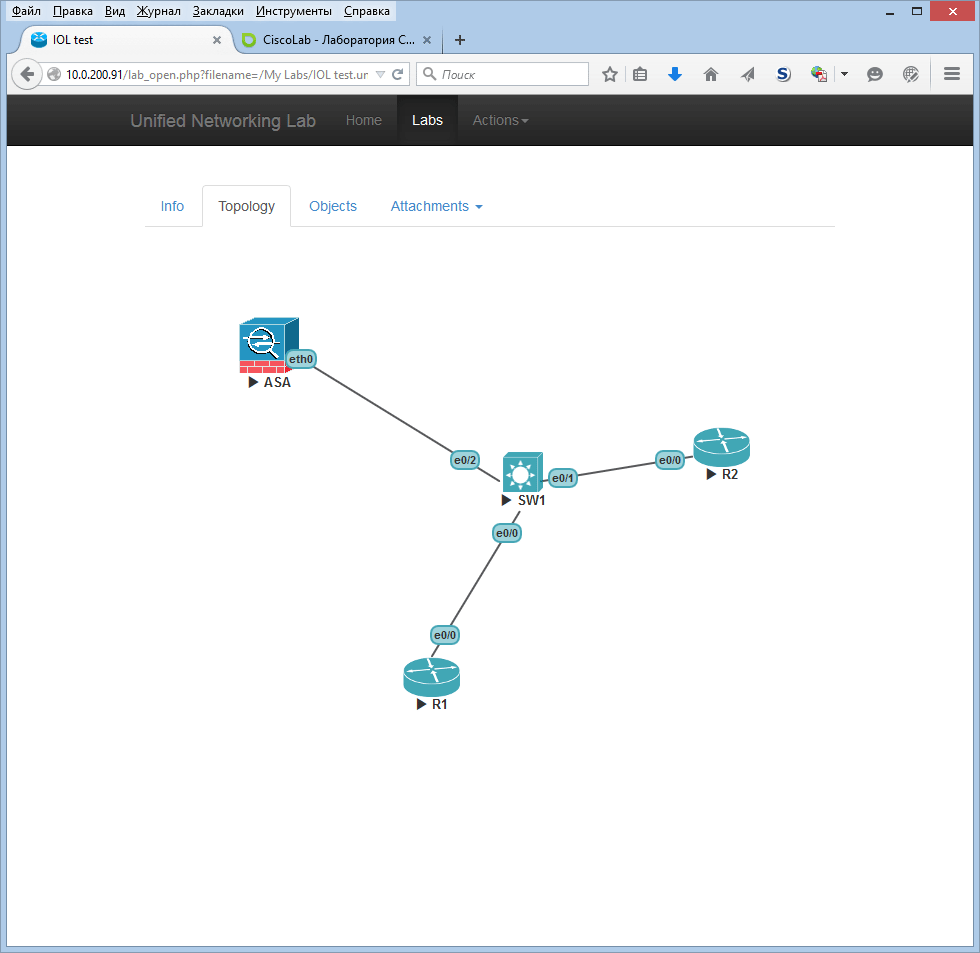
Now R1 and SW1 are connected via an Ethernet link and can communicate with each other. Similarly, connect R2 e0 / 0 with SW1 e0 / 1 through Net2, and ASA e0 with SW1 e0 / 2 through Net3. Here's what happened:

After the design is completed, you can try to run our stand. From the Actions menu, select "Open this Lab", then right-click on the device and click Start:

When the device has started successfully, its status indicator changes from a square (Stop symbol) to a triangle (Play symbol).
Repeat the same for each device in the topology. Give them about three minutes for a full download. Now you can access all devices. However, by default, clicking on devices will launch the standard telnet client. This is not very convenient, especially considering that it is not preinstalled in recent versions of Windows. It’s much more common to use PuTTY or SecureCRT.

We go to the router R1, raise the interface e0 / 0 in UP and make sure that everything works. Rotower R1 is visible on CDP our switch SW1.
Now let's assign the IP address of the router R1 to the e0 / 0 interface 192.168.1.1/24, and the interface to the e0 / 0 ASA interface 192.168.1.12/24 and make sure that everything works.
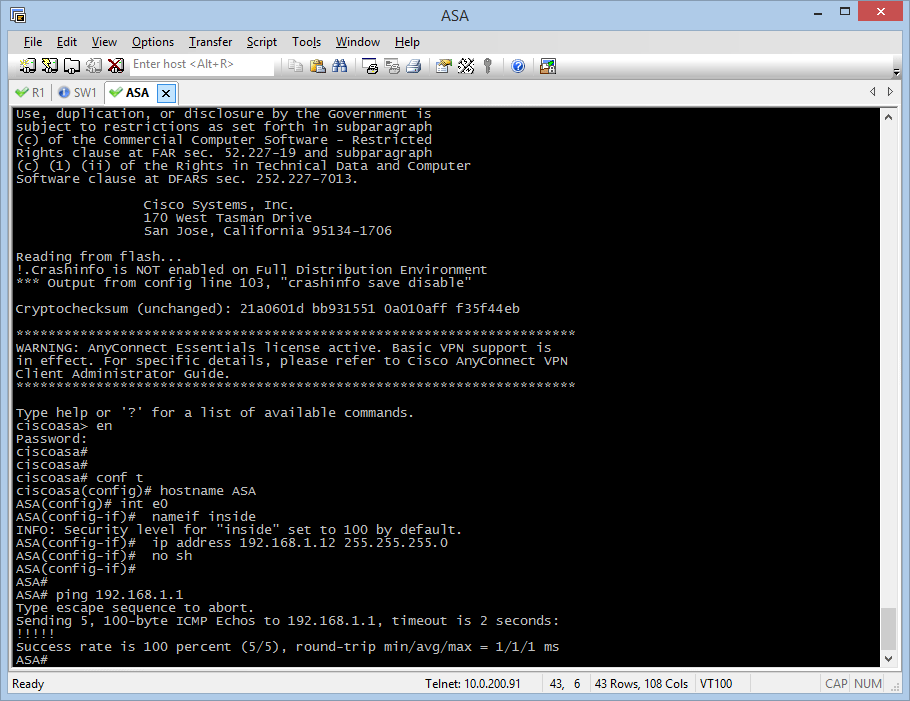
With the advent of UNetLab, working with images is not particularly difficult, everything is implemented quite logically. In many cases, this emulator leaves far behind GNS / Dynamips, VIRL, especially when it comes to various device models in the stand, not just switches and routers. But we are not talking about equipment of other vendors at all. For example, if you want to simulate the interaction of equipment of different vendors with each other, for example, IPSEC VPN tunnel between Cisco ASA and Juniper SRX or Checkpoint Firewall, etc.
Also UNetLab is much less resource-intensive as IOU, than the same VIRL. Today, UNetLab remains the best tool for preparing for CCNP / CCIE, as well as for modeling various engineering tasks.
UNetLab Developer Site
Articles on UNetLab in Russian
Laboratory Networks CiscoLAB .
What is UNetLab
UNenLab (Unified Networking Lab, UNL) is a multi-vendor and multi-user platform for creating and modeling a wide variety of laboratories and designs, which allows you to simulate a virtual network from routers, switches, security devices, etc.
')
This is a continuation of the same developer who once created a web front-end for IOU. Now the development of iou-web is completed, only UNetLab is being developed and is an indispensable tool for preparing for the CCIE, network engineering, including Troubleshooting. This is, in fact, the killer of GNS, IOU and even VIRL.
UnetLab is completely free. You can run as many instances of equipment (routers, switches, security devices, etc.) as you want and what you want. For example, in the same Cisco VIRL Personal Edition you are limited to 15 nodes and the set of devices is quite modest. For example, a full-fledged ASA is not possible to get, as well as a router with a Serial interface.
Equipment support in UNetLab is very broad. You can run Cisco IOL images, images from VIRL (vIOS-L2 and vIOS-L3), ASA Firewall images (both portable 8.4 (2), 9.1 (5), and official ASAv), Cisco IPS image, XRv images and CSR1000v, dynamips images from GNS, Cisco vWLC and vWSA images, as well as images from other vendors such as Juniper, HP, Checkpoint, etc.
In addition, since the version of UNetLab 0.9.54, multiplayer functionality has appeared. On the same VM, each authorized user can create their own stands independently of each other, and also work together with a common stand shared by several users at the same time. At the same time, users run a common stand independently of each other.
Currently the following equipment list is supported:
- Aruba ClearPass
- Alcatel 7750 SR
- Arista vEOS
- Brocade Virtual ADX
- Citrix Netscaler VPX virtual
- Checkpoint firewall
- Cisco ASA (porting)
- Cisco ASAv
- Cisco CSR 1000V
- Cisco IPS (porting)
- Cisco IOS 1710/3725/7206 (dynamips, ethernet only)
- Cisco IOL (for Cisco internal use only)
- Cisco NX-OSv - titanium (for VIRL customers only)
- Cisco vIOS (for VIRL customers only)
- Cisco vIOS L2 (for VIRL customers only)
- Cisco XRv
- Cisco WSA virtual appliance
- Cisco Wireless controller - vwlc
- Extreme Networks virtual
- F5 BIG-IP LTM VE
- Fortinet FortiGate (new)
- HP VSR1000
- Juniper Olive (porting)
- Juniper Networks vMX router
- Juniper vSRX
- Palo Alto VM-100 Firewall
- Vyos
- MS Windows hosts
A more detailed list can be found on the website of developers .
The most significant advantages of UnetLAB compared with Cisco VIRL
- Totally free
- Almost full support for L2 (due to the EOS switch, which is fully cisco-like)
- Extensive support for Cisco hardware
- The number of nodes launched is not limited by anything other than your resources (CPU, RAM)
- Multivendor
- Multiplayer functionality
- Low PC resource requirements
This platform is suitable both for beginners to prepare for CCNA / CCNP, and for professionals to prepare for CCIE Routing and Switching, CCIE Security, CCIE Service Provides, CCIE Data Centers, etc., as well as for other diverse engineering tasks.
Unlike the previous IOU-WEB project, UNetLAB implements a fully graphical interface of topology design, much like it is done in GNS. Now there is no need to write netmap files for each topology. The disadvantage is the complete lack of compatibility with the previous project. Topology files collected in iou-web must be rewritten for UNL. But in the latest version, developers provide a script that will help automate the process.
Also, UNL includes support for the so-called Custom Topology, that is, clickable beautiful picture diagrams that you can draw in MS Visio and import into your lab, as it was in iou-web.
The project is constantly evolving, adding new functionality and expanding the list of supported devices.
Installing UNetLab
UnetLAB comes as a standalone Linux-based Ubuntu 14 x64 virtual machine. The kit does not include images of any equipment. For example, using IOU images is not legal if you are not a Cisco employee. Even for training. For this reason, the L2IOU and L3IOU images themselves are not provided, as well as other images (for example, images from VIRL). If you wish, you can find them on the Internet, as well as on the official websites of manufacturers, such as Cisco ASAv, Cisco XRv, Cisco CSR1000v, Juniper vSRX, etc.
The UnetLAB developer site has comprehensive instructions for installing various images into the UNL environment. Next, we look at the installation of VM UNetLAB on VmWare Workstation or VmPlayer, as well as installation under ESXi.
We put the virtual machine
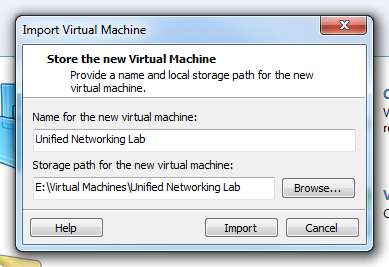
First we need the vmware player to install our virtual machine. You can download it from the VmWare website, Vmware Workstation or ESXi vsphere is also suitable. After installing the vmware player, you need to download a UNetLAB virtual machine of approximately 700Mb from the developer’s website and open the .ova file with the help of VmWare Player or VM Workstation
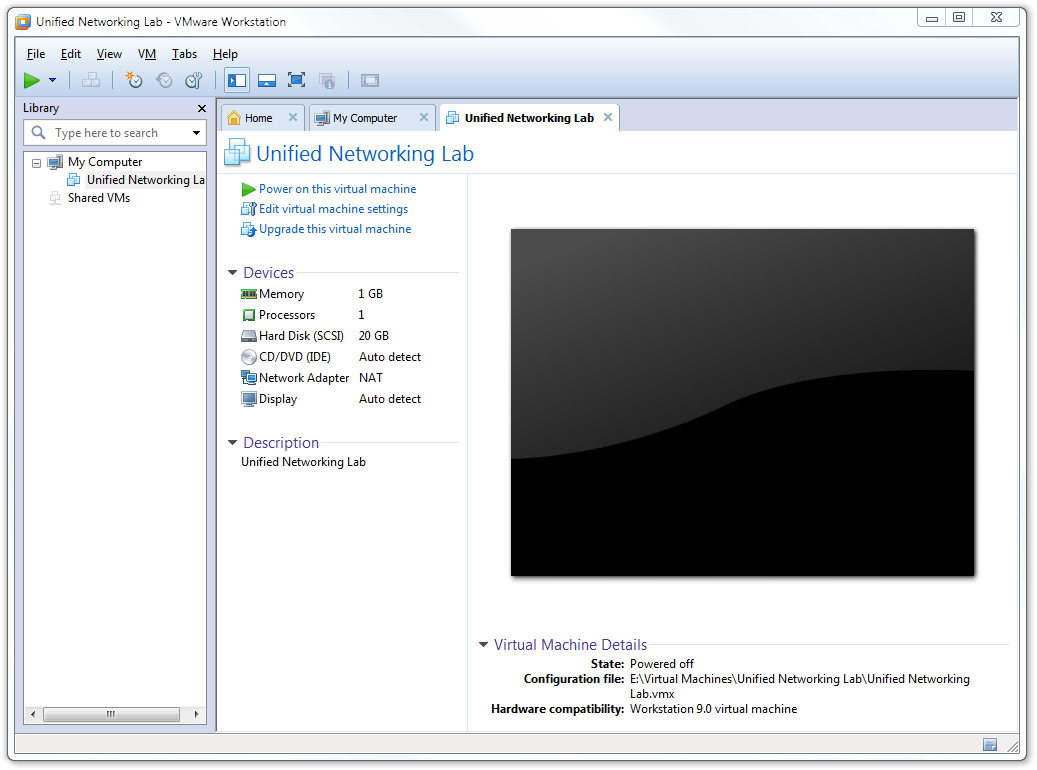
Within seconds, a VM will be created.
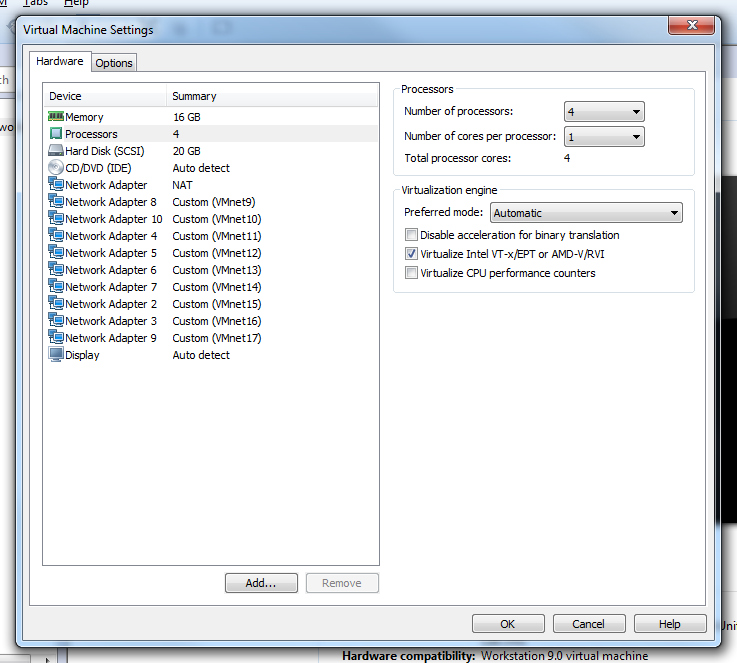
Next, you need to select the “Edit virtual machine settings” menu of your VM and configure the corresponding CPU and memory resources. The default for VM is 1G, 1 CPU and 1 NIC (network interface). For the simplest tasks, this is enough, but for a serious CCIE booth, these parameters need to be increased. I used 6 CPU and 12Gb on my 16G laptop. And under ESXi I allocated 8 vCPU and 24Gb. It all depends on what you want to run. If for example you are preparing for putting CCIE SP or CCIE Security, then you need to allocate more memory. For CCIE RS 4Gb and 1CPU is enough.
Finally, be sure to enable the “Virtualize Intel VT-x / EPT or AMD-V / RVI” option in the CPU settings. UNetLAB can determine in which environment it is running, and whether CPU virtualization commands are available to it. If you have Virtualization CPU Support turned off in the BIOS, or the processor does not support virtualization, UnetLAB detects this and issues an appropriate warning at boot. You can still run 32bit images, such as IOL or vIOS, but you cannot run 64bit images, such as ASAv, vSRX, etc. Therefore, you should definitely enable virtualization support for VM UNetLAB. If UNetLAB is deployed in an ESXi environment, then a similar option should be enabled in the CPU settings of the UNetLAB virtual machine.
Starting the UNetLAB virtual machine
After the VM starts, you must log into its Linux console using [b] root / unl [/ b] as the login and password. Immediately after that, an initialization script is launched that prompts you to configure such parameters as the IP address of the network interface, the host name, the time, etc. Just follow the instructions on the screen.
After initial setup, the virtual machine will reboot. After installing the Virtual Machine, log in with the root user and upgrade from the current version to the latest one. Today it is UNetLab 0.9.54 , in teams
apt-get update apt-get -o Dpkg::Options::="--force-overwrite" install unetlab After upgrading the VM, it is advisable to reload again, since the linux kernel will be updated.
Further, using a browser, you can access the UNetLAB web interface. Enter the address of the virtual machine, which we specified during the initial installation, for example, 10.0.200.91 , and we will see the UNetLAB interface.
Starting from version 0.9.54, multi-user support has been introduced, due to which the web interface has been slightly modified. Now you need to pass authorization. Use login: admin and password: unl .
Add device images
The first step is to import the images of the equipment we want to use. In the current article, we import IOU images as the simplest ones. The first task here is that you need a license for IOU. I will not go into details on how and where to get it, but this is easy to do by tormenting Google a little.
The second feature is that IOU images must have the .bin extension, so make sure you add it to the file name.
We need to work at least two images - L2 and L3. Cisco keeps up with the times and these two levels are not clearly divided into channel and network. Currently, L3 is more or less compliant with the ISR level router, and L2 is at the 3560 level switch. The most recent version for today is IOS 15.5T for routers and IOS 15.1 for switches.
Images are added to UNetLAB from the CLI. That is, you must upload the IOU image by SCP to the / opt / unetlab / addons / iol / bin folder and configure access rights to them using the command.
/opt/unetlab/wrappers/unl_wrapper -a fixpermissions Here is what the end result might look like:
We also remember that the IOU image looks in the iourc file each time it starts for a license key that uses information about the current host.
# cat /opt/unetlab/addons/iol/bin/iourc [license] unl01 = 0123456789abcdef; To test that the IOU images will run with us, run the following commands.
# cd /opt/unetlab/addons/iol/bin # touch NETMAP # LD_LIBRARY_PATH=/opt/unetlab/addons/iol/lib /opt/unetlab/addons/iol/bin/L3-ADVENTERPRISEK9-M-15.4-2T.bin 100 Here, L3-ADVENTERPRISEK9-M-15.4-2T.bin is the IOU image of the L3 router that we downloaded, and 100 is just the ID of the running device. Could be any number.
If you have appeared on the screen, something like:
This means that IOU images run correctly and can be used in your booth.
Create your topology in UNetLAB
From the Lab-> Actions menu, select “Add a new lab” and name it, say IOL test and press the ADD button:
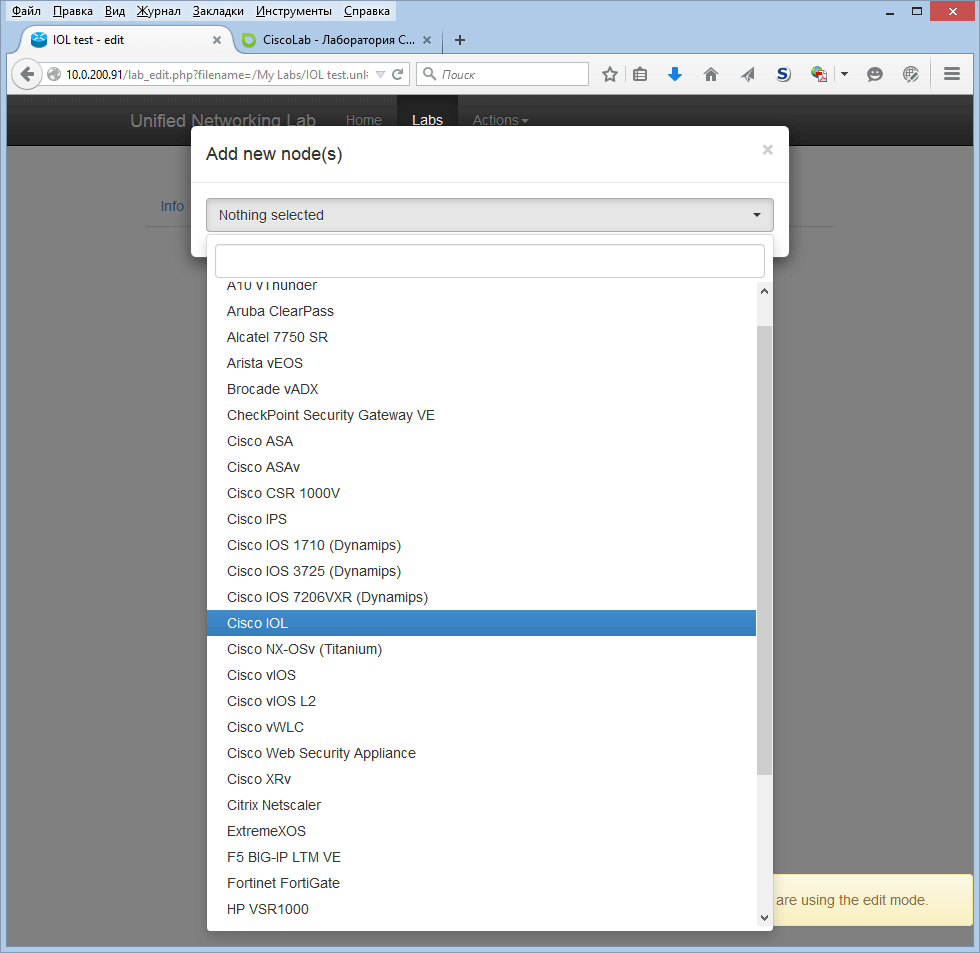
Next we get to the editing mode of our topology. Here you should add to your topology those devices that you will work with. Since we only imported IOU images, we will add only L2 and L3 IOU devices. From the Actions menu, select Nodes.
You will see a drop-down list with all supported hardware. But since we only imported IOU images, we need to select Cisco IOL from the list.
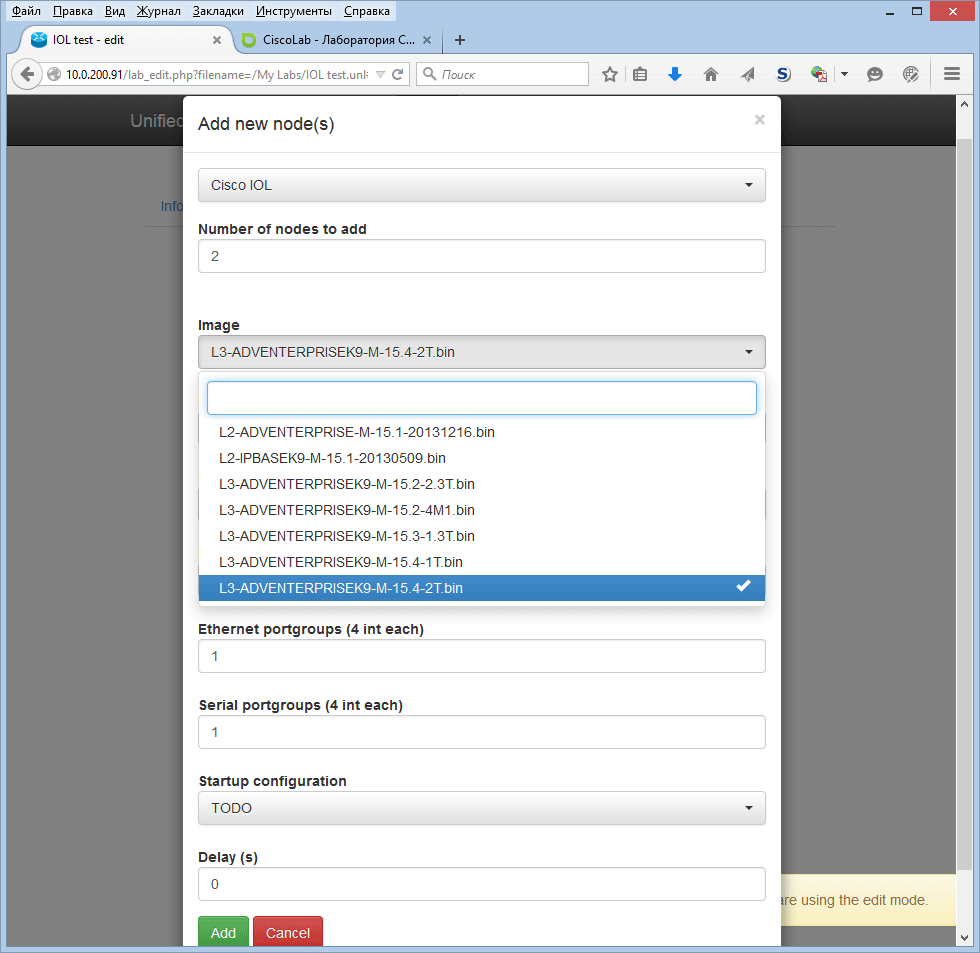
In the properties window that appears, we can select the IOU image that we want to run, in this case L3 routers, as well as the number of such devices (in this case, 2), the amount of memory for each device (default 256Mb), the device name, its graphic topology view number of Ethernet and Serial ports.
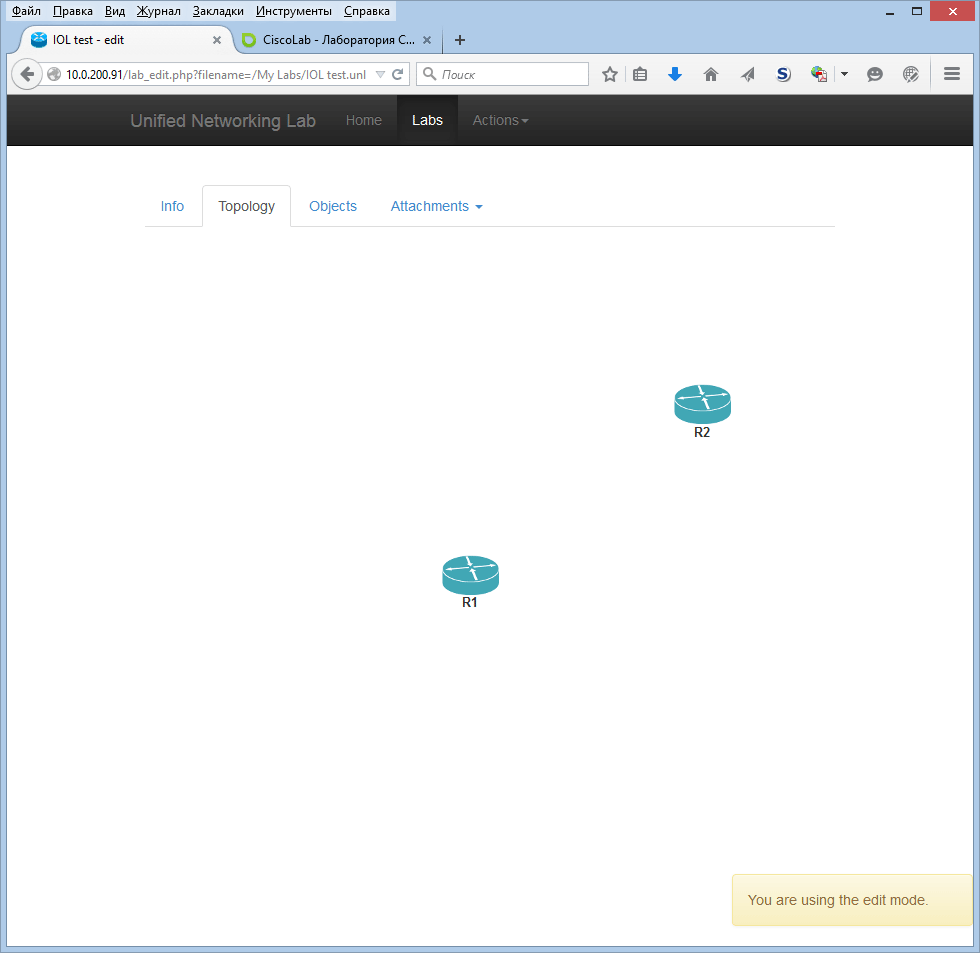
After specifying all the parameters, press ADD and two routers will appear on the screen.
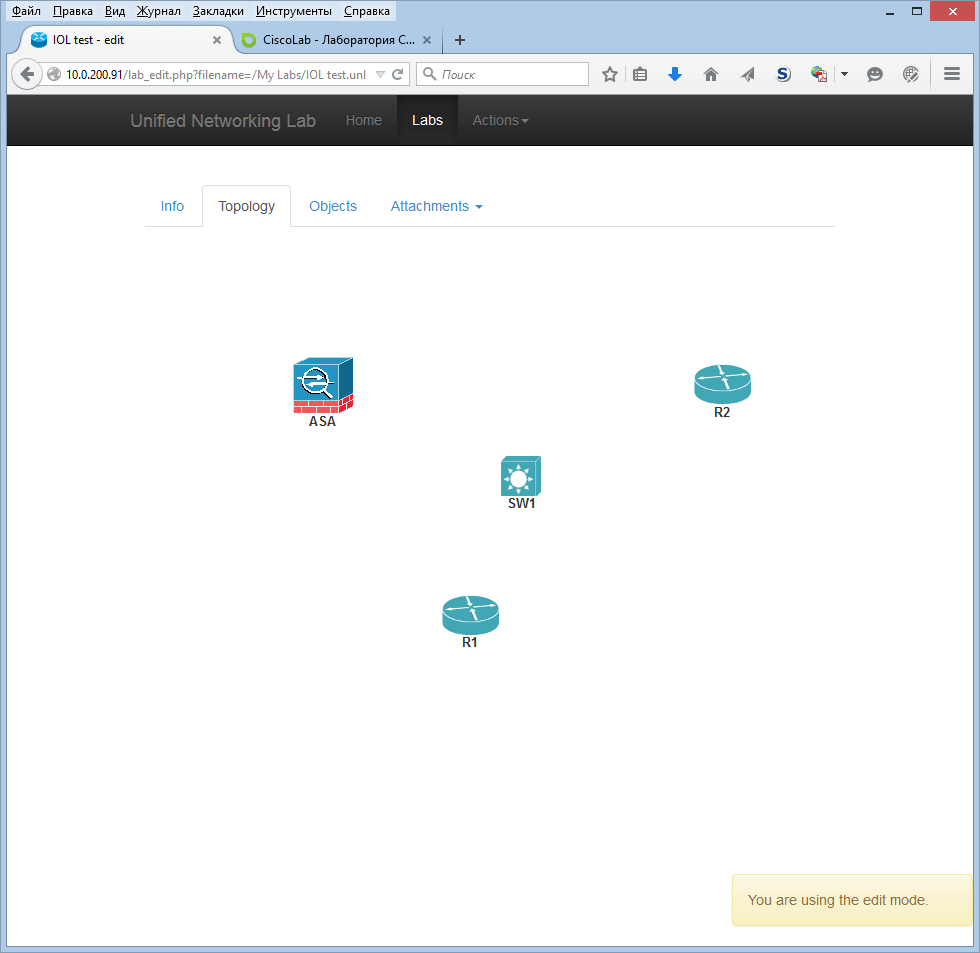
Let's make a small digression and add the ASA Firewall (porting) and IOU switch. An IOU switch is added to the topology in the same way as an IOU router — by selecting the Cisco IOL menu item. But for ASA, select Cisco ASA.
Pay attention to the amount of RAM. By default there is 256Mb. With this amount, the ASA will not start, the minimum you can set 512-768Mb. By adding two more devices we get all four devices of our topology on the screen.
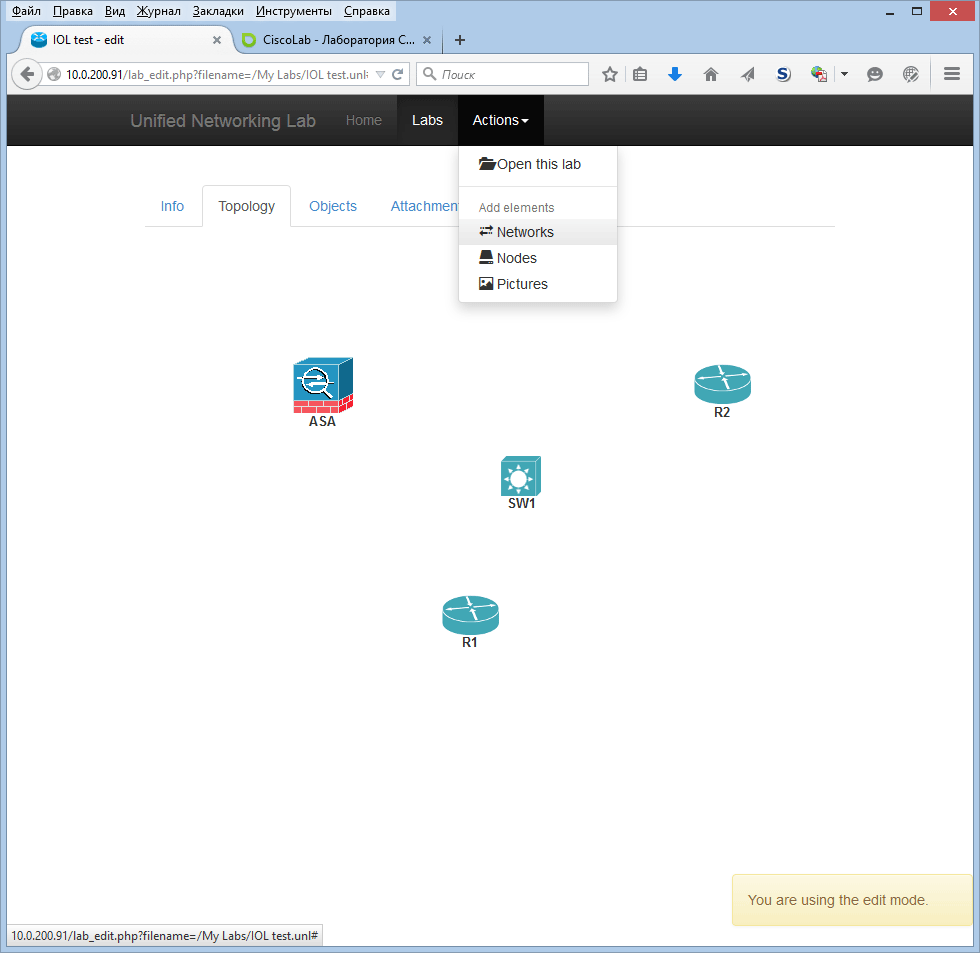
Now the device data must be linked to each other. For this, UNL has the concept of Networks and the corresponding menu item.
Devices in UNL do not communicate as GNS via a direct wire (Direct Link), but communicate through a network (Network). The general rule is that two devices are connected to each other through the same Network (network), as if you were connecting them with one wire. Simply announce your unique Network for wire.
For our simple stand you need three links. The ASA devices, R1 and R2 all connect to switch SW1. Therefore, in the Networks menu, select the number of networks 3 and wait for ADD.
By default, the name for the network starts with Net and our networks will be called Net1, Net2 and Net3. But names can always be changed to know exactly which network should lead to where. Network type set to default Bridge. On the types of networks will tell in one of the following articles. In the Objects tab, you can see the created networks, as well as device objects and their parameters. Networks that are not connected to device interfaces in the topology (Topology tab) are not shown.
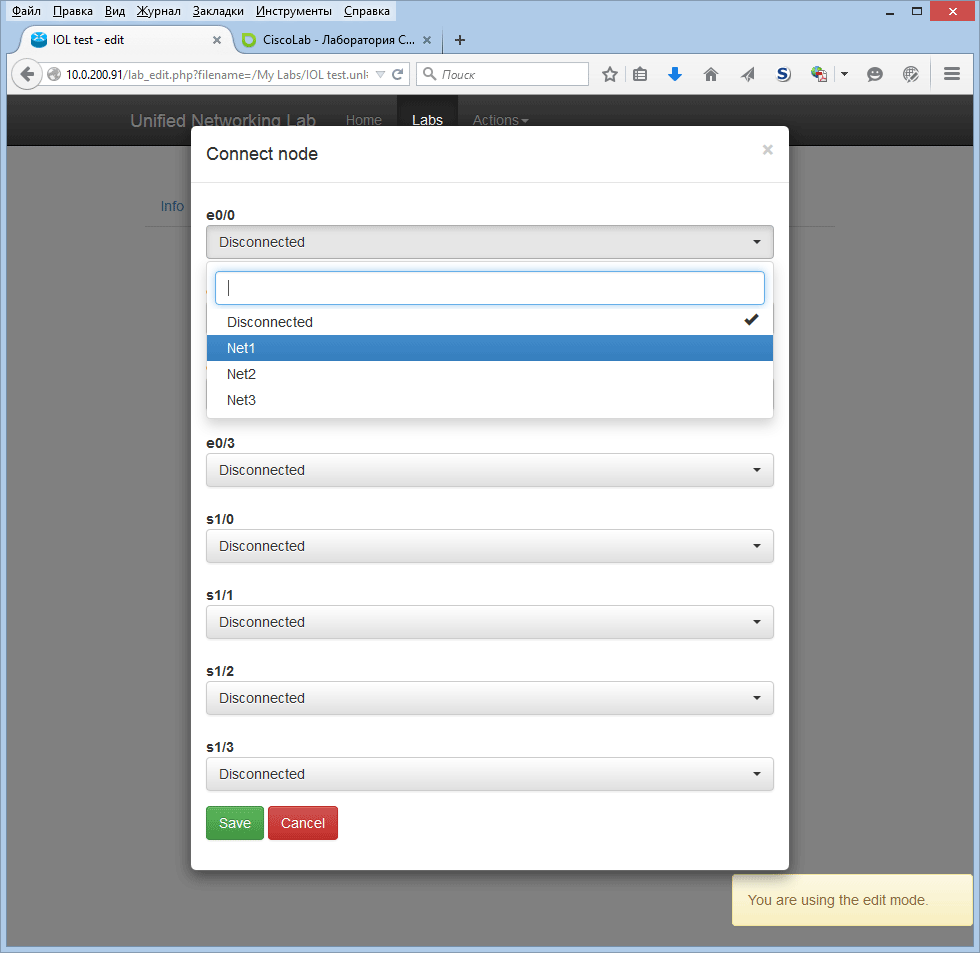
Next we need to connect the devices to each other. Since the networks are defined, we can do this through the context menu of the Interfaces of a specific device. In the Topology tab of our topology, select the desired device, for example, the R1 router and click on it with the right mouse button.
In the context menu that appears, select Interfaces. A window opens in which all the interfaces of the device are shown and to which networks they are connected:
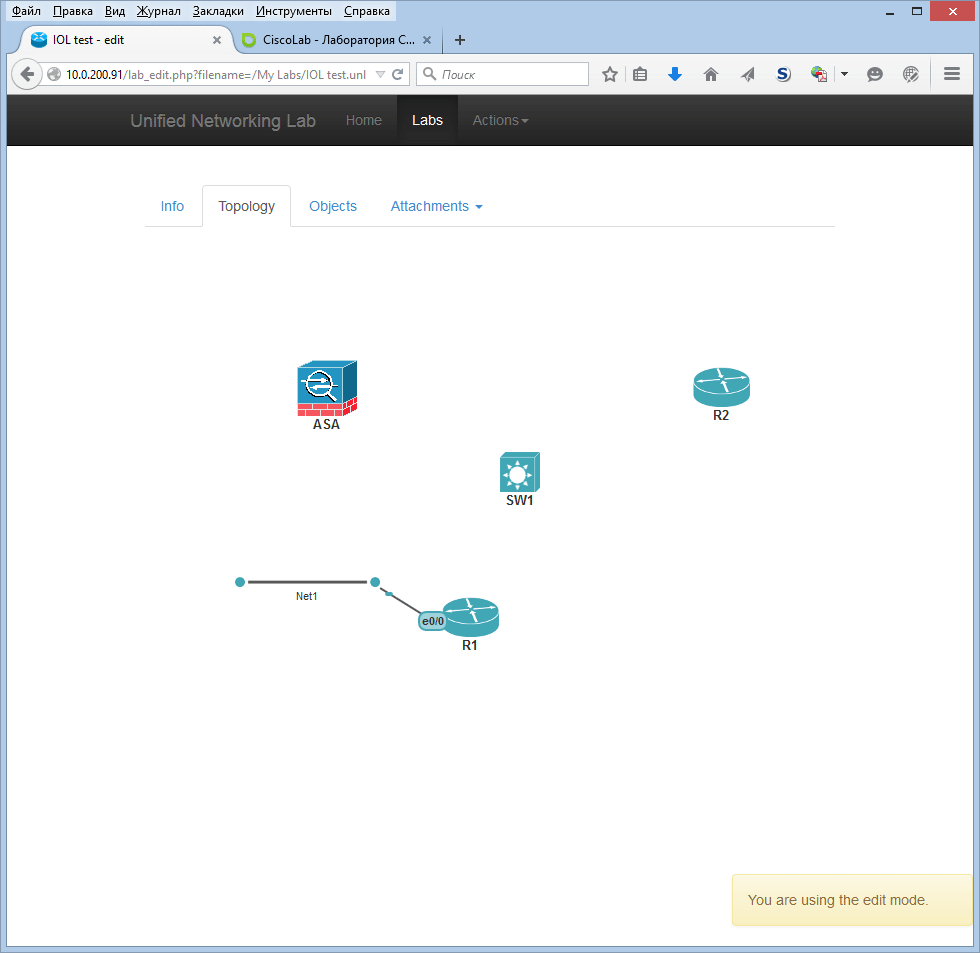
If the interface is not connected to any network, it is shown as Disconnected. In our case, R1 has 4 Ethernet interfaces e0 / 0 - e0 / 3 and 4 Serial interfaces s1 / 0 - s1 / 3. We need to connect e0 / 0 to the switch e0 / 0. Therefore, we select the Net1 network for the e0 / 0 interface and click Save.
The topology of the network appeared Net1 connected to the interface e0 / 0 of the router R1. Repeat the same procedure, but for the switch SW1 and connect its interface e0 / 0 to the Net1 network.
Now R1 and SW1 are connected via an Ethernet link and can communicate with each other. Similarly, connect R2 e0 / 0 with SW1 e0 / 1 through Net2, and ASA e0 with SW1 e0 / 2 through Net3. Here's what happened:
After the design is completed, you can try to run our stand. From the Actions menu, select "Open this Lab", then right-click on the device and click Start:
When the device has started successfully, its status indicator changes from a square (Stop symbol) to a triangle (Play symbol).
Repeat the same for each device in the topology. Give them about three minutes for a full download. Now you can access all devices. However, by default, clicking on devices will launch the standard telnet client. This is not very convenient, especially considering that it is not preinstalled in recent versions of Windows. It’s much more common to use PuTTY or SecureCRT.
We go to the router R1, raise the interface e0 / 0 in UP and make sure that everything works. Rotower R1 is visible on CDP our switch SW1.
Now let's assign the IP address of the router R1 to the e0 / 0 interface 192.168.1.1/24, and the interface to the e0 / 0 ASA interface 192.168.1.12/24 and make sure that everything works.
Conclusion
With the advent of UNetLab, working with images is not particularly difficult, everything is implemented quite logically. In many cases, this emulator leaves far behind GNS / Dynamips, VIRL, especially when it comes to various device models in the stand, not just switches and routers. But we are not talking about equipment of other vendors at all. For example, if you want to simulate the interaction of equipment of different vendors with each other, for example, IPSEC VPN tunnel between Cisco ASA and Juniper SRX or Checkpoint Firewall, etc.
Also UNetLab is much less resource-intensive as IOU, than the same VIRL. Today, UNetLab remains the best tool for preparing for CCNP / CCIE, as well as for modeling various engineering tasks.
Useful links and materials used
UNetLab Developer Site
Articles on UNetLab in Russian
Laboratory Networks CiscoLAB .
Source: https://habr.com/ru/post/262027/
All Articles