The first steps in working with Arduino
Anyone who is just taking their first steps in radio electronics, learning programming, would like to help, give confidence, so that there is an interest to study this interesting topic further. Therefore, I decided to make step-by-step instructions for those who are taking their first steps, but do not know where to start?
We will analyze the Arduino platform from the purchase of the controller itself, to “flooding” the program code (hereinafter, the sketch *) and managing your own model using an Android phone; Further we will write our own algorithm, according to which our robot will choose the path where to go (the next lesson).
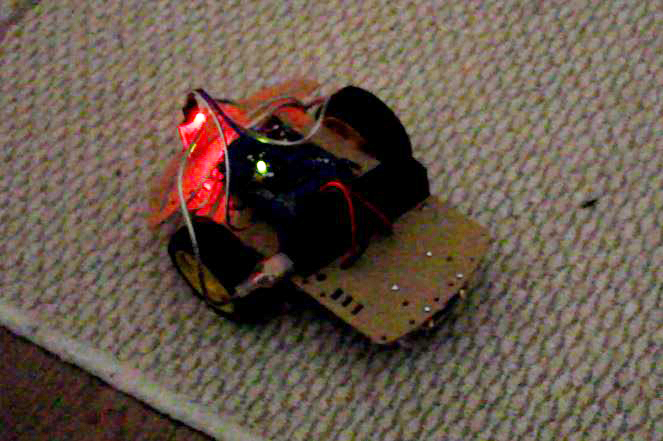
Here we have such a robot after all the lessons have expired (I apologize for the quality, this is a freeze-frame video):
')
1. Buying parts
2. Analysis of each position
3. Building and programming the model.
4. Connect to Android
So, let's begin!
First you need to choose a controller. There is a lot of choice on the official Arduino website, but in this matter you can save a little by ordering a similar and fully compatible Freeduino model.
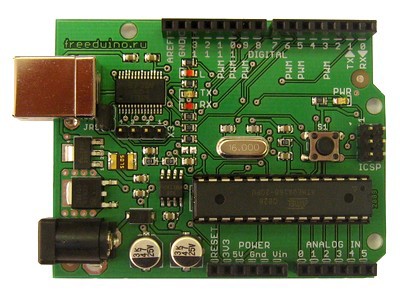
1) For this project, we are perfect model UNO. All parameters fit our criteria perfectly - this is the average size, the ability to connect different modules, shields, and the price does not bite as much as on the more “older” models. I ordered it here , came in 3 weeks (Volgograd), the quality is excellent, there were no problems in operation.
2) Next we order the consumables, shields, modules that we need for assembly. To control the motors, we, accordingly, need the following detail: Motor Shield ordered here . Delivered too quickly, everything was packed well, without damage.
3) To connect the phone with our robot, we need a Bluetooth module that was ordered here . No complaints in the work.
4) Of course, all this should have a platform on which we will fix all this. We use the finished option .
These are all the details that are vital for the work of our robot, but there are still a few things that, in my opinion, greatly simplify the life and work with the Arduino. I decided to abandon the batteries that power the platform, I ordered a small Power Bank, with which the whole thing will start. Here is the link . At the time of ordering, the course was about 35 rubles, so I got all the details much cheaper than at the time of writing this lesson.
We ordered the details and, while we wait for the notice, in order to take our order as soon as possible, we can study each item in more detail, and indeed the purpose of our work.
We ordered Freeduino 2009 - analogue of the Arduino Duemilanove.
Specifications:
Next, consider the Motor Shield, which will help us in controlling the motors of the robot.
We can connect up to 4 motors to this module, and programming each one for a certain power and speed of rotation. This module has one drawback - this is the absence of pins, where we could connect subsequent modules with the help of special cables, which made the task a bit more difficult for me. It was possible to order pins separately and solder them, but I decided to just solder the modules directly to the motor shield.
A wireless connection will be provided to us by a Bluetooth module, which has cables for connecting to the board directly.

The platform also has a complete set for assembly. There was even a screwdriver, which is convenient to assemble our model.

In the assembly should not have any problems, except that only with the connection of the Bluetooth-module. The connection diagram is attached below, and in simple words it looks like this:
Bluetooth module -> controller
VCC -> 5V
GND -> Gnd
TXD -> PIN-0
RXD -> PIN-1
Try not to confuse food and land, because It can easily ruin your items. If the detail began to heat up sharply, it means that you have messed up something.

For programming, we need an Arduino development environment - download it.
Arduino IDE is a special development environment for Arduino boards. With its help, you can write code, compile it and “fill” it to the board to make our device work. Also in this environment there is a large number of connected libraries containing a lot of additional ready-made sketches, which allow you to quickly check the performance of individual modules, additions to our board. A programming language is very similar to the C language family, which is quite easy to learn, if you know the basics of the C language, this is a big plus in programming this platform.
We start, as always with the connection of the necessary libraries. Most likely, you will have to search the Internet AFMotor.h, problems to find this library should not be.
Next, create objects for the engines:
The channel M1 and M2 is determined easily; it is enough to look at our module and there near the fasteners with clamps M1, M2, M3, M4 are signed, respectively:
Next, we need the help of the application on Android , whose commands we will accept and process.
In this part we simply describe the functionality of the program (speed, variables).
Next, we describe each action, in this case FORWARD causes the engine to spin forward, and BACKWARD turns the engine in the opposite direction. The combination of these actions allows you to rotate, move left and right, deviate from the direct direction of movement of the robot.
In this video, I simply connected the propeller to the M1 connector and changed the program code, leaving only the “forward” and “backward” motion:
But such a robot turned out at the end of our lesson:
In the next part, I will explain how to build the logic of the robot, connect the range finder to it, with which it will be oriented in space.
We will analyze the Arduino platform from the purchase of the controller itself, to “flooding” the program code (hereinafter, the sketch *) and managing your own model using an Android phone; Further we will write our own algorithm, according to which our robot will choose the path where to go (the next lesson).
Here we have such a robot after all the lessons have expired (I apologize for the quality, this is a freeze-frame video):
')
Content
1. Buying parts
2. Analysis of each position
3. Building and programming the model.
4. Connect to Android
So, let's begin!
1. Buying parts
First you need to choose a controller. There is a lot of choice on the official Arduino website, but in this matter you can save a little by ordering a similar and fully compatible Freeduino model.
1) For this project, we are perfect model UNO. All parameters fit our criteria perfectly - this is the average size, the ability to connect different modules, shields, and the price does not bite as much as on the more “older” models. I ordered it here , came in 3 weeks (Volgograd), the quality is excellent, there were no problems in operation.
2) Next we order the consumables, shields, modules that we need for assembly. To control the motors, we, accordingly, need the following detail: Motor Shield ordered here . Delivered too quickly, everything was packed well, without damage.
3) To connect the phone with our robot, we need a Bluetooth module that was ordered here . No complaints in the work.
4) Of course, all this should have a platform on which we will fix all this. We use the finished option .
These are all the details that are vital for the work of our robot, but there are still a few things that, in my opinion, greatly simplify the life and work with the Arduino. I decided to abandon the batteries that power the platform, I ordered a small Power Bank, with which the whole thing will start. Here is the link . At the time of ordering, the course was about 35 rubles, so I got all the details much cheaper than at the time of writing this lesson.
2. Analysis of each position
We ordered the details and, while we wait for the notice, in order to take our order as soon as possible, we can study each item in more detail, and indeed the purpose of our work.
We ordered Freeduino 2009 - analogue of the Arduino Duemilanove.
Specifications:
- Microcontroller: ATmega328 (ATmega168 in early versions of the board)
- Digital I / O ports: 14 ports (6 of them with PWM signal)
- Analog input ports: 6 ports
- EPROM (Flash Memory): 32 K (16 K), of which 2 K is used by the bootloader
- RAM (SRAM): 2 Kbytes (1 Kbytes)
- ROM (EEPROM): 1024 bytes (512 bytes)
- Clock frequency: 16 MHz
- PC Interface: USB
- Powered by USB or external source, selectable via jumper
Next, consider the Motor Shield, which will help us in controlling the motors of the robot.
We can connect up to 4 motors to this module, and programming each one for a certain power and speed of rotation. This module has one drawback - this is the absence of pins, where we could connect subsequent modules with the help of special cables, which made the task a bit more difficult for me. It was possible to order pins separately and solder them, but I decided to just solder the modules directly to the motor shield.
A wireless connection will be provided to us by a Bluetooth module, which has cables for connecting to the board directly.
The platform also has a complete set for assembly. There was even a screwdriver, which is convenient to assemble our model.
3. Building and programming the model.
In the assembly should not have any problems, except that only with the connection of the Bluetooth-module. The connection diagram is attached below, and in simple words it looks like this:
Bluetooth module -> controller
VCC -> 5V
GND -> Gnd
TXD -> PIN-0
RXD -> PIN-1
Try not to confuse food and land, because It can easily ruin your items. If the detail began to heat up sharply, it means that you have messed up something.
For programming, we need an Arduino development environment - download it.
Arduino IDE is a special development environment for Arduino boards. With its help, you can write code, compile it and “fill” it to the board to make our device work. Also in this environment there is a large number of connected libraries containing a lot of additional ready-made sketches, which allow you to quickly check the performance of individual modules, additions to our board. A programming language is very similar to the C language family, which is quite easy to learn, if you know the basics of the C language, this is a big plus in programming this platform.
We start, as always with the connection of the necessary libraries. Most likely, you will have to search the Internet AFMotor.h, problems to find this library should not be.
#include <AFMotor.h> // #include <SoftwareSerial.h> // Serial Next, create objects for the engines:
AF_DCMotor motor1(1); // 1 Motor Shield AF_DCMotor motor2(2); // 2 Motor Shield The channel M1 and M2 is determined easily; it is enough to look at our module and there near the fasteners with clamps M1, M2, M3, M4 are signed, respectively:
SoftwareSerial BTSerial(0, 1); // RX, TX, // Bluetooth char vbt; // int vL, vR; /* , . . */ int vspd = 200; void setup() { //C Bluetooth BTSerial.begin(9600); // C Serial.begin(9600); // vspeed(255,255); } Next, we need the help of the application on Android , whose commands we will accept and process.
In this part we simply describe the functionality of the program (speed, variables).
void loop() { // if (BTSerial.available()) { // , vbt = (char)BTSerial.read(); // if (vbt == 'F') { vforward(); } // if (vbt == 'B') { vbackward(); } // if (vbt == 'L') { vright(); } // if (vbt == 'R') { vleft(); } // if (vbt == 'G') { vforwardright(); } // if (vbt == 'I') { vforwardleft(); vforwardright(); } // if (vbt == 'H') { vbackwardleft(); } // if (vbt == 'J') { vbackwardright(); } // if (vbt == 'S') { vrelease(); } // 0% if (vbt == '0') { vspeed(0,0); } // 10% if (vbt == '1') { vspeed(25,25); } // 20% if (vbt == '2') { vspeed(50,50); } // 30% if (vbt == '3') { vspeed(75,75); } // 40% if (vbt == '4') { vspeed(100,100); } // 50% if (vbt == '5') { vspeed(125,125); } // 60% if (vbt == '6') { vspeed(150,150); } // 70% if (vbt == '7') { vspeed(175,175); } // 80% if (vbt == '8') { vspeed(200,200); } // 90% if (vbt == '9') { vspeed(225,225); } // 100% if (vbt == 'q') { vspeed(255,255); } } } Next, we describe each action, in this case FORWARD causes the engine to spin forward, and BACKWARD turns the engine in the opposite direction. The combination of these actions allows you to rotate, move left and right, deviate from the direct direction of movement of the robot.
// void vforward() { vspeed(vL,vR); vforwardRL(); } // RL void vforwardRL() { motor1.run(FORWARD); motor2.run(FORWARD); } // void vbackward() { vspeed(vL,vR); vbackwardRL(); } // RL void vbackwardRL() { motor1.run(BACKWARD); motor2.run(BACKWARD); } // void vleft() { vspeed(vL,vR); motor1.run(BACKWARD); motor2.run(FORWARD); } // void vright() { vspeed(vL,vR); motor1.run(FORWARD); motor2.run(BACKWARD); } // void vforwardleft() { if (vL > vspd) { vspeed(vL-vspd,vR); } else { vspeed(0,vR); } vforwardRL(); } // void vforwardright() { if (vR > vspd) { vspeed(vL,vR-vspd); } else { vspeed(vL,0); } vforwardRL(); } // void vbackwardleft() { if (vL > vspd) { vspeed(vL-vspd,vR); } else { vspeed(0,vR); } vbackwardRL(); } // void vbackwardright() { if (vR > vspd) { vspeed(vL,vR-vspd); } else { vspeed(vL,0); } vbackwardRL(); } // void vrelease(){ motor1.run(RELEASE); motor2.run(RELEASE); } // void vspeed(int spdL,int spdR){ if (spdL == spdR) { vL=spdL; vR=spdR; } motor1.setSpeed(spdL); motor2.setSpeed(spdR); } In this video, I simply connected the propeller to the M1 connector and changed the program code, leaving only the “forward” and “backward” motion:
But such a robot turned out at the end of our lesson:
In the next part, I will explain how to build the logic of the robot, connect the range finder to it, with which it will be oriented in space.
Source: https://habr.com/ru/post/262011/
All Articles