Exam 70-485 Advanced Windows Store App Development Using C #
While all progressive developers are anticipating the release of Windows 10 and are preparing to develop applications for it, I, after passing the 70-485 test, want to share with you the in-depth features of developing applications for Windows 8 and 8.1. Fortunately, the development of 10 and under 8.1 has a lot in common. This article is supposed to help you pass the exam 70-485, but may be interesting in any case, if you are developing applications for Windows Store. It contains some of the must-know snippets, a description of the features and classes of WinRT, as well as some points on which tricky questions can be asked.
Under the cut about everything a little. Since it is impossible to cover everything, a peculiar reminder turned out.
Exam description is available at the link: Exam 70-485 Advanced Windows Store App Development Using C #
I advise you to familiarize yourself with the list of topics posted there, on which questions will be asked. As with all such tests, after the end of the test a printout with the percentage of correct answers for each of the topics will be available to you, which means that in order to pass the exam, you must have knowledge of all topics.
Sensors (Windows.Device.Sensors space)
Accelerometer - Acceleration. This sensor returns the acceleration values along the x, y, and z axes. Simply put, this movement is left-right / to itself and from itself. Also supports the shaken event (when shaking).
Gyrometer - Angular speed / rotation. Returns values relative to the x, y, or z axis. In other words - rotation without shifting the axis.
Accelerometers give correct values for long duration actions, but give a lot of noise for short actions. On the contrary, gyrometers are good for short actions, but drift for long ones. It is advisable to use both sensors to calibrate each other.
Compass - returns the direction of the north and, if possible, the magnetic north
Inclinometer - Inclinometer pitch, roll, and yaw values that correspond to the angles of rotation around the x, y, and z axes
LightSensor - photosensitivity sensor.
OrientationSensor - returns the rotation matrix and quaternion
SimpleOrientationSensor - the current position of the device, which as a result gives the position of the device as one of the enumeration values. For example: Rotated90DegreesCounterclockwise, Faceup, Facedown, NotRotated
Proximity - object proximity sensor - NFC
Still have sensors: Barometer, Magnetometer, Altimeter
The following link is an excellent video that demonstrates the capabilities of the sensors: Choosing the right sensor
Almost all sensor APIs are identical (the SimpleOrientationSensor stands out a bit). First, you get a reference to the sensor using the GetDefault () method of the corresponding sensor class, then you set the ReportInterval property (in milliseconds) to let the system know how often to check for changes in values and how many resources need to be allocated for the sensor. Almost all classes use a rather similar ReadingChanged event to handle changes in sensor values. The accelerometer also supports the Shaken event, while, for the SimpleOrientationSensor, unlike others, the OrientationChanged event serves as a screen orientation change event.
When installing ReportInterval, you should take into account that the value cannot be set lower than that supported by the device, otherwise an exception will be raised. It is necessary using the MinimumReportInterval sensor property to find out the minimum supported interval and compare it with the interval to be set. If the ReportInterval value is 0, the device will use the default interval.
Consider an example of using an accelerometer:
using Windows.Devices.Sensors; // MainPage this.InitializeComponent() Accelerometer _accelerometer = Accelerometer.GetDefault(); if (_accelerometer != null) { uint minReportInterval = _accelerometer.MinimumReportInterval; uint reportInterval = minReportInterval > 20 ? minReportInterval : 20; _accelerometer.ReportInterval = reportInterval; _accelerometer.ReadingChanged += new TypedEventHandler<Accelerometer, AccelerometerReadingChangedEventArgs>(ReadingChanged); } // ……… - private async void ReadingChanged(object sender, AccelerometerReadingChangedEventArgs e) { await Dispatcher.RunAsync(Windows.UI.Core.CoreDispatcherPriority.Normal, () => { AccelerometerReading reading = e.Reading; txtXAxis.Text = String.Format("{0,5:0.00}", reading.AccelerationX); txtZAxis.Text = String.Format("{0,5:0.00}", reading.AccelerationZ); }); } // Dispatcher.RunAsync , UI Work with the camera
There are two standard options for working with the camera. The first way (simpler) is to assign the “mission” to the standard API and use the CameraCaptureUI class. The second way is to use MediaCapture.
Using CameraCaptureUI
We need to add a MediaElement element to the XAML to display the captured video:
<MediaElement x:Name="mediaPreivew" Width="320" /> Now you can use this code to get the video from the camera and display it in the application:
CameraCaptureUI cameraUI = new CameraCaptureUI(); Windows.Storage.StorageFile capturedMedia = await cameraUI.CaptureFileAsync(CameraCaptureUIMode.Video); if (capturedMedia != null) { var stream = await capturedMedia.OpenAsync(FileAccessMode.Read); mediaPreivew.SetSource(stream, capturedMedia.ContentType); mediaPreivew.Play(); } Or the second variant of the code with the record in the file (without preview):
Windows.Media.Capture.CameraCaptureUI dialog = new Windows.Media.Capture.CameraCaptureUI(); Size aspectRatio = new Size(16, 9); dialog.PhotoSettings.CroppedAspectRatio = aspectRatio; dialog.PhotoSettings.AllowCropping = true; Windows.Storage.StorageFile file = await dialog.CaptureFileAsync(Windows.Media.Capture.CameraCaptureUIMode.Photo); Using MediaCapture
In the application manifest, it is necessary to add permissions to use the web camera and microphone.
Code to capture:
_mediaCapture = new Windows.Media.Capture.MediaCapture(); await _mediaCapture.InitializeAsync(); // Windows.Graphics.Display.DisplayInformation.AutoRotationPreferences = Windows.Graphics.Display.DisplayOrientations.Landscape; var videoFile = await Windows.Storage.ApplicationData.Current.LocalFolder.CreateFileAsync("recording.mp4", Windows.Storage.CreationCollisionOption.ReplaceExisting); var profile = Windows.Media.MediaProperties.MediaEncodingProfile.CreateMp4(Windows.Media.MediaProperties.VideoEncodingQuality.HD1080p); await _mediaCapture.StartRecordToStorageFileAsync(profile, videoFile); When working with MediaCapture, it is necessary to free all resources before closing the application:
By default, the content of OnSuspending is this code:
private async void OnSuspending(object sender, SuspendingEventArgs e) { var deferral = e.SuspendingOperation.GetDeferral(); //TODO: Save application state and stop any background activity deferral.Complete(); } Here, between the declaration of deferral (English - delay) and its completion should be inserted the code that runs when pausing. Why do we need this deferral here? The suspension of the application can be interrupted and then the method will be interrupted in the middle. To prevent this from happening, and the system made it possible to complete the process, we get deferral and end it at the end of the operation using deferral.Complete ();
Now we will write an asynchronous procedure in which we will stop capturing the video and free up resources. Any asynchronous procedure should be exactly Task. It is advisable to use Void only for event handling procedures (button presses, etc.), that is, for those places where the Task is not used at all.
public async System.Threading.Tasks.Task disp() { await _mediaCapture.StopRecordAsync(); await _mediaCapture.StopPreviewAsync(); capturePreview.Source = null; _mediaCapture.Dispose(); } Since we have _mediaCapture in MainPage, and OnSuspending in App.xaml.cs, we need to either declare _mediaCapture in App.xaml.cs or call the MainPage object when invoked. The second option can be realized with the help of such a small trick (this is unlikely to be in the exam, but this is an interesting solution):
In the MainPage ads, add:
public static MainPage _mainpage; And in the designer himself:
public MainPage() { this.InitializeComponent(); _mainpage = this; } Now we can call Task like this:
await MainPage._mainpage.disp(); Alternatively, you can add a XAML element:
<CaptureElement Name="capturePreview" Height="400" /> And instead of capturing to a file, use the preview:
capturePreview.Source = _mediaCapture; await _mediaCapture.StartPreviewAsync(); Unlike Windows.Media.Capture.MediaCapture, - CameraCaptureUI does not throw exceptions when there are no rights, but shows a message. But you need to put the code in a try / catch wrapper both there and there.
VideoDeviceController - contains camera settings. Such as, for example: Focus, Zoom, Hue, TorchControl, FlashControl, WhiteBalanceControl, Brightness, Contrast ...
Check whether the opportunity is present by:
if (MediaCapture.VideoDeviceController.Brightness.Capabilities.Supported) or javascript style:
if (videoDev.Brightness.Capabilities.Step != 0) A small example of use:
var videoDev = _mediaCapture.VideoDeviceController; if (videoDev.Contrast.Capabilities.Supported) { var contrastCapabilities = videoDev.Contrast.Capabilities; var max = contrastCapabilities.Max; videoDev.Contrast.TrySetAuto(false); if (videoDev.Contrast.TrySetValue(max)) { // . } } Also, some settings can be set in MediaCaptureInitializationSettings
Windows.Media.Capture.MediaCaptureInitializationSettings _captureInitSettings = null; _captureInitSettings = new Windows.Media.Capture.MediaCaptureInitializationSettings(); _captureInitSettings.VideoDeviceId = ""; _captureInitSettings.StreamingCaptureMode=Windows.Media.Capture.StreamingCaptureMode.AudioAndVideo; And pass them as a parameter when initializing
await _mediaCapture.InitializeAsync(_captureInitSettings); The parameters set by MediaCaptureInitializationSettings can then be obtained for reading from the MediaCaptureSettings class.
Once again about dependency property
Dependency property must be declared with public static readonly modifiers. Example:
// IsSpinningProperty dependency property // PropertyMetadata, null public static readonly DependencyProperty IsSpinningProperty = DependencyProperty.Register( "IsSpinning", typeof(Boolean), typeof(MainPage), null ); // property/, , . // : bool spin = MainPage.Current.IsSpinning; public bool IsSpinning { get { return (bool)GetValue(IsSpinningProperty); } set { SetValue(IsSpinningProperty, value); } } But all of this should be clear and clear to you. But the following may be new.
Attached DependencyProperty - used as such a global property that can be assigned to any object. One of the purposes of Attached DependencyProperty is to allow different children to set values for a property that is set in the parent element. For example, DockPanel.Dock can be set to child elements of the standard XAML Dock control. Further example:
public static readonly DependencyProperty IsMovableProperty = DependencyProperty.RegisterAttached("IsMovable", typeof(Boolean), typeof(MainPage), new PropertyMetadata(false)); public static void SetIsMovable(UIElement element, Boolean value) { element.SetValue(IsMovableProperty, value); } public static Boolean GetIsMovable(UIElement element) { return (Boolean)element.GetValue(IsMovableProperty); } Here is declared a DependencyObject object which contains the value of IsMovable. The object is bound to another MainPage object, so you can pass the value to MainPage from any child of the window.
Thus, from the code, any control can transfer the value to the MainPage object.
<TextBlock local:MainPage.IsMovable="True" x:Name="txtOut"></TextBlock> You can also change the value of Attached DependencyProperty from code using a line like this:
MainPage.SetIsMovable(this, !(bool)this.GetValue(IsMovableProperty)); ')
Files that are retained after the application is restarted
Windows.Storage.Pickers.FileOpenPicker openPicker=new Windows.Storage.Pickers.FileOpenPicker(); Windows.Storage.StorageFile file = await openPicker.PickSingleFileAsync(); if (file != null) // Windows.Storage.AccessCache.StorageApplicationPermissions.MostRecentlyUsedList.Add(file, "20150706"); // MRU - . . // - . // : Windows.Storage.AccessCache.AccessListEntry item = Windows.Storage.AccessCache.StorageApplicationPermissions.MostRecentlyUsedList.Entries[0]; string metadata = item.Metadata; For a list of files
IReadOnlyList<Windows.Storage.StorageFile> fileList = await Windows.Storage.ApplicationData.Current.LocalFolder.GetFilesAsync(); You can also use GetFoldersAsync () to get a list of folders, or GetItemsAsync () to get both files and folders at once.
Write to file
var folder = Windows.Storage.KnownFolders.PicturesLibrary; var file = await folder.CreateFileAsync("hello.txt", Windows.Storage.CreationCollisionOption.ReplaceExisting); var stream = await file.OpenAsync(Windows.Storage.FileAccessMode.ReadWrite); using (var outputStream = stream.GetOutputStreamAt(0)) { Windows.Storage.Streams.DataWriter dataWriter = new Windows.Storage.Streams.DataWriter(outputStream); dataWriter.WriteString("Some text"); await dataWriter.StoreAsync(); await outputStream.FlushAsync(); } Or even easier:
var folder = Windows.Storage.KnownFolders.PicturesLibrary; var file = await folder.CreateFileAsync("hello2.txt", Windows.Storage.CreationCollisionOption.ReplaceExisting); await Windows.Storage.FileIO.WriteTextAsync(file, "Swift as a shadow"); In both the first and second examples, in the application manifest, you need to add permission to the Pictures Library to Capabilities.
Testing
The Windows Store applications contain the Microsoft.VisualStudio.TestPlatform.UnitTestFramework namespace, which is an excellent test framework for .NET applications. The ExpectedException attribute is no longer supported. Instead, use Assert. ThrowsException Methods marked as TestInitialize / TestCleanup will be executed before and after each test. Do you know if it is convenient when you need to destroy an object or change the parameters for the next test?
[TestInitialize] public void TestSetup() { } [TestCleanup] public void TestCleanIt() { } Even more convenient is the opportunity to support lightweight date tests. This is the ability to run a test with various parameters as input values. The following example clearly demonstrates this feature to us:
[DataTestMethod] [DataRow("25892e17-80f6-715f-9c65-7395632f0223", "Customer #1")] [DataRow("a53e98e4-0197-3513-be6d-49836e406aaa", "Customer #2")] [DataRow("f2s34824-3153-2524-523d-29386e4s6as1", "Customer #3")] public void GetCustomerName_RightID_ReturnExpected(String id, String customerName) { var obj = new SomeClass(); var actualCustomer = obj.CallSomeFunctionGetName(id); Assert.AreEqual(customerName, actualCustomer); } This method is executed several times, each time with a string of data provided. The first value in the example means the customer ID, the second - the return result with the customer name.
In addition to the [DataTestMethod] attribute, there is also the [Microsoft.VisualStudio.TestPlatform.UnitTestFramework.AppContainer.UITestMethod] attribute, which allows you to run code in an interface stream. Previously, it was necessary to use the dispatcher.
Even if you do not test (I do not test my code, and if I test, I do it in production), then you probably noticed a counter with different numbers in the corner. Sort of:
045 025 040965 003 000 001
The numbers that are indicated on the counter indicate (from left to right):
Composition thread FPS — The frame rate per second for the composition thread. By the way, this stream is used to build and animate interface elements.
UI thread FPS - frame rate for interface thread (UI thread)
Memory Video - texture memory usage
Batch - the number of surfaces that are sent to the graphics card (GPU) for drawing
Composition thread CPU - time in milliseconds spent by the CPU on the composition flow
UI CPU - time in milliseconds spent by the processor on UI threads
In order to show or hide the counter in the corner, use the following code:
public App() { this.InitializeComponent(); DebugSettings.EnableFrameRateCounter = true; } Since the composition streams and the UI streams are affected, I would like to explain a little the difference between them. There are animations, or other interface changes that do not affect the basic layout and other objects of the scene. Such processes can be calculated in advance. They occur in a specially designated composition stream and thus unload the UI stream. By the way, if the animation does not affect other objects, then it is called independent.
To determine where the graphics are more loaded, you can define an overload map with:
DebugSettings.IsOverdrawHeatMapEnabled=true; Places where there is a load will be highlighted in a darker color.
Exceptions
You should use the UnhandledException event only to perform certain operations, such as error logging or storing temporary data in the local storage before terminating the application. You should not catch errors in this event. arg.Handled = true - this is very bad in this case. Exceptions that are not related to the XAML framework will not be caught by this event.
An example of intercepting errors in asynchronous code:
// … - try { await this.DoSomethingAsync(); // , }catch{} // … - private Task DoSomethingAsync(){ // } If you forget await, and an error occurs, it is recorded in the anonymous Task and ignored.
If you forget await for an asynchronous void method, then the calling code will not be able to catch it, and an unhandled error occurs. The program is interrupted. This is why void is only used for events such as button click. In other cases, you need to use Task.
When using Task.WhenAll there is an AggregateException which returns a collection of errors, in case there were several errors. You can use Flatten to highlight a specific error. For example:
catch (AggregateException aex) { foreach (Exception ex in aex.Flatten().InnerExceptions) { // - }} Task Parallel Library (TPL) provides us with an event for catching exceptions - UnobservedTaskException .
This event can be logged, for example, when App.xaml.cs is initialized.
TaskScheduler.UnobservedTaskException += TaskScheduler_UnobservedTaskException; e.SetObserved inside event - prevents interruption of code execution. UnobservedTaskException is an error, which despite its name is an error of type AggregateException, which means it can be Flatten.
A class is created for logging error information:
using System.Diagnostics.Tracing; using System.Collections.Generic; class MyEventSource : EventSource { public static MyEventSource Log = new MyEventSource(); public void Startup() { WriteEvent(1); } public void OpenFileStart(string fileName) { WriteEvent(2, fileName); } } And then in the code you can write to the log:
MyEventSource.Log.Startup(); MyEventSource.Log.OpenFileStart("SomeFile"); Device search
In order to find which devices are present in the system, you can use the Windows.Devices.Enumeration.DeviceInformation class. In the following example, we find all the devices that can capture video:
using Windows.Devices.Enumeration; // …….. - var interfaces = await Windows.Devices.Enumeration.DeviceInformation.FindAllAsync(DeviceClass.VideoCapture); txtOut.Text = interfaces.Count + " "; foreach (Windows.Devices.Enumeration.DeviceInformation deviceInterface in interfaces) { var id = "Id:" + deviceInterface.Id; var name = deviceInterface.Name; var isEnabled = "IsEnabled:" + deviceInterface.IsEnabled; txtOut.Text = txtOut.Text + Environment.NewLine +id.ToString()+" "+name.ToString() + " " + isEnabled.ToString(); } It was a search by device type.
DeviceClass can be: All, AudioCapture, AudioRender, PortableStorageDevice, VideoCapture, ImageScanner, Location
You can also perform a search by specifying, instead of the class of the device, a string formed in accordance with Advanced Query Syntax (AQS). Thus, you can find the device, for example, by its GUID.
Registering the application to run when the device is connected
You can enable Autoplay for all Windows Store apps.
In the application manifest, you need to add the AutoPlay Device declaration, approximately as shown in the screenshot:
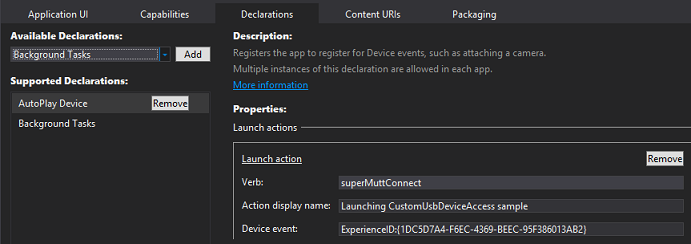
In the App class's OnActivated method, the value of the IActivatedEventArgs parameter can be checked.
if (args.Kind == ActivationKind.Device) You need to override the OnLaunched method in order to perform any actions that occur during application initialization, when the user starts your application in the normal way. For other startup options, use OnActivated .
In some cases, instead of OnActivated you need to use specialized methods:
OnFileActivated, OnSearchActivated, OnShareTargetActivated, OnFileOpenPickerActivated, OnFileSavePickerActivated, OnCachedFileUpdaterActivated
DataProtectionProvider
The following methods will help you save the information or stream asynchronously encrypting and decrypting it:
using Windows.Security.Cryptography.DataProtection; using Windows.Storage.Streams; using Windows.Security.Cryptography; // ..... - Hi secret String descriptor = "LOCAL=user"; DataProtectionProvider dpp = new DataProtectionProvider(descriptor); IBuffer binaryMessage = Windows.Security.Cryptography.CryptographicBuffer.ConvertStringToBinary("Hi secret", BinaryStringEncoding.Utf8); var _protectedBuffer = await dpp.ProtectAsync(binaryMessage); txtEncryptedTextBlock.Text = CryptographicBuffer.EncodeToBase64String(_protectedBuffer); // , _protectedBuffer: DataProtectionProvider datapp = new DataProtectionProvider(); IBuffer unprotectedBuffer = await datapp.UnprotectAsync(_protectedBuffer); txtUnprotectedTextBlock.Text = CryptographicBuffer.ConvertBinaryToString(BinaryStringEncoding.Utf8, unprotectedBuffer); Use the following class to store user passwords.
var vault = new Windows.Security.Credentials.PasswordVault(); vault.Add(new Windows.Security.Credentials.PasswordCredential("My App", "username", "password")); Licensing
If your application is hosted in the Store, then you can ask it for a trial period during which its free use is allowed. To do this, use the class CurrentApp.LicenseInformation . When developing and testing use the class CurrentAppSimulator . Brief example:
using Windows.ApplicationModel.Store; var licenseInfo = CurrentAppSimulator.LicenseInformation; if (licenseInfo.IsActive) { if (licenseInfo.IsTrial) // , IsTrial true { await Dispatcher.RunAsync(Windows.UI.Core.CoreDispatcherPriority.Normal, () => { txtLicenseRemainingDays.Text = (licenseInfo.ExpirationDate - DateTime.Now).Days.ToString(); }); } else { txtLicenseRemainingDays.Text = " "; } } else { txtLicenseRemainingDays.Text = " : license is expired!"; } Subscribe to a license change event (for “catching” the end of the trial period or purchasing an application):
CurrentAppSimulator.LicenseInformation.LicenseChanged += LicenseInformation_LicenseChanged; You can purchase a full license as follows:
await CurrentApp.RequestAppPurchaseAsync(false); If you pass true as a parameter, then you will receive a Receipt - xml file with information about the purchase.
You can not sell the entire application, but only its certain features. Approximately, as in the Free-to-play model. For example, in an application that provides access to culinary recipes, the user can purchase additional secret recipes (for example, an old stool recipe).
ListingInformation listingInfo = await CurrentAppSimulator.LoadListingInformationAsync(); var productListing = listingInfo.ProductListings["feature1"]; txtInAppPurchaseFeaturePrice.Text = String.Format(" {0}", productListing.FormattedPrice); You can purchase additional features using the CurrentApp.RequestProductPurchaseAsync method (false)
When the CurrentAppSimulator class is used, a WindowsStoreProxy.xml file is created to simulate working with licenses in the following path:
C: \ Users \\ AppData \ Local \ Packages \\ LocalState \ Microsoft \ Windows Store \ ApiData \ WindowsStoreProxy.xml
Any modifications that you will make during testing affect and do not modify the WindowsStoreProxy.xml file, and only occur in RAM.
Instead of WindowsStoreProxy.xml, you can slip your file:
StorageFolder proxyDataFolder = await Package.Current.InstalledLocation.GetFolderAsync("trial-configs"); StorageFile proxyFile = await proxyDataFolder.GetFileAsync("timed-trial.xml"); await CurrentAppSimulator.ReloadSimulatorAsync(proxyFile); WinMD
WinMD is a component of the Windows Runtime that was created specifically and only for Windows Store applications (as opposed to PCL). If its code requiring high-performance computing is written in C ++, then when accessing WinMD from C # / JavaScript applications, the performance will increase compared to the same C # code. Component code cannot be written in JavaScript.
In the WinMD library, methods can be overloaded. If you need to declare multiple overloads with the same number of parameters, you need to use the Windows.Foundation.Metadata.DefaultOverloadAttribute () attribute for one of these overloads.
If you need to use your library only from Windows Store applications, and it will contain Windows Store controls, then you need to use WinMD, in other cases PCL is better for you.
Fields, parameters, return values and members of your component must be of the Windows Runtime type. Here are some examples that compare WinRT and .Net types.
Windows Runtime - .NET Framework
IIterable - IEnumerable
IVector - IList
IVectorView - IReadOnlyList
IMap <K, V> - IDictionary <TKey, TValue>
IBindableIterable - IEnumerable
IBindableVector - IList
Application life cycle
Running - Suspended - NotRunning
After an error and interruption of the application, the status will be NotRunning
The application enters the Suspended state when the user switches to another application or the device enters power saving mode. After the application is in the Suspending state after 5 seconds it stops its work
HASHING
You, of course, know that hashing is often used to store information that may be compromised (say, passwords) or to check for errors in data storage / transfer. A small snippet in the subject:
using Windows.Security.Cryptography; using Windows.Storage.Streams; using Windows.Security.Cryptography.Core; String hashAlgorithmName = HashAlgorithmNames.Sha512; IBuffer binaryMessage = CryptographicBuffer.ConvertStringToBinary(" ", BinaryStringEncoding.Utf8); HashAlgorithmProvider hashProvider = HashAlgorithmProvider.OpenAlgorithm(hashAlgorithmName); IBuffer hashedMessage = hashProvider.HashData(binaryMessage); if (hashedMessage.Length != hashProvider.HashLength) txtHash.Text = " hash "; txtHash.Text = CryptographicBuffer.EncodeToBase64String(hashedMessage); Using the CryptographicBuffer class, you can generate a 32-bit number:
RandomNumberTextBlock.Text = CryptographicBuffer.GenerateRandomNumber().ToString(); Or random data:
UInt32 length = 32; IBuffer rndData = CryptographicBuffer.GenerateRandom(length); RandomDataTextBlock.Text = CryptographicBuffer.EncodeToHexString(rndData); HMAC contains information not only about the accuracy of the data, but also information confirming that the message came from an authorized sender. Simply put, this is a signed hash.
Digital signatures are very similar to HMAC, with the only difference that the HMAC uses a symmetric key, and digital signatures use an asymmetric key, and the public key is embedded in the certificate.
That's all for now. The contract of PlayTo, Printing, Backgroundtasks and geolocation would not fit here - they deserve separate articles. You also need to deal very well with asynchrony and multithreading, user and custom controls, animations, and also profiling (in Windows Store applications there is only sampling with a few limitations) and all other exam topics.
, . , , . . , . , , , .
, , . , -. : -
Source: https://habr.com/ru/post/261967/
All Articles