DirectX rendering in WPF window

Introduction
Good afternoon, dear readers! Not so long ago, I was faced with the task of implementing an uncomplicated graphical editor under Windows, while in the long term it should support both two-dimensional and three-dimensional graphics. The task is not easy, especially considering that along with the window of viewing the result of drawing there must be a high-quality user interface. After some thought, two tools were highlighted: Qt and WPF. Qt technology boasts a good API and good support for OpenGL. However, it also has a number of shortcomings that are difficult to put up with. First, a large Qt Widgets application will be quite expensive to maintain, and in Qt Quick it’s hard to integrate graphics. Secondly, in OpenGL there is no developed interface for two-dimensional drawing. So I settled on WPF. Everything was fine with me here: powerful GUI creation tools, C # programming language and extensive experience with this technology. In addition, it was decided to use Direct3D and Direct2D for drawing. Only one problem remained - it was necessary to place the results of rendering performed in C ++ in the WPF window. This article is dedicated to solving this problem. So, here's a guide plan:
- Development of the view rendering component in C #
- Creating a sample project using DirectX in C ++
- Displaying the drawing result in a WPF window
Let's not waste time and get down to work immediately.
1. Development of the C # view rendering component
First, create a WPF application project in Visual Studio. Then add a new C # class to the project. Let his name be NativeWindow . Below is the code for this class:
NativeWindow.cs
using System; using System.Runtime.InteropServices; using System.Windows; using System.Windows.Interop; namespace app { public class NativeWindow : HwndHost { public new IntPtr Handle { get; private set; } Procedure procedure; const int WM_PAINT = 0x000F; const int WM_SIZE = 0x0005; [StructLayout(LayoutKind.Sequential)] struct WindowClass { public uint Style; public IntPtr Callback; public int ClassExtra; public int WindowExtra; public IntPtr Instance; public IntPtr Icon; public IntPtr Cursor; public IntPtr Background; [MarshalAs(UnmanagedType.LPWStr)] public string Menu; [MarshalAs(UnmanagedType.LPWStr)] public string Class; } [StructLayout(LayoutKind.Sequential)] struct Rect { public int Left; public int Top; public int Right; public int Bottom; } [StructLayout(LayoutKind.Sequential)] struct Paint { public IntPtr Context; public bool Erase; public Rect Area; public bool Restore; public bool Update; [MarshalAs(UnmanagedType.ByValArray, SizeConst = 32)] public byte[] Reserved; } delegate IntPtr Procedure (IntPtr handle, uint message, IntPtr wparam, IntPtr lparam); [DllImport("user32.dll")] static extern IntPtr CreateWindowEx (uint extended, [MarshalAs(UnmanagedType.LPWStr)] string name, [MarshalAs(UnmanagedType.LPWStr)] string caption, uint style, int x, int y, int width, int height, IntPtr parent, IntPtr menu, IntPtr instance, IntPtr param); [DllImport("user32.dll")] static extern IntPtr LoadCursor (IntPtr instance, int name); [DllImport("user32.dll")] static extern IntPtr DefWindowProc (IntPtr handle, uint message, IntPtr wparam, IntPtr lparam); [DllImport("user32.dll")] static extern ushort RegisterClass ([In] ref WindowClass register); [DllImport("user32.dll")] static extern bool DestroyWindow (IntPtr handle); [DllImport("user32.dll")] static extern IntPtr BeginPaint (IntPtr handle, out Paint paint); [DllImport("user32.dll")] static extern bool EndPaint (IntPtr handle, [In] ref Paint paint); protected override HandleRef BuildWindowCore(HandleRef parent) { var callback = Marshal.GetFunctionPointerForDelegate(procedure = WndProc); var width = Convert.ToInt32(ActualWidth); var height = Convert.ToInt32(ActualHeight); var cursor = LoadCursor(IntPtr.Zero, 32512); var menu = string.Empty; var background = new IntPtr(1); var zero = IntPtr.Zero; var caption = string.Empty; var style = 3u; var extra = 0; var extended = 0u; var window = 0x50000000u; var point = 0; var name = "Win32"; var wnd = new WindowClass { Style = style, Callback = callback, ClassExtra = extra, WindowExtra = extra, Instance = zero, Icon = zero, Cursor = cursor, Background = background, Menu = menu, Class = name }; RegisterClass(ref wnd); Handle = CreateWindowEx(extended, name, caption, window, point, point, width, height, parent.Handle, zero, zero, zero); return new HandleRef(this, Handle); } protected override void DestroyWindowCore(HandleRef handle) { DestroyWindow(handle.Handle); } protected override IntPtr WndProc(IntPtr handle, int message, IntPtr wparam, IntPtr lparam, ref bool handled) { try { if (message == WM_PAINT) { Paint paint; BeginPaint(handle, out paint); EndPaint(handle, ref paint); handled = true; } if (message == WM_SIZE) { handled = true; } } catch (Exception e) { MessageBox.Show(e.Message); } return base.WndProc(handle, message, wparam, lparam, ref handled); } static IntPtr WndProc(IntPtr handle, uint message, IntPtr wparam, IntPtr lparam) { return DefWindowProc(handle, message, wparam, lparam); } } } This class works very simply: in order to get access to the message queue and window descriptor, the WndProc method from the parent class HwndHost is overridden . The BuildWindowCore method is used as the constructor of the new window. It takes the handle of the parent window, and returns the handle of the new window. Creating a window and its maintenance is possible only with the help of system functions, the managed analogs of which do not exist in the .NET platform. Access to WinAPI tools is provided by Platform Invocation Services (PInvoke) , implemented as part of the Common Language Infrastructure (CLI). Information about working with PInvoke can be obtained from numerous books on the .NET Framework, but here I want to draw your attention to the website PInvoke.net , where you can find the correct declarations of all functions and structures. Working with the message queue is to handle the desired event. Usually, it is enough to process the redrawing of the window contents and resizing it. The most important thing that executes this code is the creation of a window handle, which can also be used as in a normal WinAPI application. In order to be comfortable in the WPF designer, you need to place the window component on the main form of the application. The following is the XAML markup of the main application window:
MainWindow.xaml
<Window x:Class="app.MainWindow" xmlns="http://schemas.microsoft.com/winfx/2006/xaml/presentation" xmlns:x="http://schemas.microsoft.com/winfx/2006/xaml" xmlns:i="clr-namespace:app" Title="MainWindow" Height="350" Width="525"> <Grid> <i:NativeWindow></i:NativeWindow> </Grid> </Window> In order to place a component on a form, you must specify the namespace in which it is located. It can then be used as a placeholder to accurately represent the position of each element on the form. Before switching from edit mode to design mode, the project needs to be rebuilt. The figure below shows the Visual Studio window with the open designer of the main application window, in which the placeholder has a gray background:

')
2. Creating a sample project using DirectX in C ++
As an example of using the component, we will create a simple C ++ project in which, using Direct2D, the drawing window will be filled with a certain background. You can use C ++ / CLI bindings to link managed and unmanaged code, but in real projects it is not necessary to do this. Add a C ++ CLR Class Library project to the Visual Studio solution. The project will contain the default source files, you can delete them. For the experiment, you need only one source file, its contents are shown below:
Renderer.cpp
#include <d2d1.h> namespace lib { class Renderer { public: ~Renderer() { if (factory) factory->Release(); if (target) target->Release(); } bool Initialize(HWND handle) { RECT rect; if (!GetClientRect(handle, &rect)) return false; if (FAILED(D2D1CreateFactory(D2D1_FACTORY_TYPE_SINGLE_THREADED, &factory))) return false; return SUCCEEDED(factory->CreateHwndRenderTarget(D2D1::RenderTargetProperties(), D2D1::HwndRenderTargetProperties(handle, D2D1::SizeU(rect.right - rect.left, rect.bottom - rect.top)), &target)); } void Render() { if (!target) return; target->BeginDraw(); target->Clear(D2D1::ColorF(D2D1::ColorF::Orange)); target->EndDraw(); } void Resize(HWND handle) { if (!target) return; RECT rect; if (!GetClientRect(handle, &rect)) return; D2D1_SIZE_U size = D2D1::SizeU(rect.right - rect.left, rect.bottom - rect.top); target->Resize(size); } private: ID2D1Factory* factory; ID2D1HwndRenderTarget* target; }; public ref class Scene { public: Scene(System::IntPtr handle) { renderer = new Renderer; if (renderer) renderer->Initialize((HWND)handle.ToPointer()); } ~Scene() { delete renderer; } void Resize(System::IntPtr handle) { HWND hwnd = (HWND)handle.ToPointer(); if (renderer) renderer->Resize(hwnd); } void Draw() { if (renderer) renderer->Render(); } private: Renderer* renderer; }; } The Scene class binds the C # application code and the Renderer class. The latter uses the Direct2D API to fill the window background in orange. It is worth noting that, in practice, rendering is completely performed in unmanaged code, only a window handle (HWND) is needed to display the result. It is also necessary to take into account that both projects in the solution should now have the same configuration when building, for example, “Release x86”.
3. Displaying the drawing result in a WPF window
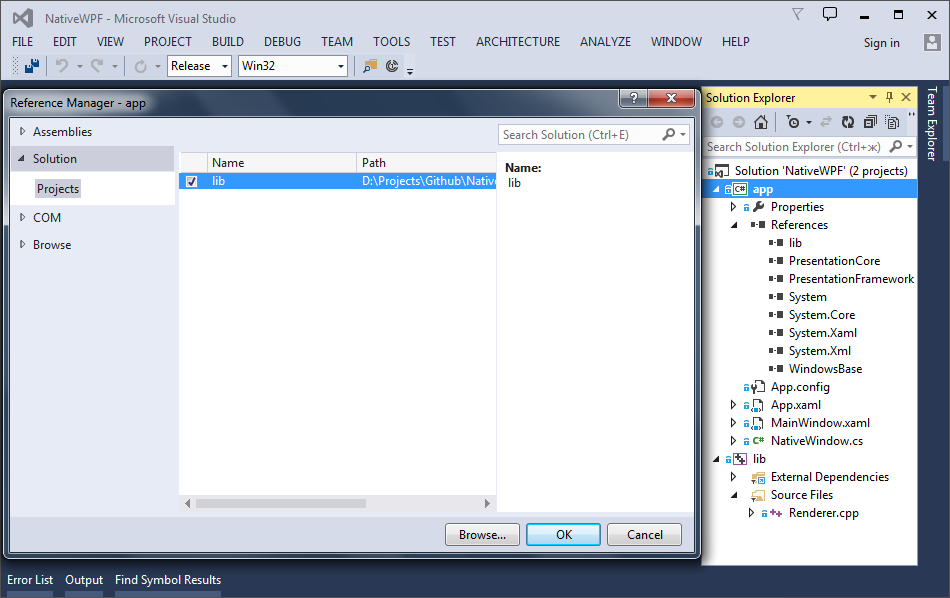
In order to display the result of drawing on the form, you need to add a link to the drawing library assembly in the WPF application project and call the corresponding functions from the library when processing the component's window messages. The figure below shows the window for adding a link to the drawing library and the solution structure:
The following is the modified code for the NativeWindow class:
NativeWindow.cs
using lib; // using System; using System.Runtime.InteropServices; using System.Windows; using System.Windows.Interop; namespace app { public class NativeWindow : HwndHost { public new IntPtr Handle { get; private set; } Procedure procedure; Scene scene; // Scene const int WM_PAINT = 0x000F; const int WM_SIZE = 0x0005; [StructLayout(LayoutKind.Sequential)] struct WindowClass { public uint Style; public IntPtr Callback; public int ClassExtra; public int WindowExtra; public IntPtr Instance; public IntPtr Icon; public IntPtr Cursor; public IntPtr Background; [MarshalAs(UnmanagedType.LPWStr)] public string Menu; [MarshalAs(UnmanagedType.LPWStr)] public string Class; } [StructLayout(LayoutKind.Sequential)] struct Rect { public int Left; public int Top; public int Right; public int Bottom; } [StructLayout(LayoutKind.Sequential)] struct Paint { public IntPtr Context; public bool Erase; public Rect Area; public bool Restore; public bool Update; [MarshalAs(UnmanagedType.ByValArray, SizeConst = 32)] public byte[] Reserved; } delegate IntPtr Procedure (IntPtr handle, uint message, IntPtr wparam, IntPtr lparam); [DllImport("user32.dll")] static extern IntPtr CreateWindowEx (uint extended, [MarshalAs(UnmanagedType.LPWStr)] string name, [MarshalAs(UnmanagedType.LPWStr)] string caption, uint style, int x, int y, int width, int height, IntPtr parent, IntPtr menu, IntPtr instance, IntPtr param); [DllImport("user32.dll")] static extern IntPtr LoadCursor (IntPtr instance, int name); [DllImport("user32.dll")] static extern IntPtr DefWindowProc (IntPtr handle, uint message, IntPtr wparam, IntPtr lparam); [DllImport("user32.dll")] static extern ushort RegisterClass ([In] ref WindowClass register); [DllImport("user32.dll")] static extern bool DestroyWindow (IntPtr handle); [DllImport("user32.dll")] static extern IntPtr BeginPaint (IntPtr handle, out Paint paint); [DllImport("user32.dll")] static extern bool EndPaint (IntPtr handle, [In] ref Paint paint); protected override HandleRef BuildWindowCore(HandleRef parent) { var callback = Marshal.GetFunctionPointerForDelegate(procedure = WndProc); var width = Convert.ToInt32(ActualWidth); var height = Convert.ToInt32(ActualHeight); var cursor = LoadCursor(IntPtr.Zero, 32512); var menu = string.Empty; var background = new IntPtr(1); var zero = IntPtr.Zero; var caption = string.Empty; var style = 3u; var extra = 0; var extended = 0u; var window = 0x50000000u; var point = 0; var name = "Win32"; var wnd = new WindowClass { Style = style, Callback = callback, ClassExtra = extra, WindowExtra = extra, Instance = zero, Icon = zero, Cursor = cursor, Background = background, Menu = menu, Class = name }; RegisterClass(ref wnd); Handle = CreateWindowEx(extended, name, caption, window, point, point, width, height, parent.Handle, zero, zero, zero); scene = new Scene(Handle); // Scene return new HandleRef(this, Handle); } protected override void DestroyWindowCore(HandleRef handle) { DestroyWindow(handle.Handle); } protected override IntPtr WndProc(IntPtr handle, int message, IntPtr wparam, IntPtr lparam, ref bool handled) { try { if (message == WM_PAINT) { Paint paint; BeginPaint(handle, out paint); scene.Draw(); // EndPaint(handle, ref paint); handled = true; } if (message == WM_SIZE) { scene.Resize(handle); // handled = true; } } catch (Exception e) { MessageBox.Show(e.Message); } return base.WndProc(handle, message, wparam, lparam, ref handled); } static IntPtr WndProc(IntPtr handle, uint message, IntPtr wparam, IntPtr lparam) { return DefWindowProc(handle, message, wparam, lparam); } } } When processing a window message WM_PAINT, the contents of the component are redrawn. This message also enters the queue when the window is resized (WM_SIZE message). The figure below shows the finished application window filled with orange:

Conclusion
The WPF window drawing method outlined in the article is well suited for creating applications in which the user interface should be combined with the viewing window. WPF technology is by far the most advanced GUI tool for Windows, and the ability to use system functions sometimes makes the work of a programmer easier. To quickly test the application, I created a repository on Github. There you can always find the latest version of this solution.
Source: https://habr.com/ru/post/261927/
All Articles