STM32, C ++ and FreeRTOS. Development from scratch. Part 1
Introduction
Not so long ago, my department encountered the difficulty of finding new software engineers for embedded software development. Experienced and intelligent did not like the level of wages, and the young simply do not exist in our city. Therefore, under the patronage of our glorious global company headquartered somewhere in St. Louis, we first began to recruit students for internship, and then we decided to go the other way and do two whole software development courses, and there we could choose the most “intelligent” if you need new employees. It is much cheaper and allows you to reach the maximum number of applicants.
I digress a bit from the topic, I myself programmed the last time a long time ago, and generally more on C #, and the last global project on a microcontroller (PIC16 in C language) was made back in 2007.
Therefore, I had to deal with modern microcontrollers, the C ++ language and the real-time operating system.
Of course, all our projects are already using RTOS and are being written in C ++, but as a developer, I don’t take part in them, but I’m involved in
Selection
I had time for everything about everything for 1 month. From the beginning of June 2015 to the beginning of July 2015, because then I was going on vacation, and after the holidays I was usually full of work. We had to do everything quickly and clearly.
Having a little consultation with colleagues, I found out that the fashionable direction of ARM Cortex is different cores and you can order Olimex STM32P152 from available debug boards that cost $ 25. They came very quickly - 6 boards for about 2000 rubles. It is worth noting that these fees were purchased by us for the university, where the course itself will take place.

Baseline: Objective
First of all, it was necessary to determine what information and what to give to students. For myself, I decided that the main goal would be to show the entire software development process for devices using the STM32 microprocessor, the C ++ programming language and the FreeRTOS real-time operating system, ranging from requirements and architecture development to coding.
Baseline: Limitations
So, the task of our project is to create a demo application for the Olimex STM32P152 debugging board, according to coding standards (which I will not give here) written in C ++ using FreeRTOS.
The application should be clear, simple and unobtrusive, without abstruse constructions inherent in the C ++ language. The architecture should be described in the UML language.
')
Baseline: Functional Requirements
SR0: The device should measure three parameters (have three variables): microprocessor temperature , voltage VDDA , voltage from a variable resistor
SR1: The device should display the value of these variables on the indicator .
SR2: The unit of measurement for the microprocessor temperature is degrees Celsius, for the other parameters it is volts.
SR3: When you press button 1 , the display should show a screen with the next variable to be measured,
SR4: When you press button 1, LED 1 must change its state
SR5: When you press button 2 , the display should change the display mode of variables from constantly showing the variable to consecutive (changing screens every 1.5 seconds) when you next press from consecutive to constant,
SR6: When you press button 2, LED 2 should change its state.
SR7: LED 3 should blink once every 1 second.
In short - these are all the requirements for this task.
It is clear that the task is not so difficult, but allows you to almost completely show the whole process of developing any device for the given requirements.
Development: getting started
And so the requirements are ready, you can proceed. Let's start with the infrastructure. First, I created a project in IAR for C ++, there is nothing new here. This article describes everything Creating a C ++ project in IAR for STM32 . We will not stop here.
Development: wrapper for FreeRTOS
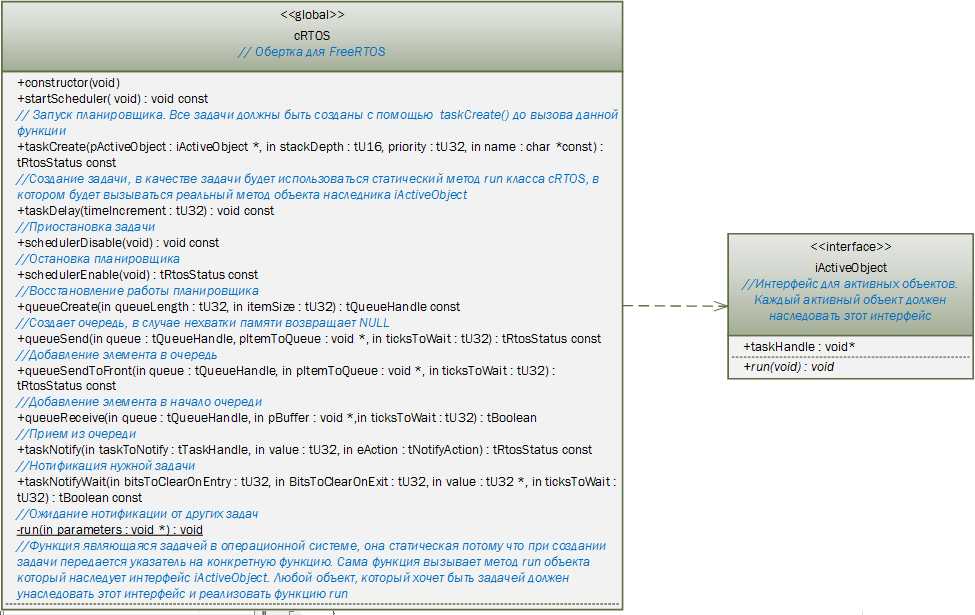
Since I was going to use C ++, and the operating system is written in C, I need C ++ wrapper for FreeRTOS. Ideally, you could write a wrapper so that it fits most RTOSs, and then in projects you could not depend on the type of RTOS, but I didn’t bother with that and in this situation I chose only those functions of the operating system that I need , and only wrapped them, stupidly copying the signature of methods.
A static static method void run (void * parameters) has also been added; This is exactly the function, the pointer to which will be used when creating the task.
In order to be able to call the class instance method in the task, an iActiveObject interface was made with the virtual function virtual void run (void) = 0; and a global attribute for storing a pointer to a task.
iActiveObject.h
#include "types.h" // class iActiveObject { public: virtual void run(void) = 0; void *taskHandle; }; Any object that wants to be a task (active) must inherit this interface and implement the run () method. A pointer to this object is passed to the run () function of the wrapper as a parameter.
On paper, it looked like this:
I entrusted the task of implementing this picture to a gifted young specialist who successfully coped with it and in a couple of days issued such an empty working draft in IAR 6.50
Empty project with FreeRTOS wrapper in IAR 6.50
An improved version of the wrapper can be taken from this article C ++ wrapper for "all" Real-Time Operating Systems for Cortex M4
Development: General Architecture
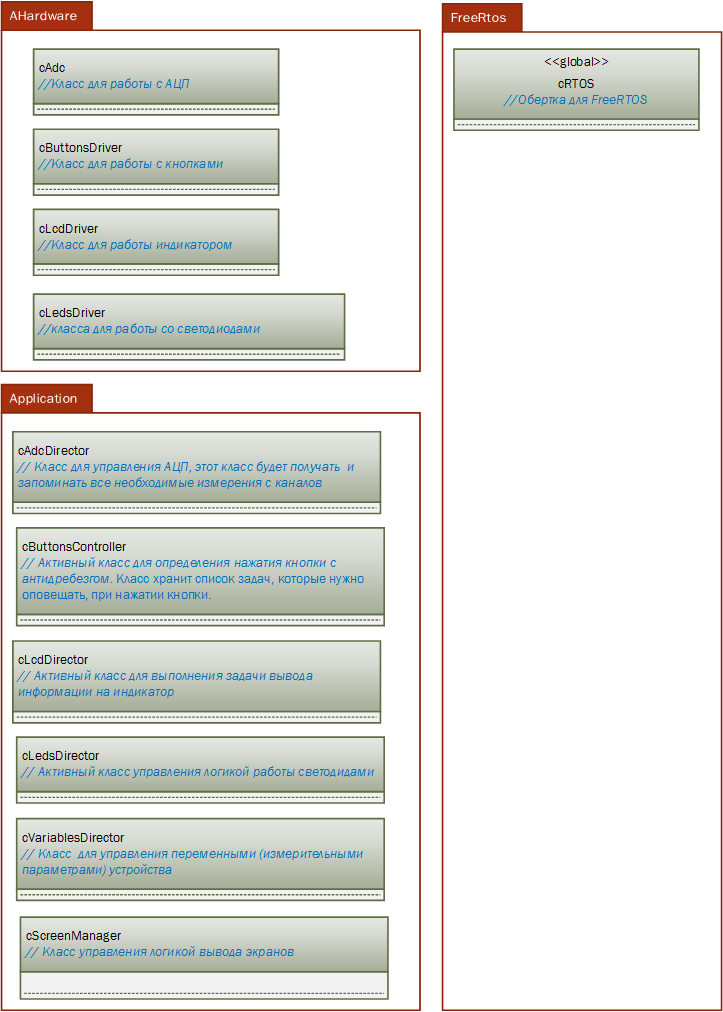
While the young specialist was doing the wrapper, I was wondering about the software architecture. For myself, I selected 3 packages:
AHardware - a package containing classes for the operation and control of equipment (LEDs, Indicator, ADC, and so on)
Application - a package containing application-level classes and knowing nothing about iron, so it can be portrayed to any microcontroller without modification, well, provided that the wrapper is not developed by a human snowflake. And in this case it is not so :)
FreeRTOS - package with ported OSes and a wrapper for it.
Having drawn a little, the following picture turned out:
Development: Blinking LED
As usual, development begins with the most interesting and challenging :) - implementing the SR7 requirement: LED 3 should blink every 1 second, it seemed to me exactly the task, having mastered which I can move forward.
The first thing was to deal with the ports of the microcontroller and the frequency setting. And I must say that over the past 8 years since my last microcontroller project, a lot has changed and it seemed like nothing at all. It was necessary to read the data sheet for these sections very carefully and in the end to understand that everything is rather trivial, just there are many more settings (than in PIC 16).
As a result, the entire port configuration was dropped in __low_level_init (). And in general, the entire configuration of the hardware, which will not be changed in the course of the program, I put in this function. It is called before main (), before initializing all variables and executing the constructors of global class instances.
Configuring ports for LEDs
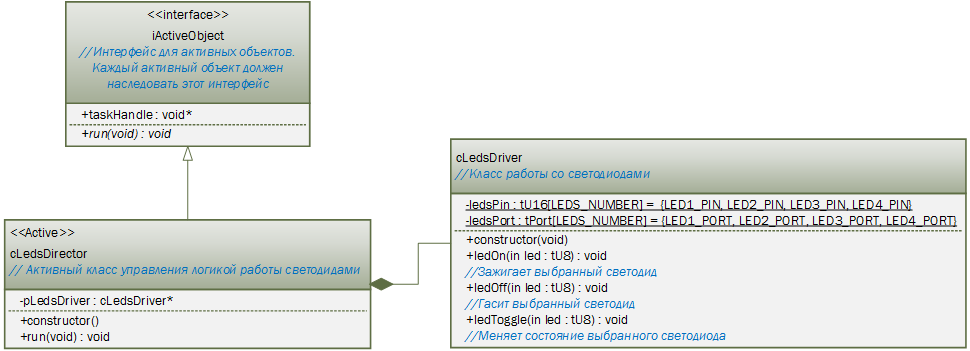
// - //PE.10, PE.11 - stat3 stat4 //PA.4, PA.5 - stat1 stat 2 // PE.10, PE.11, PA.4, PA.5 , c.174 CD00240194.pdf GPIOE->MODER |= GPIO_MODER_MODER10_0; GPIOE->MODER |= GPIO_MODER_MODER11_0; GPIOA->MODER |= GPIO_MODER_MODER4_0; GPIOA->MODER |= GPIO_MODER_MODER5_0; Well, the iron is set up and I sat down again for drawing, this time - the class of control of the LEDs. After half an hour it turned out this:
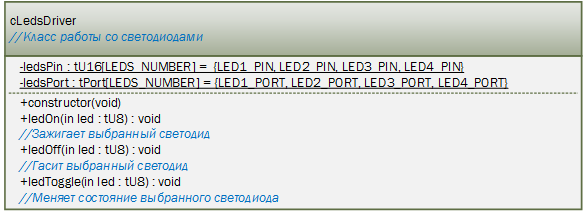
And then the realization of this miracle:
LedsDriver.h
#include "types.h" // tU8 #define LEDS_NUMBER 4 class cLedsDriver { public: explicit cLedsDriver(void); void ledOn(const tU8 led); void ledOff(const tU8 led); void ledToggle(const tU8 led); private: static tPort ledsPort[LEDS_NUMBER]; static const tU16 ledsPin[LEDS_NUMBER]; }; ledsdriver.cpp
#include "ledsdriver.h" // tLeds #include <stm32l1xx.h> // STM32 #include "susuassert.h" // for ASSERT #include "types.h" // tPort, tU16, tU8 #include "bitutil.h" // #define LED1_PIN GPIO_OTYPER_ODR_4 #define LED1_PORT GPIOA #define LED2_PIN GPIO_OTYPER_ODR_5 #define LED2_PORT GPIOA #define LED3_PIN GPIO_OTYPER_ODR_10 #define LED3_PORT GPIOE #define LED4_PIN GPIO_OTYPER_ODR_11 #define LED4_PORT GPIOE tPort cLedsDriver::ledsPort[LEDS_NUMBER] = {LED1_PORT, LED2_PORT, LED3_PORT, LED4_PORT}; const tU16 cLedsDriver::ledsPin[LEDS_NUMBER] = {LED1_PIN, LED2_PIN, LED3_PIN, LED4_PIN}; /******************************************************************************* * Function: constructor * Description: ******************************************************************************/ cLedsDriver::cLedsDriver(void) { } /******************************************************************************* * Function: ledOn * Description: ******************************************************************************/ void cLedsDriver::ledOn(const tU8 led) { ASSERT(led < LEDS_NUMBER); SETBIT(this->ledsPort[led]->ODR, this->ledsPin[led]); } /******************************************************************************* * Function: ledOff * Description: ******************************************************************************/ void cLedsDriver::ledOff(const tU8 led) { ASSERT(led < LEDS_NUMBER); CLRBIT(this->ledsPort[led]->ODR, this->ledsPin[led]); } /******************************************************************************* * Function: ledToggle * Description: ******************************************************************************/ void cLedsDriver::ledToggle(const tU8 led) { ASSERT(led < LEDS_NUMBER); TOGGLEBIT(this->ledsPort[led]->ODR, this->ledsPin[led]); } Now again you need to draw a little to make the class of control of the logic of the LEDs - class cLedsDirector. This will be the active class, i.e. its run () function will be launched in the task. As I wrote above, all my active classes must inherit the iActiveObject interface. Therefore, the drawing does not look difficult either.
Again, the implementation is also simple and a human snowflake, like me:
ledsdirector.h
#include "ledsdriver.h" // cLedsDriver #include "iactiveobject.h" // iActiveObject typedef enum { LD_led1 = 0, LD_led2 = 1, LD_led3 = 2, LD_led4 = 3, LD_none = 4 } tLeds; class cLedsDirector: public iActiveObject { public: explicit cLedsDirector(void); void run(void); private: cLedsDriver* pLedsDriver; }; ledsdirector.cpp
#include "ledsdirector.h" // #include "frtoswrapper.h" // oRTOS #include "types.h" // l #define LED_DELAY (tU32)500/portTICK_PERIOD_MS /******************************************************************************* * Function: constructor * Description: cLedsDriver ******************************************************************************/ cLedsDirector::cLedsDirector(void) { this->pLedsDriver = new cLedsDriver(); } /******************************************************************************* * Function: runTask * Description: . led3 ******************************************************************************/ void cLedsDirector::run(void) { for(;;) { oRTOS.taskDelay(LED_DELAY); this->pLedsDriver->ledToggle(LD_led3); } } Well, everything is written, it remains just a little - to create an instance of the cLedsDirector class and the task in main () and check how it all works.
main () function
#define LEDSDIRECTOR_STACK_SIZE configMINIMAL_STACK_SIZE #define LEDSDIRECTOR_PRIORITY (tU32)2 // , oRTOS // RTOS , - // , cRTOS oRTOS; .... void main(void) { cLedsDirector *pLedsDirector = new cLedsDirector(); oRTOS.taskCreate(pLedsDirector, LEDSDIRECTOR_STACK_SIZE, LEDSDIRECTOR_PRIORITY, "Leds"); oRTOS.startScheduler(); } We start on a payment, and about a miracle - works from the first. So I did everything right. There is an implementation of the first requirement. We will go further. For now let's save the project
Project blinking LED in IAR 6.50
Development: Buttons
The LEDs are working, now you can realize the requirements of the SR6: When you press the button 2, the LED 2 should change its state and SR4: When you press the button 1, the LED 1 should change its state.
I decided to do the buttons without interruptions, and in general I will not use interruptions in this project, although nothing prohibits the use of interrupts, but I just decided so.
According to the procedure, draw the class cButtonsDriver.
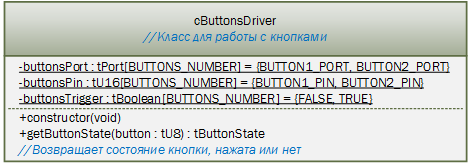
Here I must say one thing: the first time my buttons did not work, or rather only one earned. The second did not work. Having understood, I realized that one button is pulled to zero, and the second to one. Therefore, pressing is determined from them in different ways. To define a click, I introduced the additional attribute -buttonsTrigger (which was not originally in the architecture). It shows by what value the button is considered to be pressed by 0 or 1. And then after that, everything began to work like a clock.
The implementation is very simple.
buttonsdriver.h
#include "types.h" // tU16 tU8 #define BUTTONS_NUMBER 2 typedef enum { BS_buttonNotPressed = 0, BS_buttonPressed = 1 } tButtonState; class cButtonsDriver { public: explicit cButtonsDriver(); tButtonState getButtonState(const tU8 button); private: static tPort buttonsPort[BUTTONS_NUMBER]; static const tU16 buttonsPin[BUTTONS_NUMBER]; static const tBoolean buttonsTrigger[BUTTONS_NUMBER]; }; buttonsdriver.cpp
#include "buttonsdriver.h" // tLeds #include <stm32l1xx.h> // STM32 #include "susuassert.h" //for ASSERT #include "types.h" // tPort, tU16, tU8 #define BUTTON1_PIN GPIO_OTYPER_IDR_13 #define BUTTON1_PORT GPIOC #define BUTTON2_PIN GPIO_OTYPER_IDR_0 #define BUTTON2_PORT GPIOA tPort cButtonsDriver::buttonsPort[BUTTONS_NUMBER] = {BUTTON1_PORT, BUTTON2_PORT}; const tU16 cButtonsDriver::buttonsPin[BUTTONS_NUMBER] = {BUTTON1_PIN, BUTTON2_PIN}; // , 0, 1 const tBoolean cButtonsDriver::buttonsTrigger[BUTTONS_NUMBER] = {FALSE, TRUE}; /******************************************************************************* * Function: constructor * Description: ******************************************************************************/ cButtonsDriver::cButtonsDriver() { } /******************************************************************************* * Function: getButtonState * Description: , ******************************************************************************/ tButtonState cButtonsDriver::getButtonState(const tU8 button) { tButtonState eState = BS_buttonNotPressed; ASSERT(button < BUTTONS_NUMBER); // , 1, 0, // , , // // . tBoolean isLogicalZero = !(this->buttonsPort[button]->IDR & this->buttonsPin[button]); if(isLogicalZero ^ this->buttonsTrigger[button]) { eState = BS_buttonPressed; } return eState; } Well, with the driver done, now we need to think about the task, which will periodically poll the buttons.
The picture looks very similar to the active class for LEDs, and it is true, why reinvent the wheel:
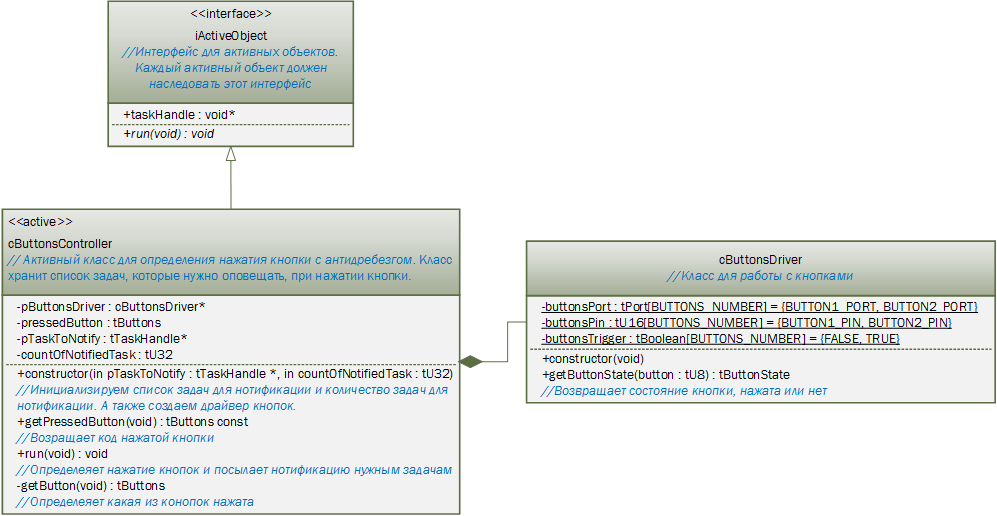
Pressing the button should somehow notify those tasks that need to know about it. You can do this in several ways: Through events, either use a queue, or use the latest FreeRTOS notification property (Notify).
Let's analyze the requirements. At the touch of a button, we should do two things: First, change LEDs 1 and 2 to change their states, and second, the display mode and screens should change on the indicator. The problem is that the queues and events can be taken only one task, after which the second does not know about it, and then the architecture will be complicated. We'll have to redirect events, let's say that the LED task will have to redirect the event or the queue from the buttons to the Indicator task. Something in this did not suit me, and I decided to make a notification of a specific task. That is, our task of polling the buttons after determining the click will only notify those tasks that need these events.
For this, an array of pTaskToNotify pointers was added to the tasks that need to be notified.
Now implementation:
buttonscontroller.h
#include "types.h" // tU32 #include "iactiveobject.h" // iActiveObject #include "buttonsdriver.h" // cButtonsDriver #include "frtosWrapper.h" // tTaskHandle typedef enum { BT_button1 = 0, BT_button2 = 1, BT_none = 2 } tButtons; class cButtonsController: public iActiveObject { public: explicit cButtonsController(const tTaskHandle *pTaskToNotify, const tU32 countOfNotifiedTask); tButtons getPressedButton(void) const { return pressedButton; }; void run(void); private: cButtonsDriver* pButtonsDriver; tButtons getButton(void); tButtons pressedButton; const tTaskHandle *pTaskToNotify; tU32 countOfNotifiedTask; }; buttonscontroller.cpp
#include "buttonscontroller.h" // #include "susuassert.h" // ASSERT #include "types.h" // tPort, tU16, tU8 #include "bitutil.h" // #define BUTTON_TASK_DELAY (tU32) 50/portTICK_PERIOD_MS #define NEXT_PRESS_DELAY (tU32) 500/portTICK_PERIOD_MS /******************************************************************************* * Function: constructor * Description: * . . ******************************************************************************/ cButtonsController::cButtonsController(const tTaskHandle *pTaskToNotify, const tU32 countOfNotifiedTask) { ASSERT(pTaskToNotify != NULL); this->pButtonsDriver = new cButtonsDriver(); this->pTaskToNotify = pTaskToNotify; this->countOfNotifiedTask = countOfNotifiedTask; } /******************************************************************************* * Function: run * Description: * ******************************************************************************/ void cButtonsController::run(void) { tRtosStatus eStatus = RS_fail; tButtons eButtonPreviousState = BT_none; tButtons eButtonCurrentState = BT_none; const tTaskHandle *pTaskHandle; tU32 i = 0; for(;;) { eButtonPreviousState = this->getButton(); if (eButtonPreviousState != BT_none) { // oRTOS.taskDelay(BUTTON_TASK_DELAY); eButtonCurrentState = this->getButton(); if (eButtonPreviousState == eButtonCurrentState) { pTaskHandle = this->pTaskToNotify; i = 0; // , while ((pTaskHandle != NULL) && (i != countOfNotifiedTask)) { eStatus = oRTOS.taskNotify(*(pTaskHandle), (tU32)eButtonCurrentState, eSetValueWithOverwrite); if(eStatus == RS_fail) { ;// } pTaskHandle++; i++; } // 0.5 oRTOS.taskDelay(NEXT_PRESS_DELAY); } } oRTOS.taskDelay(BUTTON_TASK_DELAY); } } /******************************************************************************* * Function: getPressedButton * Description: ******************************************************************************/ tButtons cButtonsController::getButton(void) { tButtons eButton = BT_none; if (BS_buttonPressed == this->pButtonsDriver->getButtonState(BT_button1)) { eButton = BT_button1; } else if (BS_buttonPressed == this->pButtonsDriver->getButtonState(BT_button2)) { eButton = BT_button2; } this->pressedButton = eButton; return eButton; } Now in main you need to create a task list for the alert and a new task for polling the buttons:
main.cpp
#include <stm32l1xx.h> // STM2 #include "ledsdirector.h" // cLedsDirector #include "buttonscontroller.h" // cButtonsController #include "types.h" // #include "frtoswrapper.h" // cRtos #define LEDS_TASK_HANDLE_INDEX 0 #define BUTTON_TASKS_NOTYFIED_NUM 1 #define LEDSDIRECTOR_STACK_SIZE configMINIMAL_STACK_SIZE #define LEDSDIRECTOR_PRIORITY (tU32)2 #define BUTTONSCONTROLLER_STACK_SIZE 256//configMINIMAL_STACK_SIZE #define BUTTONSCONTROLLER_PRIORITY (tU32)3 // , oRTOS // RTOS , - // , :) cRTOS oRTOS; .. void main( void ) { // ButtonControllera // , . //, static tTaskHandle tasksToNotifyFromButton[BUTTON_TASKS_NOTYFIED_NUM]; cLedsDirector *pLedsDirector = new cLedsDirector(); oRTOS.taskCreate(pLedsDirector, LEDSDIRECTOR_STACK_SIZE, LEDSDIRECTOR_PRIORITY, "Leds"); tasksToNotifyFromButton[LEDS_TASK_HANDLE_INDEX] = pLedsDirector->taskHandle; cButtonsController *pButtonsController = new cButtonsController(tasksToNotifyFromButton, BUTTON_TASKS_NOTYFIED_NUM); oRTOS.taskCreate(pButtonsController, BUTTONSCONTROLLER_STACK_SIZE, BUTTONSCONTROLLER_PRIORITY, "Buttons"); oRTOS.startScheduler(); } We start, check and everything works - it’s just amazing :) That's what it means at first to draw.
As usual we save the project:
Design Buttons and LEDs for IAR 6.50
An improved project with an example of a new wrapper can be found here:
Project at IAR 8.30
And the project began to look like this:

So, for some three days I implemented three requirements - not a bad speed, considering that I have only 7 of them. And having decided that for the remaining 2.5 weeks I’ll do it for sure, I went to the lake for two days.
As it turned out later, in vain I was so optimistic about things, but this is already in the second part.
Source: https://habr.com/ru/post/261807/
All Articles